For some testing, I need some Aruba SD-Branch gateways. Instead of using hardware gateways, which I do not have, I use a virtual gateway. You could run them in ESXi as well, but why not use EVE-NG for this.
For instructions on how to install EVE-NG use the following link:
For other Aruba Stuff within EVE-NG follow the following guide:
I’m assuming that EVE-NG is running and that you have uploaded the Aruba Virtual Gateway OVA file to the EVE-NG Server. Make sure it is the OVA file!
Creating the Template File for the Virtual Gateway
First, create a template file for the virtual gateway. I re-use the one from the Aruba Mobility Conductor and mine looks like this:
# Copyright (c) 2016, Andrea Dainese
# Copyright (c) 2018, Alain Degreffe
# All rights reserved.
#
# Redistribution and use in source and binary forms, with or without
# modification, are permitted provided that the following conditions are met:
#     * Redistributions of source code must retain the above copyright
#       notice, this list of conditions and the following disclaimer.
#     * Redistributions in binary form must reproduce the above copyright
#       notice, this list of conditions and the following disclaimer in the
#       documentation and/or other materials provided with the distribution.
#     * Neither the name of the UNetLab Ltd nor  the name of EVE-NG Ltd nor the
#       names of its contributors may be used to endorse or promote products
#       derived from this software without specific prior written permission.
#
# THIS SOFTWARE IS PROVIDED BY THE COPYRIGHT HOLDERS AND CONTRIBUTORS "AS IS" AND
# ANY EXPRESS OR IMPLIED WARRANTIES, INCLUDING, BUT NOT LIMITED TO, THE IMPLIED
# WARRANTIES OF MERCHANTABILITY AND FITNESS FOR A PARTICULAR PURPOSE ARE
# DISCLAIMED. IN NO EVENT SHALL <COPYRIGHT HOLDER> BE LIABLE FOR ANY
# DIRECT, INDIRECT, INCIDENTAL, SPECIAL, EXEMPLARY, OR CONSEQUENTIAL DAMAGES
# (INCLUDING, BUT NOT LIMITED TO, PROCUREMENT OF SUBSTITUTE GOODS OR SERVICES;
# LOSS OF USE, DATA, OR PROFITS; OR BUSINESS INTERRUPTION) HOWEVER CAUSED AND
# ON ANY THEORY OF LIABILITY, WHETHER IN CONTRACT, STRICT LIABILITY, OR TORT
# (INCLUDING NEGLIGENCE OR OTHERWISE) ARISING IN ANY WAY OUT OF THE USE OF THIS
# SOFTWARE, EVEN IF ADVISED OF THE POSSIBILITY OF SUCH DAMAGE.
---
type: qemu
description: Aruba Virtual Gateway
name: ArubaVGW
cpulimit: 1
icon: Aruba_ctrl.png
cpu: 3
ram: 4096
ethernet: 4
console: vnc
qemu_arch: x86_64
qemu_version: 4.1.0
qemu_options: -machine type=pc,accel=kvm -serial none -nographic -no-user-config
  -nodefaults -display none -vga std -rtc base=utc -cpu host -smp 3,sockets=1
The above creates the lowest possible configuration, but for some testing, it is enough. Save this file to “/opt/unetlab/html/templates/intel/arubavgw.yml”. Replace “intel” with “amd” if you run on an AMD processor.
Creating the Disk Image for the Virtual Gateway
First, I unpack the OVA file as below:
tar -xf ArubaOS_VGW_8.7.0.0-2.3.0.0_79669.ovaI convert the vmdk images to a qcow2 images afterward, using the command below:
 eve-ng@eve-ng:~$ /opt/qemu/bin/qemu-img convert -p -f vmdk -O qcow2 ArubaOS_VGW_8.7.0.0-2.3.0.0_79669-disk1.vmdk hda.qcow2
    (100.00/100%)
eve-ng@eve-ng:~$ /opt/qemu/bin/qemu-img convert -p -f vmdk -O qcow2 ArubaOS_VGW_8.7.0.0-2.3.0.0_79669-disk2.vmdk hdb.qcow2
    (100.00/100%)
The above command creates the “hda.qcow2” and “hdb.qcow2” files. This is the base image. Put this into the image directory:
eve-ng@eve-ng:~$ sudo mkdir /opt/unetlab/addons/qemu/arubavgw-2.3.0.7/
eve-ng@eve-ng:~$ sudo mv hd* /opt/unetlab/addons/qemu/arubavgw-2.3.0.7/
Finally fix the permissions:
eve-ng@eve-ng:~$ sudo /opt/unetlab/wrappers/unl_wrapper -a fixpermissionsThe VM would start, but you still need an ISO from Aruba Central, to get the “Device Identity” of the VM to get it working.
Add Device Identity
To create a new “Device Identity” in Aruba Central, log in to your account. Select the “Global” group context and go to “Network Services–>Virtual Gateways”. Click the “Config” symbol in the right upper corner and select the “Unmanaged” tab:
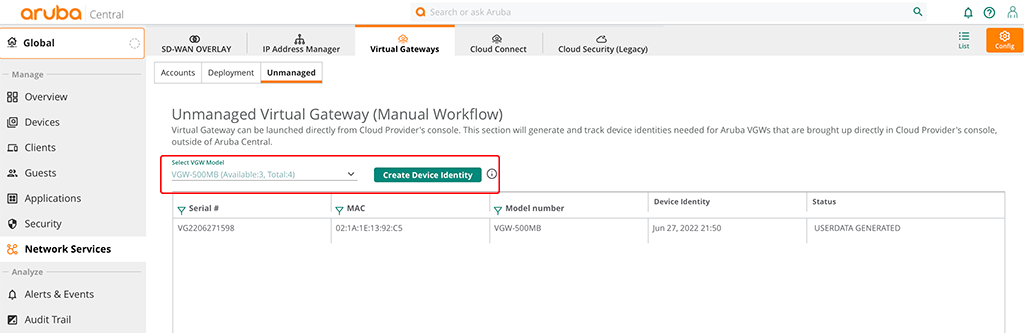
Select the Gateway size you need and click the “Create Device Identity” button. Confirm the warning message. This creates a new entry in the table below the button:
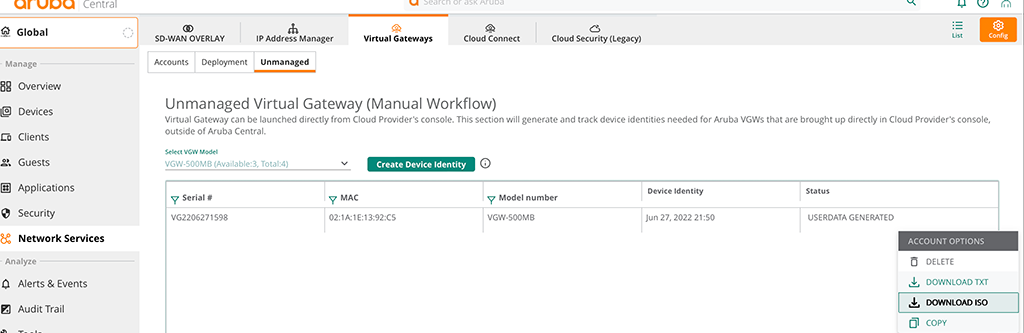
Click into the row with the gateway identity you created a moment ago. Three vertical dots appear. Click them, to download the ISO, as in the screenshot above. Upload this ISO to the EVE-NG server as well and rename the file to “cdrom.iso”.
Move the ISO into the folder with the two HDD files and fix permissions:
eve-ng@eve-ng:~$ sudo mv cdrom.iso /opt/unetlab/addons/qemu/arubavgw-2.3.0.7/
eve-ng@eve-ng:~$ sudo /opt/unetlab/wrappers/unl_wrapper -a fixpermissions
You can now boot the VM. Make sure it is getting an IP address and can access the internet (Aruba Central).
How often do you use EVE-NG to test and/or learn?
If you find this post useful, leave me a comment and share your feedback with me. You can also buy me Pizza, using the “Buy me a Pizza” button on the right, to support this blog and keep the IT gremlin happy.
If you would like to do me a favor, share this post with your friends and social media contacts. This would really help to make this blog more popular and help others to find the information above more easily using search engines.