In the past, I saw a lot of guest workflows which either did a very overloaded username and password authentication to fully authenticate the guest or the simple “Just Accept the Ts and Cs”. The first one is very complex for the guest but gives you the option to see who is online and controls who can access the network. The second one is very easy for the guest, but it will give you no information of who is currently online and using your Wi-Fi.
This post is about a solution, which is somewhere in between those two. The guest will use a username only workflow, which is very easy for the guest, but it still gives you the insights of who is online.
I was inspired to this setup by the Aruba Community here:
Custom ClearPass Guest page for Public Login (no username/pass) | Security (arubanetworks.com)
I’m using this for a long time within my home network to allow guests using my internet. I also tweaked the mac caching to extend the caching period each time the guest uses my network. By doing so, it was also usable for my grandmother in law. And this is the ultimate evidence of simplicity.
ClearPass Role and Role Mapping
The first thing to start with is to create the role and the role mapping. Those are the basics for the most setups in ClearPass.
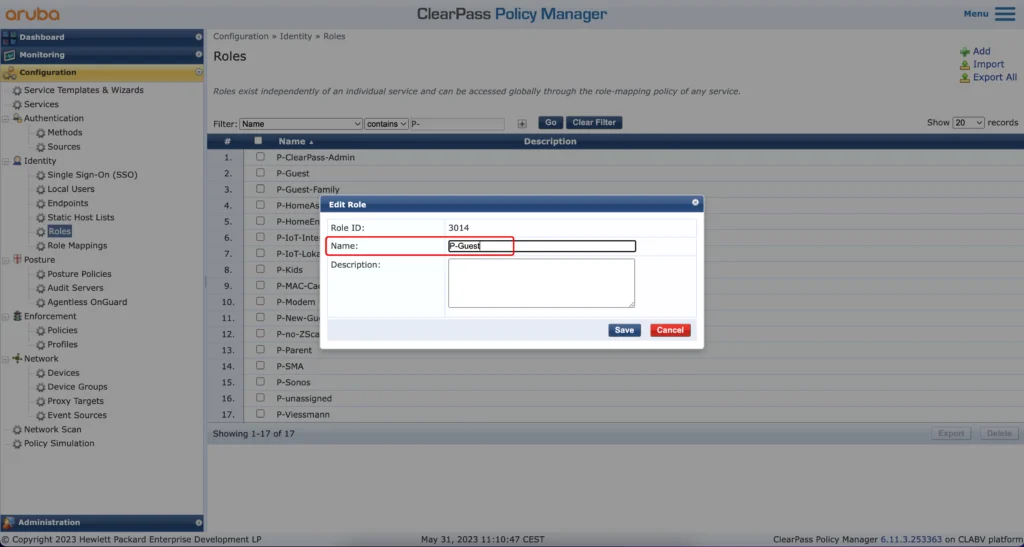
To create a role, go to the policy manager part and go to “Configuration–>Identity–>Roles”. Use the “Add” button, to create a role for your guests. You can also create multiple roles if needed:
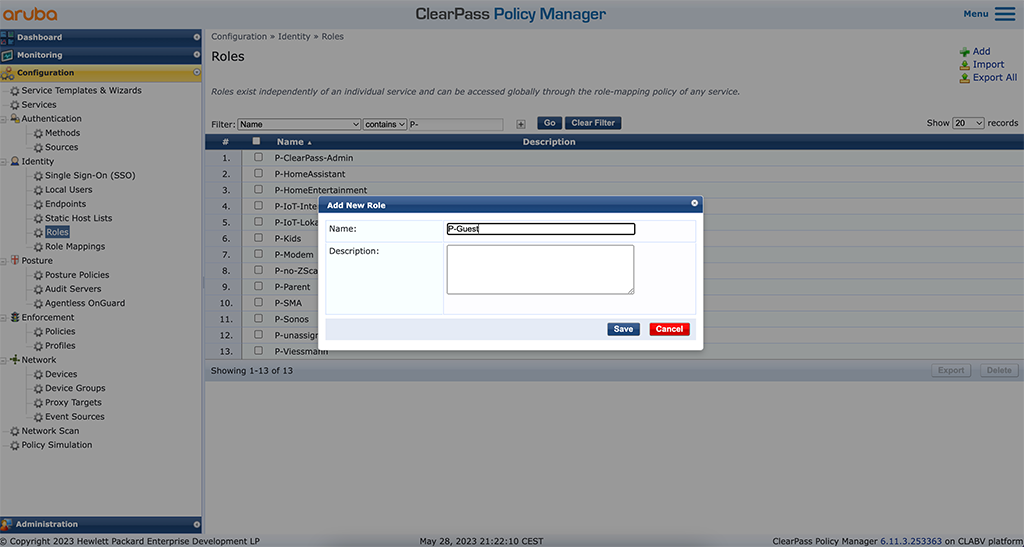
Enter a “Name” and a “Description”. “Save” the role and create additional roles if required.
To use the roles in the ClearPass guest part you need to map the role to “GuestUser” Role ID’s. This sounds complicated but is very easy. Just go to “Configuration–>Identity–>Role Mappings” and modify the “[Guest Roles]” role mapping. Add a new row like this:
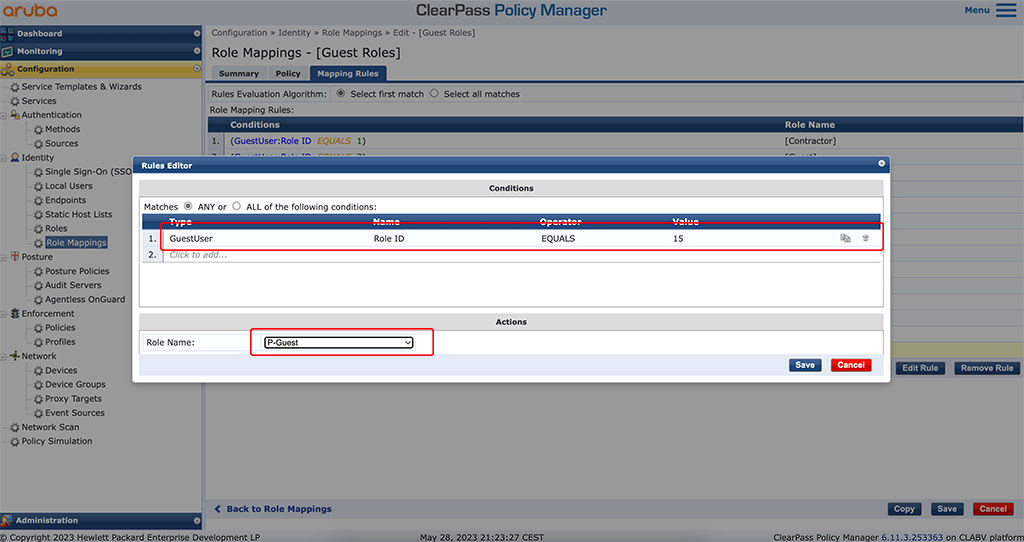
Add the role like in the picture above. Adjust the “Value” to fit your environment. This value is simply incremented every time you add a new role. Look at the last rule and simply add one to the value. In the “Actions” field select the created role and “Save” the new rule.
This part is done, and we can head over to the ClearPass guest part to continue with the captive portal configuration.
ClearPass Selfregister Page for Username Only
In this part we will build the captive portal for this workflow.
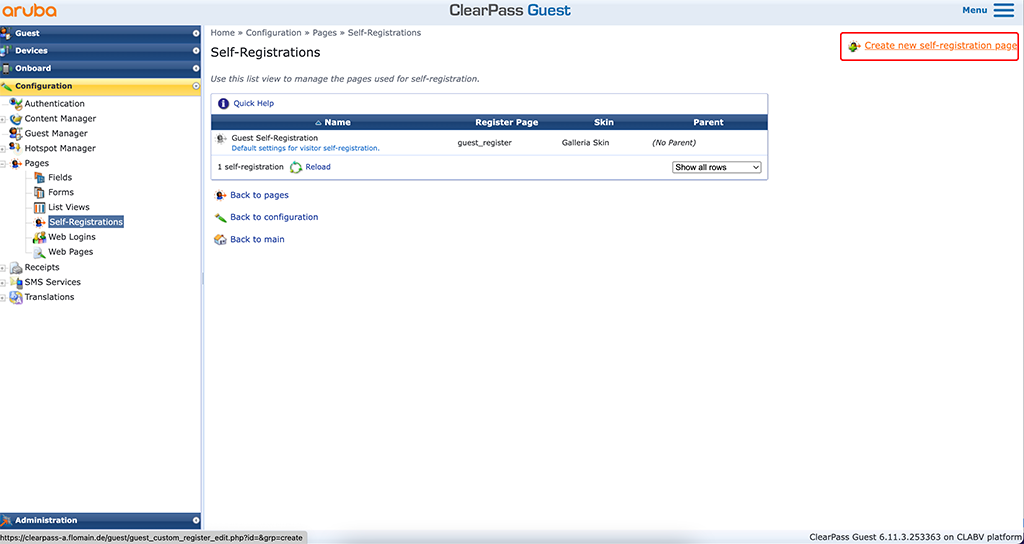
Please change to the ClearPass guest part and go to “Configuration–>Pages–>Self-Registrations” and “Create new self-registration page”:
This will start a wizard to create the captive portal. It will guide you through every step. The first step is to name everything:
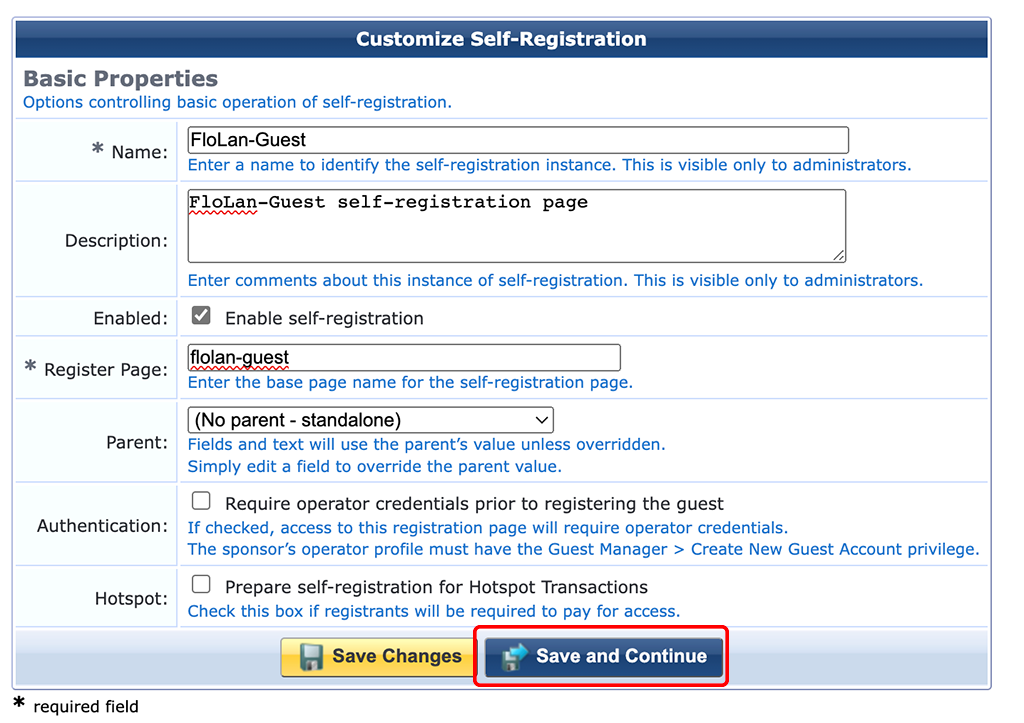
Enter a “Name” for the captive poral in ClearPass itself and a name for the “Register Page”. A “Description” is always helpful. Click “Save and Continue”:
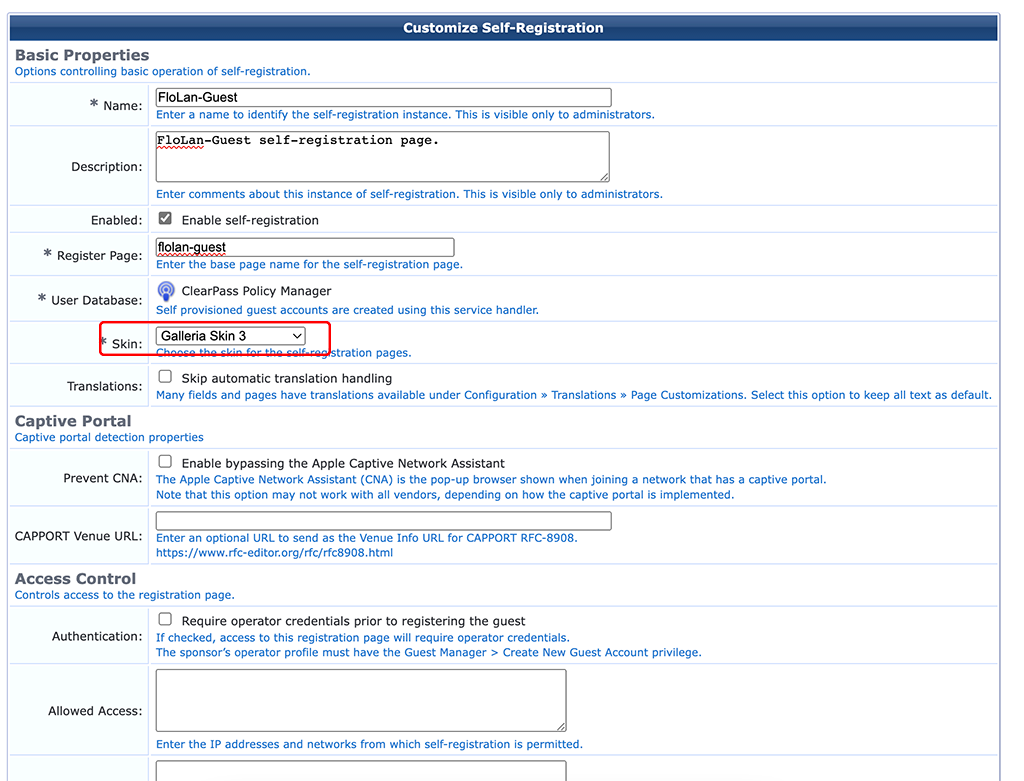
On the second page of the wizard select the “Skin” to be used for the captive portal. Use the one you like, or which was created for you. Click “Save and Continue”:
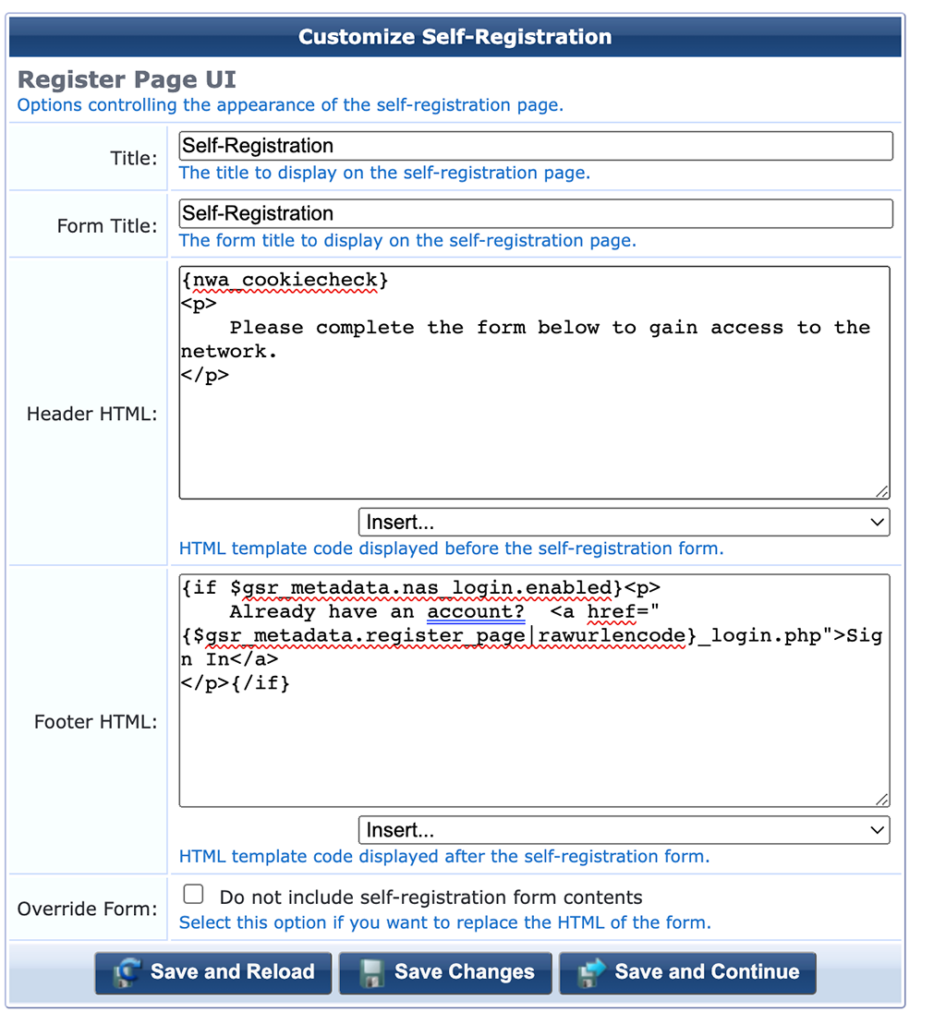
Leave all as it is and with the click on “Save and Continue” go to the next page:
To avoid the receipt page, include the code above in the “Footer HTML”. Below is the code for simple copy and paste. It will autosubmit the page:
<script type="text/javascript"><!--{literal}
addLoadEvent(function() {
Nwa_SubmitForm(_form_name,"ID_"+_form_name+"_submit");
});
//-->
{/literal}</script>
Use “Save and Continue” to go to the next page:
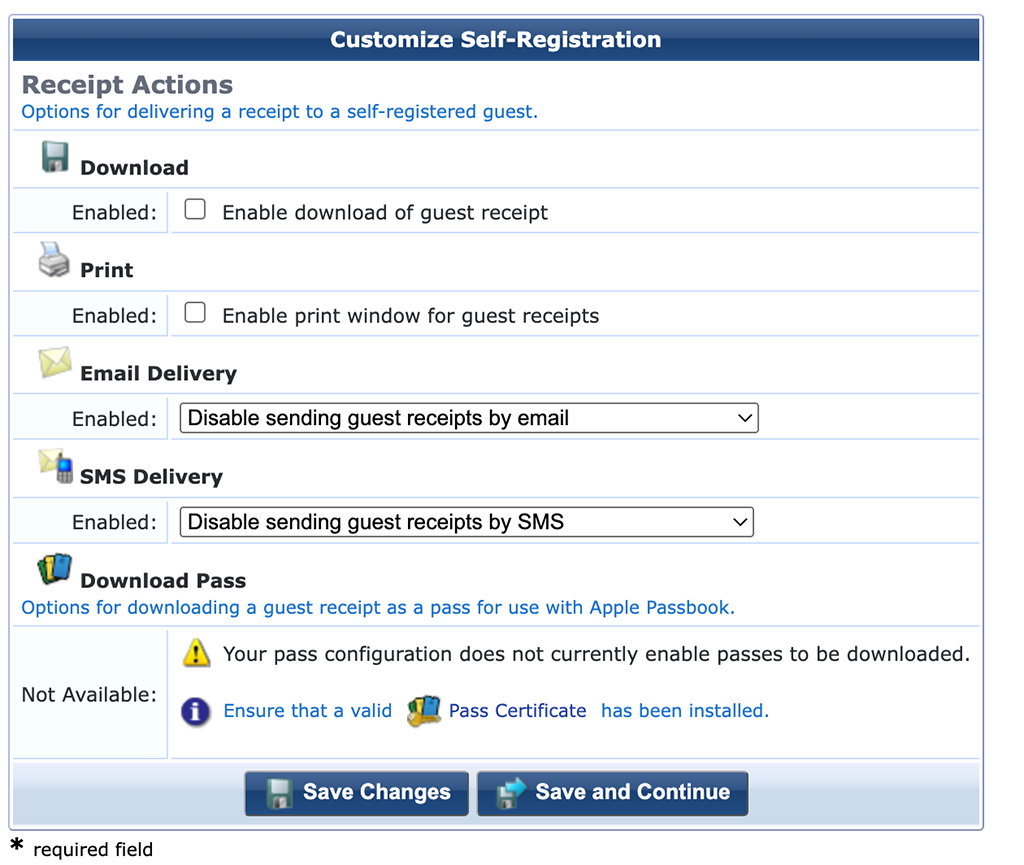
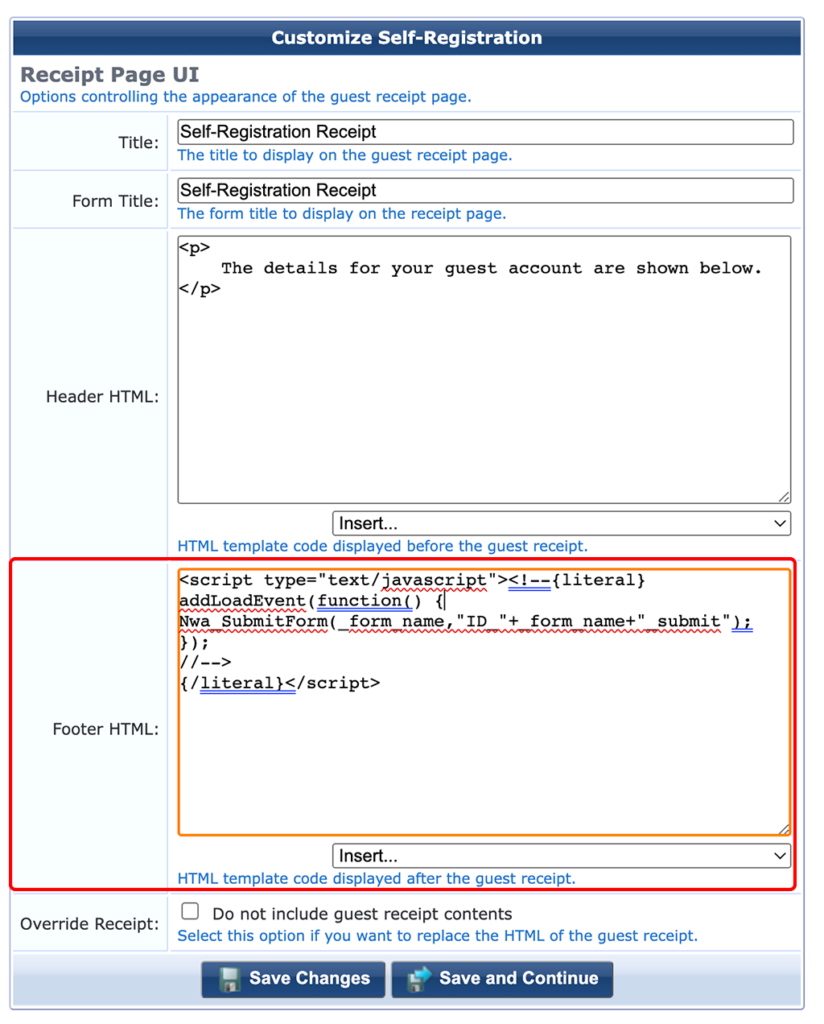
As the page will work with the username only, I do not need any receipt. I leave everything blank and go to the next page:
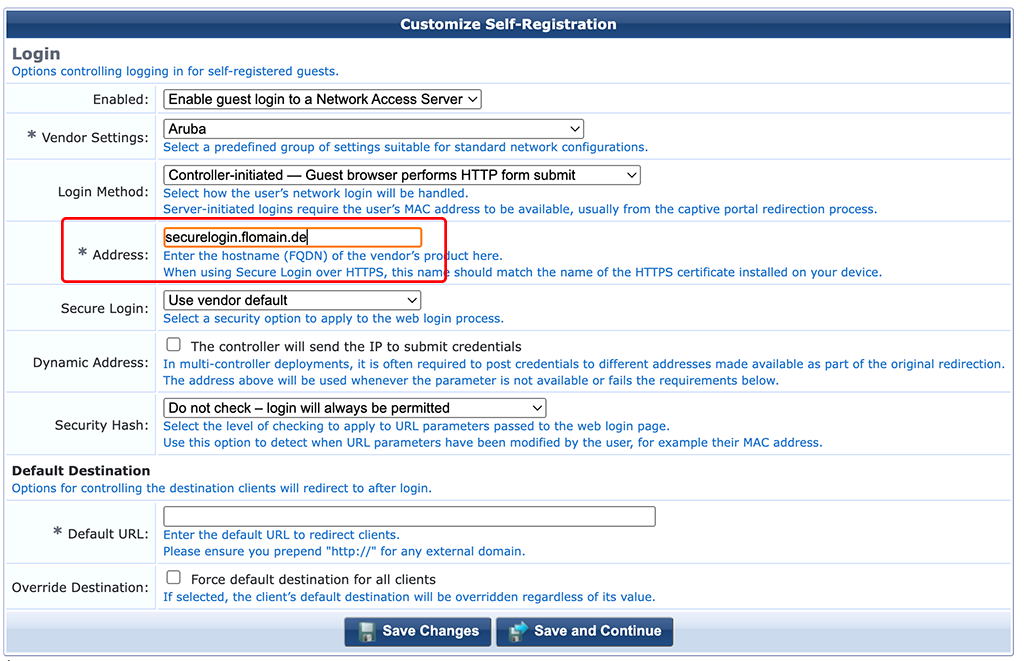
Make sure to set the “Address” to the one, which is in your certificate on your access device. The settings above, are for Aruba gear. If you use a different vendor, you need to adjust one or the other option. Go to the next page:
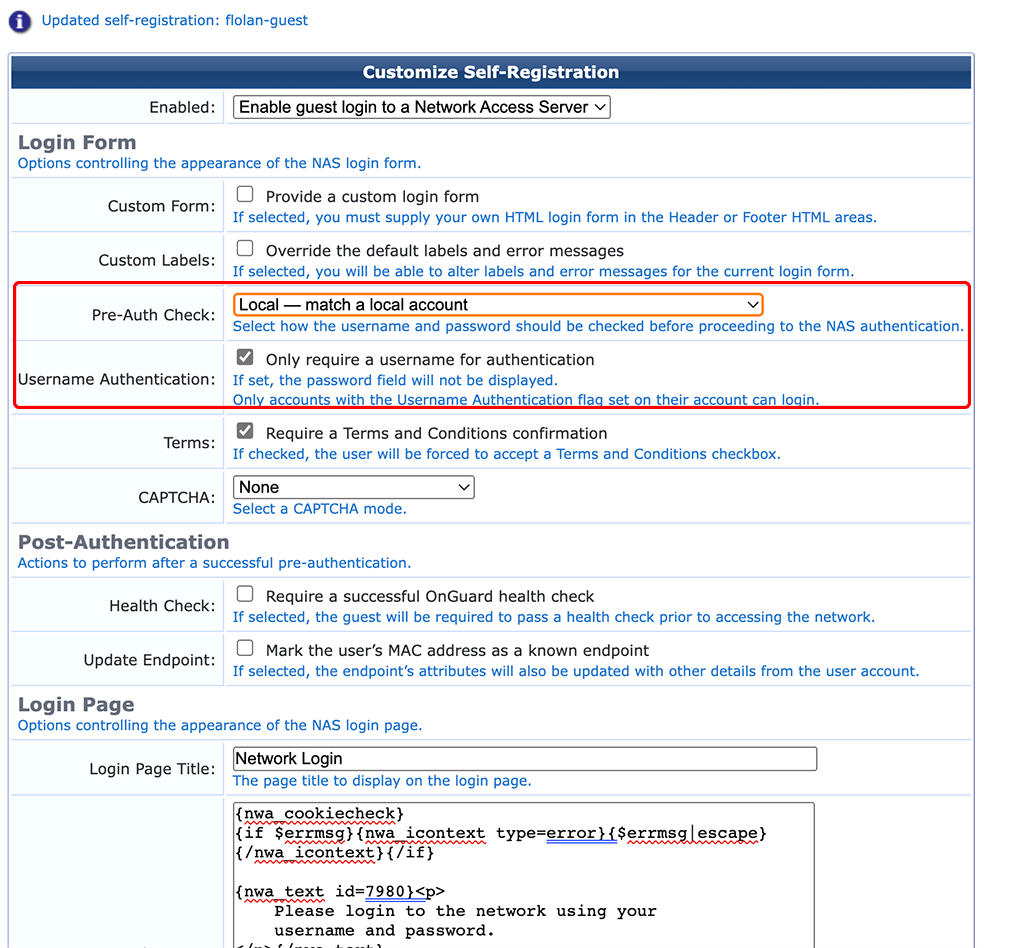
For the page above, enable “Only require a username for authentication”. This only works with the “Pre-Auth Check” “Local — match a local account”. Go to the next page:
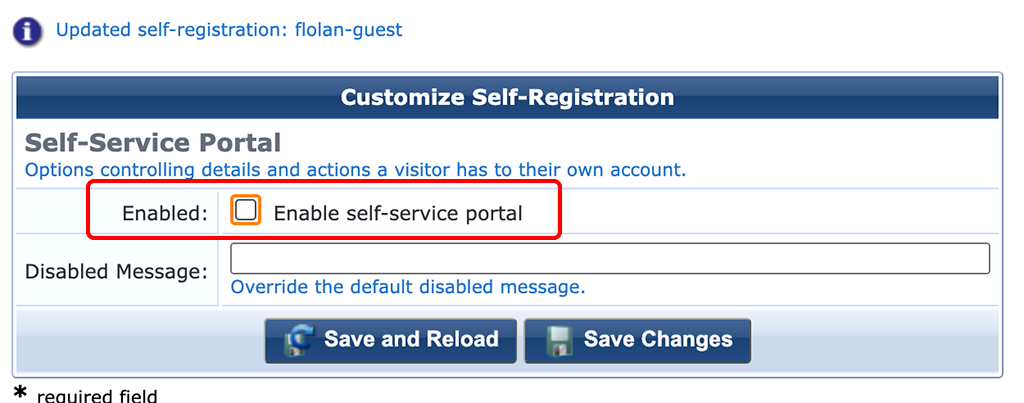
On the last step, I disable the “Self-Service Portal”. This is not required in my setup. “Save Changes” to get to the main overview of your self-registration page:
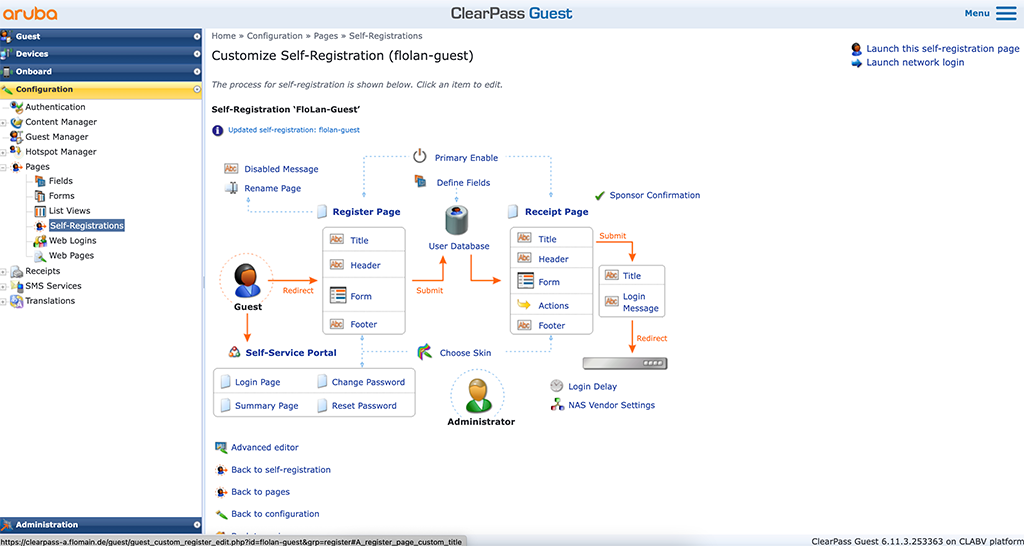
We have the basic settings. Now, let’s tweak it to work as we want.
ClearPass Tweak Form for Username Only
We have created the basic captive portal page in the section above. Now we will change some settings, to allow a username only registration and authentication.
I assume, that you are still at the screen from the last screenshot above.
In the “Register Page” section, there is link to the “Form”. Click that link and you get a table of all enabled form elements. It looks like this:
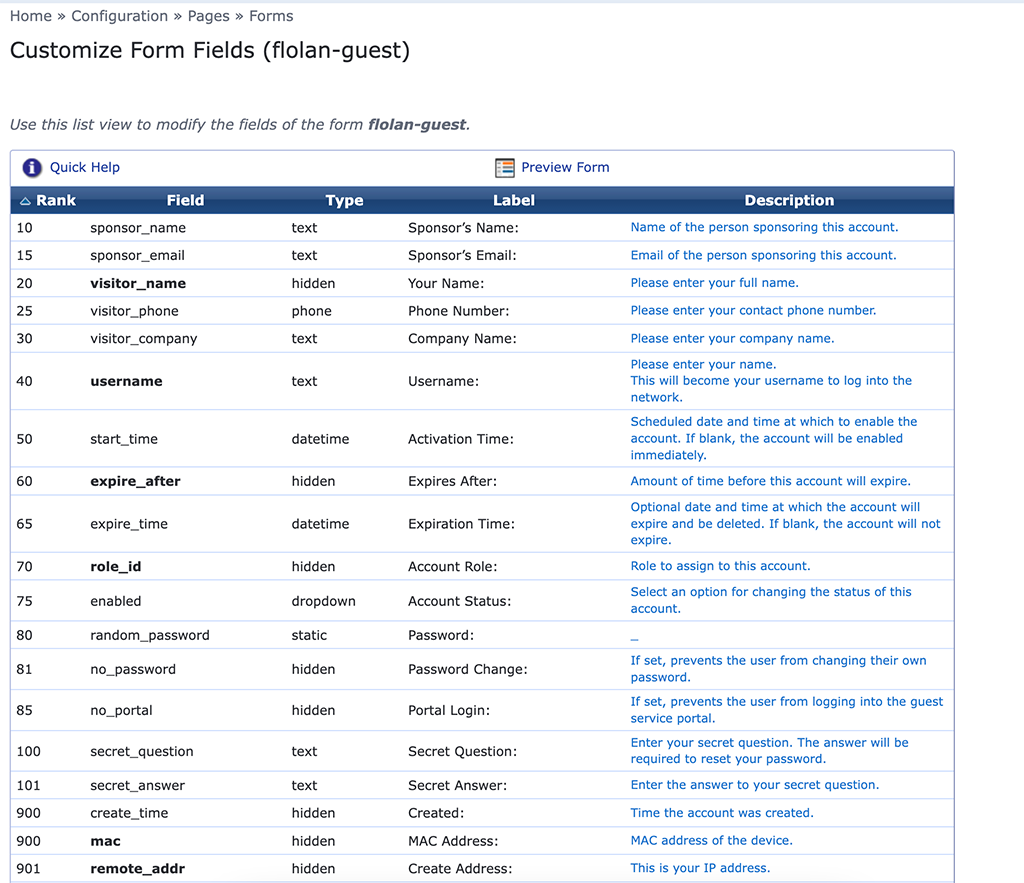
Let’s start to change some elements and even add some as well.
We start with the “visitor_name” element. Select the element in the table and click “Edit”:
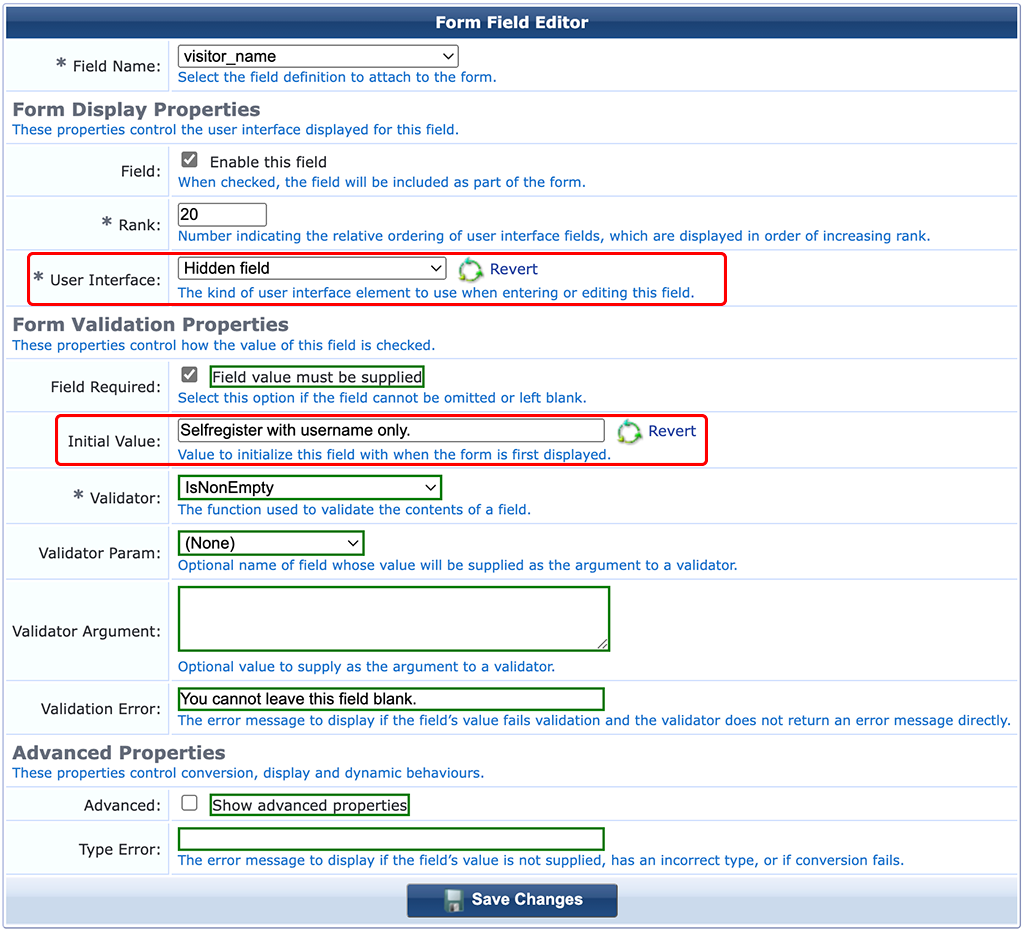
Make this field a “Hidden field”. This makes the form field invisible for the user. Set an “Initial Value”. This will be the same for all guests and will show up in the guest database.
Next, edit the “email” field:
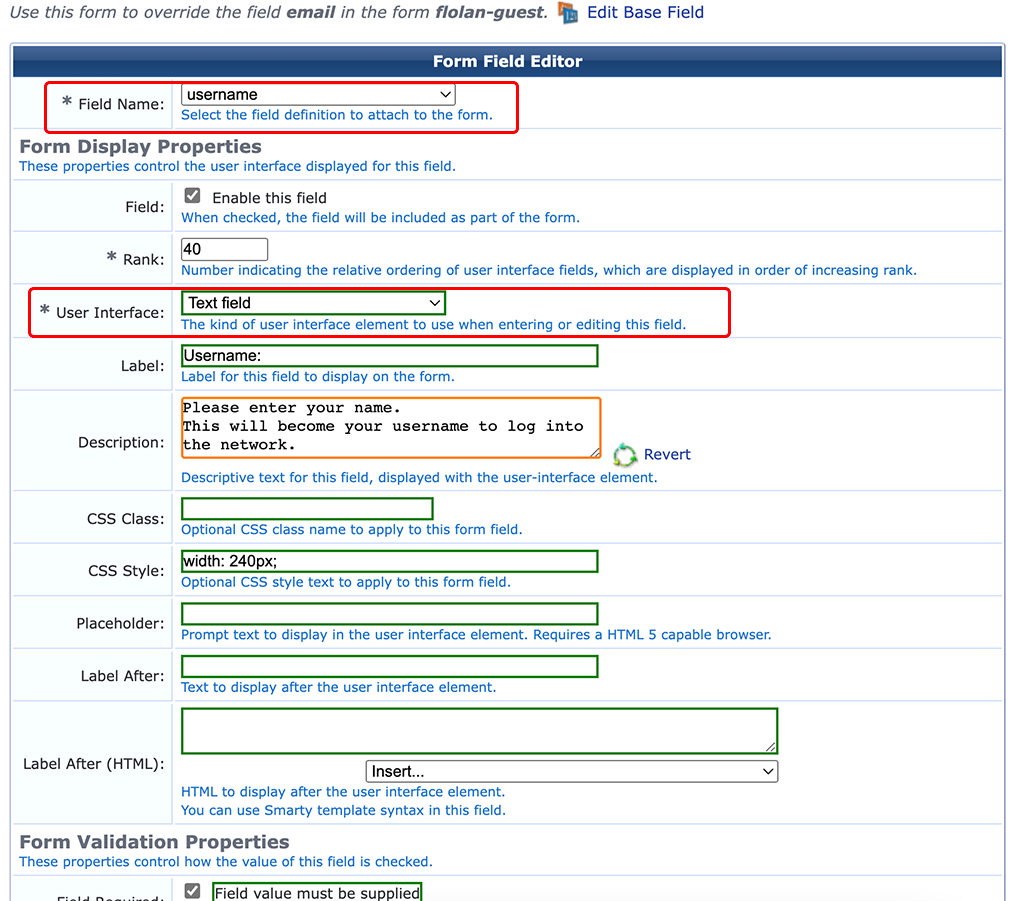
Normally, the mail address is the username to login to the captive portal. For my setup, I do not want to have the mail address being the username. I changed the “Field Name” to “username” and made it a “Text field”. Adjust the “Label” and “Description” to your needs. Now, we have a username field which is not necessarily the mail address.
Next step is to create a new field. Click on an item on the form list (I used the “creator_accept_term” field and click on “Insert Before”:
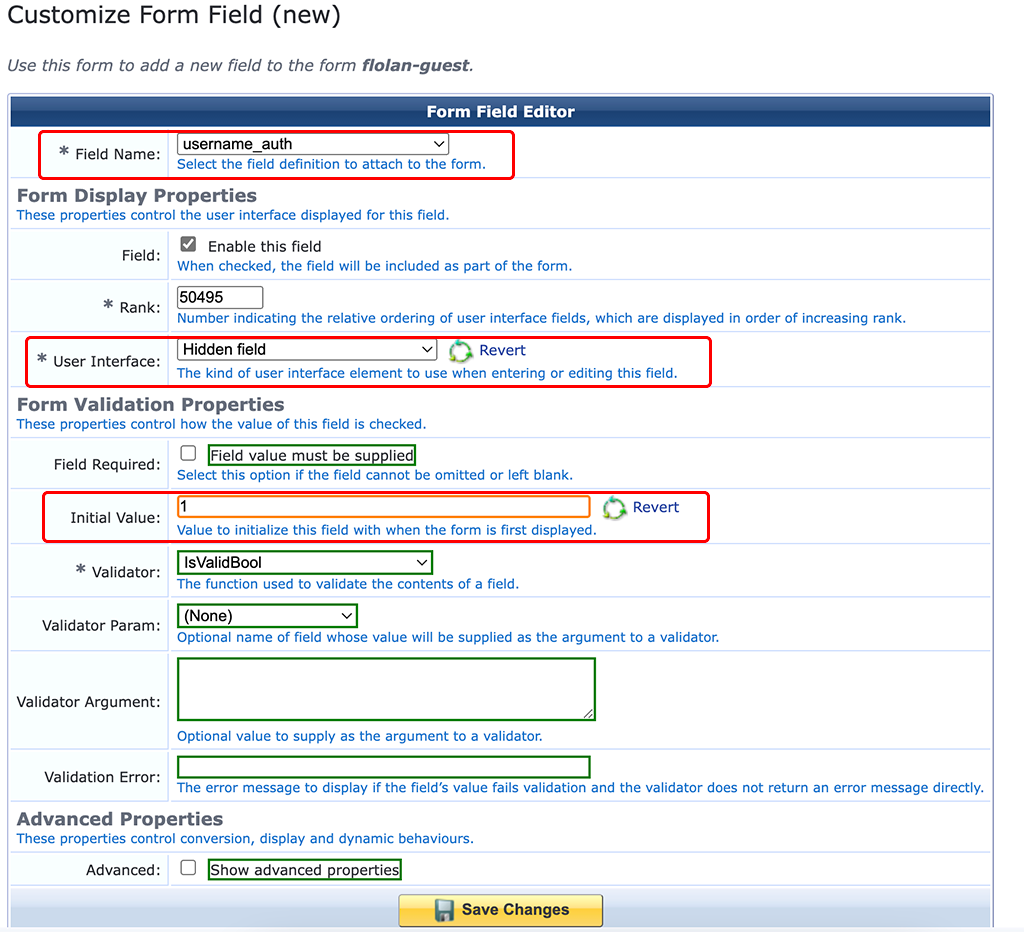
This creates a new field for the form. Select “username_auth” for the “Field Name”. This is a Boolean value and tells ClearPass if this guest is allowed to use username only authentication. Make it a “Hidden field” and set “1” as the “Initial Value”.
Next one is the “role_id” field:
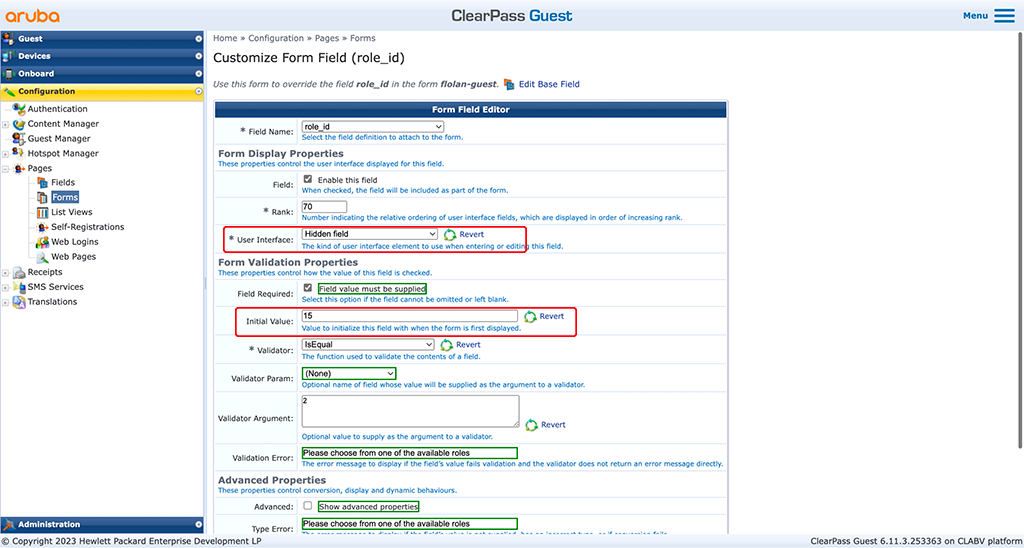
This field defines the role you would like to assign to the guest. This field accepts a number, so look into your “[Guest Roles]” mapping and find the role id you will assign to guests. Again, make the field hidden.
Next one is the “expire_after” field:
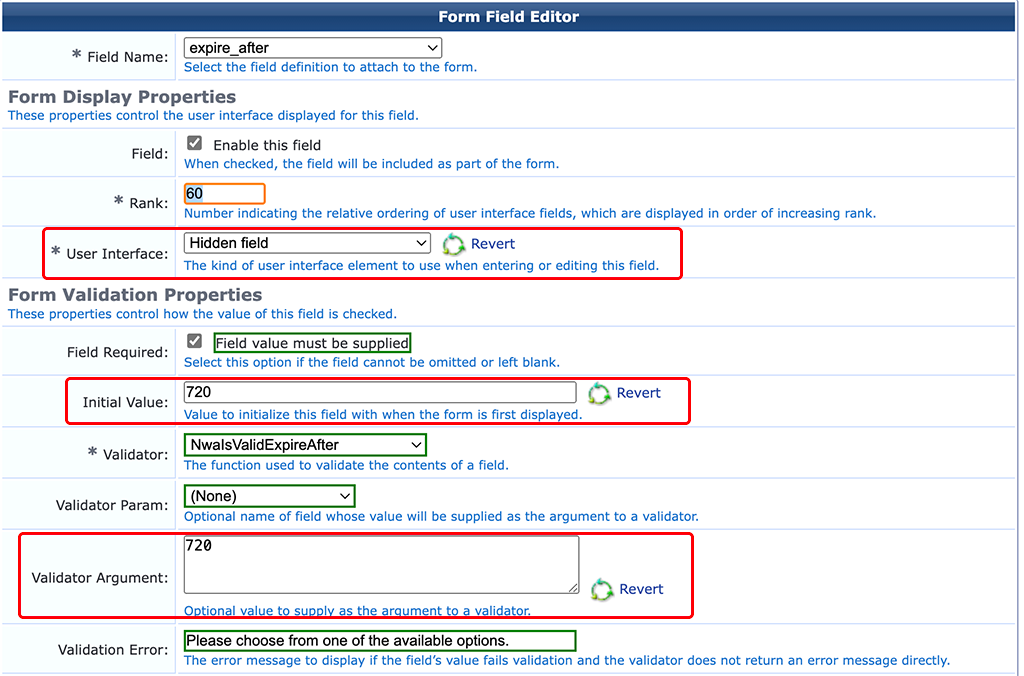
This field defines the lifetime in hours for the guest. I use “720”, as this is 30days or one month. Adjust this to your needs. Again, this field is hidden.
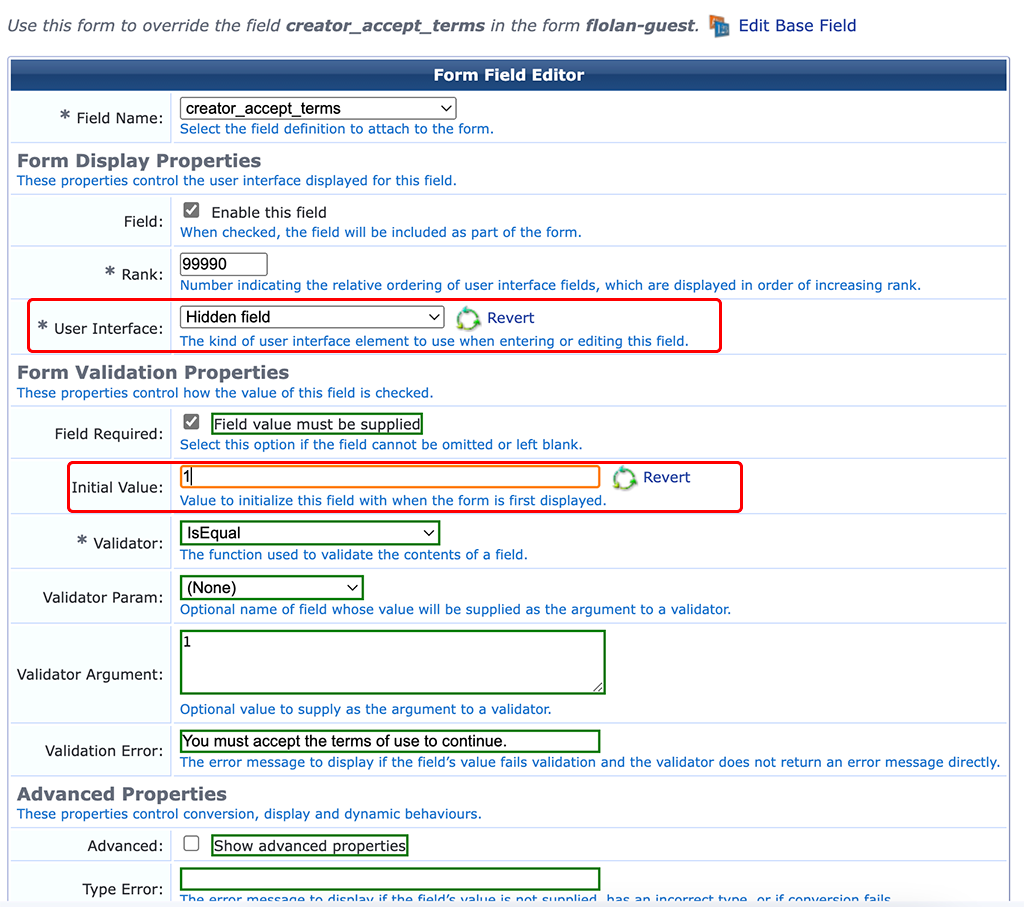
The last field is about the terms and conditions. I do not use them, so I make this field hidden as well. For public facing SSID’s and services you should use a T&C field:
Thats it for the registration form. Let’s jump over to the next one.
ClearPass Tweak Guest Receipt Form
The Guest receipt form is displayed after the user is registered. For username only we do not need much information. I use only the username. To modify the created form, go back to the main configuration page of your self-registration page. There is a section for “Receipt Page”. Within this section there is the “Form” link to modify the receipt form:
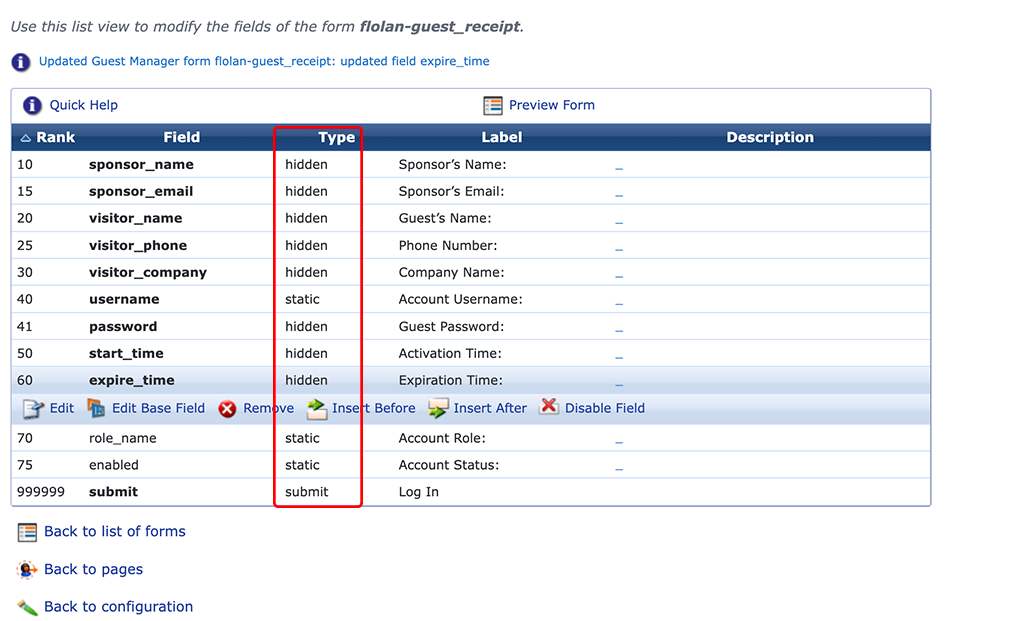
Adjust the form to your needs. For my case, I only show the username and the submit button. All the rest is hidden or disabled. The page itself will be visible only for a short moment. We added a script to the page in one of previous section, which will auto-submit the form.
Set Guest Manager Expiration Options
This step is optional. If you choose an already configured expiration time you can skip this step. In my scenario my initial expiration time is 4 weeks or 720 hours. This is not available in the default but can be added very easily.
In the ClearPass Guest part just go to “Configuration–>Guest Manager”:
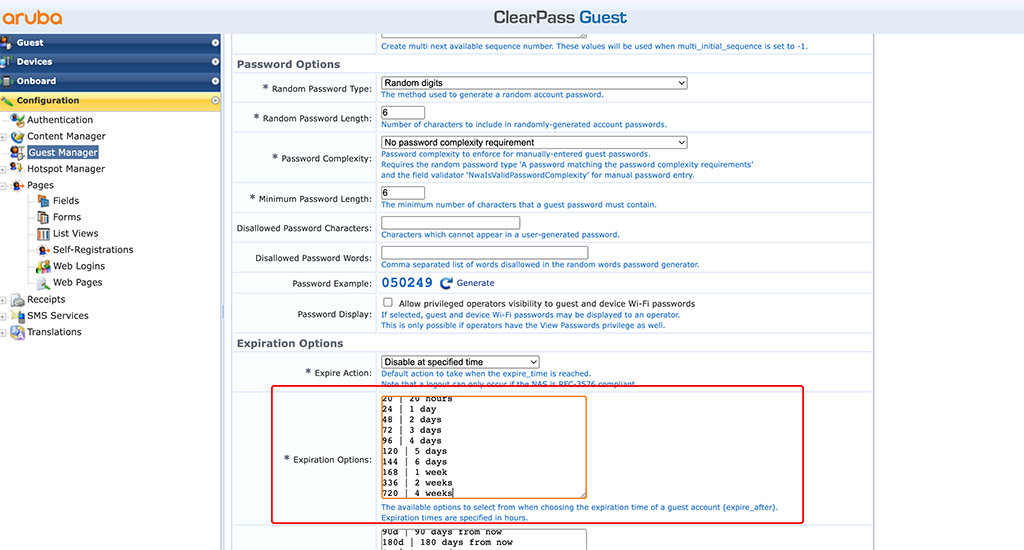
I just added the following line in the “Expiration Options field:
720 | 4 weeksThe first number is the expiration time in hours and the second number (text) is the label, displayed in the dropdown box if you would make this available for guests to select.
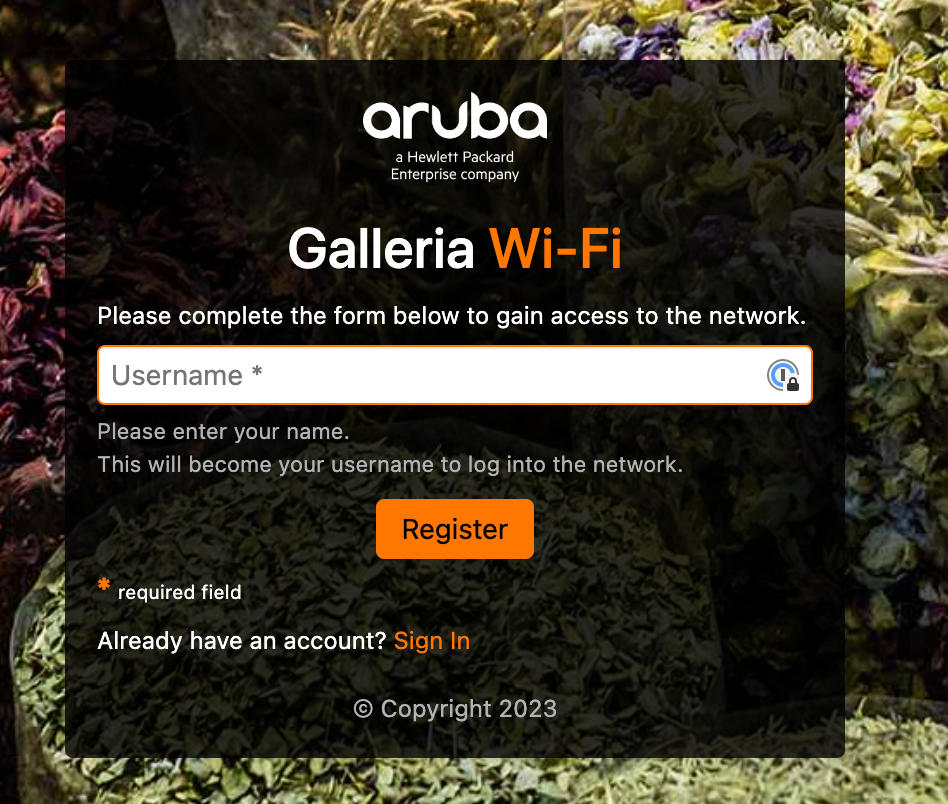
After all those configurations, the captive portal, displayed to the guests look like this:
Create the Guest SSID
This part will briefly show the steps to create a guest SSID in Aruba Central using AP’s running AOS10 and gateways for central breakout.
Select the group in Central with your AP’s and got to “Devices–>Config–>WLANs”:
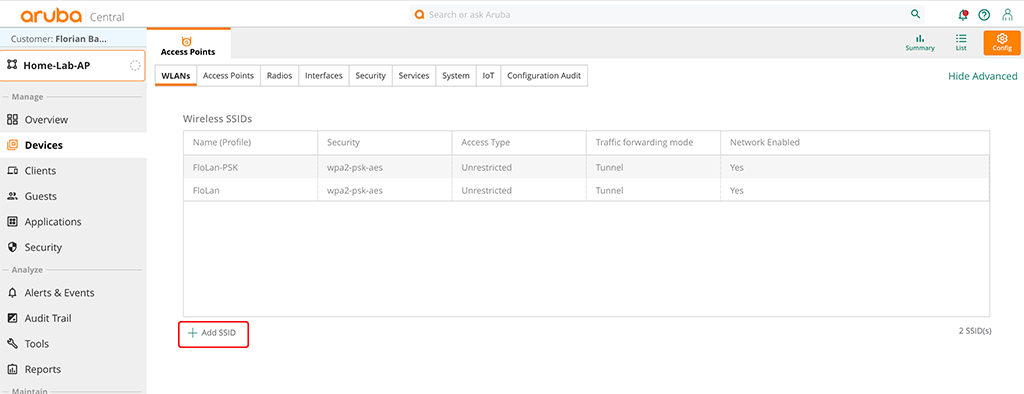
Click the “Add SSID” button at the bottom of the table to start the SSID wizard.
The first screen is the “General” tab:
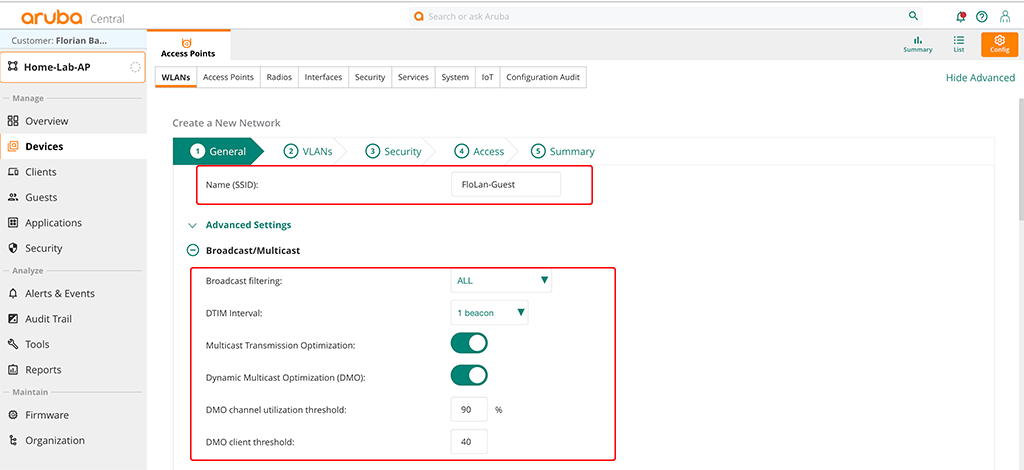
The important part is the “Name (SSID)” field. In the “Broadcast/Multicast” section you can configure what makes sens for your environment. The above settings are the recommended ones. They might not work best for every environment, but for most environments and they are a very good starting point.

I set the minimum transmit rates for 2.4GHz to 5 and for 5GHz to 18. This should allow good speeds and remove very old devices and those which are far away.
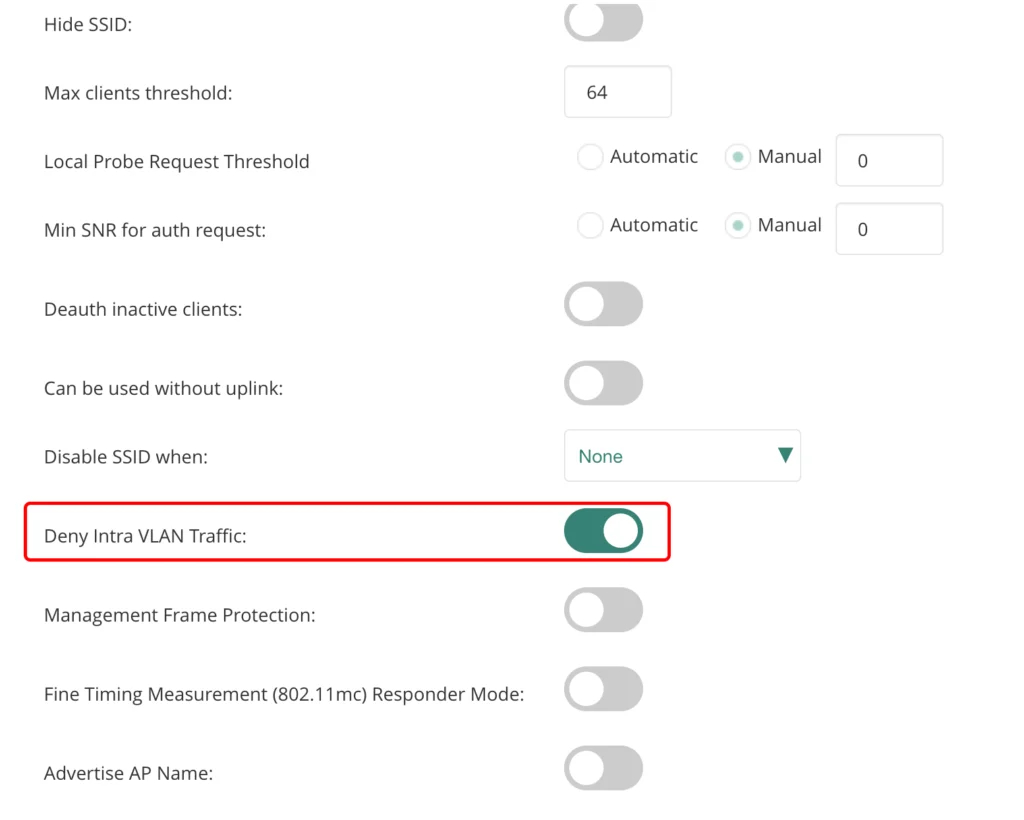
I also set the “Deny Intra VLAN Traffic” switch to separate all guests from each other and allow only traffic towards the default gateway. Now, let’s go to the next tab:
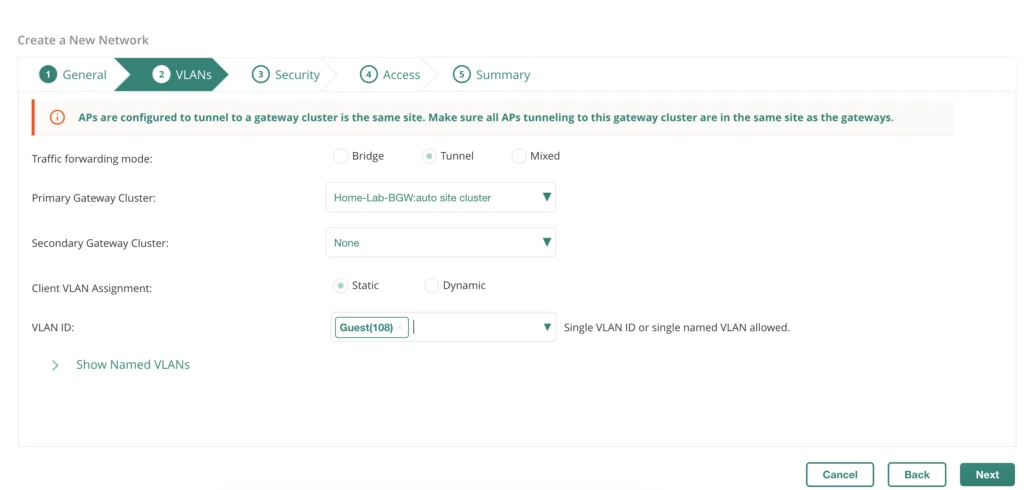
On the VLANs tab you define how the guest traffic is managed. In my case, all traffic is tunneled to the gateway cluster on the same site. If you would have multiple sites, this will make sure, that always the local cluster is used automatically. I also set a static VLAN (Guest(108)). Feel free to adopt to your needs.
Go to the “Security” tab:
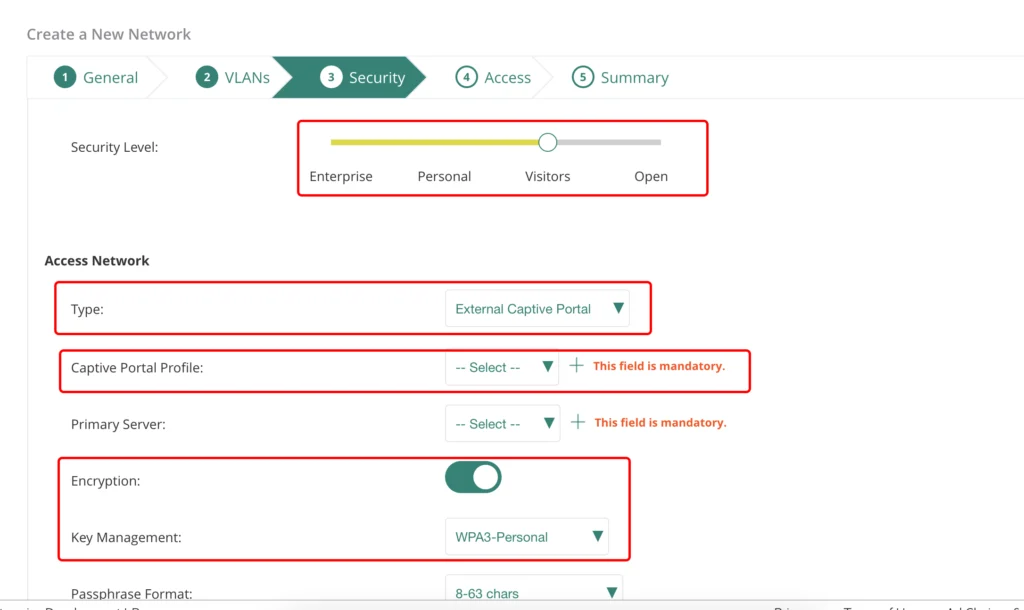
In the security tab, select the “Visitors” “Security Level” and use the “External Captive Portal” as the “Type”. If required, use “Encryption”. For my Guests at home, I will make sure, that only my guests use this SSID. In the “Captive Portal Profile” dropdown either use an existing profile or create a new one with a click on the “+”:
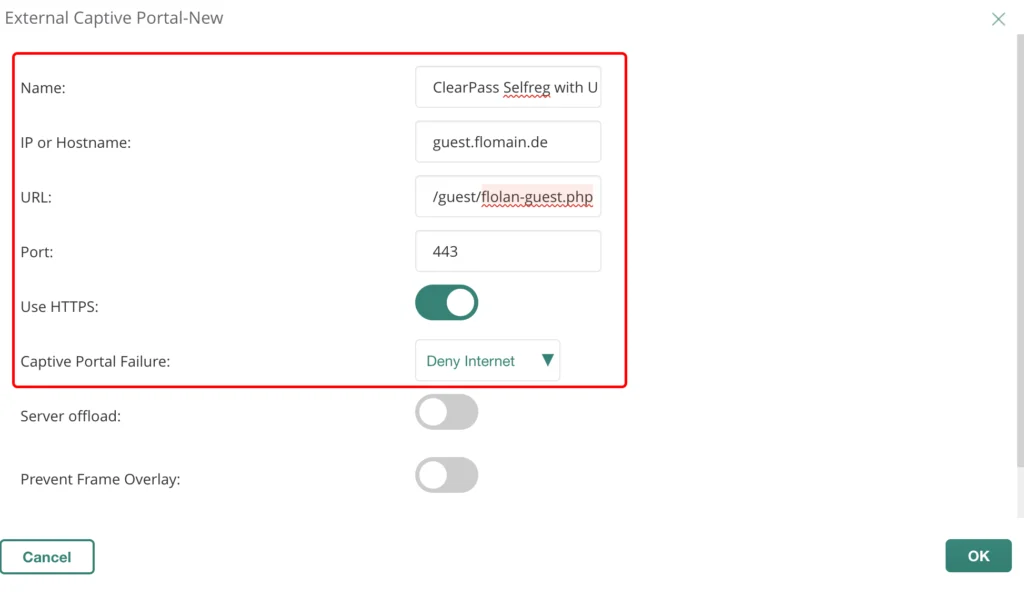
If you click the “+” sign, the dialog above will show up. Enter a “Name” for the profile. Also enter the “IP or Hostname” of your ClearPass server. Make sure, that the DNS name or the IP is within the official HTTPS server certificate in ClearPass.
The “URL” is the one, from the login page of your self-registration login page from the parts above. Use the default HTTPS “Port” and select the “Use HTTPS” knop. Click “OK” to use this profile:
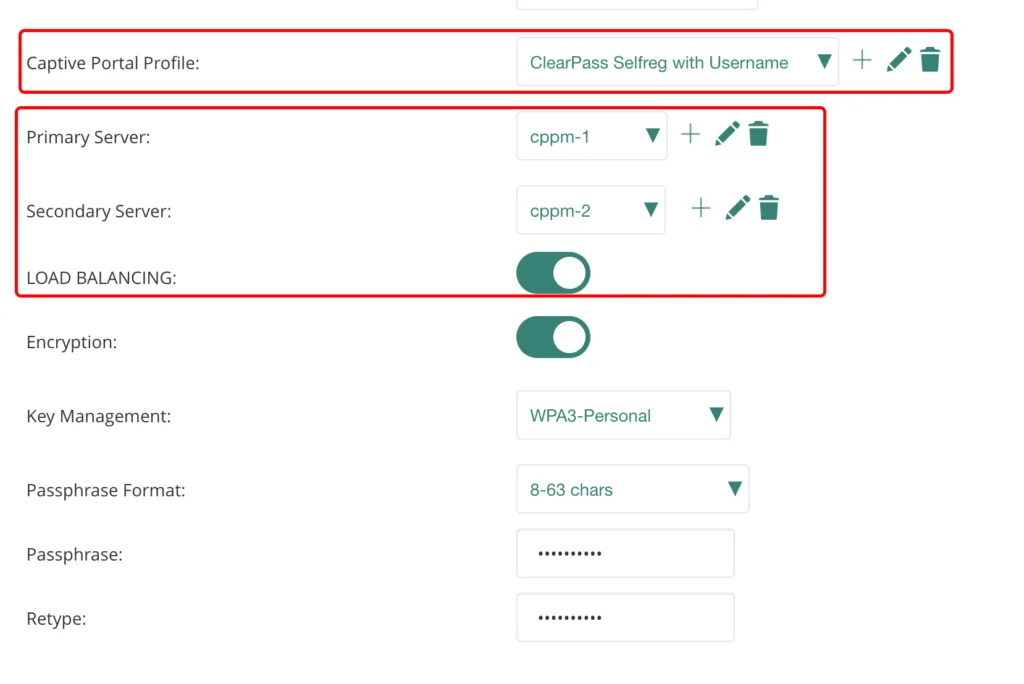
The created profile will show up in the drop-down menu. Now, also select the radius server as well.
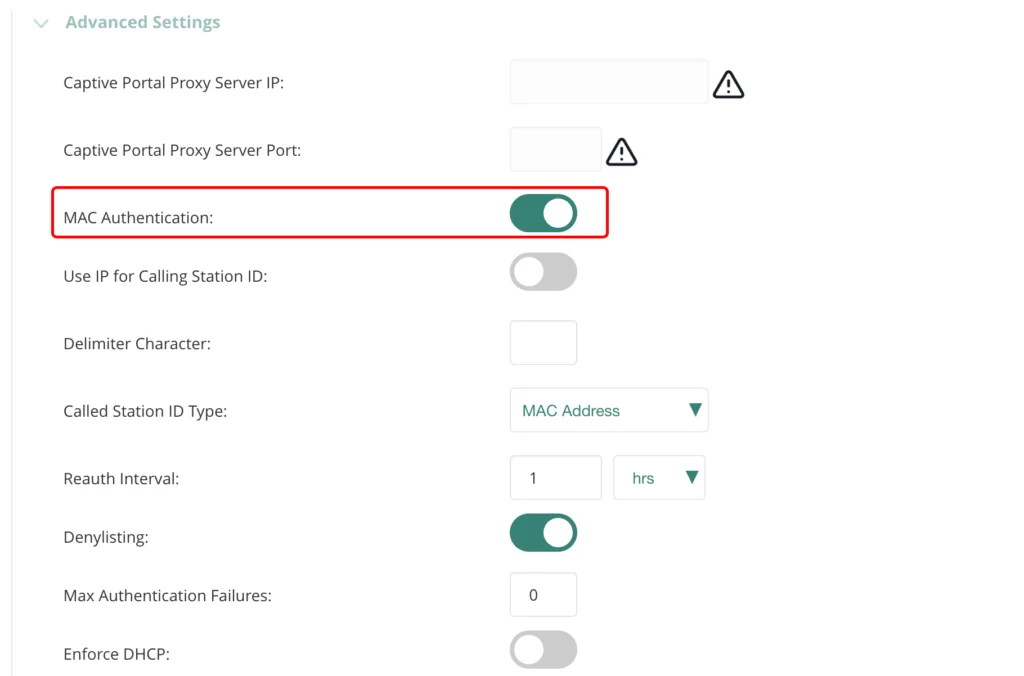
In the “Advanced Settings” section enable “MAC Authentication”.
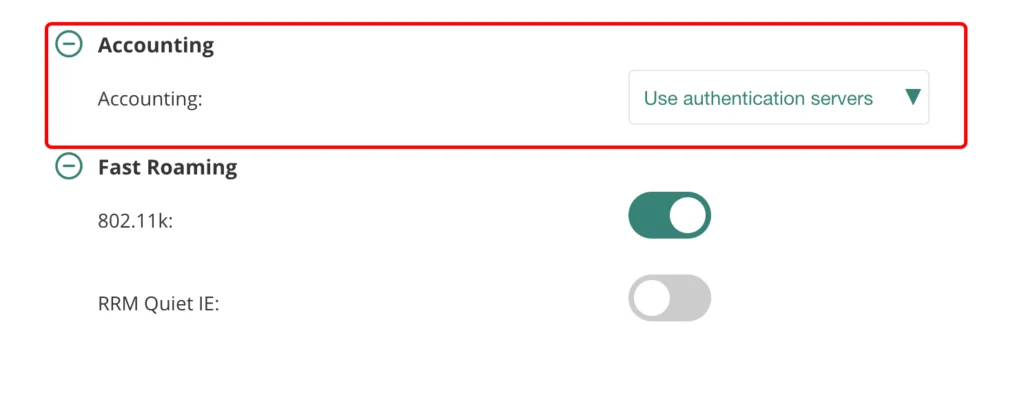
Make sure, to enable “Accounting” as well. Go to the “Access” tab:
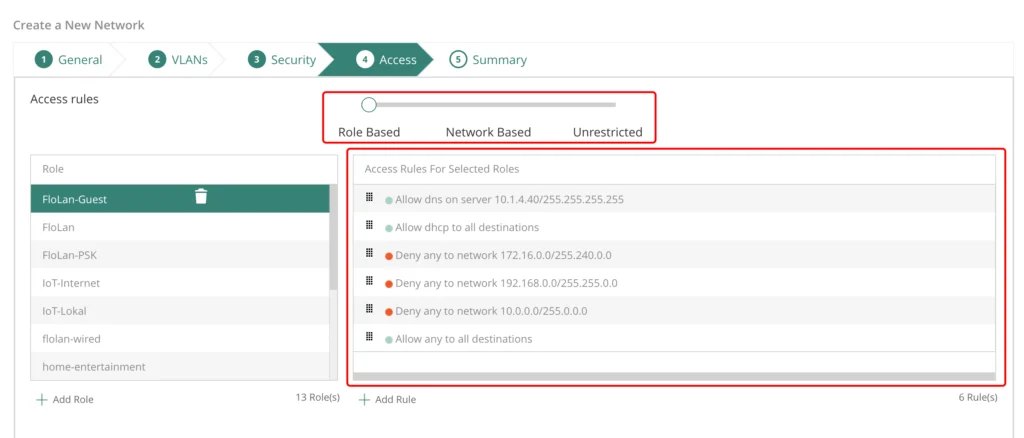
This is the last tab to configure something. Just move the slider to “Role Based” and build the role to your needs. My role allows DNS and DHCP, deny’s access to my internal networks, but allows all the rest. But the requirements for such a role depends on the needs of your environment. The above is just an example.
Go to the “Summary” tab and save your SSID. The AP’s will start broadcasting the SSID shortly.
We go now back to ClearPass.
ClearPass Policy Manager for Username Only
This section will describe all steps to enable the policy manager to authenticate guests with username only. We will also cache the mac address to avoid unnecessary captive portal hits and extend the lifetime of the guest account and the mac caching with each authentication.
First, we need to create a new time source to create our own time values. Please follow the post below for this:
Add Custom SQL Queries to CPPM Auth Sources
If you do not see the error, described in the post, you can also alter the existing time source.
For my setup, I added the new time span for 6 months:
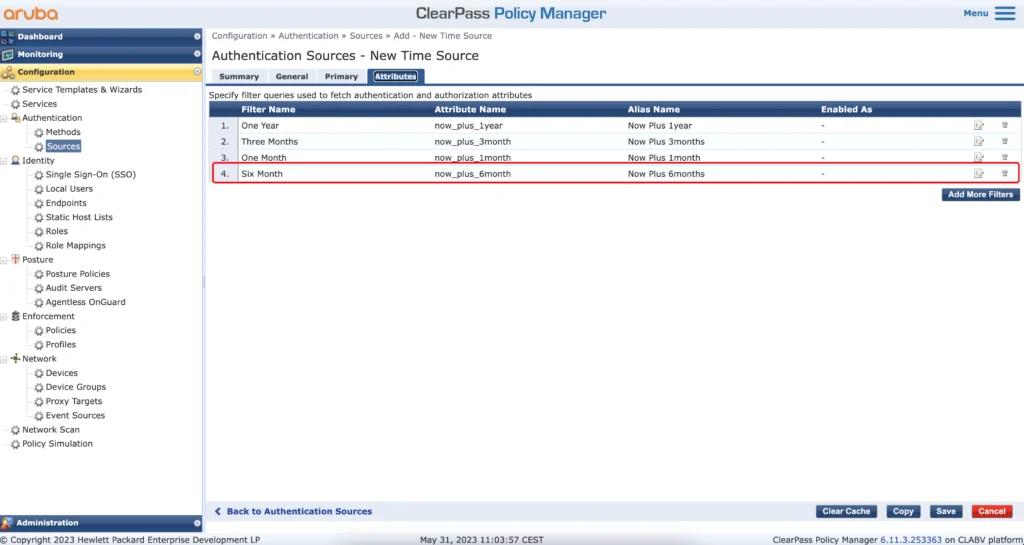
The content of the query, to get six months is the following:
SELECT (EXTRACT (EPOCH FROM NOW() + interval '6 month'))::int AS now_plus_6month;I use the six months for known guests which will come back regularly, like friends and family.
The next step is to create a new context server action. How to create those and use them, please follow the post here:
Use ClearPass RestAPI in Enforcement Profile
If you follow the post above, you should have a new context server (ClearPass itself). You need to create the following context server action to extend the guest user lifetime. This is required, as there is no simple way of doing it. The API is the only option, I’m aware of.
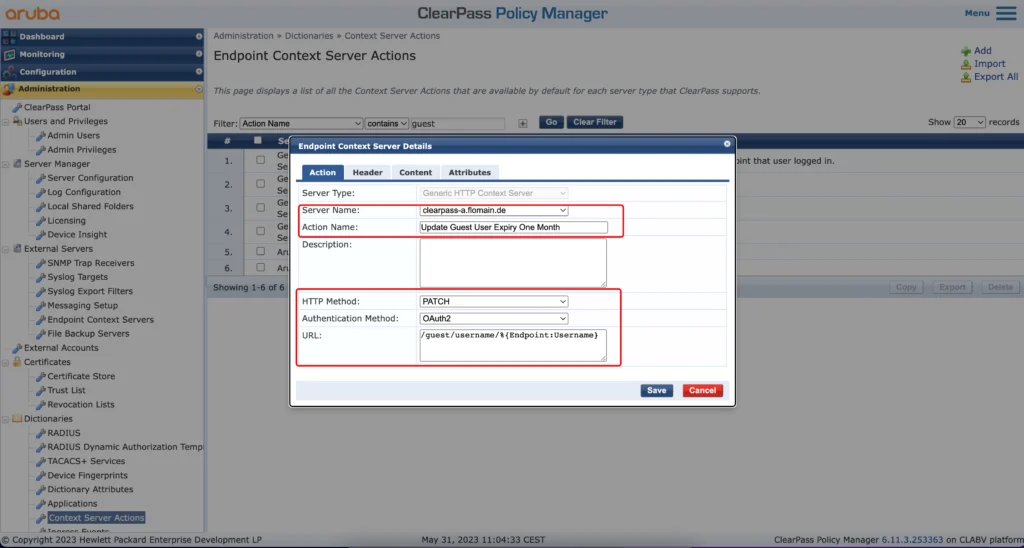
Select the created (from the blogpost above) “Endpoint Context Server” in the “Server Name” dropdown and define the “Action Name”. Set the other option as in the screenshot above.
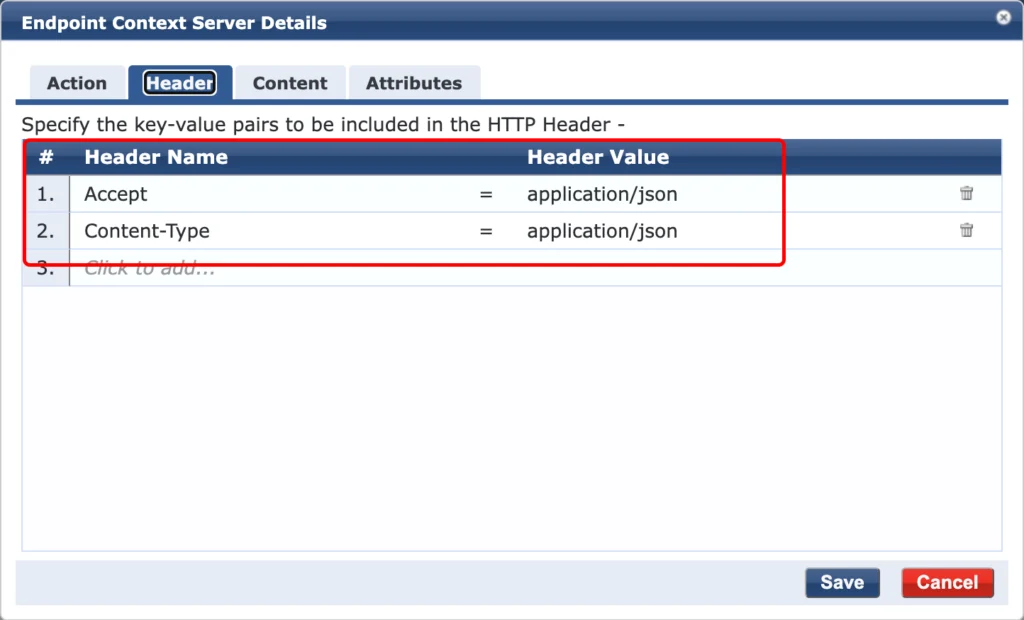
In the “Header” tab use the settings from the screenshot above and go to the “Content” tab:
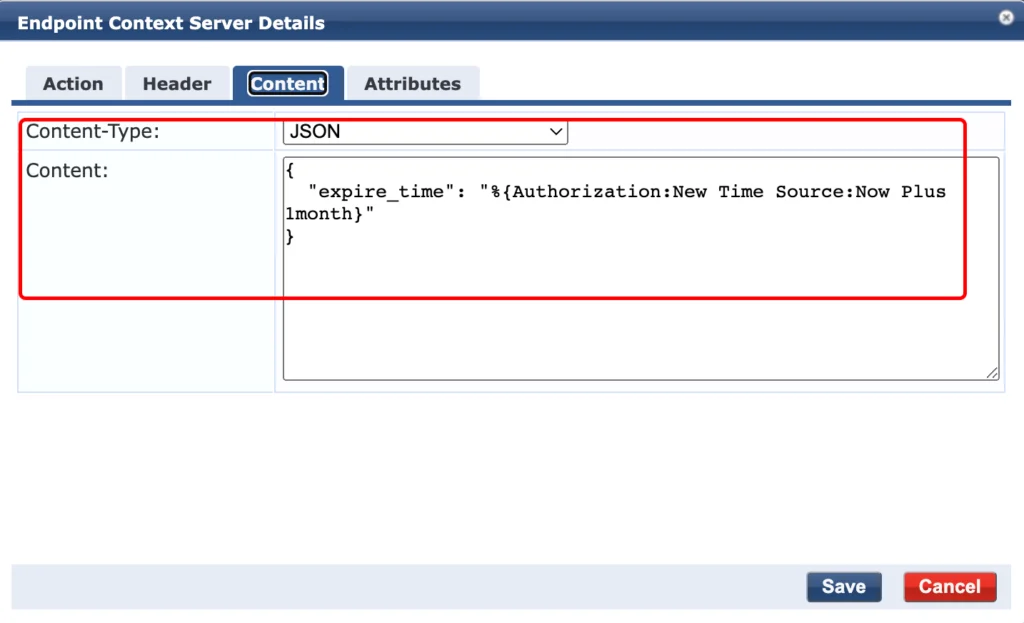
Select “JSON” as the “Content-Type” and copy the following into the “Content” field:
{
  "expire_time": "%{Authorization:New Time Source:Now Plus 1month}"
}
You can replace “Authorization:New Time Source:Now Plus 1month” with the time span you’ve defined. You can also have multiple “Context Server Actions” with different time spans.
To use the “Context Server Action” create a new HTTP Based Enforcement Profile like the one below:

Use “HTTP Based Enforcement” for the “Type”. The “Target Server” is the one you would like to run the action against, and the “Action” is the one we created above. This profile within an Enforcement Policy will extend the lifetime of the guest account. To also extend the lifetime of the mac caching to the device itself create another Enforcement Profile:
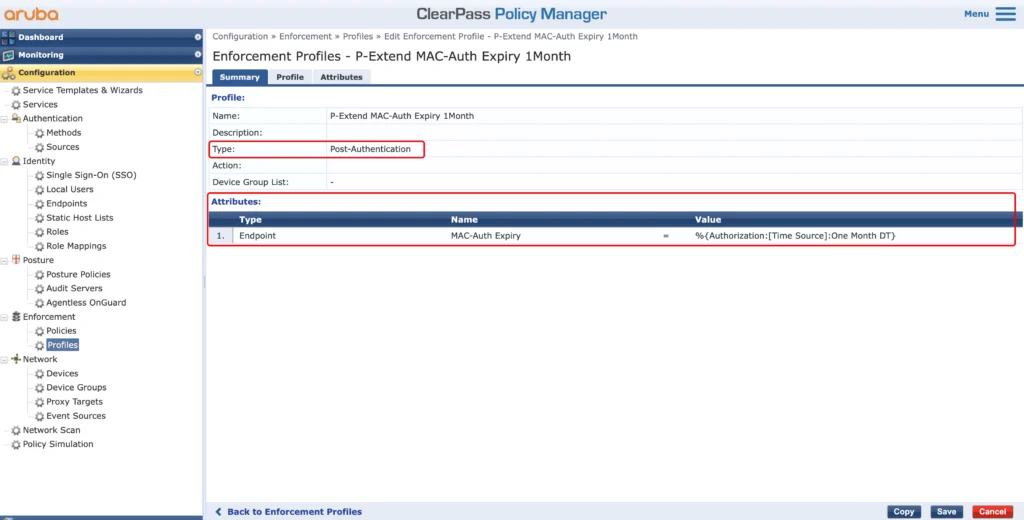
This will extend the lifetime of the device by adding or modifying the “MAC-Auth Expiry” attribute.
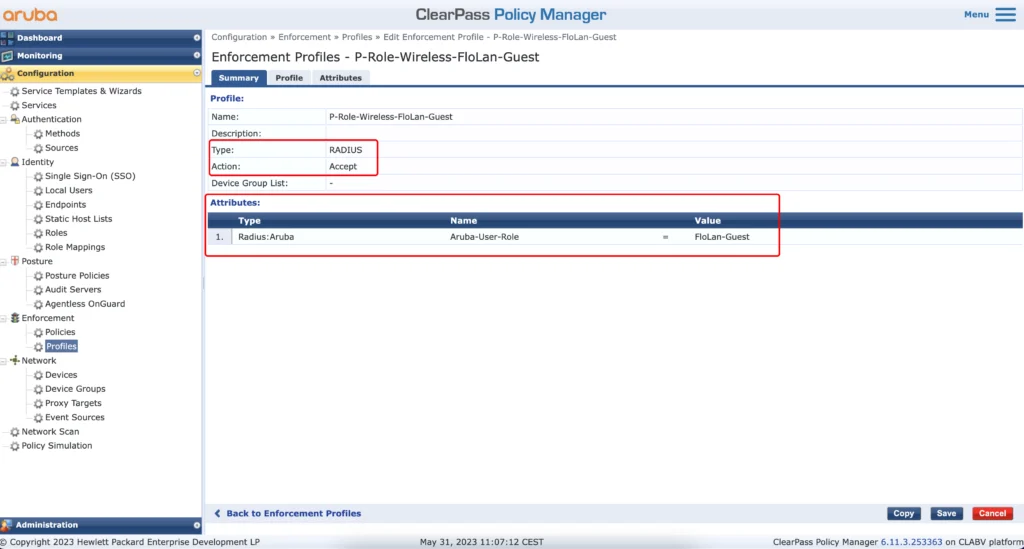
Let’s also create a profile to return the guest role. This role was created earlier during the SSID creation:
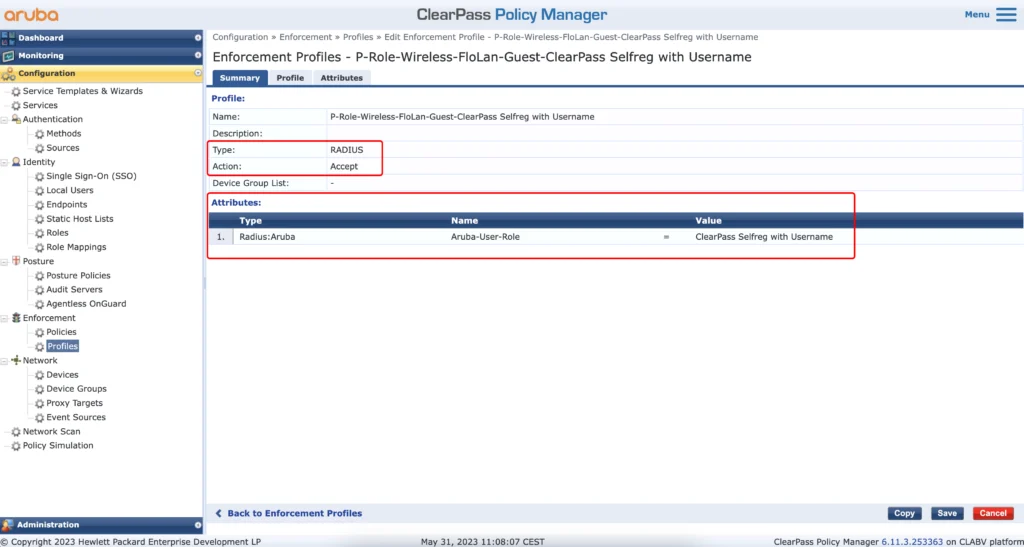
The next profile is to send back the captive portal role. During the creation of the SSID above we also created a captive portal profile. This automatically creates a role with the same name as well. This role will do the redirect to the captive portal. For all mac addresses, which could not be authenticated, I return this role:
The next profile is optional. I find it beneficial to see the username instead of just the mac address in my wireless monitoring tool. To get this you must return the guest username during authentication. The following profile will do this:

The profile above will use the “Username” from the endpoint database. To get the username into that database I use the profile below:
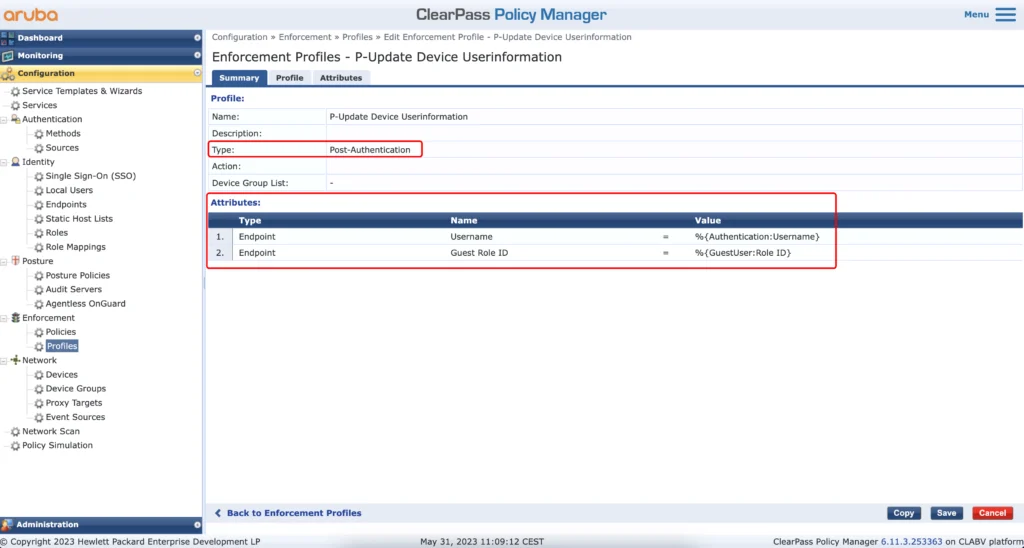
This profile will update the endpoint with the “Username” and with the “Guest Role ID”. The “Guest Role ID” is required to assign the correct role to a guest during mac authentication with mac caching.
The next step is to create all the roles in ClearPass. It will make your life easier during the steps after the current one:
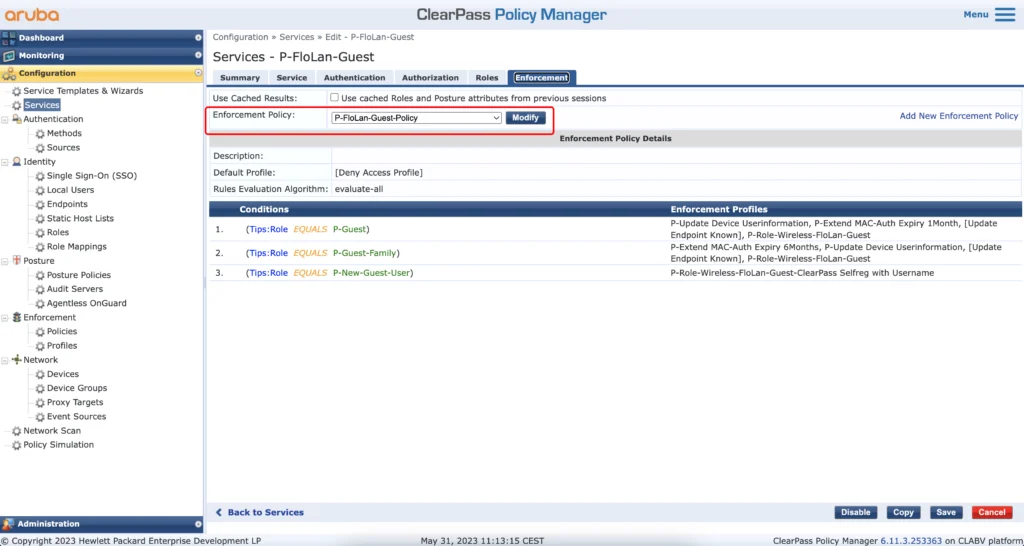
Now, let’s create an Enforcement Policy for the mac authentication:
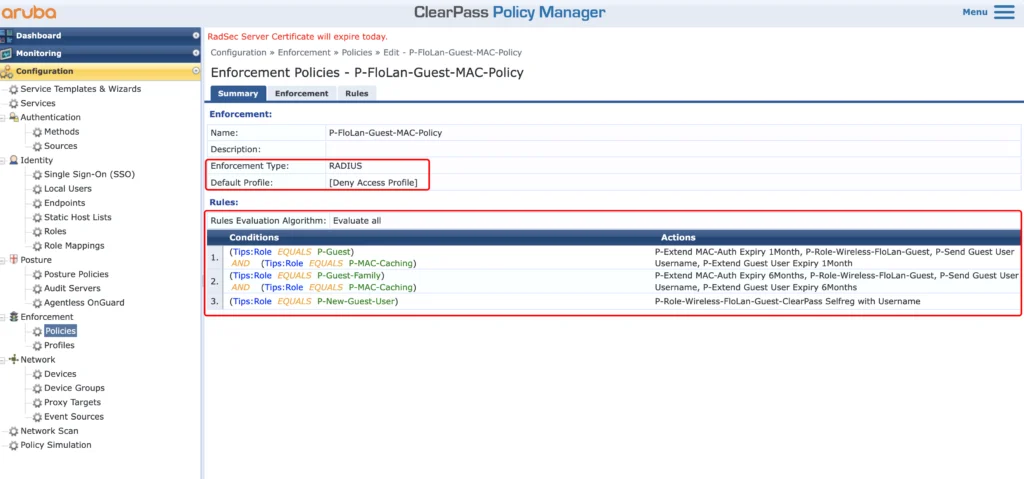
The policy will deny access if no rule is matched. If the guest is getting the guest role, we will do the following:
- P-Extend MAC-Auth Expiry 1Month–>Update the expiry information in the endpoint database for the client
- P-Role-Wireless-FloLan-Guest–>return the role of the guest to the AP’s/Gateways
- P-Send Guest User Username–>return the Guest User Username to see them in the NMS
- P-Extend Guest User Expiry 1Month–>Extend the lifetime of the Guest User
For the “P-Guest-Family” role I will do the same as above, but with different expiry times.
The “P-New-Guest-User” role is a new device which is not yet known or with an expired mac caching. If this rule is hit, I return the captive portal role, to send the user to that captive portal.
Now, let’s create the policy for the web auth:
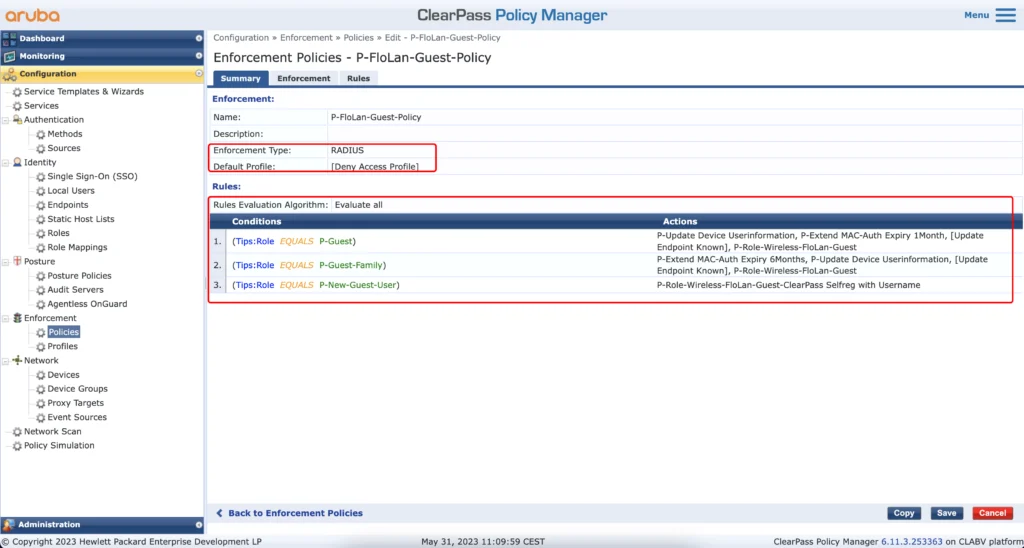
This policy will also deny access if no rule is hit. If it hits the first rule, the guest user has the “P-Guest” role and the following will happen:
- P-Update-Device Userinformation–>The Guest information’s will be added to the endpoint in the endpoint database for mac caching
- P-Extend MAC-Auth Expiry 1Month–>Update the MAC-Auth expiry in the endpoint database for mac caching
- [Update Endpoint Known]–>Set the “Status” in the endpoint database for this client to “Known”
- P-Role-Wireless-FloLan-Guest–>return the guest role for the user
The second rule is again just the same but with different timespans.
The last rule is for unknown users, like wrong username during captive portal authentication and will return the captive portal role again.
Now, let’s create the role mapping for the services:
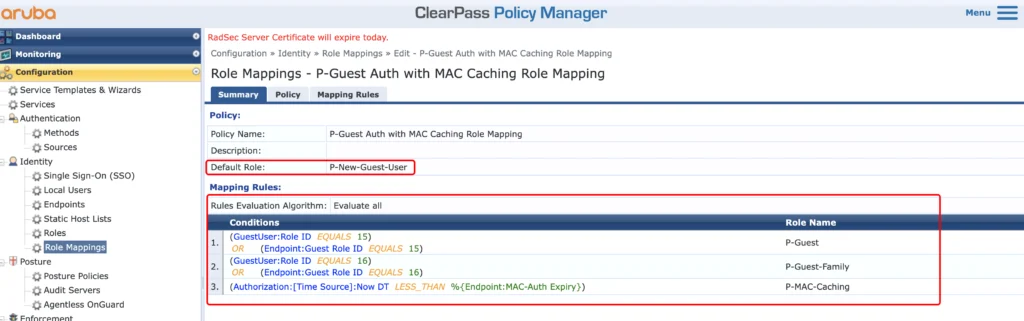
The role mapping will either use the “GuestUser:Role ID” or the “Endpoint:Guest Role ID” to match the role in ClearPass. The last one will check if mac caching is still valid, by comparing the current timestamp with the one in the “MAC-Auth Expiry” attribute.
Now let’s create the captive portal web auth service:
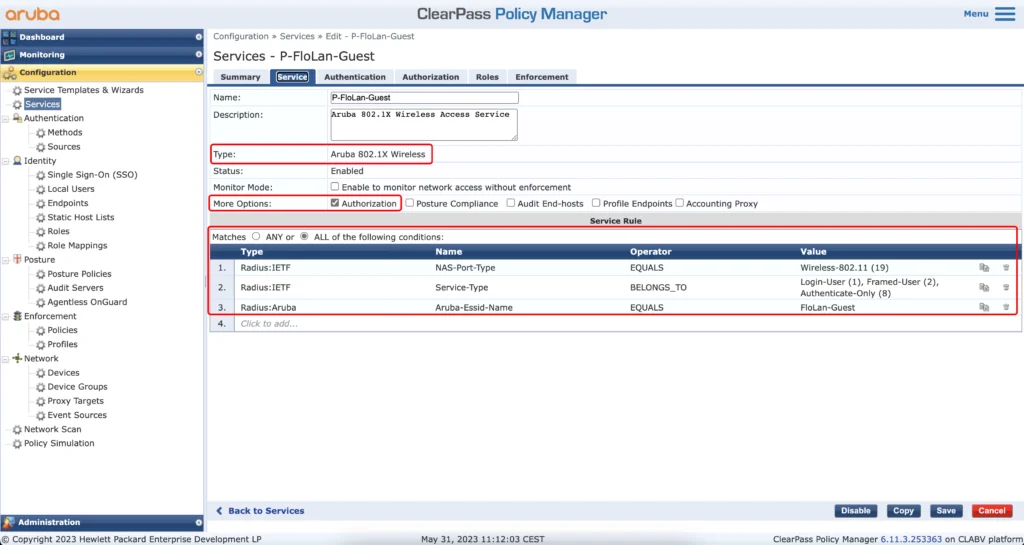
The “Type” of the service is “Aruba 802.1X Wireless”. Make sure to enable “Authorization” in the “More Options” section. For the “Service Rules” copy the ones above and replace my SSID name with yours in line 3.
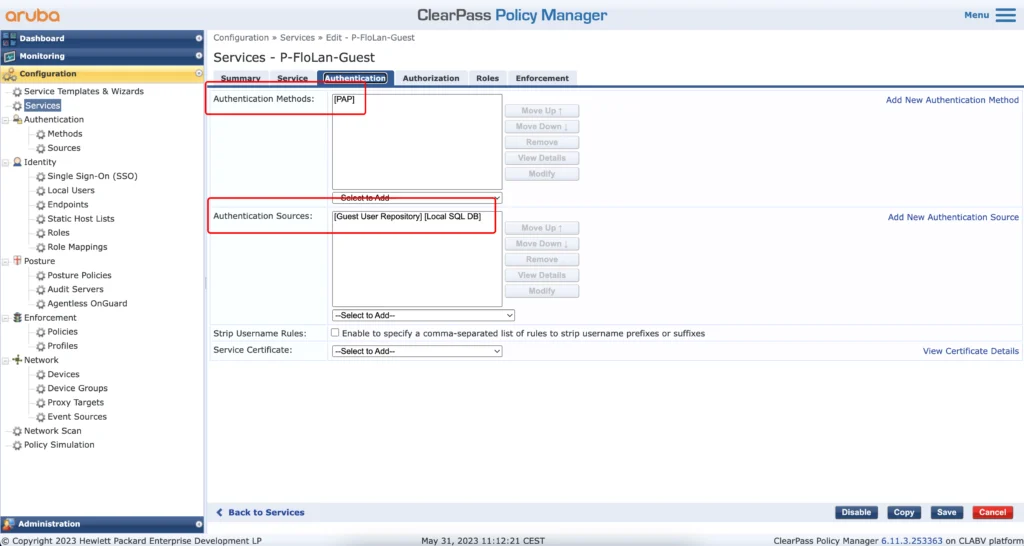
In the “Authentication” tab, select “[PAP]” for the “Authentication Methods” and the “[Guest User Repository][Local SQL DB]” for the “Authentication Sources”.
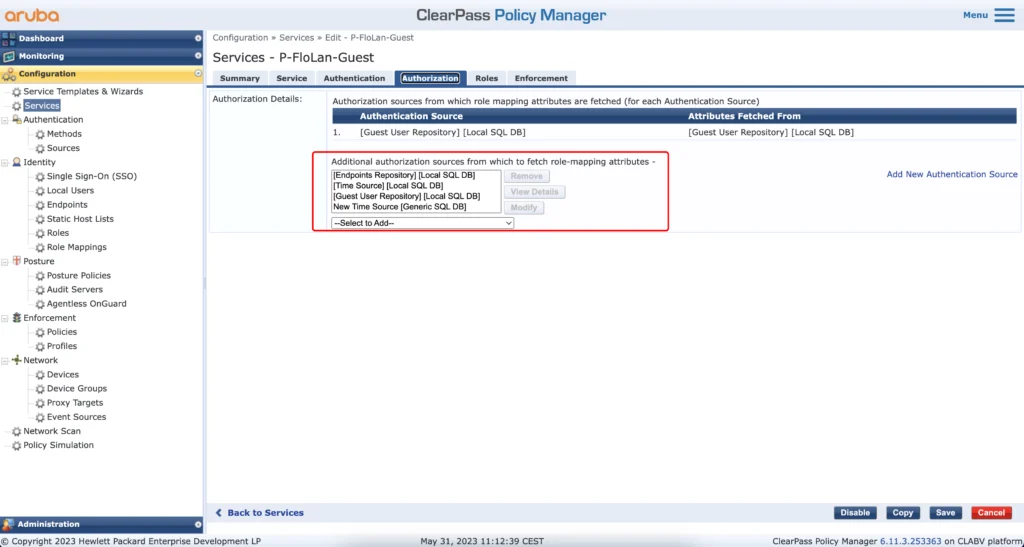
In the “Authorization” tab select the “Additional authorization sources”. If you follow my post step by step you can copy those from the screenshot above.
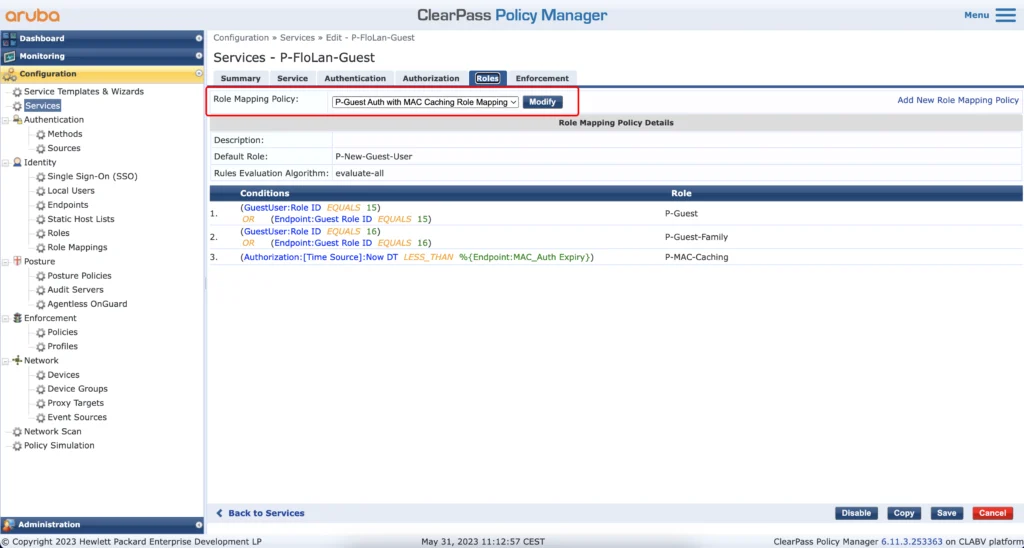
Make sure, to select the role mapping, we created earlier.
Just select the enforcement profile we create earlier. Save the service and create another one, for the mac caching:
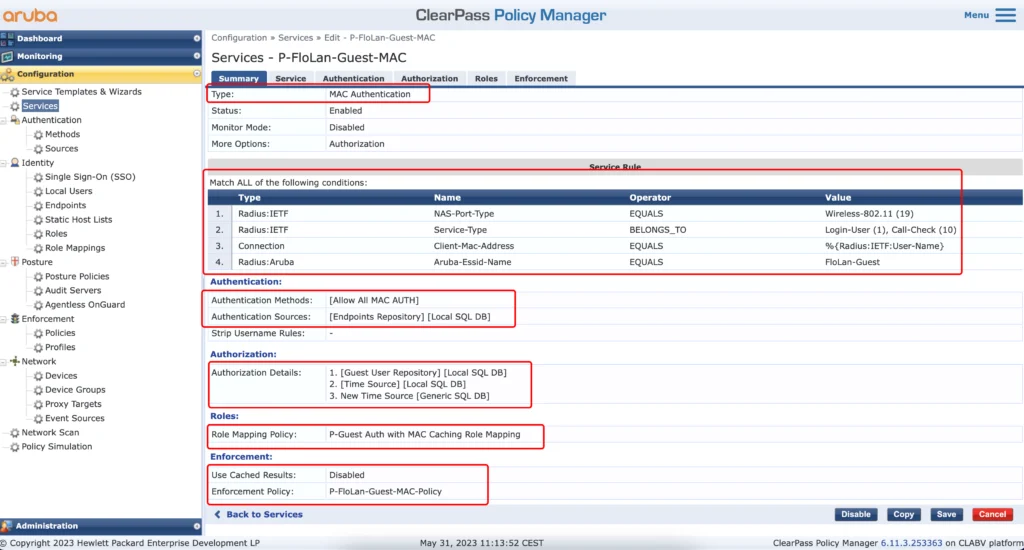
This service will authenticate the mac address, while connecting to the guest SSID. The “Type” is “MAC Authentication”. For the “Service Rule” it looks nearly the same as the web auth service before. Only rule two is different and rule three is added. Rule three makes sure, that only mac authentications are matched by this service. Replace your SSID name in rule four.
The authentication uses the “Allow All MAC AUTH” and the source is the endpoints repository.
For the “Authorization” add all the required sources.
In the “Roles” tab select the role mapping, we created earlier for the mac auth service. Same goes for the “Enforcement” tab. Select the enforcement policy we created earlier for the mac auth.
After that, we are finally done. Everything is in place, and we can start testing.
Username Only – Access Tracker
Let’s go through all the access tracker events, we will see during username only self-registration. The first one, is the mac authentication event, when the user connects to the SSID the first time:
It hits the correct service, the mac authentication service (P-FloLan-Guest-MAC). It also assigns the correct role to an unknown user (P-New-Guest-User) and returns the correct “Enforcement Profile (P-Role-Wireless-FloLan-Guest-ClearPass Selfreg with Username”. The output looks like this:
The correct user role is returned, and the user should now hit the captive portal. After running through the self-registration with username only we should see the next event in the access tracker. The Web-authentication from the captive portal:
This time, the “Authentication Method” is “PAP”, as it is coming from the captive portal. It assigns the “P-Guest” role to the user und uses to correct “Enforcement Profiles”.
The endpoint is updated with the required information’s and the “FloLan-Guest” user role is returned. This allows the guest to use the SSID.
We can check the client for the attributes as well:
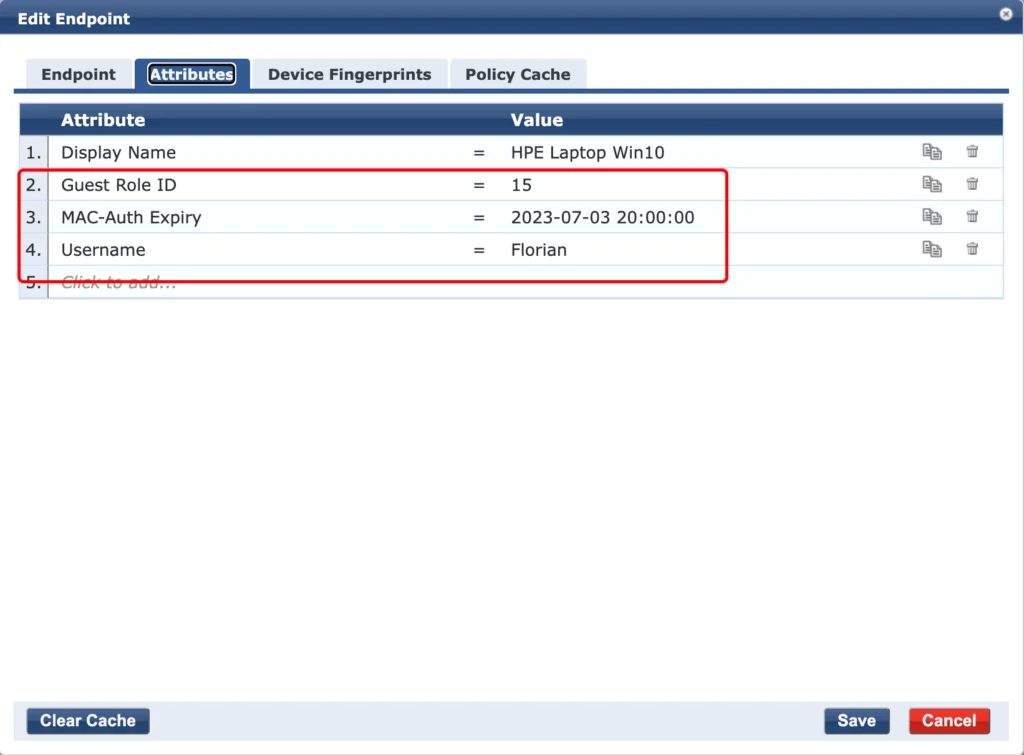
As you can see, all the attributes are added, the “Guest Role ID”, the “MAC-Auth Expiry” and the “Username”. We can use those attributes during the authentication with mac caching.
If the user returns to your network the attributes above are used to authenticate the client:
It is again a mac authentication, but this time, we can use the attributes from the endpoint database. Those attributed identify the device and ClearPass can assign the correct role to the user without redirecting to the captive portal. According to the role, all enforcement profiles are selected.
ClearPass returns the user role and the username but also updates the endpoint in the endpoint database. The guest user is updated as well, using the API:
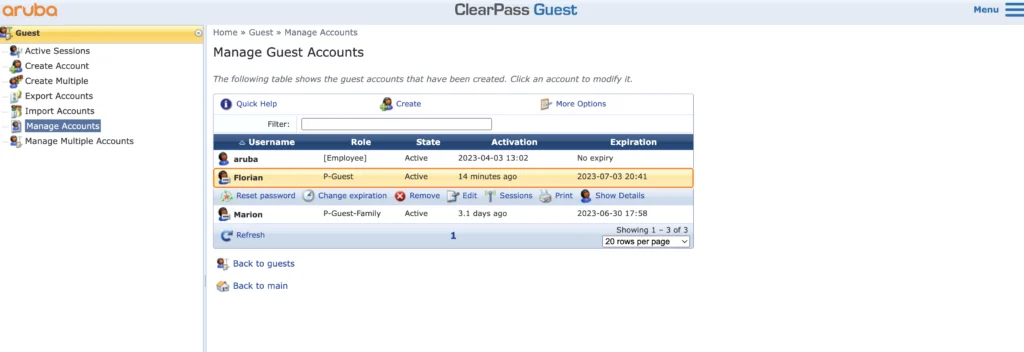
With the setup above, you can keep the guest accounts active and extend the lifetime when the user connects. If the user does not come back, he will be removed after the lifetime is expired.
This setup also uses a username only self-registration and authentication, which is in my point of view a very good tradeoff between usability and the ability to monitor the users.
If you find this post useful, leave me a comment and share your feedback with me. You can also buy me Pizza, using the “Buy me a Pizza” button on the right, to support this blog and keep the IT gremlin happy.
If you would like to do me a favor, share this post with your friends and social media contacts. This would really help to make this blog more popular and help others to find the information above more easily using search engines.
Share on:
Great post Flomain!
Just one thought…. what if a user spoofs the username? 🤔 maybe I’m just overthinking the use case.
Thanks for the content!
Hi Vairo,
thanks for the comment. You are absolutly correct. If someone spoofs the username, he could get access. I personally see this solution not to be an authentication in order to deny access for specific users. It is more some kind of making it more easy, or create a better management/monitoring experience.
As with any solution it can be modified to add an extra level of security, like with the username/password authentication, which works more or less by default with ClearPass. But if you enable mac caching there, the quesion about spoofed mac addresses arises.
Thanks for the question, great point.
Many thanks,
Florian
Hi Florian,
Thank you for all your posts, they were really helpfull.
Im’ fascing an issue, if you could please help me :
I didn’t find a way to set a single SSID for (employees and guest) with captive portal and separate them by role.
So my needs are :
-one single ssid with captive portal for guest and employee
-the guest will access by the sponsorship option (already done thank you again)
-the employee will connect with the same ssid by credential that i already created (send them by mail)
-restrict access for them ( only internet authorized)
i done 99% of that, but still one thing missing :
when i set the captive portal, the sponsorship confirmation (the link for confirming the guest is 192.168.x.x/guest/guest_register_confirm.php…etc )
i set some rules to blocks guest access and just give them internet access which i include the link above. and if an employee want confirm a guest, when he click on the link, it’s not working because is blocked i think by rules. and when i delete the rule, the guest can perform an nmap on the clearpass address and see the 80 and 443 are open
i dont know how to do that
could you please give me an advise
thank you in advance
Hi vuhidus,
thanks for your comment. Much appreciated.
Let’s see if I get you request right 🙂
If you separate guest and employees by role, and I hope with employees you mean employee devices, like BYOD or personal devices, which only access the internet and not internal ressources, you can allow access to clearpass only on port 443. Even if a guest is doing a port scan, they only get 443 and nothing more.
The confirmation should be send to employees internal devces, which should be connected to a different SSID/Network with full (or at least enough) access to clearpass.
One thing is still on my interest. Where do you block the access to clearpass? Is it on clearpass itself or is there any firewall inbetween? Try to get an understanding of the setup.
BR
Florian