You can easily configure ClearPass SSO to use Google Workspace for all kinds of Single Sign On based logins. This post will show how to use Google Workspace to authenticate your ClearPass Operators and Guest admins.
I have quite a similar post with Azure AD here:
If you read the post above as well, you should have no problems using Google Workspace for ClearPass SSO. The ClearPass part is the same, only the Google part is different.
Add the SSO App to Google Workspace
So, let’s get started. Login to your Google Workspace account as an admin:
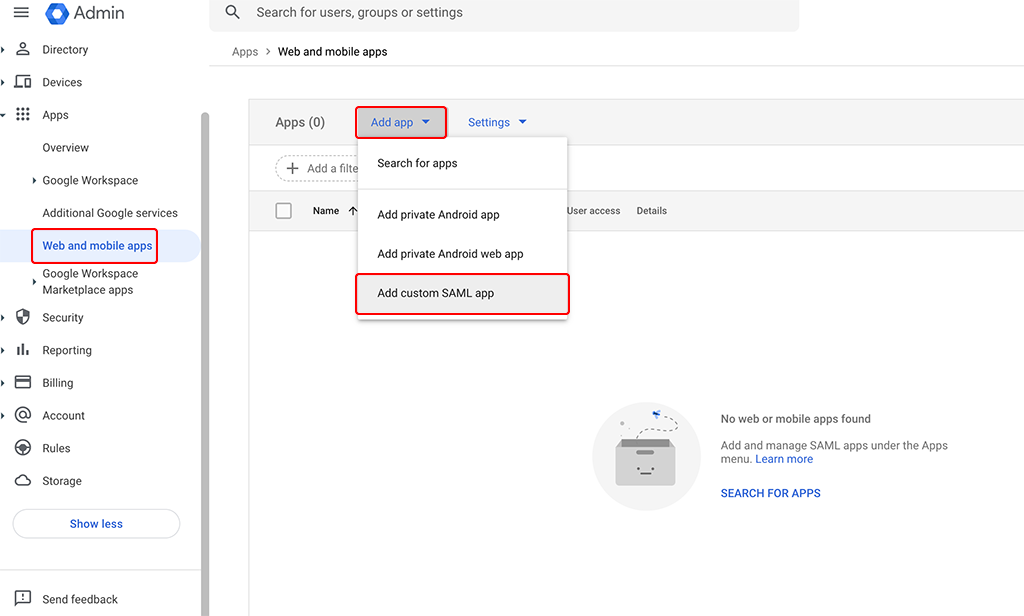
After logging in, you go to “Apps–>Web and mobile apps”, click the “Add app” and select the “Add custom SAML app” options to create a new app:
A wizard will start to guide you through the setup. The first page allows you to set a name for the app and add an icon:
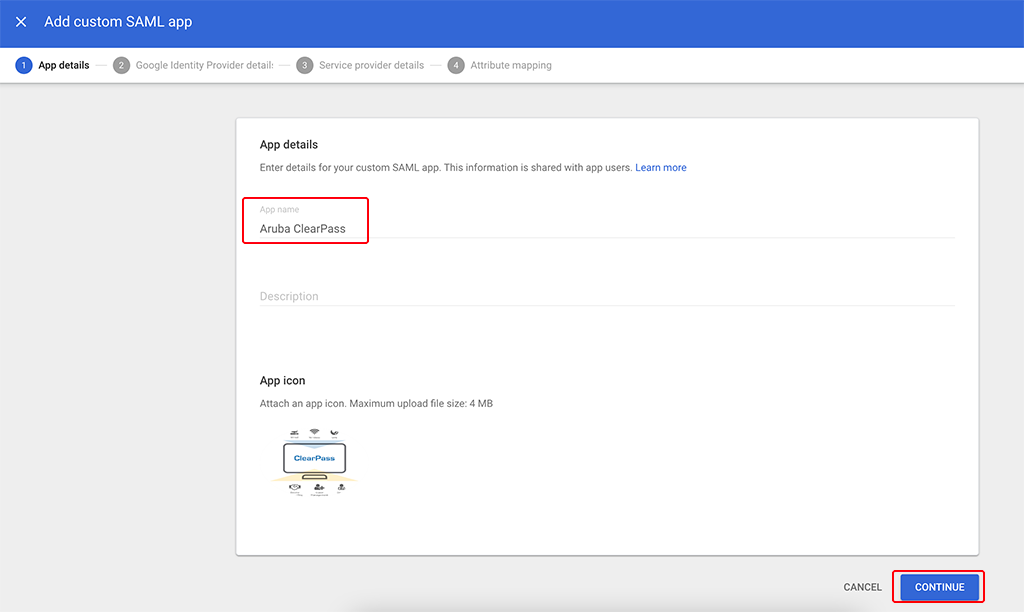
Enter a descriptive name and add an icon. Afterward, click “CONTINUE”:
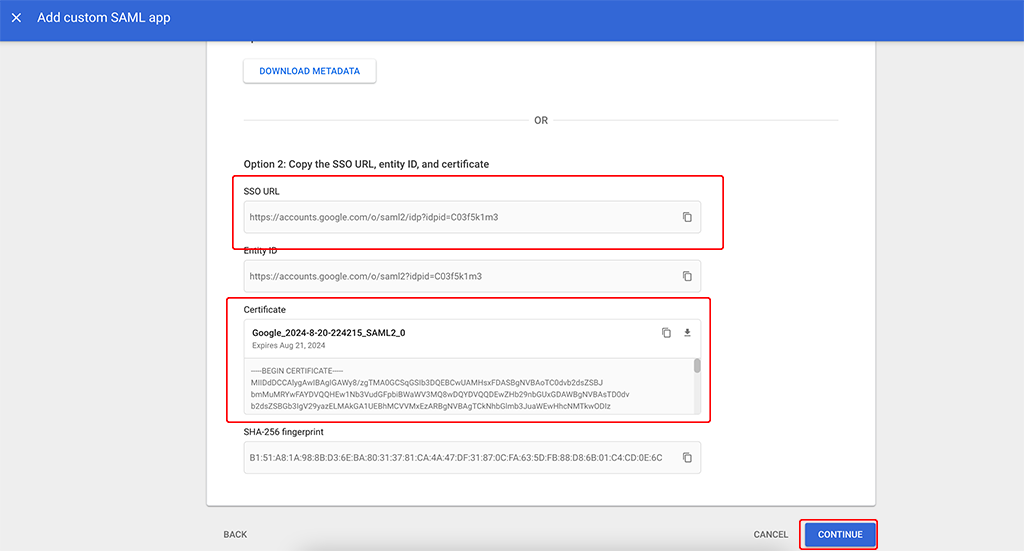
On this page copy the “SSO URL” and download the “Certificate”. Click “CONTINUE” to get to the next page in the wizard:
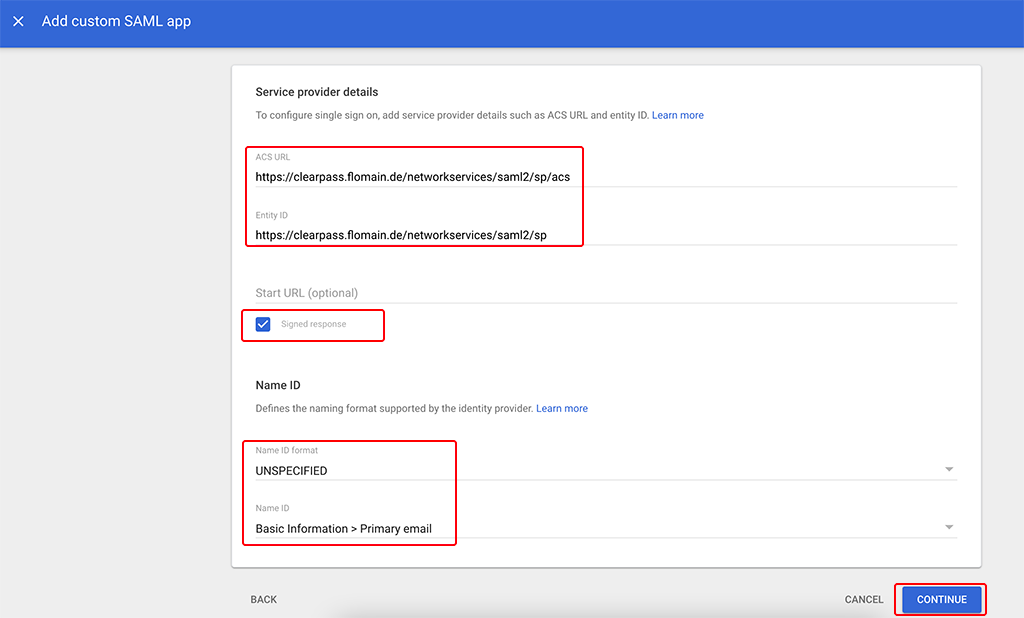
This page is quite important. The page asks for the “ACS URL” and the “Entity ID”. Those are always the same for all ClearPass Installations.
ACS URL
https://<clearpass fqdn>/networkservices/saml2/sp/acs
Entity ID
https://<clearpass fqdn>/networkservices/saml2/sp
For Google Workspace, I was not able to find a way to specify multiple URLs. With Azure this was possible. For one ClearPass system, this is not a problem. But if you are running multiple ClearPass systems or a cluster this is a problem, as all servers will have their own URLs. I solved this by using multiple SAML Apps in Google Workspace. One for every cluster member.
Also, use the “Name ID format” and “Name ID” fields as above in the screenshot.
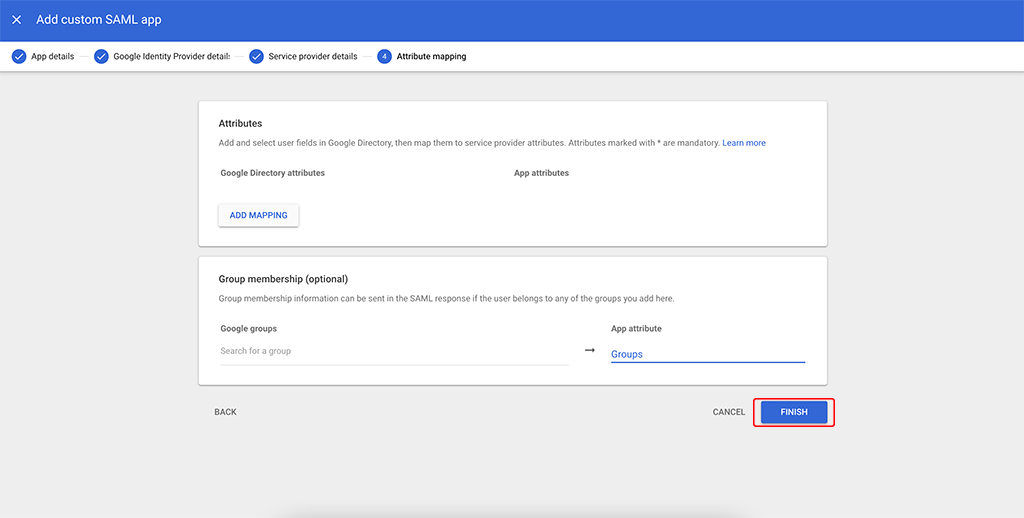
On this last screen simply click the “FINISH” button. We will configure those details later.
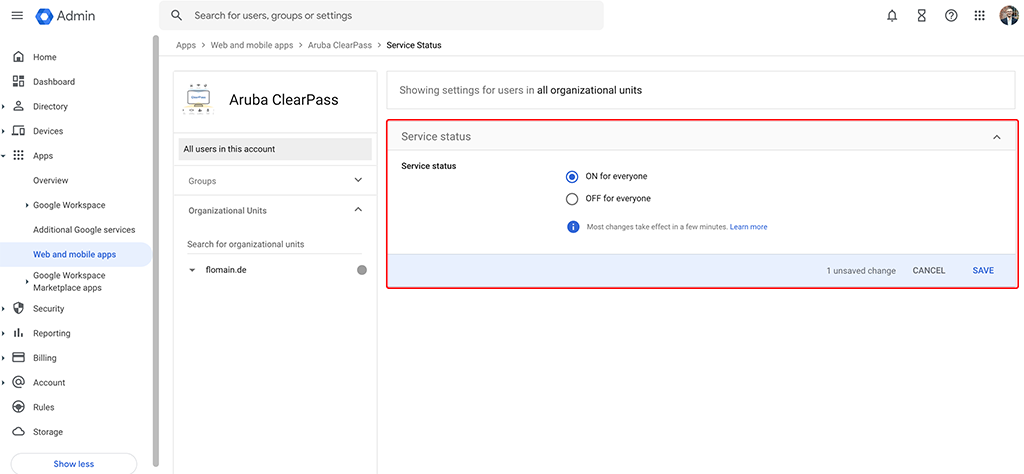
You are sent back to the Apps screen. Select the created app and enable the app for all accounts. I restrict access later using the ClearPass service.
That’s all we need to do for the moment on the Google Workspace site. Let’s head over to ClearPass.
Configure ClearPass SSO
Now, we need to configure ClearPass to use Google Workspace for authentication. Actually, this is very simple, as the steps above 🙂
First, you add the downloaded certificate to ClearPass’s trust store. Go to “Administration–>Certificates–>Trust List” and click the “Add” button:
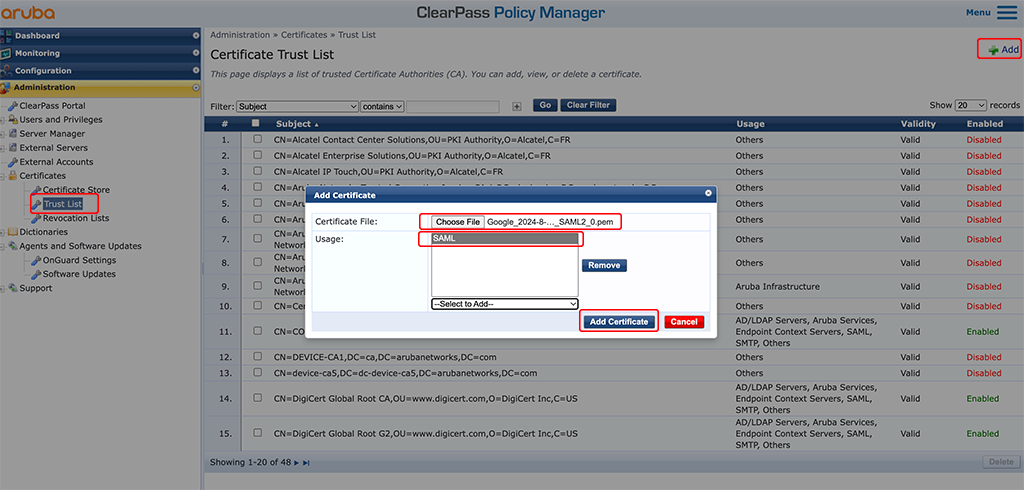
Select the downloaded certificate from above. Use “SAML” as the “Usage” option and click “Add Certificate”.
Afterward, go to “Configuration–>Single Sign-On (SSO)”:
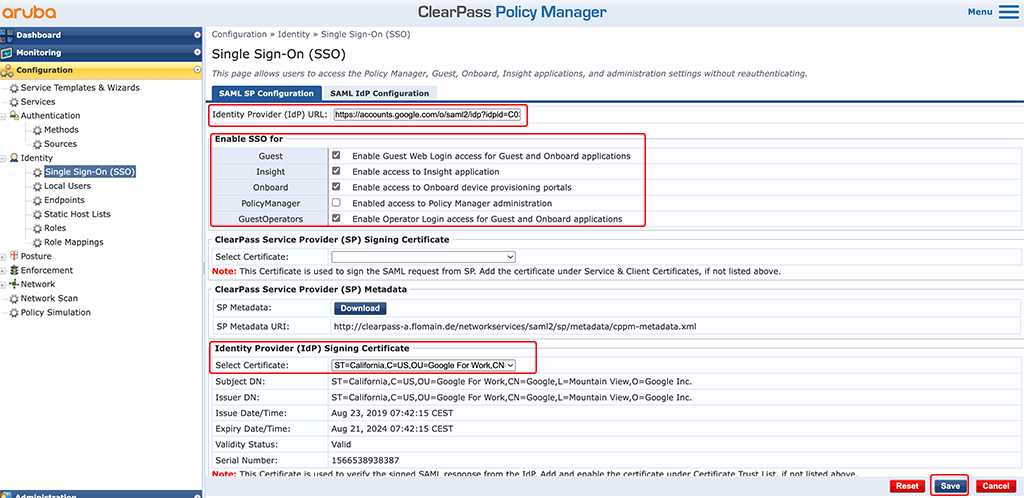
On this page enter the “Identity Provider (IdP) URL”. This is the “SSO URL” from the Google Workspace app.
In the “Enable SSO for” field check the checkmarks as needed. But remember to leave “PolicyManager” unchecked for the moment. I would check this one only after the tests went fine.
In the “Identity Provider (IdP) Signing Certificate” section select the certificate you uploaded previously.
In the following, we will use groups in Google Workspace to assign access rights in ClearPass. To make those groups visible in ClearPass go back to the Google Workspace app and modify the “SAML attributes mapping”:
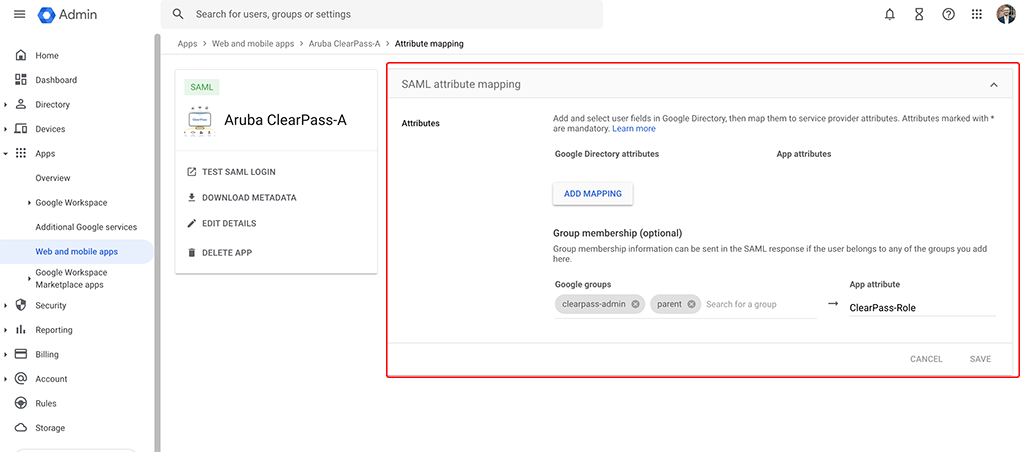
I selected my current important roles “clearpass-admin” and “parent”. In the “App attribute” column enter a name, like the one in the screenshot above. This name will be visible in ClearPass and will have the groups included if the user is part of them. Consider this like the “memberof” attribute in Active Directory.
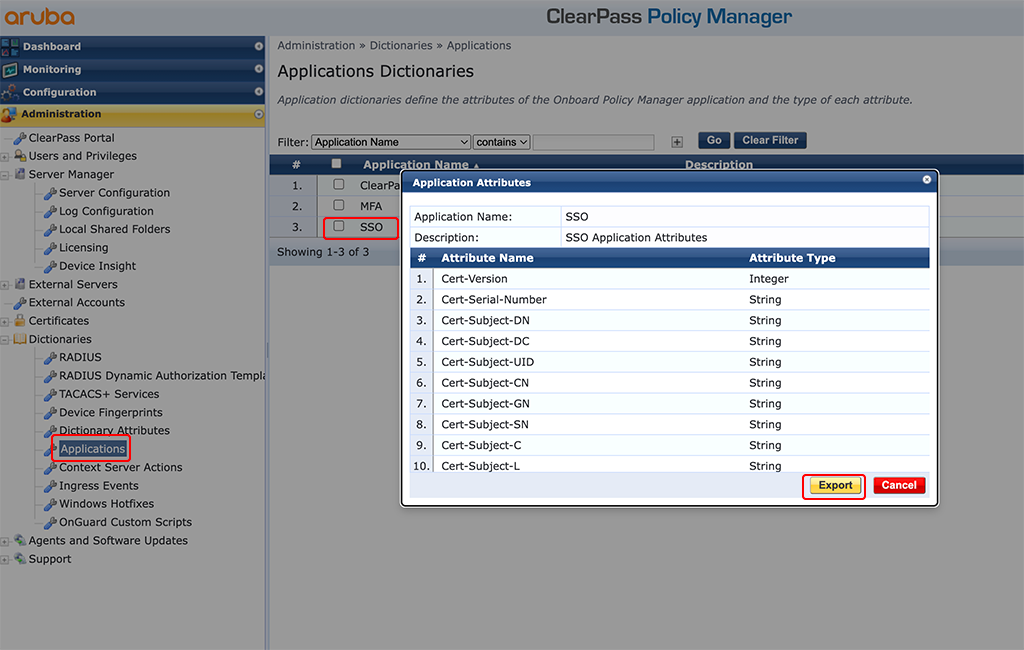
To make this attribute available and usable in ClearPass simply add this one to the “SSO” dictionary. Go to “Administration–>Dictionaries–>Applications” and click on the “SSO” application. In the new windows click the “Export” button and download the dictionary.
Open the downloaded file with a text editor of your choice. I use VisualStudio Code. But any text editor will work.
The dictionary is an XML file and you add the new line to the “ApplDictionary” section:
<ApplDictionaryAttributes attrType="String" attrName="ClearPass-Role"/>The “attrName” should align with your “App attribute” name from the Google Workspace app. You can add more lines if needed to align with your Google Workspace app.
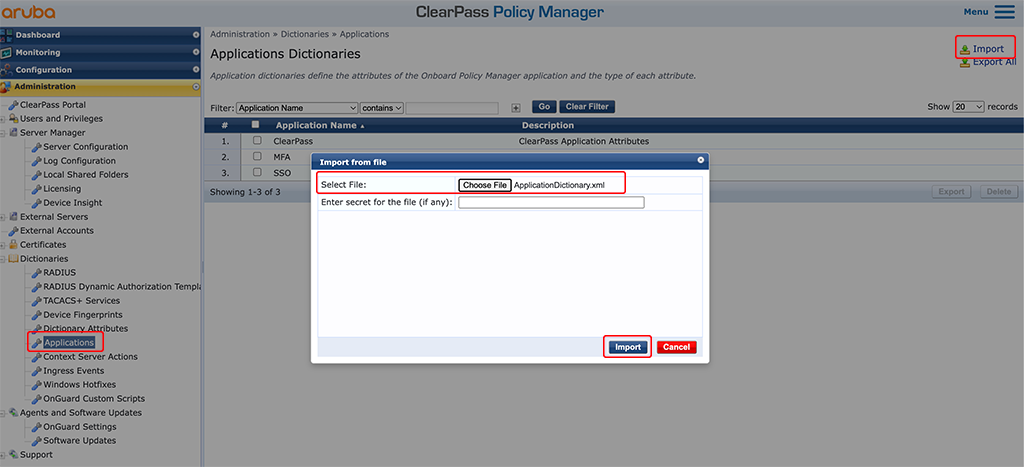
Now, simply import the modified dictionary again:
After the import, you can check if the new attribute is available. Click on the “SSO” application:
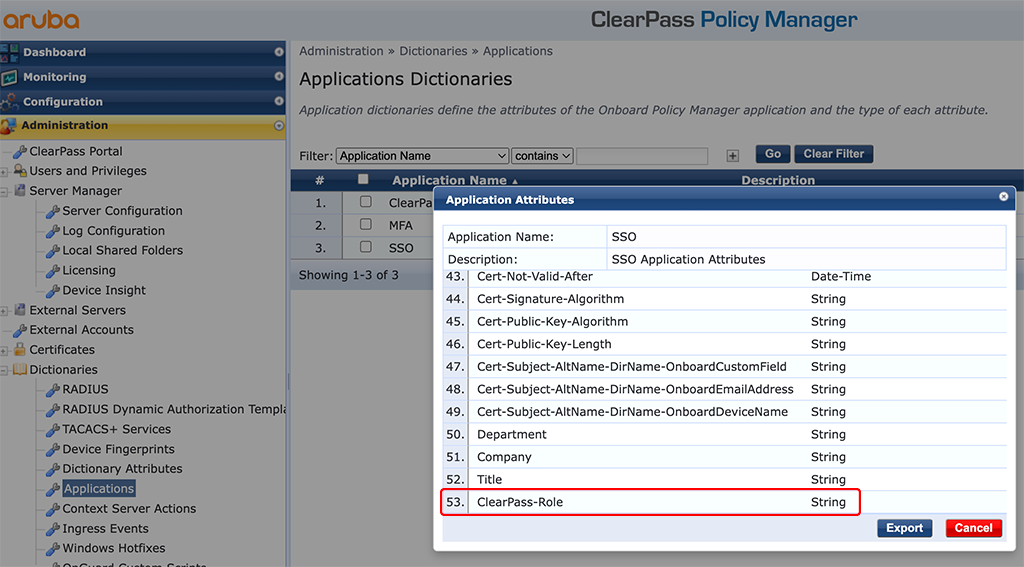
If it is not available, wait a minute and check again. For me, it took a little bit. Might be due to browser caching issues or ClearPass needing some time to load the dictionary correctly.
Create the ClearPass SSO Service
As any authentication in ClearPass, a Single Sign On needs an authentication service as well. I always use role mappings in my authentication services and this one is no exception. To use roles, create a new role in ClearPass or use one of the existing roles. To create a new one go to “Configuration–>Identity–>Roles” and click the “Add” button:

Simply enter a “Name” for the role and click the “Save” button.
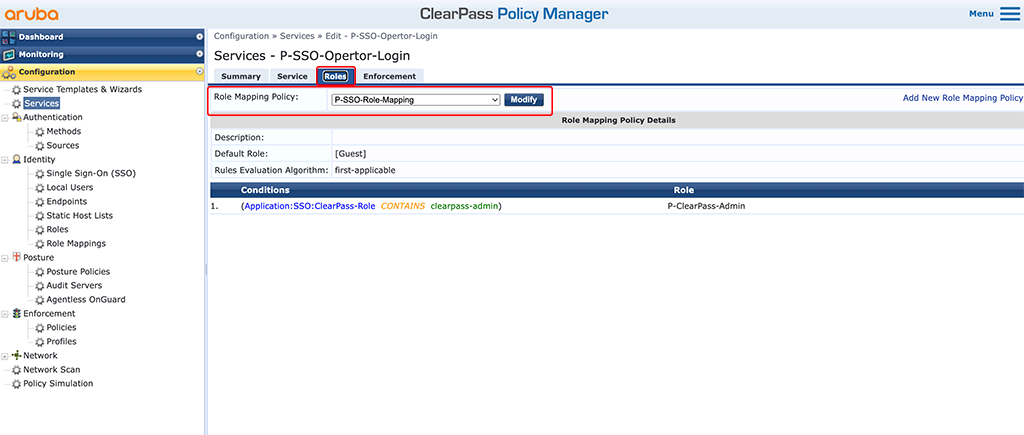
The next step is to create a role mapping to use the created role from above. Go to “Configuration–>Identity–>Role Mappings” and modify an existing role mapping or add a new one:
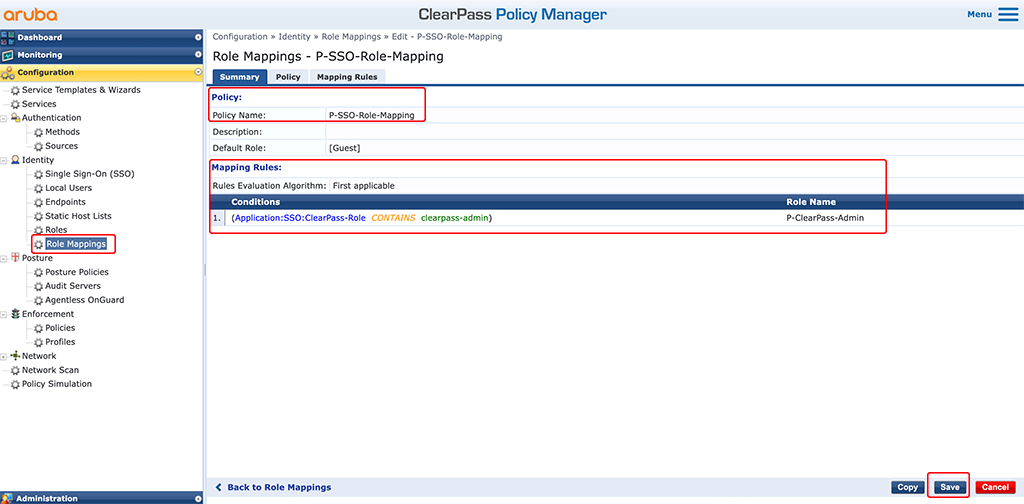
First, add a “Policy Name”. I often use the “[Guest]” role as the “Default Role”. The important part is the “Mapping Rules” section. For the setup, described above, you only need one mapping. I assign the created role from the step before, to everyone who is part of the “clearpass-admin” group in Google Workspace. The information about the group membership is in the “Application:SSO:ClearPass-Role”.
The next step is to create an “Enforcement Profile”. This one will actually tell the authentication requestor what to do. Go to “Configuration–>Enforcement–>Profiles” and create a new profile:
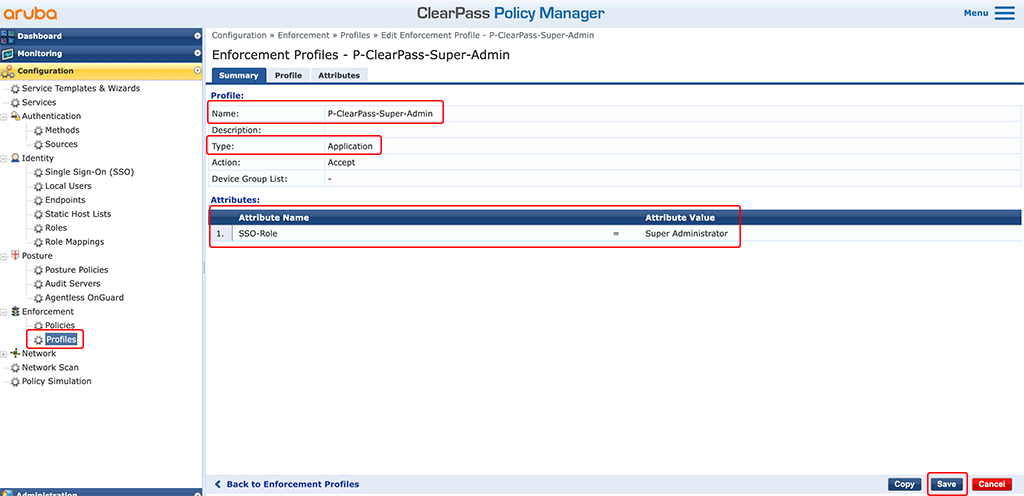
Select a descriptive “Name” for the profile and select “Application” for the “Type”. For this type of setup, you only need one “Attribute”. As this profile should allow full management access to ClearPass, select the “Super Administrator” for the “SSO-Role”. If you created different user profiles within ClearPass, add additional “Enforcement Profiles” for each and select those in the “Attribute Value” column.
To use the “Enforcement Profile” create an “Enforcement Policy”. Go to “Configuration–>Enforcement–>Policies” and add a new policy:

Again, select a descriptive “Name” and select “Application” for the “Enforcement Type”. The “Default Application Access Profile” should be the “[Deny Application Access Profile]”. So, if no rule matches, access is denied. If you require a different behavior, you can change this to your needs.
I only have one simple rule. Thanks to the role mapping, we did some steps before, I can use this role, the “P-ClearPass-Admin” role, and match the created “Enforcement Profile” to all users with this role. Add additional roles to your needs and keep track of the order of rules. In my case, the rule with the most privileges should be the first and those with the second most privileges second… I think you got the logic.
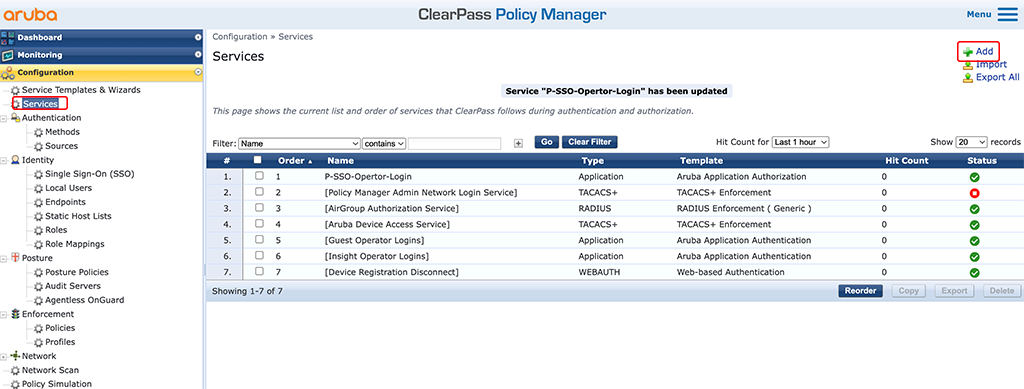
In the final step, we bring everything together. Create a “Service” and use all the policies and role mappings we created before. Go to “Configuration–>Services” and create a new service:
A new wizard will open and you can configure the service:
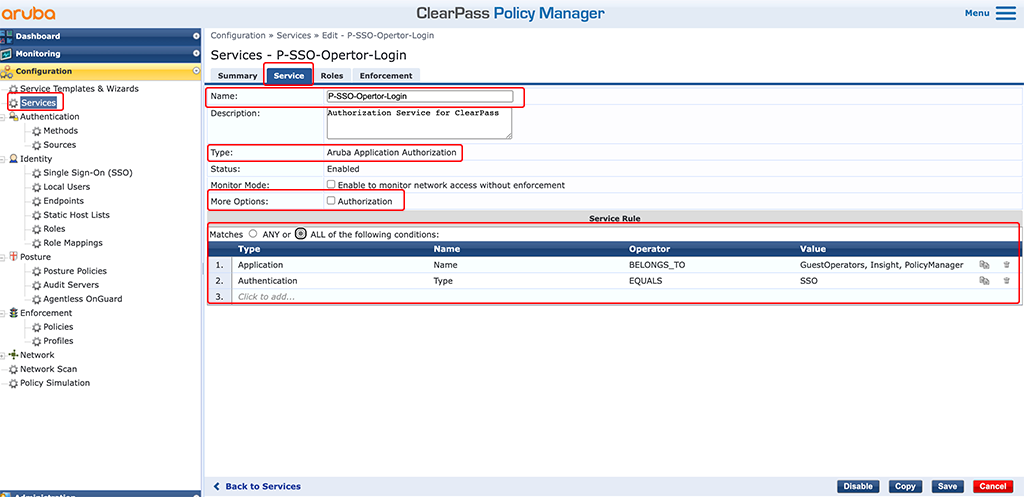
As always, select a descriptive “Name” for the service and select “Aruba Application Authorization” for the “Type”. Uncheck the checkmark for “Authorization” under “More Options”. Create the “Services Rules” as in the screenshot above. For the “Application Name” select all parts of ClearPass you have selected in the SSO configuration.
In the “Roles” tab select the “Role Mapping” we created previously.

In the “Enforcement” tab, select the “Enforcement Profile” we created earlier.
Afterward, your service is ready and you can check by trying to log in.
Access Tracker Results
After you tried to log in check the “Access Tracker”. You will see all details about the login and you can troubleshoot if something goes wrong.
The “Summary” tab reveals all the important information. We see that the correct “Service” is used. We also see the assigned “Roles” and “Enforcement Profiles”.
In the “Input” tab you can see the “ClearPass-Role” attribute. The one we configured in Google Workspace.
The “Output” tab shows details about the return values. In this case “Super Administrator”.
All that is as expected and actually it is as easy as described above. Do you use SSO (SAML) to login to ClearPass or other services?
If you find this post useful, leave me a comment and share your feedback with me. You can also buy me Pizza, using the “Buy me a Pizza” button on the right, to support this blog and keep the IT gremlin happy.
If you would like to do me a favor, share this post with your friends and social media contacts. This would really help to make this blog more popular and help others to find the information above more easily using search engines.
Share on:
Can it be used as “user authentication” for network access?
Hi Jose,
not sure what you are looknig for, but you cannot use SSO to get access the network, but there are two options:
1. You can use a web login with SSO to allow users to gain network access, but it would not encrypt the connection (if wireless)
2. You can use SSO to onboard devices with a certificate and use the certificate for TLS based aushtentication against the network.
The last one would be my recommendation, as it is the most secure one.
I’m currently writing a post about exactly this topic. I hope I can get it done within the next weeks. If it is ready, let me know if this is whyt you are looking for.
BR
Florian
Hi Florian,
Option 1 is something I am keen to look into. Im struggling with the web login settings to get this working though .
Any help would be greatly appreciated
Hi David,
the workflow is the same, as with any other web login page you have, except, that you need to select “Single Sign-On – enable SSO for this Web login” for “Pre-Auth Check” in the weblogin configuration. Make sure, to have a service which will accept SSO requests for the “Guest” application. For my quick test I used acopy of the service from above and replaced the GuestOperators, Insight and PolicyMAnager selection with Guest. If succussfull, the normal guest login process kicks in to authenticate the user/mac address.
I hope this helps.
BR
Florian
Going to try this tomorrow morning for one of my customers. Thanks for the great info and details! Sam