I discovered that EVE-NG supports a lot of Aruba Stuff and in this post, I will show how to get it running in EVE-NG.
I did a first post on this with the topic on how to install EVE-NG in Azure here:
https://www.flomain.de/2020/11/eve-ng-in-azure/(opens in a new tab)
This was related to EVE-NG in Azure, the following post is related to EVE-NG. You can do this with EVE-NG in Azure or in every other supported environment.
EVE-NG Management Interface
As I’m running EVE-NG in the cloud I’m not directly connected to my EVE-NG VM. To get access to the network devices, I use the EVE-NG VM as a hoping server. For this, I do two things.
First, I do local port forwarding through the SSH session in order to access the EVE-NG WEB UI and also to access the UI’s of the network devices in my labs.
Second, I created an internal management network for all my network devices within EVE-NG. EVE-NG uses Cloud networks to connect the virtual world with the real world. The first Cloud network is always bound to the first ethernet interface. If you are in a local installation, you can also use this Cloud network, as all your virtual devices will then be able to get an IP from the same network as the EVE-NG server itself.
But as my VM is running in Azure this will not help me. So I created a second network, only available at the EVE-NG server itself. I used Cloud network 2 for this. In order to make this work open the “/etc/network/interfaces” file and modify the existing “pnet1” interface like this:
# Cloud devices
iface eth1 inet manual
auto pnet1
iface pnet1 inet static
    address 172.16.1.1
    netmask 255.255.255.0
    bridge_ports eth1
    bridge_stp off
Now I can use the “172.16.1.0/24” network to get access to my virtual devices from the EVE-NG host or through my SSH tunnel, using port forwarding.
If I would like to access host”172.16.1.100″ through the SSH tunnel the command for the connection would look like this:
ssh -i CloudStation/Cert/PublicKey/eve-ng_key.pem -L 8080:eve-ng-lab.flomain.local:80 -L 8081:172.16.1.100:443 [email protected]The important option is this one:
-L 8080:eve-ng-lab.flomain.local:80 -L 8081:172.16.1.100:443I will forward the port “8080” to port “80” in the EVE-NG host itself and port “8081” to port “443” on the host “172.16.1.100” which is my NetEdit server.
That way, I can reach everything within my cloud based lab.
ArubaOS CX in EVE-NG
So let’s start to bring some devices online. First I would like to start with the simplest to install. All you need is to download the OVA of the ArubaOS CX switch. I’m using the latest one which is 10.05.0020.
You need to upload the OVA to the EVE-NG host. I always create a temporary working directory were I do all the following stuff:
mkdir tempI than move the OVA into this directory and change to this directory as well:
mv ArubaOS-CX_10_05_0020_ova.zip temp/
cd temp/
Now you need to unzip the file:
unzip ArubaOS-CX_10_05_0020_ova.zipAnd unpack the OVA itself:
tar -xvf ArubaOS-CX_10_05_0020.ovaYou now have access to the virtual disk of the ArubaOS CX switch. This one needs to be converted to be compatible with EVE-NG:
/opt/qemu/bin/qemu-img convert -f vmdk -O qcow2 arubaoscx-disk-image-genericx86-p4-20200929130400.vmdk virtioa.qcow2The name for the new virtual disk is very important. How to name this disk can be found here:
https://www.eve-ng.net/index.php/documentation/qemu-image-namings/
After you created the virtual disk you need to create a folder, where EVE-NG will find the disk. All images need to go into this folder:
/opt/unetlab/addons/qemu/In this folder, you need to create subfolders for different devices. They must start with the device name. This name can be found on the page mentioned above. After a “-” you can write whatever you need. In most cases, this will be the version number. For my example it would look like this:
sudo mkdir /opt/unetlab/addons/qemu/arubacx-10.05Now copy the created image (virtual disk) into this folder:
sudo mv virtioa.qcow2 /opt/unetlab/addons/qemu/arubacx-10.05/The last step is fix some permissions:
sudo /opt/unetlab/wrappers/unl_wrapper -a fixpermissionsNow, you can add the device into EVE-NG to your lab. The configuration file is already present in EVE-NG:
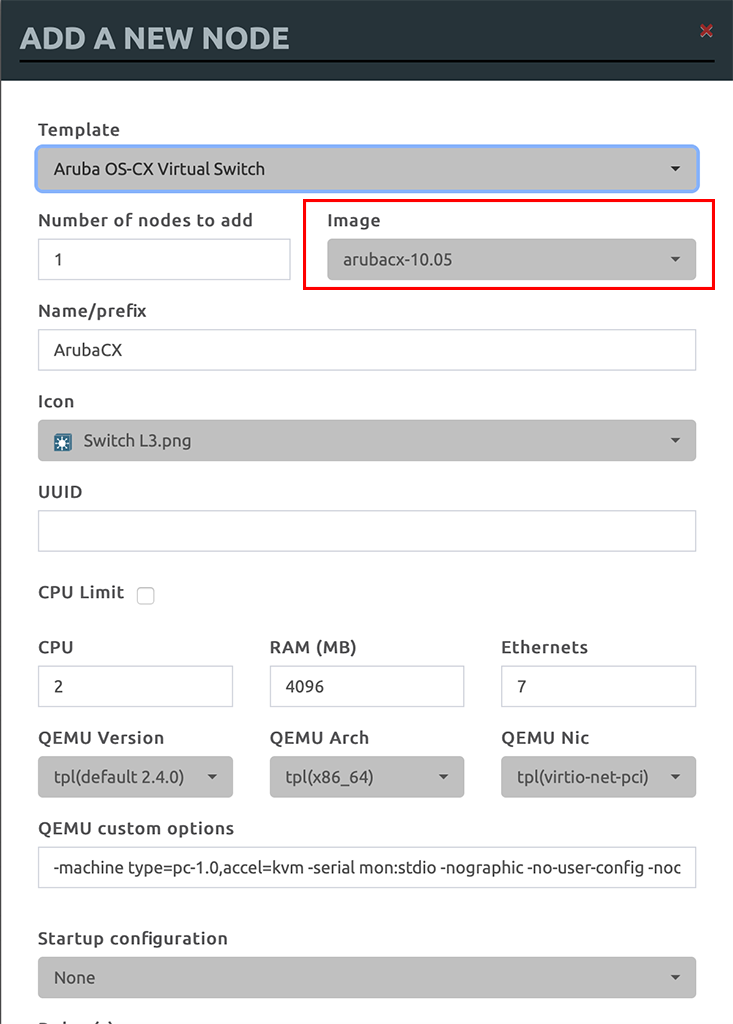
As you can see, the “Image” dropdown allows you to select, based on the folder name we created above. Here you can have multiple versions available. That is all you need to do. Simply press the “Save” button on the bottom of the window and the switch will be added to your lab.
NetEdit in EVE-NG
Now let’s start to do something more complicated. Let’s add NetEdit to EVE-NG. This is not natively supported, yet. But it’s still very simple to add NetEdit. First, you need to figure out what kind of CPU is running in your system. Use this command “sudo lsmod | grep ^kvm_” to figure it out:
sudo lsmod | grep ^kvm_
kvm_intel             212992  0
In my case it is an Intel CPU. There for the config files are located here:
/opt/unetlab/html/templates/intel/If you would run an AMD CPU you would find the config file here:
/opt/unetlab/html/templates/amd/To get NetEdit into EVE-NG we need a config file for NetEdit. One option would be to create a new one, but it is much simpler to use something which is already there. I use the ClearPass config file. To do so, simply copy that file:
sudo cp /opt/unetlab/html/templates/intel/clearpass.yml /opt/unetlab/html/templates/intel/netedit.ymlNow open the file and do some modifications:
type: qemu
description: Aruba NetEdit
name: NetEdit
cpulimit: 1
icon: Network Analyzer.png
cpu: 2
ram: 8192
ethernet: 1
console: vnc
qemu_arch: x86_64
qemu_version: 2.12.0
qemu_options: -machine type=pc,accel=kvm -serial none -nographic -no-user-config
  -nodefaults -display none -vga std -rtc base=utc
The file should look like the one above. I didn’t include the copyrights in the output above. If the file is ready, you can upload the NetEdit OVA to the server and we will start the same procedure as with the ArubaOS CX switch.
Unzip the the zip file:
unzip Aruba_NetEdit_2.0.9_ova.zipAnd unpack the OVA:
tar -xvf Aruba_NetEdit-2.0.9.ovaAnd convert the vmdk file:
/opt/qemu/bin/qemu-img convert -f vmdk -O qcow2 netedit-2.0.9-disk001.vmdk virtioa.qcow2Now, create the subfolder in the image folder:
sudo mkdir /opt/unetlab/addons/qemu/netedit-2.0.9And move the created image into the new folder:
sudo mv virtioa.qcow2 /opt/unetlab/addons/qemu/netedit-2.0.9/Last step is to fix permissions:
sudo /opt/unetlab/wrappers/unl_wrapper -a fixpermissionsNow you can add NetEdit to your labs as well. But there might be some usability issues right now. Every time you add this image to your lab, you would need to go through the whole installation process. To avoid this, you can go through this process once and apply those changes to the default image. So let’s do this.
So add NetEdit to a lab and start the machine. I will not go through the initial setup of NetEdit. Refer to the manual of NetEdit for this step.
If you have configured NetEdit with all initial settings, shutdown NetEdit. First, you need to get the UUID of the lab. This can be found in the lab details:

Next, you need the pod id. In my case, it is 0, as I’m the admin and the pod id is bound to the user. If you do not use the admin, you can find the pod id in the user settings.
Last but not least we also need the device id:

Putting everything together and we have the working directory for that machine:
/opt/unetlab/tmp/0/502c6fb3-4f0d-45b3-aa93-1ac47fef6c43/2/In this directory, there is a snapshot of the initial image:
$ ls -l
total 10843084
-rw-r--r-- 1 root unl 11103371264 Nov  1 12:54 virtioa.qcow2
-rw-rw-r-- 1 root unl         120 Nov  1 12:55 wrapper.txt
More details can be found here:
$ /opt/qemu/bin/qemu-img info virtioa.qcow2
image: virtioa.qcow2
file format: qcow2
virtual size: 115G (123480309760 bytes)
disk size: 10G
cluster_size: 65536
backing file: /opt/unetlab/addons/qemu/netedit-2.0.9/virtioa.qcow2
Format specific information:
    compat: 1.1
    lazy refcounts: false
    refcount bits: 16
    corrupt: false
Normale, you would simply commit the snapshot like this:
$ sudo /opt/qemu/bin/qemu-img commit virtioa.qcow2
Image committed.
But for some reason, this was not working for me in Azure. So I created a completely new base image from the snapshot like this:
/opt/qemu/bin/qemu-img convert -p -f qcow2 virtioa.qcow2 -O qcow2 new_base.qcow2This will create a new image from the snapshot. Now, I simply replaced the old baseline with the new one:
sudo rm /opt/unetlab/addons/qemu/netedit-2.0.9/virtioa.qcow2
sudo mv new_base.qcow2 /opt/unetlab/addons/qemu/netedit-2.0.9/virtioa.qcow2
Last but not least, you need to fix the permissions:
sudo /opt/unetlab/wrappers/unl_wrapper -a fixpermissionsIf you now add a new NetEdit machine to one of your labs it will already be installed and ready to use. Add always only one machine, as you will get IP conflicts.
ClearPass in EVE-NG
For ClearPass there is already a template available. But I was changing it a little bit:
---
type: qemu
description: Aruba ClearPass
name: ClearPass
cpulimit: 1
icon: Network Analyzer.png
cpu: 4
ram: 8192
ethernet: 2
console: vnc
qemu_arch: x86_64
qemu_version: 2.12.0
qemu_options: -machine type=pc,accel=kvm -serial none -nographic -no-user-config
  -nodefaults -display none -vga std -rtc base=utc
...
I set “cpu” to 4 and “ram” to “8192”. This will make ClearPass running more smoothly.
First you need to upload the KVM image to EVE-NG. Afterwards you need to unzip the archive:
unzip CPPM-VM-x86_64-6.9.0.130064-KVM.raw.zipAfterwards, you need to convert the raw image to a qcow2 image:
qemu-img convert -p -f raw -O qcow2 home/jenkins/KVMImage/CPPM-VM-x86_64-6.9.0.130064-KVM.raw hda.qcow2As ClearPass also needs a second drive we need to create this as well:
/opt/qemu/bin/qemu-img create -f qcow2 hdb.qcow2 100G100G is more than enough for a testing environment.
You need to create a new folder within the image folder:
sudo mkdir /opt/unetlab/addons/qemu/clearpass-6.9.xNow, you can copy the two images into this folder and fix permissions:
sudo cp hd* /opt/unetlab/addons/qemu/clearpass-6.9.x/
sudo /opt/unetlab/wrappers/unl_wrapper -a fixpermissions
You can now start the installation of ClearPass in your lab.
After you have installed ClearPass, activated the licenses and configured ClearPass basics, you can shut down the ClearPass machine again. Now we will make the changes permanent and create a new base image.
Search for the snapshot disks. You can find the path the same way as before for NetEdit. If you have found them (hda.qcow2 and hdb.qcow2) we will create a new base image from them:
sudo /opt/qemu/bin/qemu-img convert -p -f qcow2 hda.qcow2 -O qcow2 new_hda.qcow2
sudo /opt/qemu/bin/qemu-img convert -p -f qcow2 hdb.qcow2 -O qcow2 new_hdb.qcow2
Especially for the second disk, this process can take a while.
Next step is to remove the old image and move the new base image into the image directory:
sudo rm /opt/unetlab/addons/qemu/clearpass-6.9.x/hd*
sudo mv new_hd* /opt/unetlab/addons/qemu/clearpass-6.9.x/
The last step is to rename the images and fix permissions:
sudo mv new_hda.qcow2 hda.qcow2
sudo mv new_hdb.qcow2 hdb.qcow2

sudo /opt/unetlab/wrappers/unl_wrapper -a fixpermissions
Afterward, if you add ClearPass to your labs, it will already be licensed and has the base config. After each software upgrade, you need to repeat the steps above to work with the recent version in your labs.
If you add ClearPass to different labs it could be, that there are no ethernet interfaces configured in ClearPass. This is due to the MAC address change in different labs. If this happens, just log in to the CLI of ClearPass and issue the following command:
system refresh-networkA reboot is required afterwards, but everything should be working when ClearPass is up again.
Aruba Mobility Master in EVE-NG
To install a Mobility Master in EVE-NG you need to create a new template first. I reuse the one for the VMC, which is already included in EVE-NG:
sudo cp /opt/unetlab/html/templates/intel/aruba.yml /opt/unetlab/html/templates/intel/arubamm.ymlI changed the file to look like this:
---
type: qemu
description: Aruba WiFi Mobility Master
name: ArubaVMM
cpulimit: 1
icon: Aruba_ctrl.png
cpu: 3
ram: 6144
ethernet: 3
console: vnc
qemu_arch: x86_64
qemu_version: 4.1.0
qemu_options: -machine type=pc,accel=kvm -serial none -nographic -no-user-config
  -nodefaults -display none -vga std -rtc base=utc -cpu host -smp 3,sockets=1
...
Now, you need to upload the OVA of the Mobility Master to the EVE-NG host and un-tar the OVA:
tar -xvf ArubaOS_MM_8.7.1.0_77203.ovaAnd convert both VMDK files to qcow2:
/opt/qemu/bin/qemu-img convert -p -f vmdk -O qcow2 ArubaOS_MM_8.7.1.0_77203-disk1.vmdk hda.qcow2
/opt/qemu/bin/qemu-img convert -p -f vmdk -O qcow2 ArubaOS_MM_8.7.1.0_77203-disk2.vmdk hdb.qcow2
Now create a new image folder:
sudo mkdir /opt/unetlab/addons/qemu/arubamm-8.7.1.0and copy the two disks into this folder:
sudo cp hd* /opt/unetlab/addons/qemu/arubamm-8.7.1.0/Last step is to fix the permissions:
sudo /opt/unetlab/wrappers/unl_wrapper -a fixpermissionsNow you can add the Mobility Master to your labs.
Aruba Virtual Mobility Controller in EVE-NG
There is already a temple for the VMC in EVE-NG:
sudo vi /opt/unetlab/html/templates/intel/aruba.ymlI have not changed the file as it has all the needed settings. So let’s start to create the images. First, upload the OVA to EVE-NG and un-tar the file:
tar -xvf ArubaOS_VMC_8.7.1.0_77203.ovaAnd convert the two disk files:
/opt/qemu/bin/qemu-img convert -p -f vmdk -O qcow2 ArubaOS_VMC_8.7.1.0_77203-disk1.vmdk hda.qcow2
/opt/qemu/bin/qemu-img convert -p -f vmdk -O qcow2 ArubaOS_VMC_8.7.1.0_77203-disk2.vmdk hdb.qcow2
Next step is to create a folder for the images and copy the images into this folder:
sudo mkdir /opt/unetlab/addons/qemu/aruba-8.7.1
sudo cp hd* /opt/unetlab/addons/qemu/aruba-8.7.1/
Don’t forget to fix permissions:
sudo /opt/unetlab/wrappers/unl_wrapper -a fixpermissionsYou can now start the VMC and use it in your labs.
After following all the steps above you have all virtual stuff from Aruba within your EVE-NG and you can start quite big lab environments.
If you find this post useful, leave me a comment and share your feedback with me. You can also buy me Pizza, using the “Buy me a Pizza” button on the right, to support this blog and keep the IT gremlin happy.
If you would like to do me a favor, share this post with your friends and social media contacts. This would really help to make this blog more popular and help others to find the information above more easily using search engines.
Share on:
Can you really run all of this with an 8GB of RAM? Which Azure Virtual Machine did you end up running this on?
Which Azure VM did you select in order to run all of these VMs?
Hi George,
I used the small VM only for making the screenshots for this blog. My real VM is a “Standard D16s_v4 (16 vcpus, 64 GiB memory)”. With this one I already have created labs with NetEdit, ClearPass and 10 CX Switches, without running out of memory. Actually, there was still a lot of free memory for more.
BR
Florian
Thanks!
Hi Florian,
Can we access Aruba controller GUI using this?
Hi Feiz,
sure, you just need to make sure, that you have IP connectivity with the VM in EVE, using the cloud networks. It depends on your environment how you should configure this.
BR
Florian
Hi Faiz,
sure, you just need to make sure, that you have IP connectivity with the VM in EVE, using the cloud networks. It depends on your environment how you should configure this.
BR
Florian
Hi Florian,
Can I emulate AP(Aruba IAP) version on EVE for full lab environment test?
Thank you.
Hi Vinicius,
This would be really great, but unfortunately not.
BR
Florian
Hi Florian,
I have tried to add the CX Switch in EVE-NG (Versions 10.05 and 10.06 as well) from the official eve-ng page and from your step by step guide as well, but after that the ArubaCX is not listed under the templates (new node – template list). Both versions are visible in the newly created folders under /opt/unetlab/addons/qemu (converted file virtioa.qcow2).
Any help will be appreciated!
BR
Stanislav
I have sorted it out – “apt update” and “apt upgrade” solved the issue for me 🙂
Hi Stan,
thanks for sharing your solution. My first guess would be to check if the config file is correct. If a simple update solved your issues, even better 🙂
BR
Florian
Hi Florian,
Editing the config file is not that easy job, which also ends up in not being able to login into eve (this was the result at least for me :D).
Maybe a helpful link for the templates: https://gitlab.com/eve-ng-dev/templates/-/tree/master/intel
If something is missing and an update is not solving the issue, the desired template can be downloaded and copied to the templates folder in eve. But a simple update should add all supported technologies under the template list.
Cheers
Hi Florian,
First of great writings, very easy to follow and understand. You should consider teaching. QQ – in regards to your permanent VM, would you mind sharing the yearly cost? I’m considering my options either to buy a power full PC or built it in Azure.
cheers!
mg
Hi Max,
thanks for the feedback. Really appreciated.
I do not run the VM all the time, but only if I need it. This dramatically reduces cost. My monthly costs are around 100$. Depending on how much I need the VM.
Many thanks,
Florian
Hi Florian,
Great post very helpful, just trying to understand how the licence for clearpass and mobility master/controller works in eve-ng, as we need to give serial no etc of mobility master/controller to generate eval license so is it same process if we go with eve-ng?
Hi Andy,
Yes, licensing is the same. For ClearPass I can say, that you need to license it only once and even with a new (different mac) it will use the license.
The licensing on the controllers will be lost after creating a new device (which will create a new MAC for the device).
Many thanks,
Florian
Hi Florian,
I added the MM using the same steps that you mentioned.
Unfortunately i can see the MM in the drop down to add the device – however it appear to be Greyed Out.
Do you know what could be the issue ?
Hi rahul,
from what you wrote it is hard to tell. If the entry is there, you have at least configured it correctly. If it is greyed out the system is not able to find the image files. You should check if the folder is in the correct place and named correctly. Make also sure, that the access rights are correct.
BR
Florian
Hi Florian,
How well do you usually configure CX switches? I have a technical problem I want to ask you !
Hi Zhang,
I configure them on a regular basis so feel free to ask.
But I would also recommend going to the Aruba Community here:
https://community.arubanetworks.com/community-home?CommunityKey=22dc38ea-a1e1-4059-b55e-a622fedecf32
There are a lot of experts who can help you out.
BR
Florian
Hi Florian,
I have followed all the steps to add the VMC in eve-ng, but its showing still booting from the hard disk. How can resolve the error. please help me.