The ClearPass RestAPI is powerful and has many helpful options during authentication, e.g. sending a mail as a notification. The following post will show, how to use the ClearPass RestAPI during authentication for different tasks.
In my scenario, I will create an entry in the Guest Device Repository, if the mac address is unknown and send an email to an admin to assign a role to the created device.
I use only two RestAPI calls for this scenario. Those highlight how easy it is to use the ClearPass RestAPI.
Create a ClearPass RestAPI Client
The first step is to create a client to authenticate against the RestAPI using Oauth2. To create the client, go to “Administration–>API Services–>API Clients” in the ClearPass Guest module and use the “Create API client” link in the top right corner:
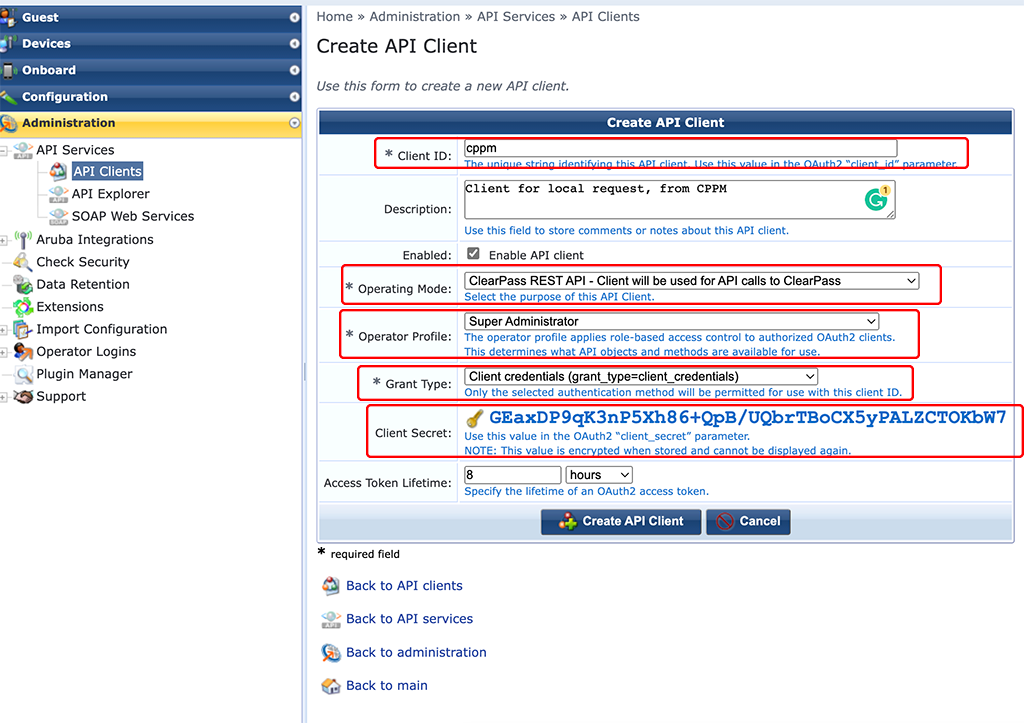
This opens a new window with many options. First, set the “Client ID”. Set the “Operating Mode” to the setting in the screenshot above. If you choose the other option, you will also need to create a service. The option above works without additional services and is best if there is no real client, in our case, it is the ClearPass server and no client, behind the requests. I choose the “Super Administrator” for the “Operator Profile”, you can adapt this to your needs. The “Grant Type” should be the same as above in the screenshot. The important part here is the “Client Secret”. Make a note of this secret and keep it secret. The one above is not used 🙂
Create Endpoint Context Server and Context Server Actions
The next step is to create the “Endpoint Context Server”. This one will use the ClearPass RestAPI client from above, to send requests against the RestAPI.
To create an “Endpoint Context Server” go to “Administration–>External Servers–>Endpoint Context Servers” and use the “Add” button:
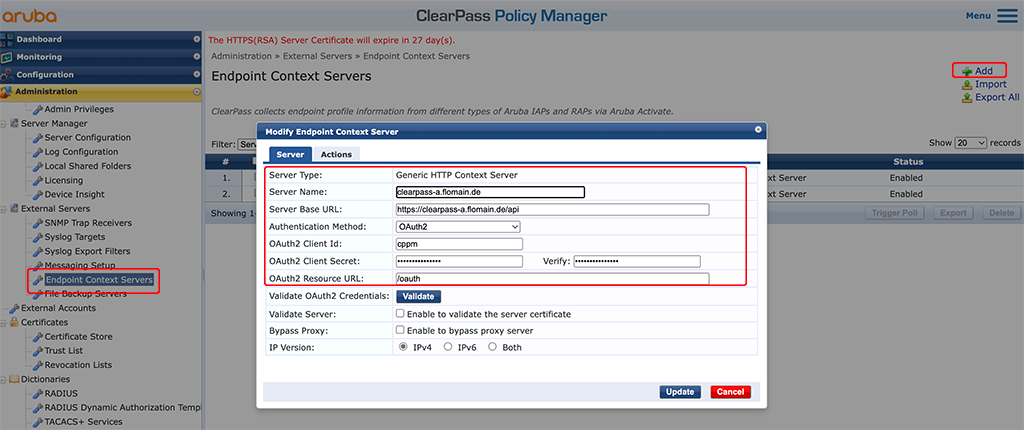
Select “Generic HTTP Context Server” as the “Server Type”. The “Server Name” should be a reachable IP or DNS name. From the “Server Name” ClearPass creates the “Server Base URL”. I just added “/api”.
For “Authentication Method” select “OAuth2”. The “Oauth2 Client Id” and the “Oauth2 Client Secret” is used from the “API Client” from above.
The “Oauth2 Ressource URL” is the one to authenticate the client. For ClearPass simply use “/oauth”.
Press the “Validate” button to check the connection. Afterward, save everything.
The last step is to create a “Context Server Action”. This action defines what to send to the ClearPass RestAPI and to which API endpoint. Go to “Administration–>Dictionaries–>Context Server Actions” and use the “Add” button to create a new action:
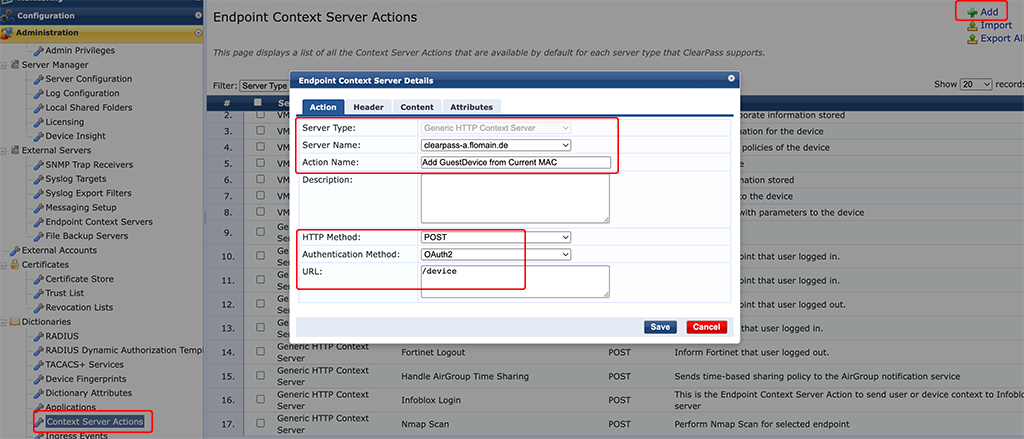
The “Server Type” should be “Generic HTTP Context Server” and in the “Server Name” drop-down select the created “Endpoint Context Server”.
Use a descriptive “Action Name”. That’s the one you will use in your enforcement profiles.
The “HTTP Method” for my request is “POST”. Check yours in the API. The “Authentication Method” is “OAuth2” and the “URL” is “/device”.
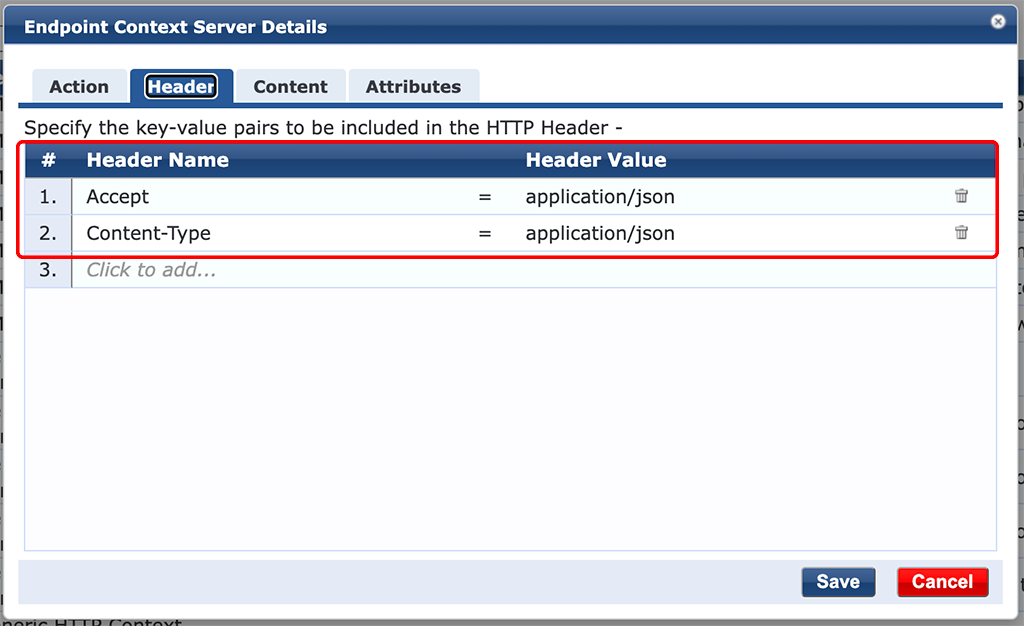
For all requests against the ClearPass RestAPI, you must add the headers above.
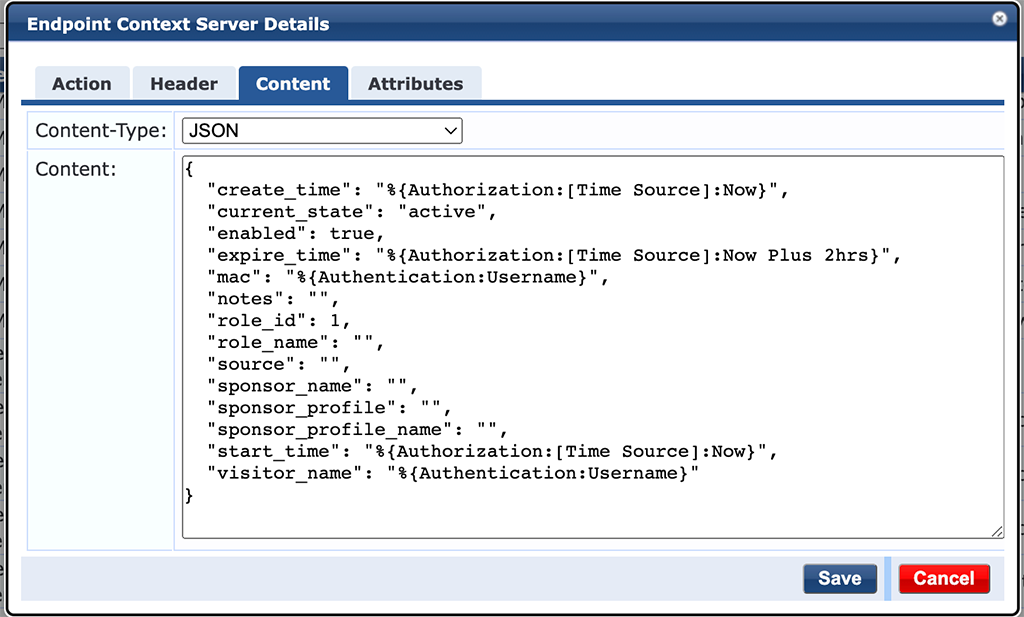
In the “Content” tab select “JSON” for the “Content-Type”. The actual “Content ” is the one below:
{
  "create_time": "%{Authorization:[Time Source]:Now}",
  "current_state": "active",
  "enabled": true,
  "expire_time": "%{Authorization:[Time Source]:Now Plus 2hrs}",
  "mac": "%{Authentication:Username}",
  "notes": "",
  "role_id": 1,
  "role_name": "",
  "source": "",
  "sponsor_name": "",
  "sponsor_profile": "",
  "sponsor_profile_name": "",
  "start_time": "%{Authorization:[Time Source]:Now}",
  "visitor_name": "%{Authentication:Username}"
}
This one is copied from the API documentation and modified with some variables and static content. I will not go into details, as those are often used variables in other enforcement profiles as well.
I created a second action to send a mail, whenever a new device is created. Most of the settings are equal to the one above. The “URL” is “/email/send” and the “Content” is:
{
    "to": ["[email protected]"],
    "subject": "New Device Added: %{Authentication:Username}",
    "message": "New Device added to ClearPass \nPlease check the following URL and accept the device: \nhttps://clearpass-a.flomain.de/guest/mac_list.php",
    "cc_recipients": [],
    "bcc_recipients": []
}
Again, the “Content” is copied from API and modified to my needs.
That’s all that is required. You can now use the actions in your profiles to create policies.
Example of Using the ClearPass RestAPI
In my case, I use the RestAPI to create new unknown devices in the Guest Device DB. In my home lab, I use the Guest Device DB as an authentication source for internal devices. To make it easy to add them to this DB, I use the RestAPI. Every new, unknown device is automatically added to the Guest Device DB and I just need to assign a role to the device to make it work as expected.
I use the actions from above in two Enforcement Profiles:

This profile creates a new Device in the Guest Device Database.
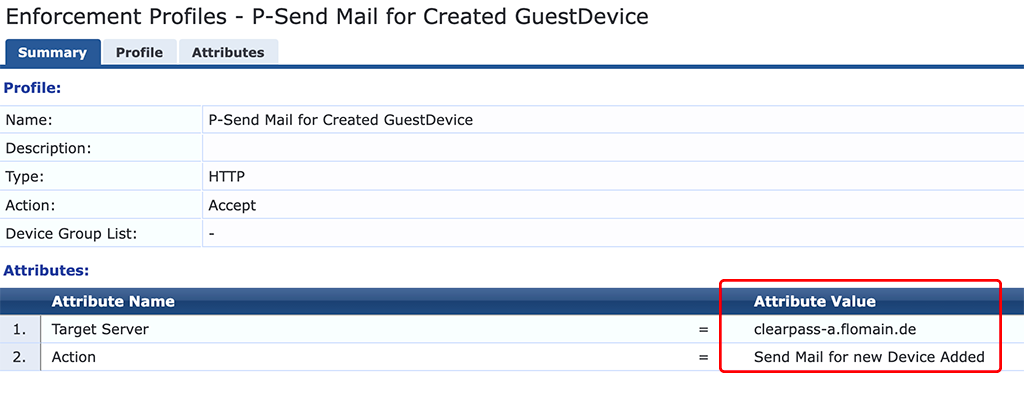
The profile above sends an email when used in a policy.
I have an Enforcement Policy that assigns roles to devices in my home. If no role can be assigned the policy has a default rule which always applies. This rule is using the two profiles above:
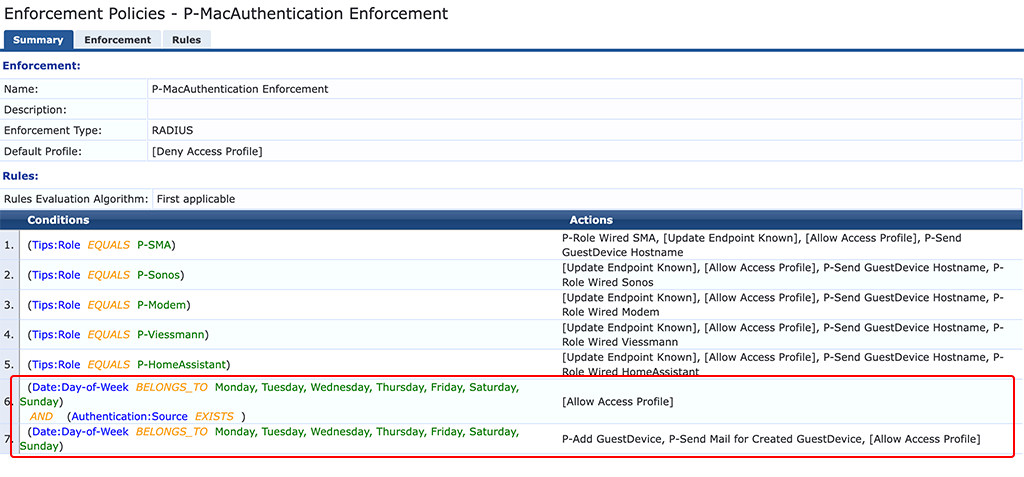
The policy has two default rules. Rule number 7 fires if the device is not present in the Guest Device DB and creates the device. Rule number 6 is fired if the device is present in the Guest Device DB, but I haven’t modified the role.
I have a simple mac authentication service. This service is using the default guest role mapping and the Enforcement Policy from above. To make it work, the service also uses the Endpoints Repository und and the Time Source DB for authorization.
If a new MAC is authenticated by ClearPass we see the following entry in the Access Tracker:
We see the “Enforcement Profiles” from above.
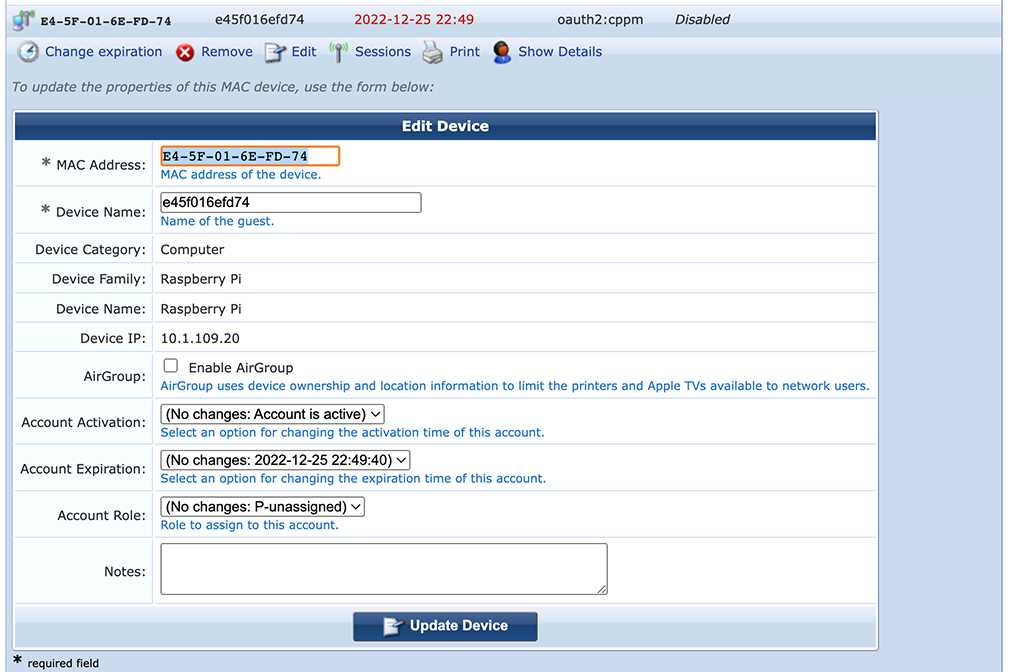
We see that the device was added/registered by “oauth2:cppm”, which is our RestAPI client from the beginning of the post.
We also see all important parts filled, like the “MAC Address” and the “Device Name”. The cool part, no typos while adding the mac address.
I now change the “Device Name” to something meaningful and change the role to the desired one. After “Update Device” is pressed a CoA is sent and the device is fully operational online.
That’s really easy and a good example of how powerful the ClearPass RestAPI can be. Feel free to create your own actions and make use of the ClearPass RestAPI.
If you find this post useful, leave me a comment and share your feedback with me. You can also buy me Pizza, using the “Buy me a Pizza” button on the right, to support this blog and keep the IT gremlin happy.
If you would like to do me a favor, share this post with your friends and social media contacts. This would really help to make this blog more popular and help others to find the information above more easily using search engines.
Share on:
Wow, your articles are awesome.
Hi,
thanks, really appreciated.
Many thanks,
Floran
I found this article incredibly useful.. 🙂 Thank you for sharing this..
What a cool article! This could be really useful for me. I have a requrement to send an email whenever a device gets dropped into a captive portal vlan , only issue would be that you’d get an email every time the device auth.d and with a short reauth time there could be lots of them.
Hi Alex,
Thanks for the comment. Great feedback.
Maybe you can create some kind of rate limit by using the endpoint database together with a timestamp to only send a mail if there is no timestamp for that device or the timestamp is far enough in the past like one hour or one day, what ever suits your needs.
BR
Florian
Hello! The use of timesource doesn’t seem to work. The value isn’t replaced it seems – as I see in the Application Log that the Time Source is unchanged and just identical as entered. Any idea what that is about? I do have Time Source as an authorization source.
Hi John,
thanks for your comment.
Do you see the attribute in the access tracker under authorization?
BR
Florian