For an urgent project, I was asked to set up a Remote Mesh, and actually, I was thinking it is an easy task as I had created mesh networks before. But Remote Mesh is a different beast and it took me more than three days to get this working. To help others with this kind of setup I will write down my experiences with this setup. Maybe it will save you three days.
How does Aruba Remote Mesh works
In this post I assume you know how Aruba Mesh works and I will use terms form Aruba Mesh.
Aruba Remote Mesh works differently than mesh networks with Campus AP’s. The main difference is, that for a Remote Mesh, the IPSec connection of the RAP (acting as the portal) is used to transfer the user traffic and Management traffic of the mesh pointer. The mesh pointer AP’s will be normal Campus AP’s. Only the Remote Mesh Portal (RMP) will be a RAP. Below is a topology of the setup:
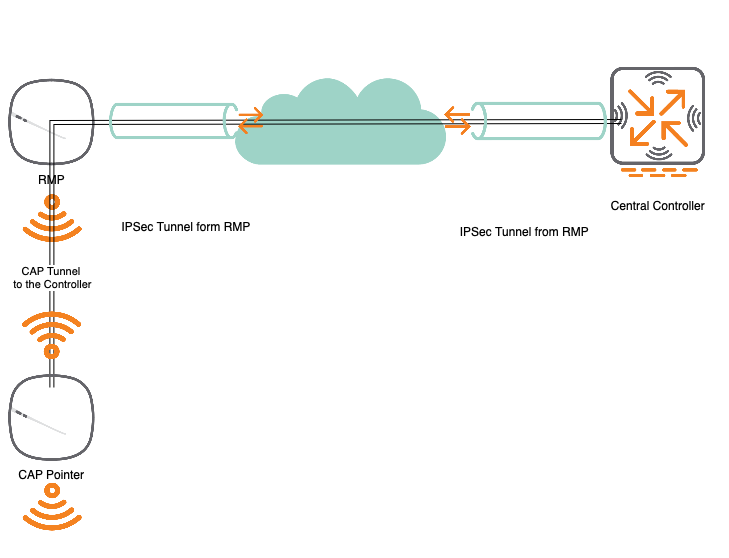
The Setup looks simple. But actually, it takes some time to get everything. But let’s start from the beginning.
- First, you need a RAP (Remote AP) connected to the controller. This RAP is provisioned to be a Remote Mesh Portal.
- For Remote Mesh Portals (RMP’s) you need to configure a Private Mesh VLAN (PMV). This PMV is tunneled back to the controller through the IPSec tunnel from the RMP.
- If a Pointer (these are normal Campus AP’s) connects to the Remote Mesh, the management VLAN of the Pointer is within the PMV.
- Within the PMV, the Controller is the DHCP server and can communicate directly with all the Pointer AP’s.
- The Pointer behaves like a normal CAP and creates different tunnels to the controller through the PMV.
Everything clear? Let’s start the configuration.
Configure Aruba Remote Mesh
I will use 8.6.0.6 for this setup. I will also assume you know how to handle the controller and the configurations. I will also assume that the RAP is already connected to the controller. Same for the AP which will be used as the pointer.
My Remote Mesh Portal (RMP) is the RAP225. My pointer is named CAP305. My Private Mesh VLAN (PMV) is VLAN 50. The setup I did works only internally, so I will not use a public address for my controller. In real-world scenarios, the controller needs a public IP (preferable a public DNS name as well) and RAP’s should connect to the public IP (DNS name).
I have tested Remote Mesh also with a controller cluster. But this was not working at all. So I use a standalone controller for the test. You can also use MD’s, managed by a mobility master, for the setup. Just make sure to not create a cluster. You might use VRRP for redundancy.
To start the configuration create the PMV first. Go to “Configuration–>Interfaces–>VLANs” and create a new VLAN:
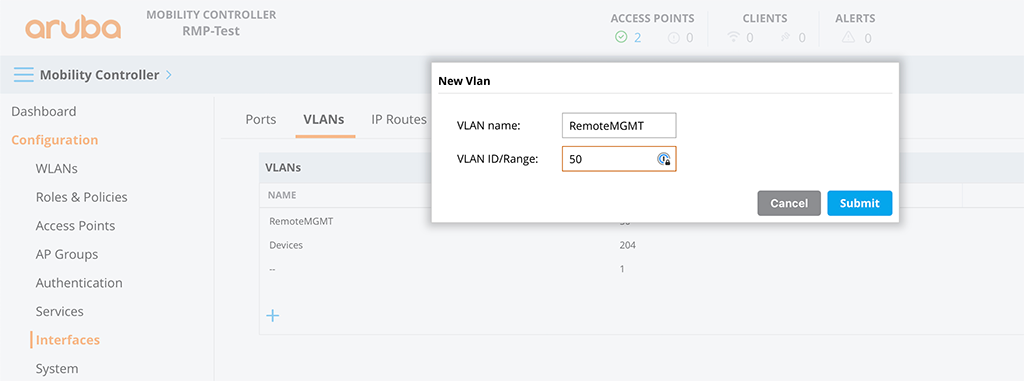
This one is used to allow the CAP, running as Mesh Portal, to communicate with the controller. Afterward, assign an IP to the VLAN for the controller:
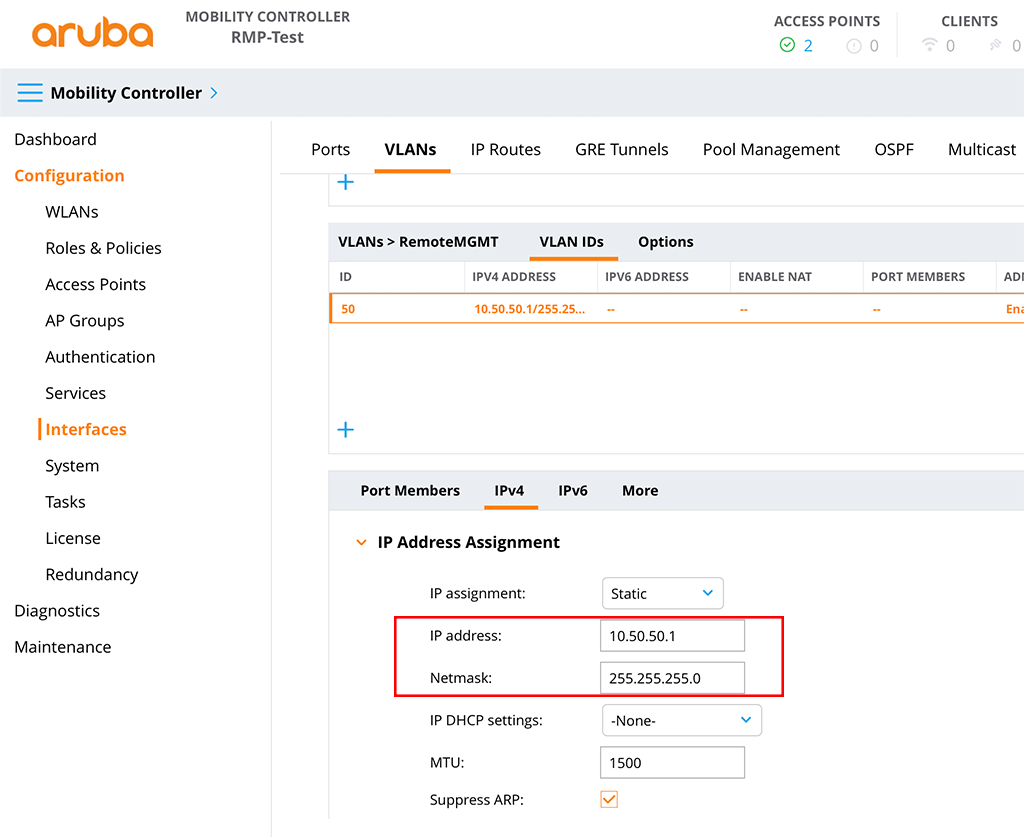
Make sure to not use this subnet somewhere else. The network is only used between the controller and CAP’s. It will not appear anywhere else.
The last step is to create a DHCP server for the PMV. To create a DHCP server pool go to “Configuration–>Services–>DHCP”. First, check the checkmark for “IPv4 DHCP server”. Afterward, create a new pool:
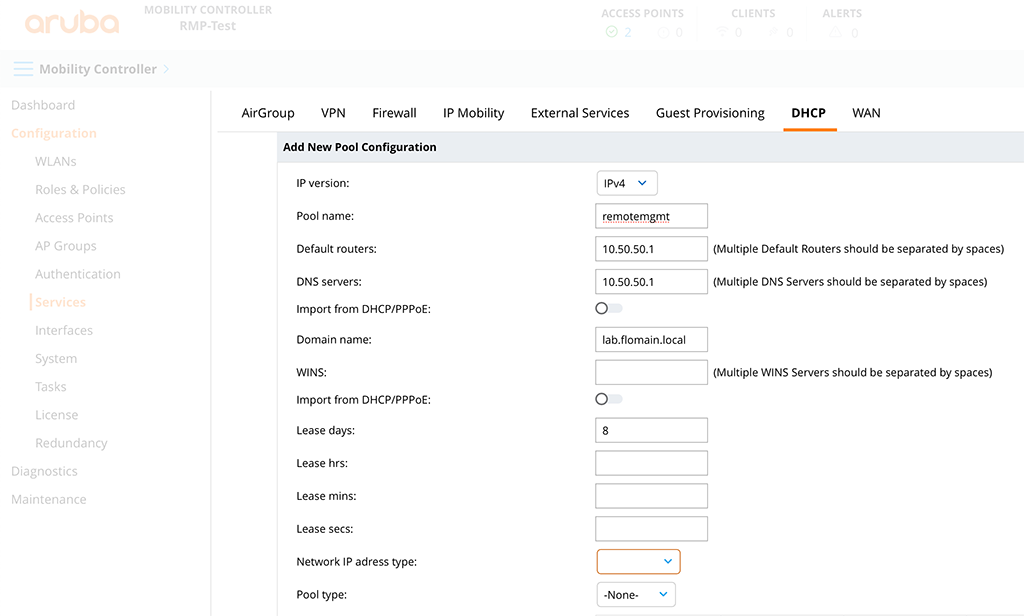
The assignment of the pool to the correct interface is done automatically by the controller.
The next step is to create the mesh-related profiles. To create those profiles go to “Configuration–>System–>Profiles” and in the profiles tree go to “Mesh–>Mesh Cluster” and create a new mesh profile:
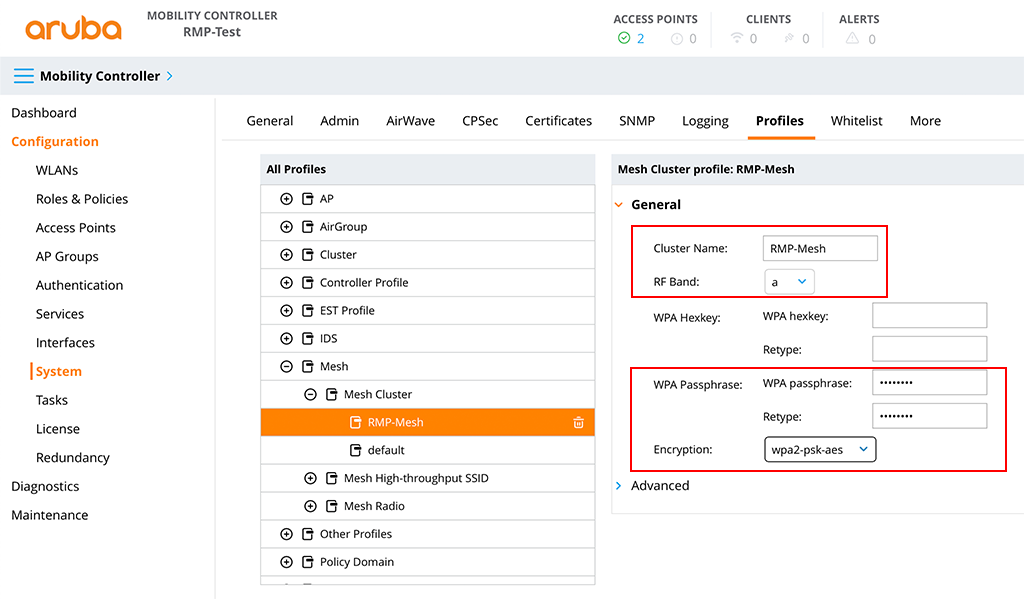
The important parts are the “Cluster Name” and the “Encryption”. I would also leave the “RF Band” with “a”. The “g” band is too crowded.
The next one is the Mesh Radio profile. I just reused the default one and save it with a different name:
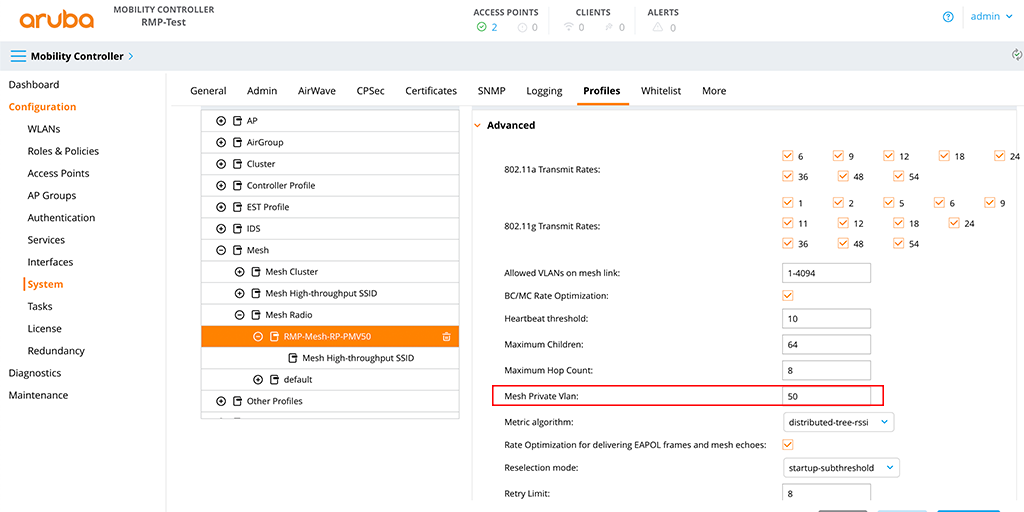
The important part is the “Private Mesh VLAN”. Set this to the VLAN ID create above.
The next part is not that obvious but very important to get the whole thing working. Either a VAP (Virtual AP) or a Wired AP profile with split-tunnel and the PMV is needed to make it work. If you have an AP with two ethernet ports I would prefer the Wired AP profile. If you don’t, you can create a VAP as well.
The Wired AP Profile is quite simple. In the “All Profiles” page go to “AP–>Wired AP” and create a new profile with the PMV as the “Access mode VLAN” and “split-tunnel” for the “Forward mode”:

Next create a new “AP wired port”. To do so, go to “AP–>AP wired port” and create a new one:
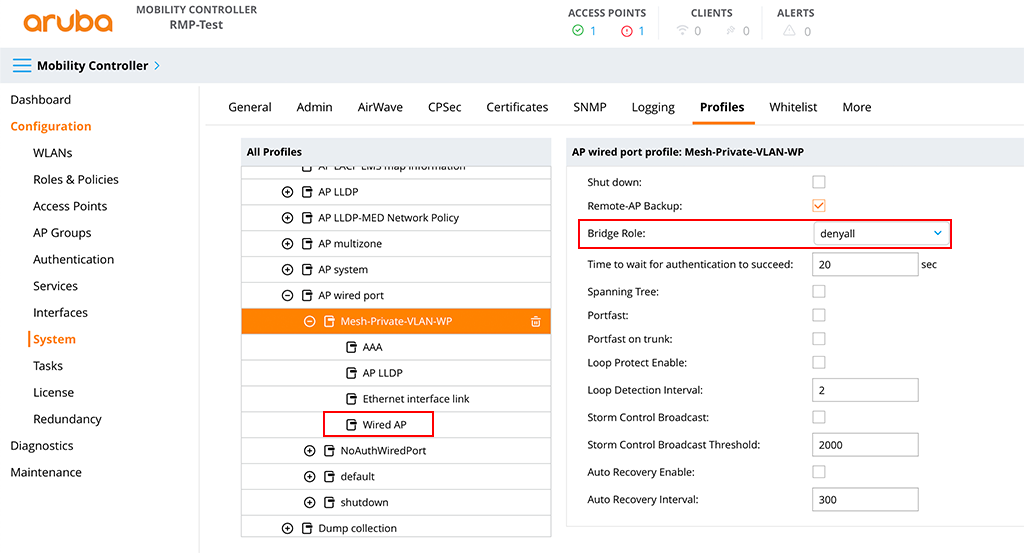
I use the “denyall” role for the “Bridge Role”. Just to make sure no clients connect to the port by accident. Also, use the “Wired AP” profile from above in the new “AP wired port” profile.
If you do not have a RAP with at least two ethernet ports you need to create a VAP. Therefore go to “Wireless LAN–>SSID” in the “All Profiles” screen and create a new SSID. The name does not matter. For simplicity I use a WPA3 PSK based SSID and set the following settings:
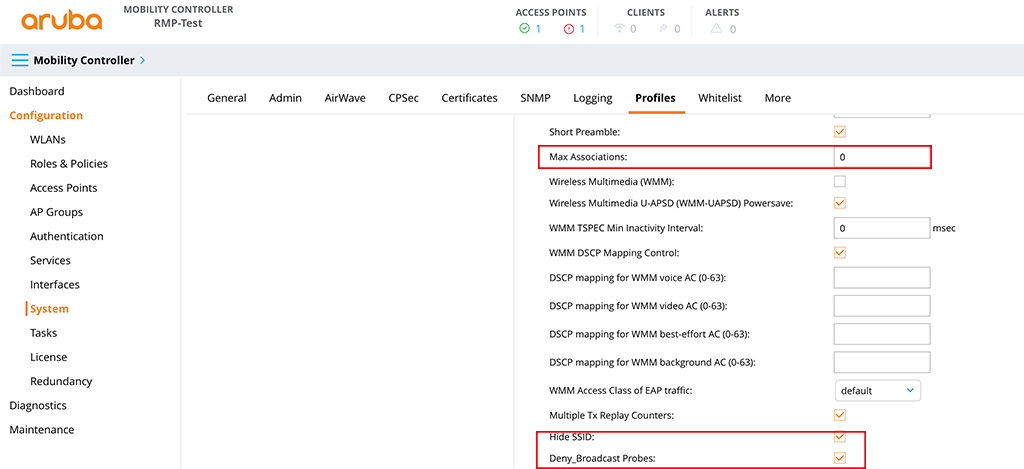
The “Max Associations” is set to 0 to make sure no client can connect and “Hide SSID” and “Deny_Broadcast Probes” es enabled to make the SSID invisible in the air. At least for the normal users.
Apply this new SSID to a new VAP profile. Go to “Wireless LAN–>Virtual AP” and create a new one:
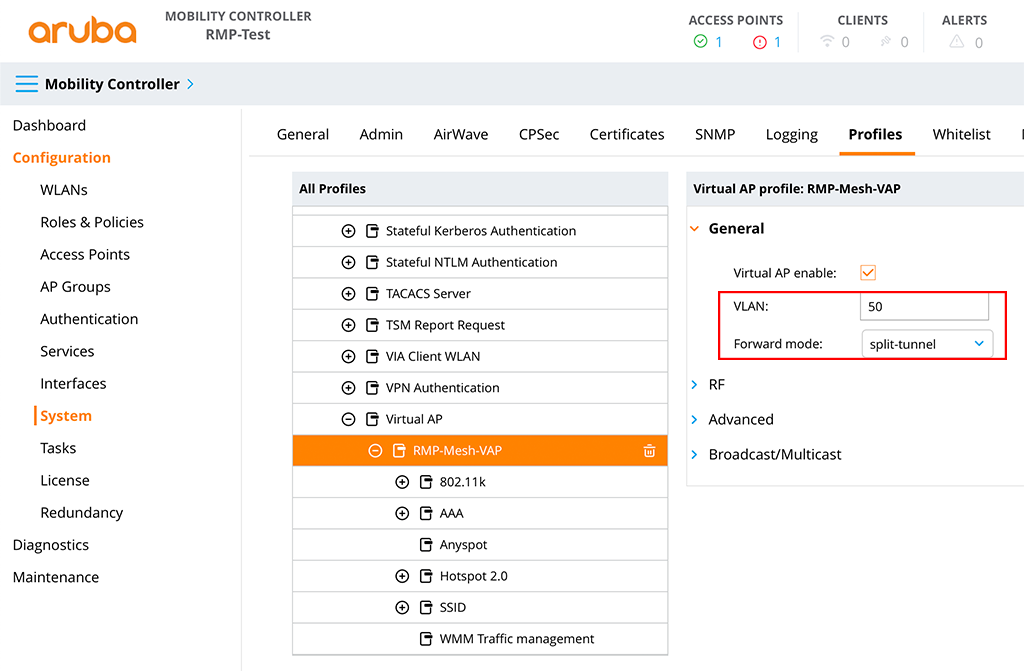
Set the PMV for the “VLAN” and use “split-tunnel” for the “Forward mode”. Also, add the created SSID profile from above to the VAP.
With the configuration above, no one can connect to this SSID, but if you want to be sure, you can set the “denyall” role in the “AAA” profile as well. This will also deny all traffic for SSID.
Next, create two new AP groups. I use one for the Mesh Portals and one for the CAP’s acting as the pointer. Just go to “Configuration–>AP Groups” and create a new group by clicking the “+” sign:
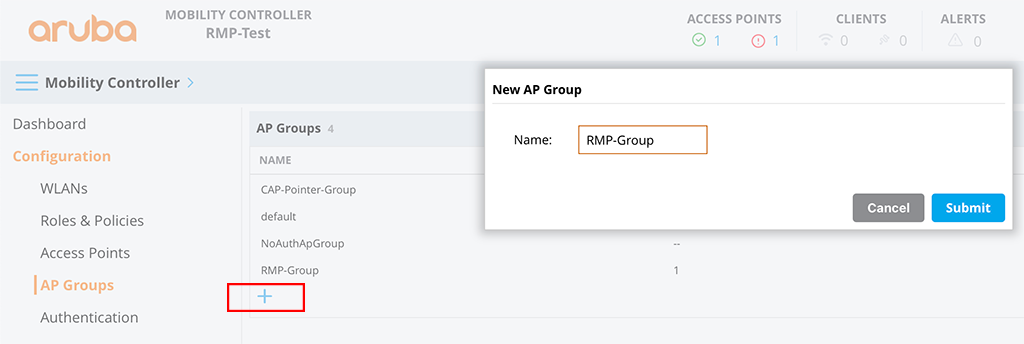
Repeat this for the group for the CAP’s.
Let’s start to configure the “RMP-Group”. Select the group and go to “Profiles”. If this is not visible, you need to activate “Show advanced profiles” in your user preferences.
You will now see the list of all profiles assigned to this group. Go to “AP–>Ethernet interface 1 port configuration” and select the created wired port profile for “AP wired port profile”:
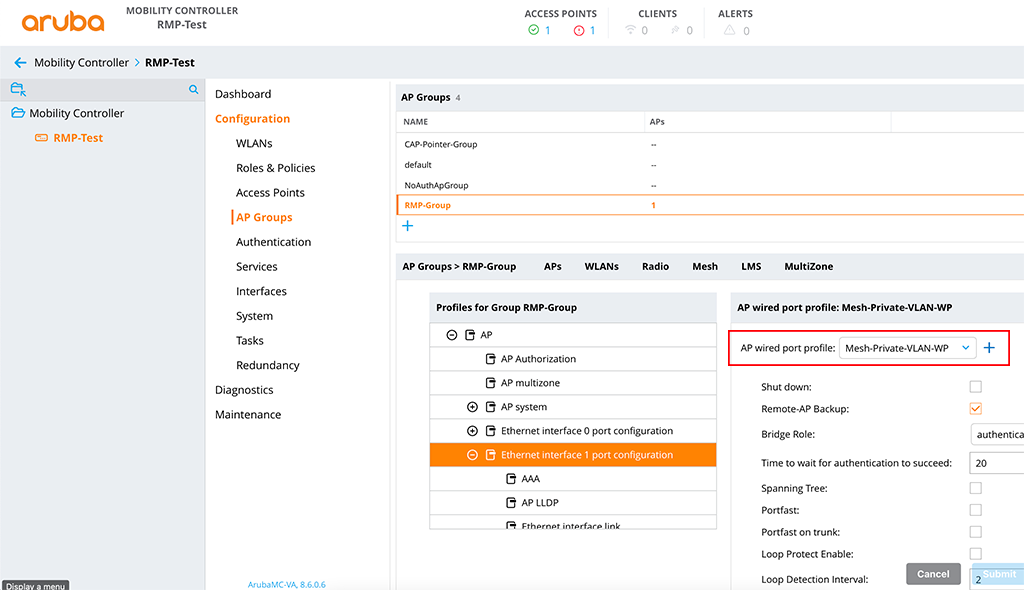
If you do not need the wired port or your AP does not have more than one wired port you can also apply the above-created SSID (the one with the PMV).
The next step is to apply the mesh profiles. In the screen with all the profiles go to “Mesh–>Mesh Radio” and select the created mesh radio profile for “Mesh Radio profile”:

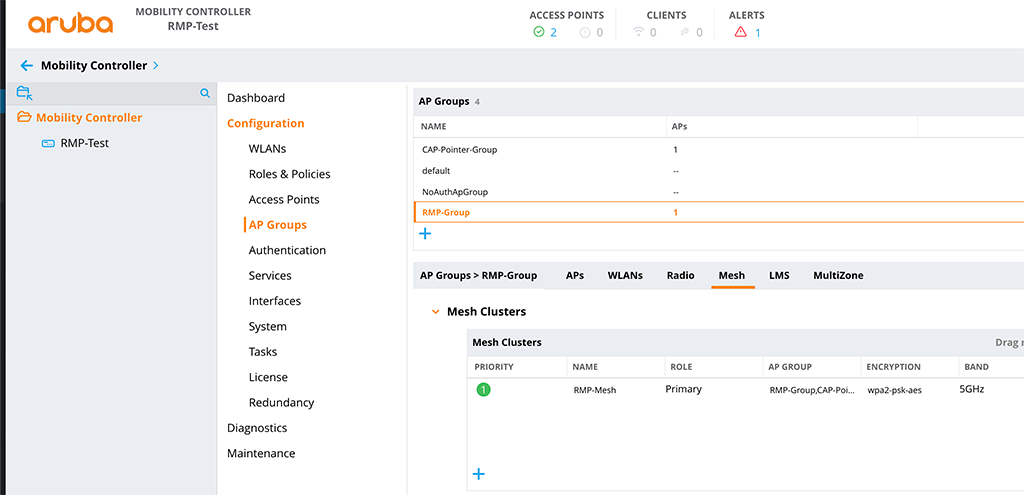
The last step for this group is to add the mesh cluster profile to the group. Select the “Mesh” tab for the group and in the “Mesh Clusters” table click the “+” sign to add the created “Mesh Cluster Profile”:
Now, head over to the group for your campus pointer AP’s. Apply the “Mesh Cluster Profile” and the “Mesh Radio Profile” the same way as above.
Additionally, you can also apply your SSID for the clients in the group for the campus pointer AP’s as well.
Provision AP’s for Aruba Remote Mesh
The final step to get this working is to provision your AP’s. In my setup, I have only two AP’s, one will serve as the Remote Mesh Portal and one will work as the Campus Mesh Pointer. Both AP’s are already online and connected to the controller.
You can also deploy all AP’s onsite if you have a remote AP with at least two ethernet ports. First, you need to use activate to provision the RAP with the controller. If the RAP is online you can use the additional ethernet port to connect the campus AP to the controller as well. For this you need an external power supply for the campus AP (and the remote AP as well if you do not have a PoE-enabled switch). This also assumes that you allow the connection to the wired port of the RAP. For that, you cannot use the “denyall” role for the “Bridge Role”.
To provision your AP’s go to “Configuration–>Access Points”. Here you need to select the tab which is valid for your AP. If both of them are Campus AP’s select the “Campus AP’s” tab. This is the case for me. If your RAP is already a RAP because of Activate provisioning select the “Remote AP’s” tab.
Select your AP and press the “Provision” button:
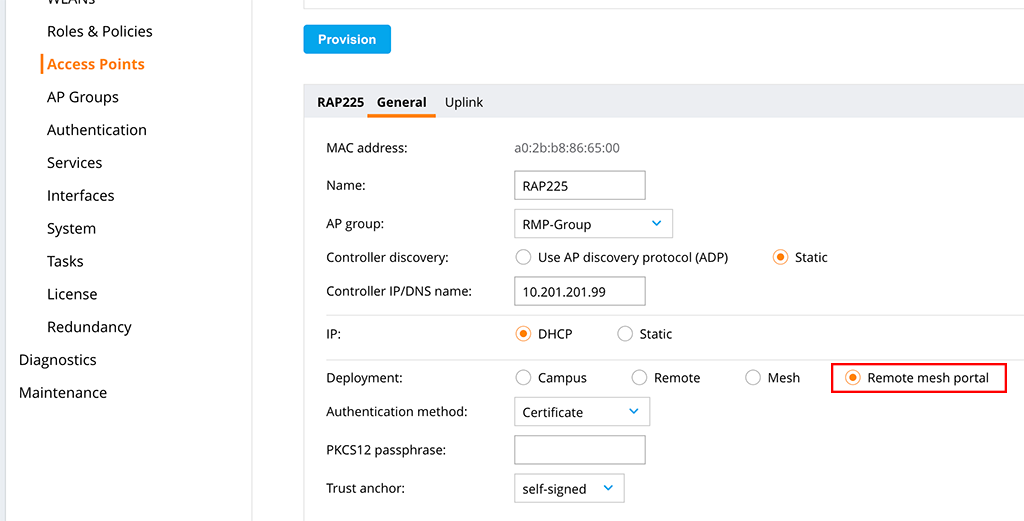
The important part is to provision the AP as a “Remote mesh portal”. All other settings are specific to your environment but those above should work for most environments. Don’t forget to replace the “Controller IP/DNS name” with your IP/DNS name and select the correct “AP group” as well.
Click the “Submit” button and wait for the AP to connect back to the controller.
Now you can start to provision your campus AP’s:
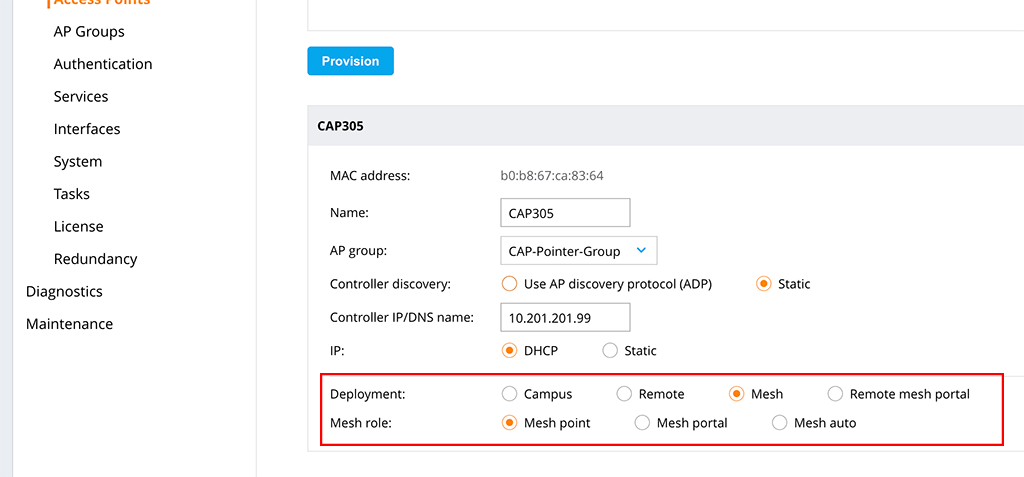
The important part the “Mesh point” setting. Also, set the correct “AP group” and the “Controller IP/DNS name”. Press the “Submit” button and wait for the AP to get back online. The AP should now be visible in the “Mesh AP’s” list.
You can deploy multiple pointer, connecting to the Remote Portal.
I know this kind of setup is some kind of special for special scenarios but I would like to hear from you if you have such an environment and how this satisfied your requirements.
If you find this post useful, leave me a comment and share your feedback with me. You can also buy me Pizza, using the “Buy me a Pizza” button on the right, to support this blog and keep the IT gremlin happy.
If you would like to do me a favor, share this post with your friends and social media contacts. This would really help to make this blog more popular and help others to find the information above more easily using search engines.
Share on:
Very well written guide. I have deployed remote AP mesh. These are my observation: RAP 205H is not working well as portal and point. “show ap mesh topology” indicates RSSI drops so clients complain strong signal but still very slow. Replace 205 with with RAP303 fix the problem.
I use PRTG to monitor mesh back-haul. There is “mesh” since Airwave version 8, but not sure why it is not showing any mesh Aps.
Hi Trinh,
I saw the same with my 205H in the past but did not dig deeper as I replaced it with a 225 that day.
Never checked the Mesh monitoring in AirWave 8 recently as I’m using Central to manage my AP’s. You should open a case with Aruba to get this fixed.
BR
Florian