This post is to show how Aruba VIA VPN with IKEv2 works. With IKEv2 we switch to a certificate-based authentication which makes it easier for users and more secure for the whole organization.
In an older post here I did a basic setup with IKEv1 and username password. This new post will leverage IKEv2 and certificate-based authentication for the user and for the computer as well. But I will go deeper into this later on.
Aruba VIA VPN – Basic Setup
Let’s start with the basic setup.
First, you need to make sure, that your controller is reachable from the internet. But I’m pretty sure, this is obvious.
Secondly, and I assume this as given as well, all client devices need at least one certificate. For Windows-based machines which are domain joined, a computer certificate will be helpful as well.
Third, the controller also needs a certificate that is trusted by the client devices. If you have a checkmark on all of those requirements go ahead.
If you are still reading and the above requirements are met, go to the controller and login as admin. Let’s start to do the basic stuff. Go to “Configuration–>Services–>VPN” and select the “General VPN” section:
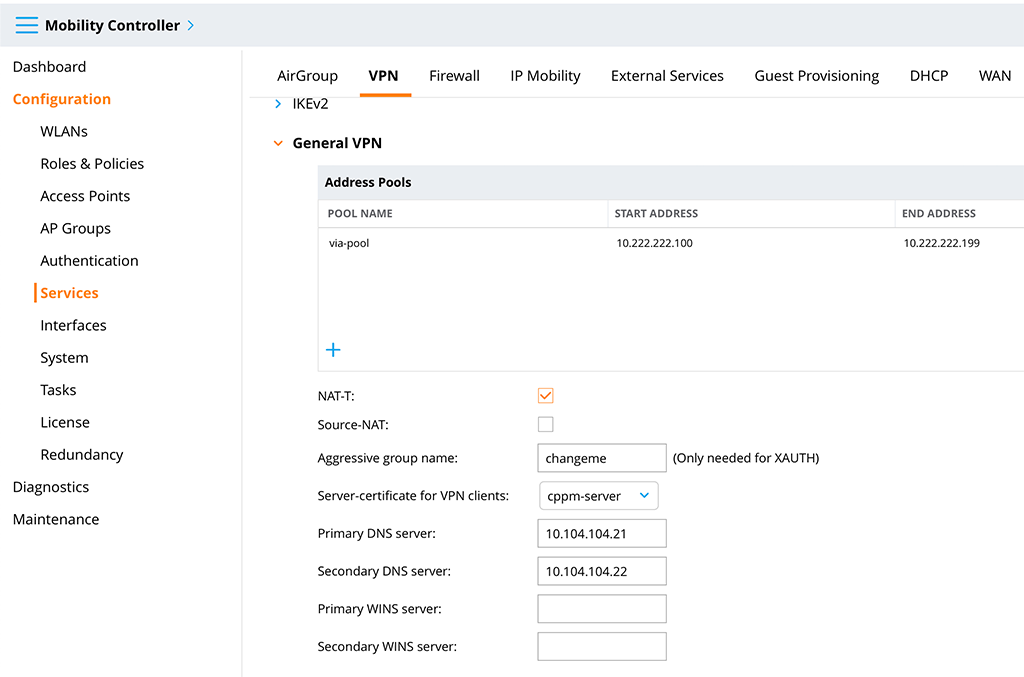
First, create the “Address Pool” with a click on the “+” sign in the table. This allows you to give the pool a “Pool name” and to define a “Start address” and “End address”. Also, enable “NAT-T” for NAT Traversal. You need to select a “Server-certificate for VPN clients”. This is the certificate that will be presented to all clients, trying to connect to the controller. So the client devices need to trust this certificate.
Defining the “Primary DNS server” and “Secondary DNS server” should be the easy part.
Afterwards, submit the changes.
The next step is to assign the certificates to root ca’s for all VPN clients. Go to “Configuration–>Services–>VPN” and select the “Certificates for VPN Clients” section:
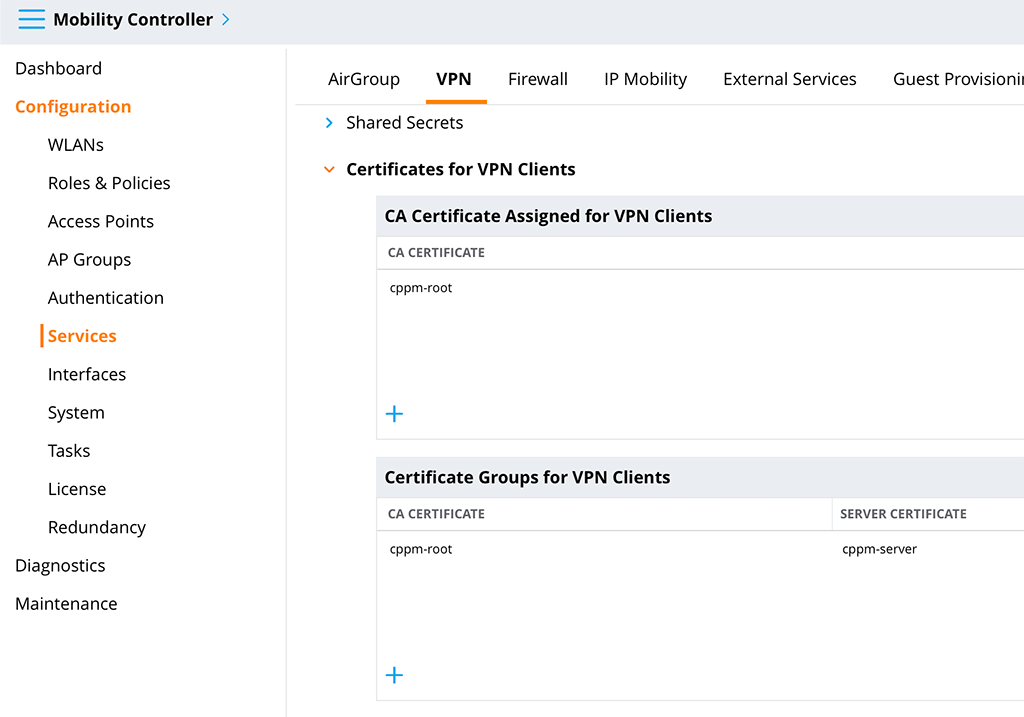
You need to fill both tables. First, use the “+” sign to add your root certificate to the “CA Certificate Assigned for VPN Clients” table and select your root ca certificate from the drop-down list. The one you used to sign your client certificates. You can add more than one if needed.
Secondly, you need to create a certificate group. Click the “+” sign in the “Certificate Groups for VPN Clients” table and select the “Server certificate” (should be the one from the “General VPN” section” and the corresponding “CA certificate”. Add more groups if needed, e.g. if different client devices have different trusts to different root ca’s.
Submit the changes. The basic settings are done.
Aruba VIA VPN – Authentication Prerequisites
Let’s do the authentication stuff. Before you can start to authenticate something you need to create a role for your VPN clients. At this stage, you will only create the role. Go to “Configuration–>Role & Policies–>Roles” and click the “+” sign to create a new role:
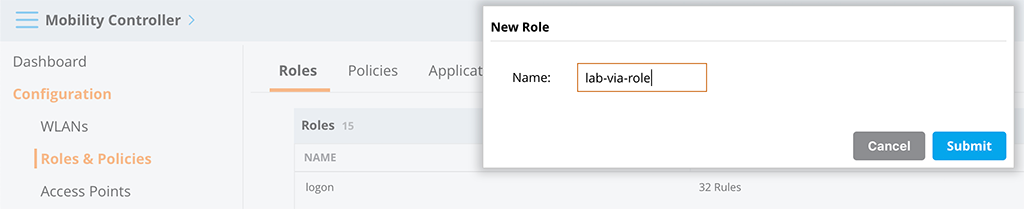
Submit the changes. You will modify the role later.
The next step is to configure the radius servers. They will do the authentication of your users and will check the certificate against revocation. You can also check the user in your directory. I use ClearPass as the radius server, but every radius server will do the job. In a later chapter, I will share, my ClearPass config.
If you have already configured your radius servers in the controller, you can skip the next step.
Go to “Configuration–>Authentication–>Auth Server” and add your radius servers:
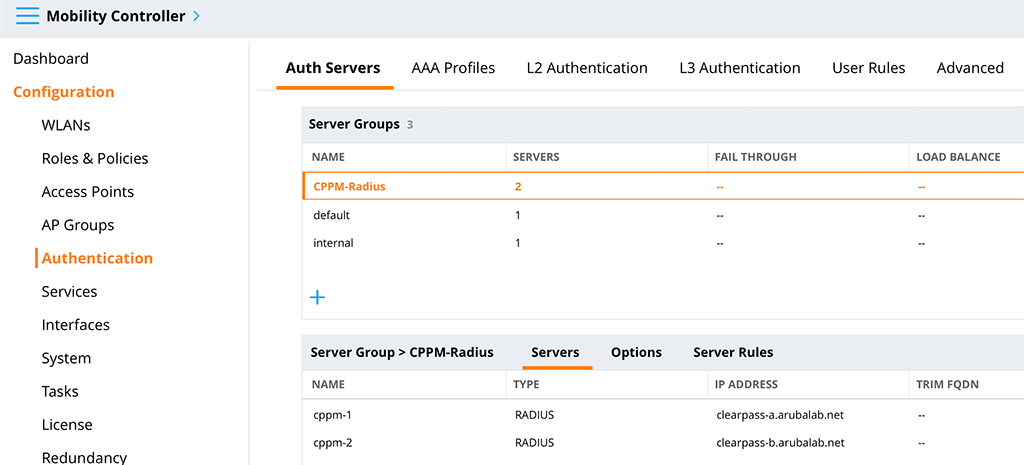
First, create a new server group and click on the “+” sign in the “Server Groups” table. Only a “Name” is required.
Afterward, select the new server group and add servers to the group. Click the “+” sign in the “Server Groups>[SERVER GROUP NAME]” table and select the “Add new server” radio button. Select a “Name” and enter the “IP address / hostname”. Afterward, select the created server and change the “Shared key”. This is the radius key, which must match with the key on the radius server, configured for your controller.
Submit the changes.
The last prerequisite is to allow port 8085 to the controller’s control plane. This is only needed if you like to use the certificates for authentication during the initial profile download as well. Go to “Configuration–>Services–>Firewall” and select the “ACL White List” section. There is a list of all allowed traffic types, which are permitted by the firewall to hit the control plane. Port 8085 is not in there by default so you need to add this port. Click the “+” sign below the table to add a new entry:
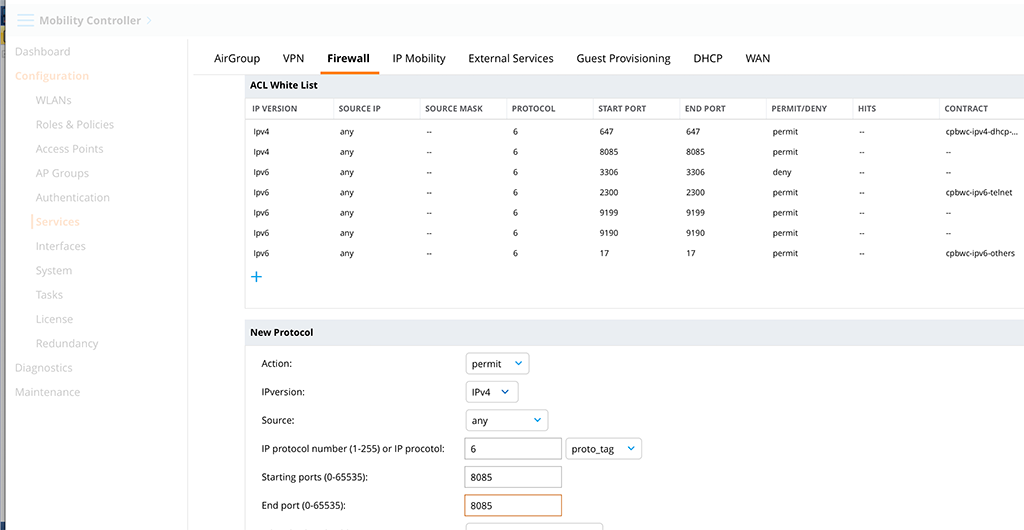
The “Action” is permit and the “IPversion” is in my case “IPv4”. You can add an entry for IPv6 as well if needed. “Source” can be any, as the traffic will come from the VPN clients. “IP protocol number” is 6 for TCP and “Starting ports” is the same as “End port”, which is 8085. You might also set a rate limit to that connection if needed with the “White list bandwidth contract” to make sure, there is no DoS attack at that port. But from my point of view, this is only needed, if the controller is directly connected to the internet. If there is a firewall in front of the controller, this is firewall business.
Aruba VIA VPN – Profiles
Now, you will configure VIA profiles in order to authenticate and connect to the controller with VIA. The most important but easiest one is the “VIA Authentication Profile”. To create this profile go to “Configuration–>Authentication–>L3 Authentication” and look for “VIA Authentication”. Create a new profile like this:
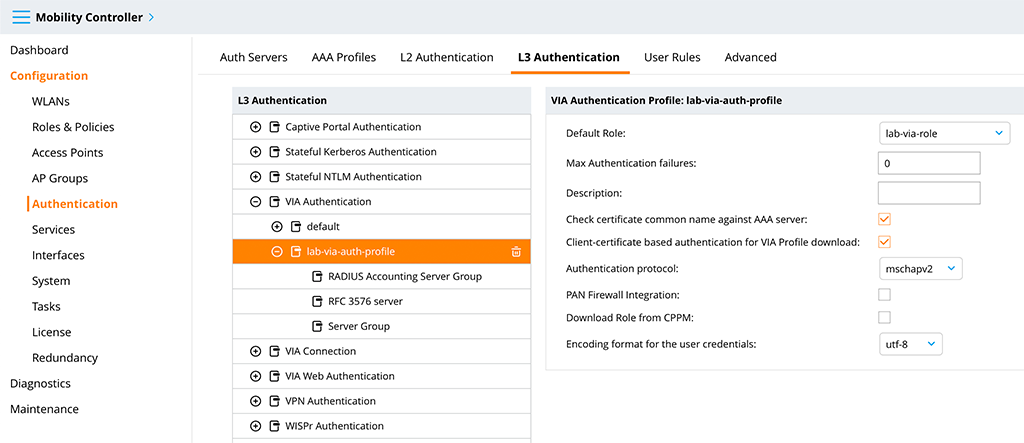
You should set a good “Profile name” and select the role we created before as the “Default Role”. I also checked the “Client-certificate based authentication for VIA Profile download” checkbox to use the client certificate for profile download as well and changed the “Authentication protocol” from “pap” to “mschapv2”. Submit the changes and select the “Server Group” entry:
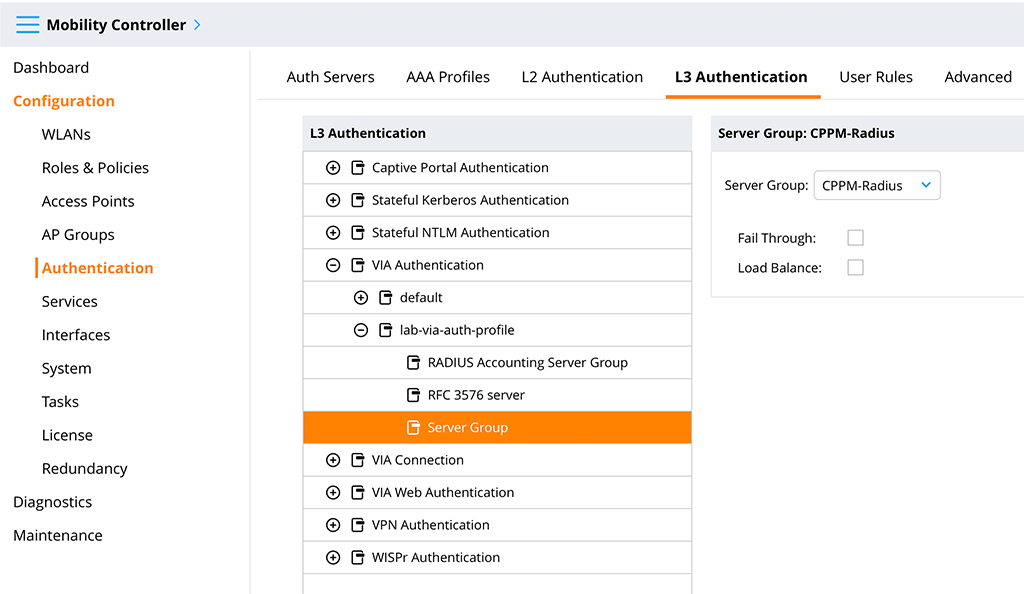
Select the created radius server group from above as the “Server Group”. If you need accounting (I recommend to use accounting), do the same for the “RADIUS Accounting Server Group”.
Now, go to the “VIA Web Authentication” section and select “default”. With a click on the “+” sign add the created “VIA Authentication Profile”:

Let’s get to the biggest chunk. Go to “VIA Connection” and create a new profile. This is where all the configuration for the VIA client is configured. I will only highlight the options I changed from default for this setup. There are many more options available, some are useful others are for corner cases. For the basic IKEv2 setup with automatic connection, the following are needed:
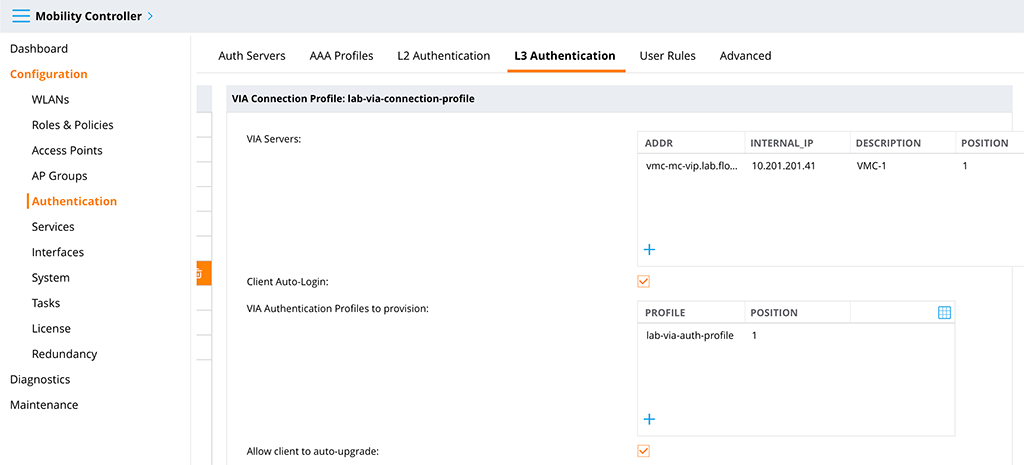
The first one you need to add is the “VIA Servers” entry. This is a list of controllers the client tries to reach for a connection. You need to enter an “Addr”, which is the external address or hostname of the controller, an “internal_IP”, which is the internal IP and which is used to check if the client is within your network or connected to an external network and a “Description”.
I enabled the “Client Auto-Login” option. This makes the client to connect automatically, if the client device is connected to an external network.
Also add the “VIA Authentication Profiles to provision” and use the one created above.
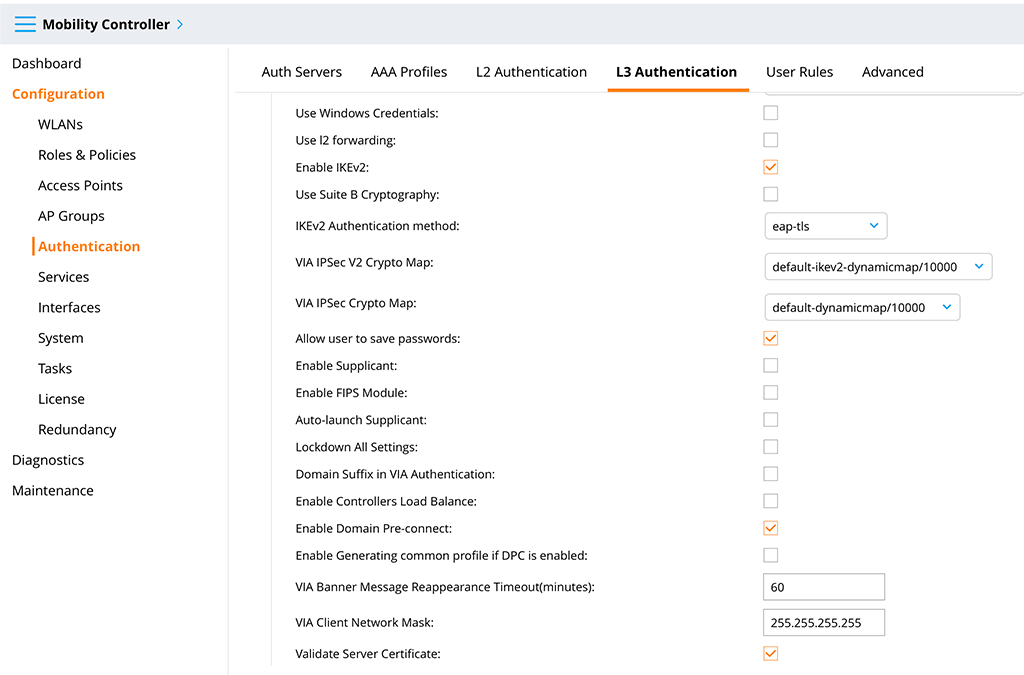
Here you need to check the “Enable IKEv2” checkbox. I also use “eap-tls” for “IKEv2 Authentication method”. In the past, I also enabled “Allow user to save passwords”. If you like your domain-joined Windows devices to connect to VPN even before the user logs into the system (e.g. for password change, expired passwords, or no cached logins) also check the “Enable Domain Pre-Connect” checkbox.
The last thing I changed is the “Certificate Criteria” option. The content of the option is this:
organizationalUnitName=VPN Access for User;[email protected]|@flomain.deThis option is to preselect the certificate, used for the connection. In my case, all certificates on the device are filtered for “organizationalUnitName” and “mailAddress”. If there are multiple certificates in the device this is very helpful to strip the list down. If there is only one certificate in the filtered list, the user is not asked for a selection and the connection is using the certificate for the connection. This makes it really easy.
Below is a list of possible filter options:
| Text | OID |
| commonName | 2.5.4.3 |
| organizationalUnitName | 2.5.4.11 |
| organizationName | 2.5.4.10 |
| subjectAltName | 2.5.29.17 |
| certificateIssuer | 2.5.29.29 |
| userPrincipalName | 1.3.6.1.4.1.311.20.2.3 |
| emailAddress | 1.2.840.113549.1.9.1 |
| friendlyName | 1.2.840.113549.1.9.20 |
Those are all options needed for this simple setup.
Submit the changes.
Now, get back the role we created earlier. Go to “Configuration–>Roles & Policies–>Roles” and select the created role. There is an option to “Show Advanced View” on the right side of the page. Click this option, select “More” and select the “VPN” section:
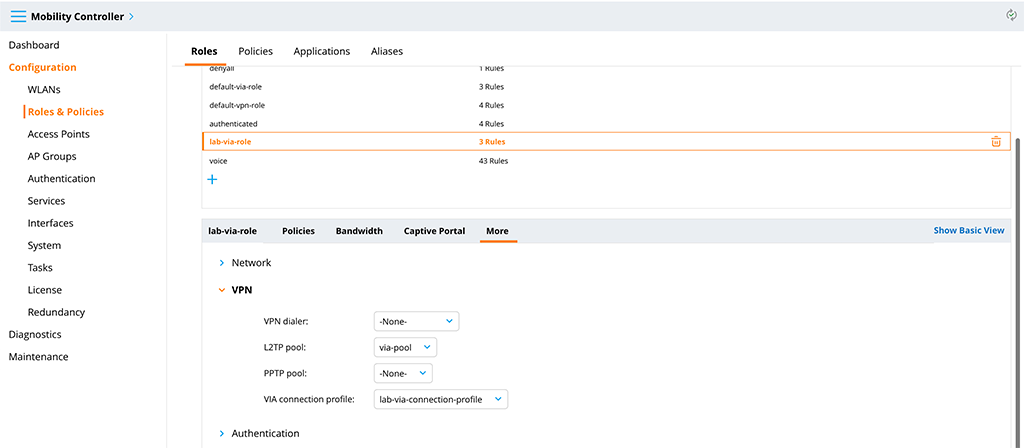
Select the created “Address Pool” as the “L2TP pool” and the created “VIA connection profile”. This brings everything together.
One last step, before we start the testing. Go to “Configuration–>Services–>VPN” and select the IKEv2 section. Make sure that “EAP-TLS” passthrough is enabled:
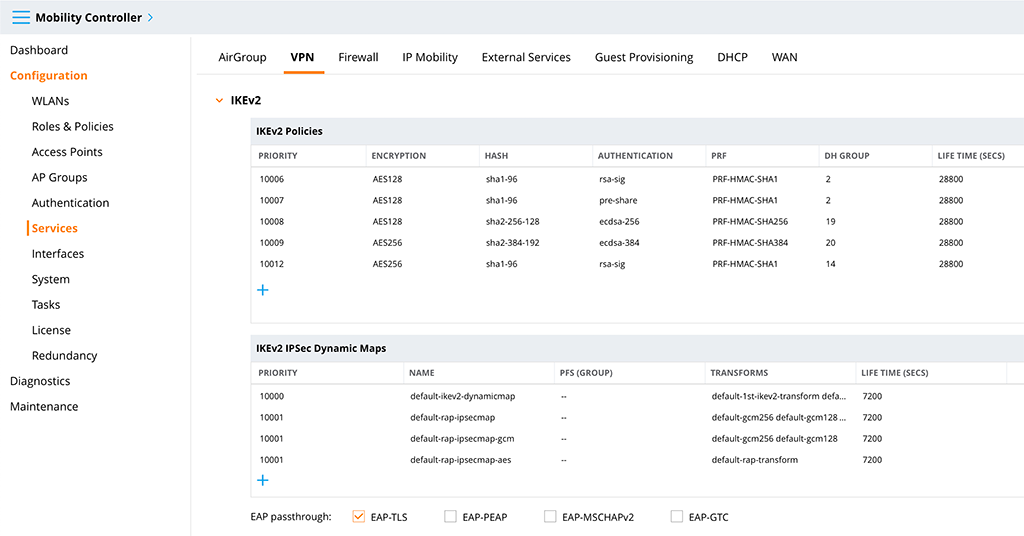
This allows the radius server to do EAP-TLS with the client for authentication.
Aruba VIA VPN – Radius Server
As the radius server, I use ClearPass. Every other radius server should work as well. My users are in an active directory and the radius server is checking there for role assignment. I keep the radius part quite short as this is just complementary and not the focus of this post.
I use three services for the solution above. First one an authorization only service for the web profile download. This one is used to authenticate the clients who try to download the VIA profile from the controller. The service looks like this:
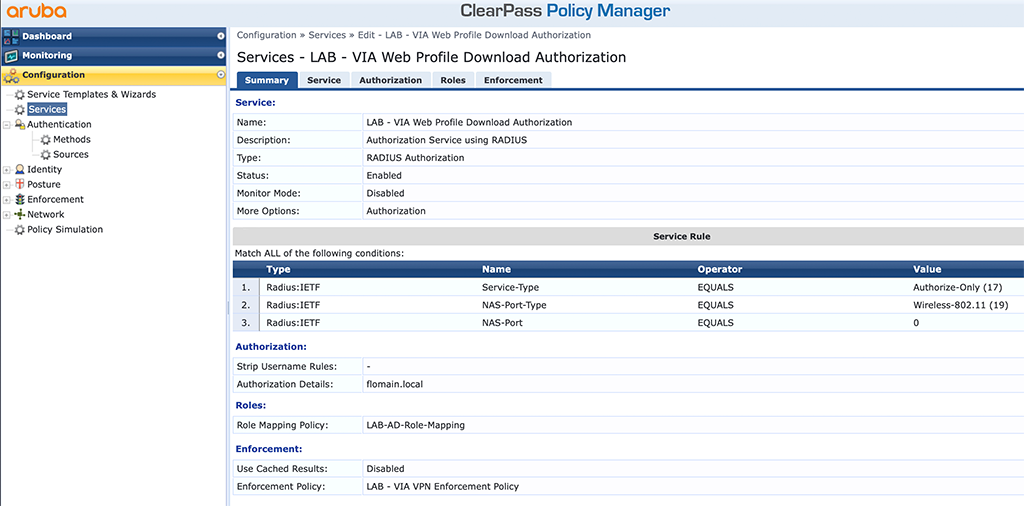
The service is simple. It simply looks up the username from the certificate against the active directory and returns the “lab-via-role” role VSA to the controller.
The second service is to authenticate VPN users:
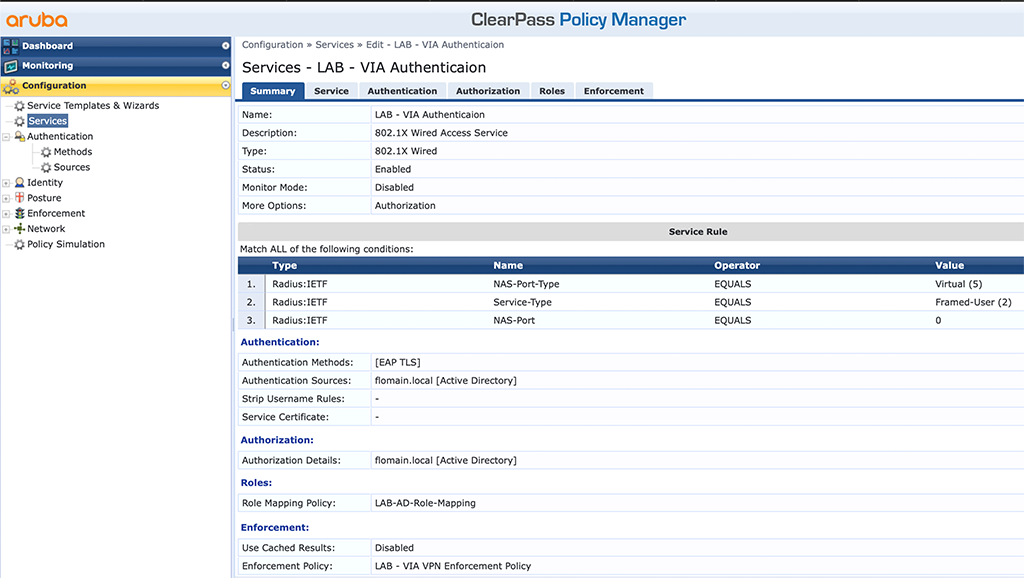
This one authenticates the user against active directory using EAP-TLS and assigns the “lab-via-role” role via VSA to the user.
The third service is for machine authentication. If you use “Domain Pre-connect” you need something like this as well:
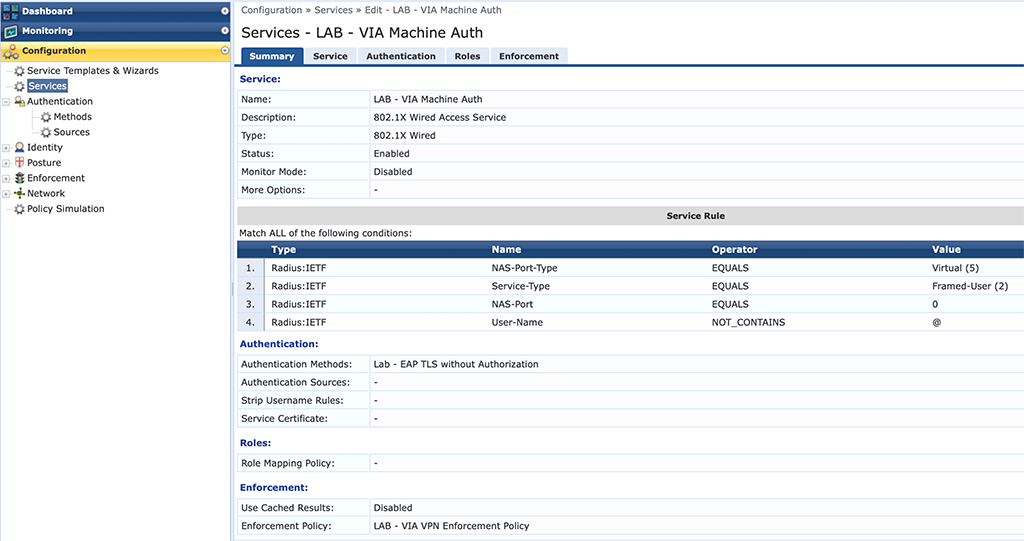
This one is a little bit tricky. VIA will use a certificate from the machine certificate store to authenticate and connect to the VPN before the user logs into the system. But this is not a machine authentication but a normal user authentication. Therefore the radius server will not find the user in AD if you use the real machine certificate with FQDN as the username. To avoid user authorization I use my “LAB – EAP TLS without Authorization” method. This will only check the certificate without user lookup. To differentiate those requests from the normal user request, I check that there is no “@” in the username, as the machine certificate will have the FQDN as the username.
Based on the OU in the cert I return the “lab-via-role” role VSA.
That is the radius config and now we can start testing.
Aruba VIA VPN – Test the VPN Connection
So let’s start the testing. I will use a domain-joined Windows 10 running the latest version of the VIA client (version 4.0). The device has two certificates, one user certificate in the user certificate store and one machine certificate in the machine certificate store. When starting the client, you need to download the profile before you can connect to the VPN:
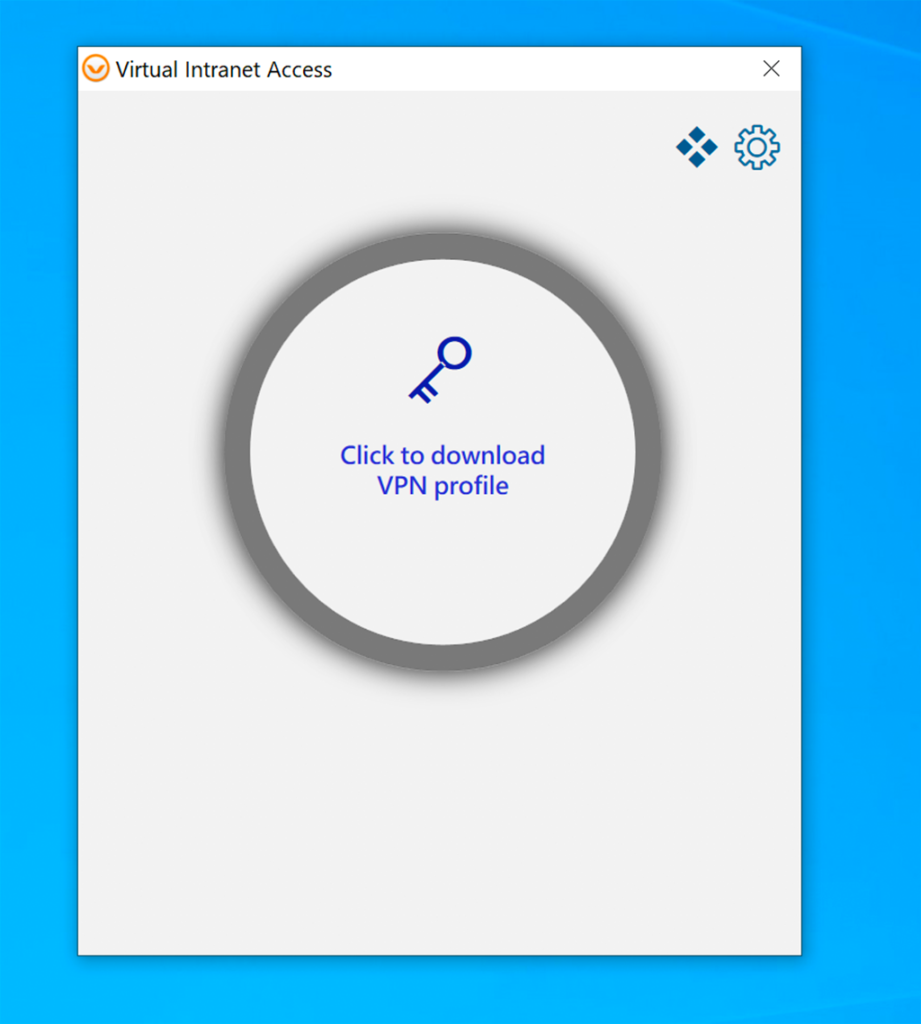
I think the advice is clear, click to download the profile:
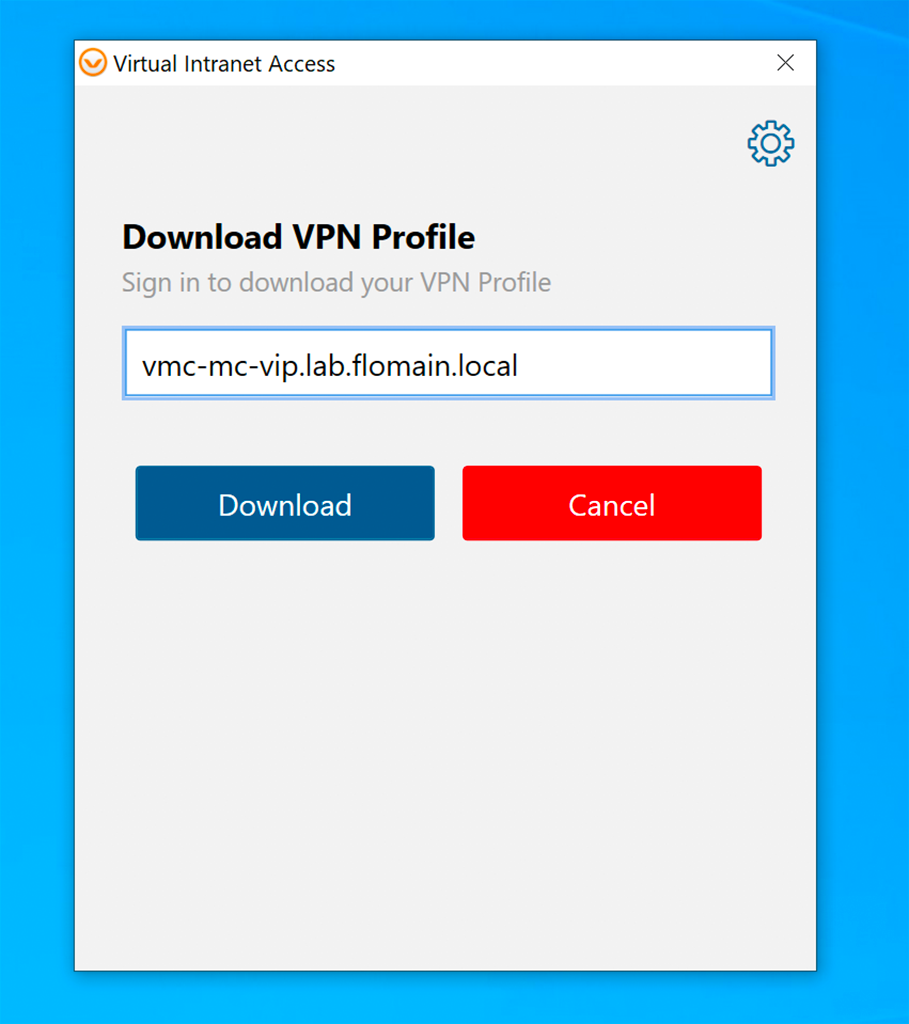
First, you need to enter the hostname or IP of the controller. Click “Download” to get the certificate section screen:

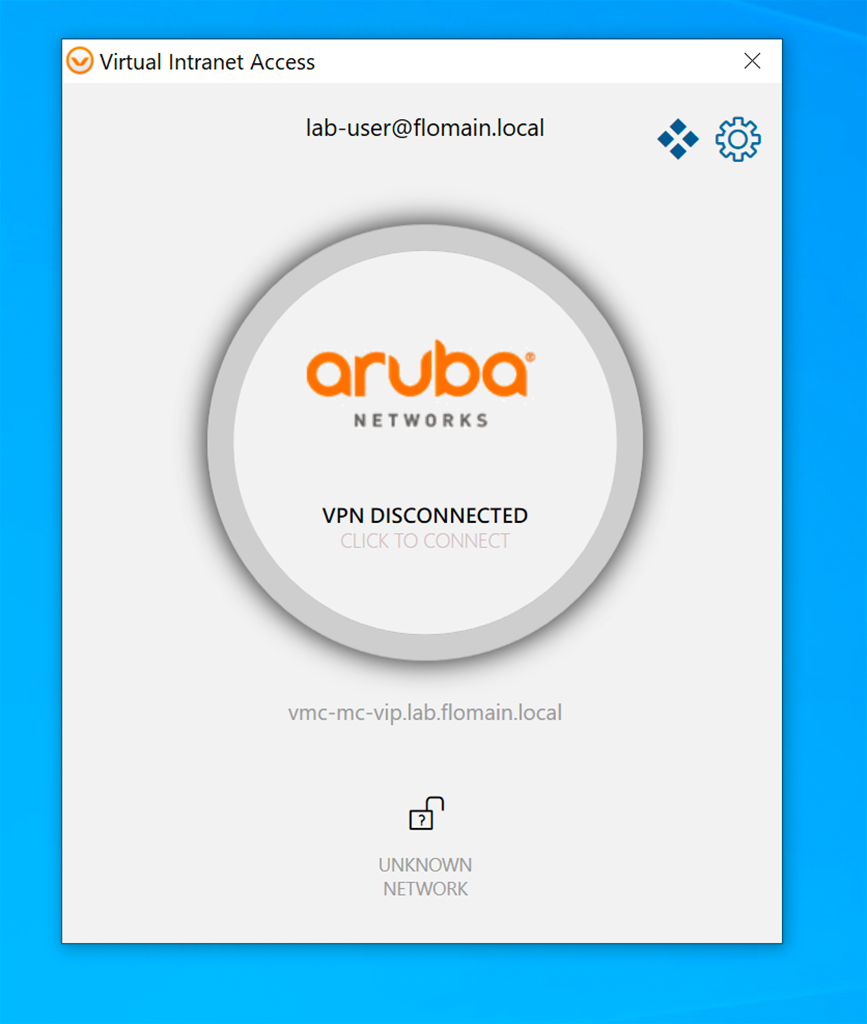
Here I chose the user certificate. This certificate is used to authenticate against the controller and to download the VPN profile. Click “Proceed” to download the profile. It might happen, that you need to acknowledge a certificate warning if the controller’s web server certificate is not trusted.
After downloading the VPN profile the client might connect automatically to the VPN. This happens if you are not connected to your internal network. If the VPN did not connect automatically, you can start the connection by clicking on the big button in the middle of the app, with the text “CLICK TO CONNECT”:
If you clicked you should get connected to the VPN. Normally, the window will minimize, if you bring it to the desktop again it should look like this:
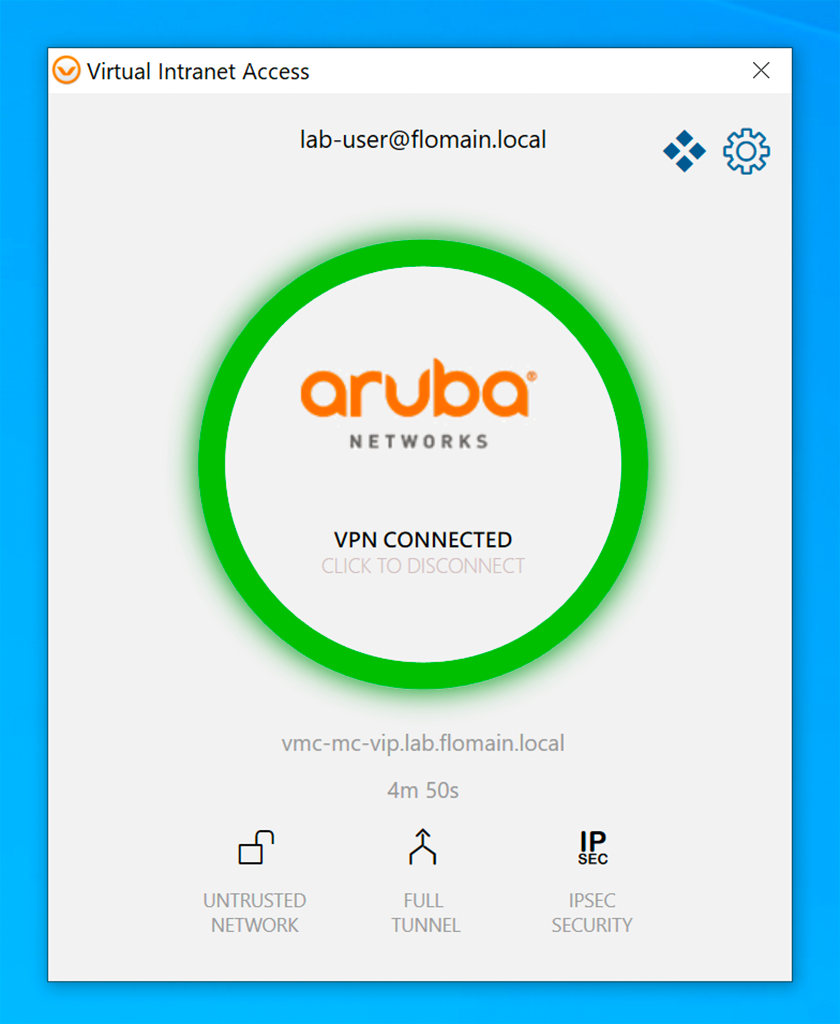
Here you can see that the connection is established and using IPSec. If IPSec is not available, the client can fall back to SSL.
From the controller it would look like this:
(VMC-MC-1) *[mynode] #show user-table

Users
-----
    IP               MAC            Name                   Role          Age(d:h:m)  Auth     VPN link       AP name  Roaming  Essid/Bssid/Phy  Profile  Forward mode  Type  Host Name  User Type
----------      ------------       ------                  ----          ----------  ----     --------       -------  -------  ---------------  -------  ------------  ----  ---------  ---------
192.168.2.154   00:00:00:00:00:00                          logon         00:00:08                            N/A                                         tunnel                         WIRELESS
10.222.222.100  00:00:00:00:00:00  [email protected]  lab-via-role  00:00:08    VIA-VPN  192.168.2.154  N/A                                         tunnel                         WIRELESS

User Entries: 2/2
 Curr/Cum Alloc:3/3 Free:0/0 Dyn:3 AllocErr:0 FreeErr:0
You will see two entries in the user table. One for the device with the outer IP and the “logon” role and one with the inner IP with the “lab-via-role”. This one will also have the username populated.
You can also check the IPSec and ISAKMP entries:
(VMC-MC-1) *[mynode] #show crypto ipsec sa


IPSEC SA (V2) Active Session Information
-----------------------------------
Initiator IP                              Responder IP                              SPI(IN/OUT)        Flags Start Time        Inner IP
------------                              ------------                              ----------------   ----- ---------------   --------
192.168.2.154                             10.201.201.40                             87bba500/9f4a59ab  UT2   May 27 13:16:29   10.222.222.100
10.201.201.42                             10.201.201.41                             79989f00/d697fe00  T2    May 27 13:01:02     -

Flags: T = Tunnel Mode; E = Transport Mode; U = UDP Encap
       L = L2TP Tunnel; N = Nortel Client; C = Client; 2 = IKEv2
       l = uplink load-balance

Total IPSEC SAs: 2
(VMC-MC-1) *[mynode] #show crypto ipsec sa peer 192.168.2.154

 Initiator IP: 192.168.2.154
 Responder IP: 10.201.201.40
 Initiator: No
 SA Creation Date: Wed May 27 13:16:29 2020
 Life secs: 7200
 Exchange Type: IKE_SA (IKEV2)
 Phase2 Transform:Encryption Alg: AES 256 Authentication Alg: SHA1
 Encapsulation Mode Tunnel
 IP Compression Disabled
 PFS: no
 IN SPI: 87BBA500, OUT SPI: 9F4A59AB
 CFG Inner-IP 10.222.222.100
 Responder IP: 10.201.201.40

(VMC-MC-1) *[mynode] #show crypto isakmp sa

ISAKMP SA Active Session Information
------------------------------------
Initiator IP                            Responder IP                            Flags     Start Time        Private IP                              Peer ID
------------                            ------------                            -----     ----------        ----------                              -------------
10.201.201.42                           10.201.201.41                           r-v2-p    May 27 13:01:03     -                                     IPV4_ADDR:10.201.201.42
192.168.2.154                           10.201.201.40                           r-v2-E-V  May 27 13:16:29   10.222.222.100                          IPV4_ADDR:192.168.0.100

Flags: i = Initiator; r = Responder
       m = Main Mode; a = Agressive Mode; v2 = IKEv2
       p = Pre-shared key; c = Certificate/RSA Signature; e =  ECDSA Signature
       x = XAuth Enabled; y = Mode-Config Enabled; E = EAP Enabled
       3 = 3rd party AP; C = Campus AP; R = RAP;  Ru = Custom Certificate RAP; I = IAP
       V = VIA; S = VIA over TCP; l = uplink load-balance

Total ISAKMP SAs: 2
(VMC-MC-1) *[mynode] #show crypto isakmp sa peer 192.168.2.154

 Initiator IP: 192.168.2.154
 Responder IP: 10.201.201.40
 Initiator: No
 Initiator cookie:dded66ae7e6002e8 Responder cookie:1200b8a83e16d6e6
 SA Creation Date: Wed May 27 13:16:29 2020
 Life secs: 28800
 Initiator Phase1 ID: IPV4_ADDR:192.168.0.100
 Responder Phase1 ID: C=DE S=NRW L=Selm O=Flomain OU=Network VPN Test CN=vmc-mc-vip.lab.flomain.local [email protected]
 Exchange Type: IKE_SA (IKEV2)
 Phase1 Transform:EncrAlg:AES128 HashAlg:HMAC_SHA1_96 DHGroup:2
 Authentication Method: EAP
 CFG Inner-IP 10.222.222.100
 IPSEC SA Rekey Number: 0
 VIA
During this initial connection, the client also creates another profile for the machine authentication, if “Domain Pre-connect” is enabled. This one is used to connect to the VPN if no user is logged into the computer. To check this as well, disconnect the VPN and logoff or restart the computer. After the computer is up again do not log in but let the computer in the login screen. Let’s check the controller for a VPN connection:
(VMC-MC-1) *[mynode] #show user-table

Users
-----
    IP               MAC            Name                       Role          Age(d:h:m)  Auth     VPN link       AP name  Roaming  Essid/Bssid/Phy  Profile  Forward mode  Type  Host Name  User Type
----------      ------------       ------                      ----          ----------  ----     --------       -------  -------  ---------------  -------  ------------  ----  ---------  ---------
192.168.2.154   00:00:00:00:00:00                              logon         00:00:00                            N/A                                         tunnel                         WIRELESS
10.222.222.101  00:00:00:00:00:00  lab-computer.flomain.local  lab-via-role  00:00:00    VIA-VPN  192.168.2.154  N/A                                         tunnel                         WIRELESS

User Entries: 2/2
 Curr/Cum Alloc:3/6 Free:0/3 Dyn:3 AllocErr:0 FreeErr:0
Comparing the output to the one above, you will now see, that the username is now the FQDN of the device and not the username of the user. If we would now log in, the connection would be disconnected and the user connection would be established again. This is useful if you do not allow cached login to windows based domain-joined devices. You cannot define the certificate to use. VIA will use the first available certificate in the machine certificate store.
In addition to my last post on this topic, this should enhance usability and security using the VIA VPN.
If you find this post useful, leave me a comment and share your feedback with me. You can also buy me Pizza, using the “Buy me a Pizza” button on the right, to support this blog and keep the IT gremlin happy.
If you would like to do me a favor, share this post with your friends and social media contacts. This would really help to make this blog more popular and help others to find the information above more easily using search engines.
Share on:
Killer post! Thanks so much!
Hi Greg,
thanks for the feedback. Really appreciated.
Many thanks,
Florian
Hi Florian, you have saved my bacon since 2016 with HPE MSM controllers. I have been following your website ever since. Really appreciate your help, guidance and respect your technical knowledge.
Hi Nick,
thanks for the feedback. Really appreciated.
BR
Florian
hi Florian,
this really is an excellent post on the VIA set up. i have used your recommendations to implement a large VIA deployment. The only config we had an issue with was using “domain pre-connect” which we disabled and all was well. Thanks again Pete
Hi pete,
“domain pre-connect” will only work with domain-joined windows clients and is only needed if you do not cache the user password on the laptop. If you do, I would recommend to not use “domain pre-connect” as it brings a little bit more complexity to the story.
BR
Florian
Hello, just wanted to say this is a great post. I do wonder if you ever ran in to any issues using the Certificate Criteria. I have it configured to use certificateIssuer, however when presented certificates to choose for profile download/connection it will show certs not issued by our CA. This causes an issue with pre-domain connection, as we have a cert in the machine store not issued by our CA. The VIA client chooses that cert first (alphabetical order?) and then fails clearpass auth. If I delete that cert, it will choose the only remaining cert, which is the one issued by our CA.
I would think the Certificate Criteria would only present the certs that match the certificateIssuer I have defined in the connection profile.
Any insight on this would be very helpful.
Thank you,
Jeremy
Hi Jeremy,
To my understanding, the “Certificate Criteria” is only used for user-based authentication and not for Domain Pre-Connect. Domain Pre-Connect will use the first available Certificate in the Machine Certificate Store, at least at the moment.
I would contact your Aruba representative to get more details about this.
BR
Florian
Hello,
After a lot of troubleshooting and testing, that is also the conclusion I came to. I ended up using the computer cert for both Domain Pre-Connect and user connect. With the computer cert in the connection profile, it will choose that one for Domain Pre-Connect and user connection. It’s been working well with this setup so far.
Thank you,
Jeremy
Hello Jeremy,
thanks for sharing this. I’m sure, others will benefit from your finding.
If you still need the ability to use a certificate selection criteria for domain pre-connect as well, I would strongly recommend to connect with your peers within Aruba.
BR
Florian
Hi Florian.
Quick one.
Have you come across an error “Profile selection cancelled” before? I have a company-wide issue when trying to load a profile for end users
Hi Stephen,
No, I did not come across this one. You should open a case with Aruba in order to get this sorted out.
BR
Florian
Hi Florian,
Great post.
I had a query regarding the certificate that is installed on the Aruba Mobility Controller. I appreciate that this must be issued by an internal CA and must be trusted on the client, but are there any EKUs that must be included for the server certificate i.e. IP Security IKE intermediate?
Thanks,
Darren
Hi Darren,
I’m not aware of any required EKU’s. I always use a cert with TLS Server Authentication for the key usage. Even a Let’s encrypt cert will do the job 🙂
BR
Florian
Hi Florean,
Have you come a issue where VPN cannot connect on Windows 11 22H2 version? The error reads 8949.
Thanx
Stephen
Hi Stephen,
I haven’t tested windows 11 so far but have heard from others, especially Windows 11 22H2 does cause problems with authentications, not only related to VIA.
what kind of authentication do you use, PEAP, TLS…?
BR
Florian
Hi again.
We currently use PEAP.
Hi Stephan,
to my understanding, windows 11 22H2 is denying EAP PEAP (sending NTLM credentials) by default. This is due to Credential Guard being enabled.
https://learn.microsoft.com/en-us/windows/security/identity-protection/credential-guard/credential-guard-considerations#wi-fi-and-vpn-considerations
BR
Florian
Hi. Stephen did you solve this problem ? I’m facing the same problem. I already disabled the device guard through Regedit and Gpedit but still receiving the 8949 error message on Aruba VIA.
Hi Ricardo.
The only way around it is just uninstalling the KB that installed H2022 update on Win11 and also doing a system restore prior the date of the update.
Hello, Stephen! Thanks for your reply. I am sad to read that… I was putting a lot of effort to change different fields on W11 configurations hoping that it could solve this auth problem.
Hello,
Have you tried this same setup using AOS10? On AOS8, all my VIA clients are getting a RAPNG route created on the VPNC as a /32, and then being redistributed in to the network. On AOS10, this route is no longer being created, and I had to resort to adding an interface VLAN that has an IP address in the VPN pool and is forced up. This VLAN is then redistributed in to the network.
Thoughts? I have a case open with Aruba, and they are looking at the two different configurations to try and figure out why this is.
Thanks,
Jeremy
Hi Jeremy,
So far, I have not used this kind of setup with AOS10, mainly because my gateway is the default gateway for the rest of the network. Therefore, there is no need to redistribute the route. But I will try to setup this and test as well. But this could take some time, as I have many different projects ahead.
Have you tried to import the routes into OSPF using the “IAP-VPN Overlay”?
BR
Florian
Hello,
Yes the IAP-VPN Overlay is in the OSPF redistribution. I have a case open with HPE right now. The last test we did was have a VPNC on AOS8, then connected a VIA VPN client. With that you were able to see the /32 RAPNG route created. Right after we updated it to AOS10, and did the same test. Then with AOS10, the /32 RAPNG route was not created. Then we downgraded back to AOS8, and once again the /32 RAPNG route was created again. So the tech gathered all those logs to send up to the engineers.
The other issues I ran in to with Aruba VIA, was any version past 4.3 was getting a EAP timeout in ClearPass when trying to do domain pre-connect. The tech sent logs up to the engineer level, and they had me try a debug install, which did work. So they are saying the fixed version will be released in a month or so.
I’ll keep you updated on the AOS10 RAPNG route once I hear back from HPE.
Thanks,
Jeremy
Hi Jeremy,
Thanks for the update. Looks like there need to be fixed something. I will test this as well and might open a case as well, as soon as I can reproduce your issue.
BR
Florian