This time, I would like to show the configuration of the Virtual Intranet Access client. I use this one as a replacement for my OpenVPN installation. The aim is, to have an encrypted connection, even when using public hot spots. The great thing, Aruba VIA is also available to mobile phones, like my iPhone.
In this post, I will demonstrate the configuration of the controller, which is used as the VPN concentrator. I will not show the installation of the client itself, as this heavily depends on the operating systems used and I did several installations, and it was always straight forward. If you are able to configure the controller part, the installation of the client is no problem for you.
Requirements for Aruba VIA
To use the Aruba VIA (Virtual Intranet Access) client, you need at least one Aruba controller, as the client can only work with the controller. The client cannot work with other VPN concentrator. If you already use Aruba controller, the main benefit of using the VIA client is, that the same roles can be applied. Even if the client is connected through the VPN, the client will get a role, and this role defines everything, the client is allowed to do, or not to do. This could be part of an end to end security strategy.
If the controller is in place, it needs to be accessible via the internet. From my personal point of view, I would not use a controller, which is also used for my corporate WLAN installation. I would prefer a solution with one, for redundancy two, controller in the DMZ, or even more, if needed.
If the controller is placed behind a firewall, with NAT enabled, which is the case in my lab environment, you need to open/forward the following ports to make it work:
- UDP 500, 4500 – they are used for the VPN itself
- TCP 443 – this port is used for SSL fallback and download of the VIA client and profiles
- IP protocol 50 – only required for MAC OS clients, as they use the MAC OS internal IPSec stack, which needs IP protocol 50
To make VIA work with the controller, the controller needs the Policy Enforcement Firewall–VPN (PEFV) license, which is a feature license and is needed once for every controller.
General Configuration
To start with Aruba VIA, you need to have a controller, which is accessible from external. As we will create VPN’s, the controller needs to be configured for that, independently, what type of VPN we will use.
I use already the new ArubaOS 8.0.1.0 version. The GUI will be different, but the configuration is the same, as with version 6.x.
The first step. is to create an IP pool for the tunnel. Those addresses will be assigned to clients. Make sure, that this address pool is routed within your network, to make sure, that clients can work properly.
To create the pool go to your managed networks and select “Configuration–>Services–>VPN–>General VPN”(Configuration–>VPN Services–>IPSec, for 6.x):
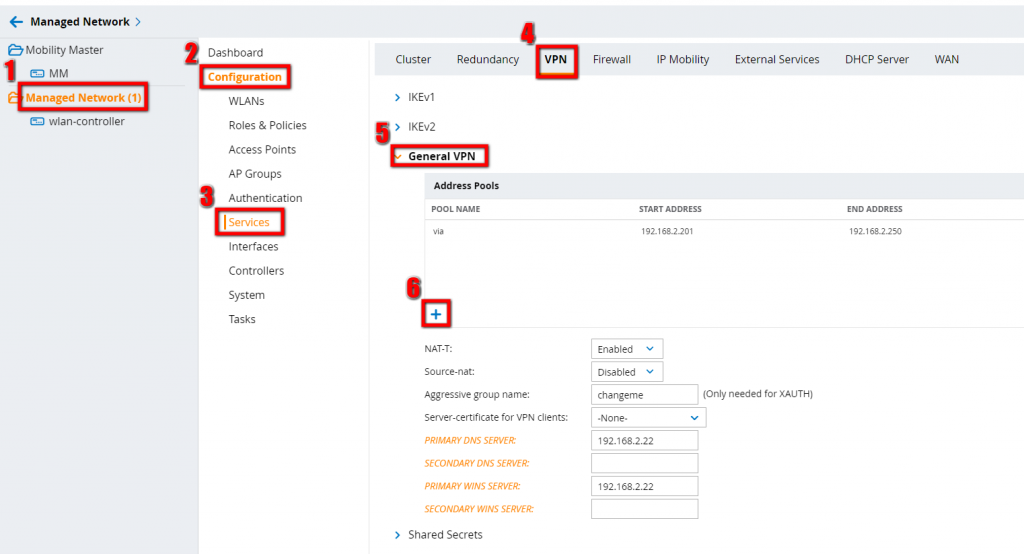
Click the plus sign (number 6) to add the pool.
On the same page, you have to configure some general properties to make the VPN server working:
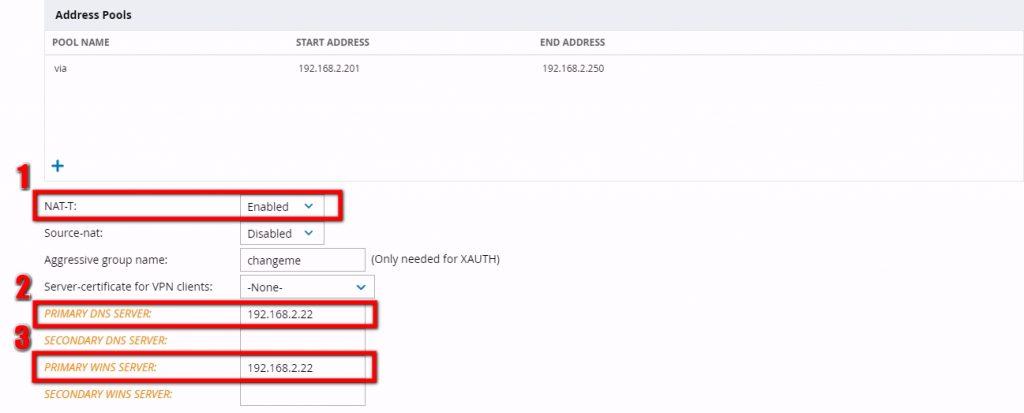
I would always enable NAT-T (1), for Nat traversal, as it is highly possible that VIA clients will be located behind NAT. You have to create an entry for DNS(2) and could also create an entry for WINS(3).
Save the settings and you have finished the first step.
Next step, is to enable IKEv1 with PSK, as I haven’t certificates and/or the need for IKEv2.
Open the “Shared Secret” options. They are just below the “General VPN” options. For 6.x users, the shared secret options are on the same page as before:
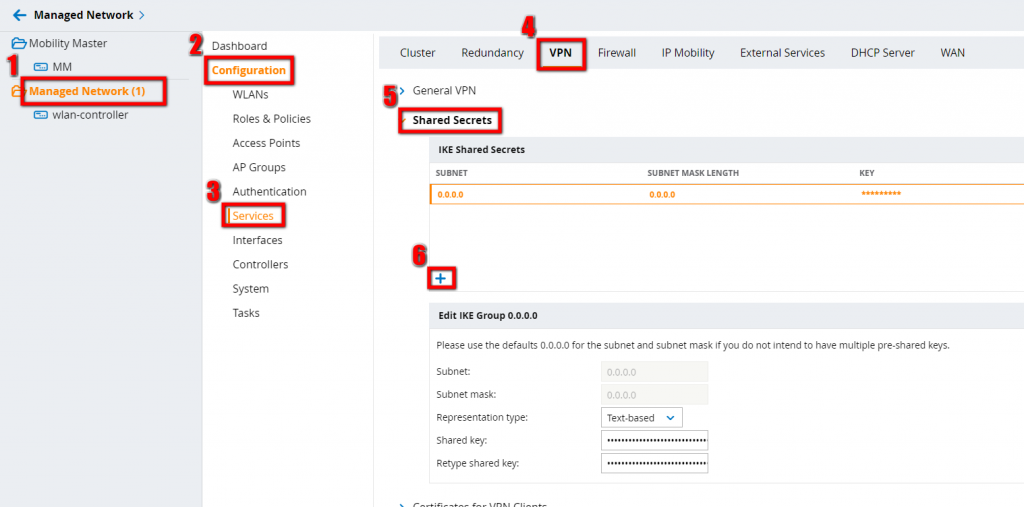
Press the plus sign and add a shared secret. The subnet defines, from which addresses the PSK is allowed to use. enter “0.0.0.0” for any source. Preferred option for Aruba VIA, as you will not know, from where you clients will connect. Save the settings.
Still on the same page, configure IKEv1:
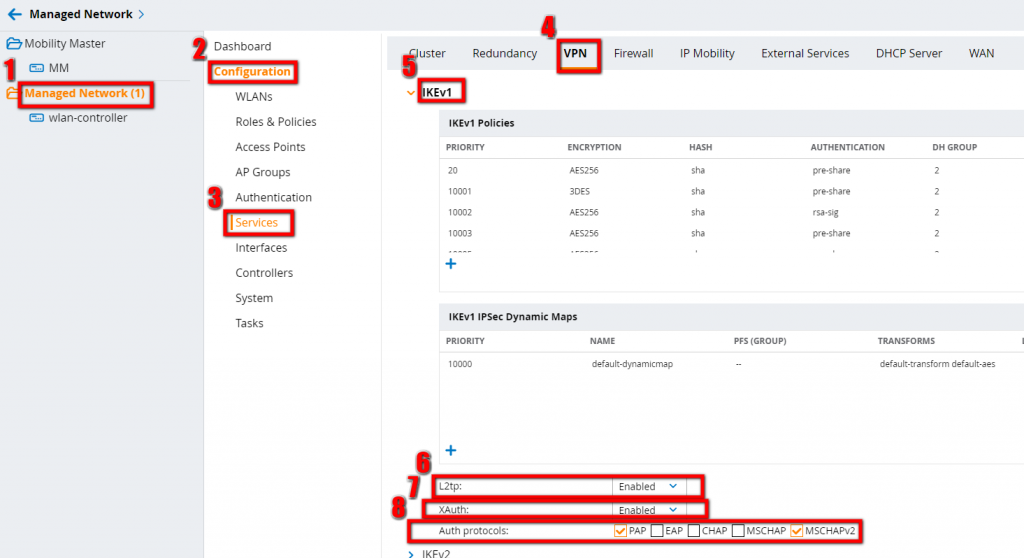
You should enable L2TP and XAuth, as the first is required for MacOS clients and the second one is required for Windows and IOS clients. For the Auth Protocols, I have selected PAP and MSCHAPv2. They are only used for MacOS Clients.
Save and you are done with the VPN settings and you can start configuring Aruba VIA specific settings.
Configure Aruba VIA
As all Aruba products work with role based access, the first step is to create one or multiple roles, which are assigned to users, connecting through the Aruba VIA client.
To create a new user role, go to “Managed Network–>Configuration–>Roles & Policies–>Roles”. For 6.x, go to “Configuration–>Access Controller–>User Roles”:
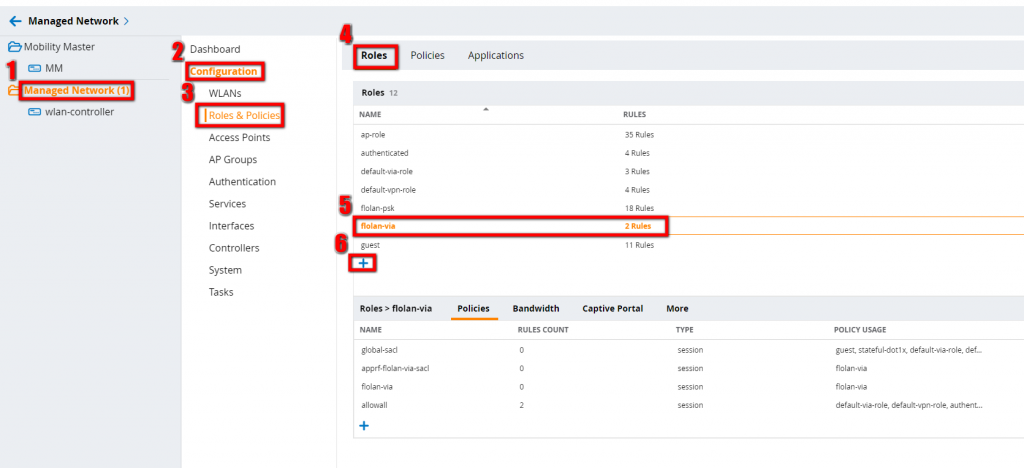
Press the plus sign and create the role by giving the role a name. Add as many policies as you like to restrict the user traffic to your needs. I simply allow all. You also have to configure some VPN/VIA specific options:

You should assign the created VPN Pool to the user and, when the VIA connection profile is created later on, the VIA connection profile has to be assigned to the role as well.
The next step is to create the VIA authentication profile, which defines how to authenticate VIA clients and which role should be assigned to them. Go to “Managed Network–>Configuration–>Authentication–>L3 Authentication–>VIA Authentication”. For Version 6.x you will find this under “Configuration–>Advanced Services–>All Profile Management–>Other Profiles–>VIA Authentication Profile”:
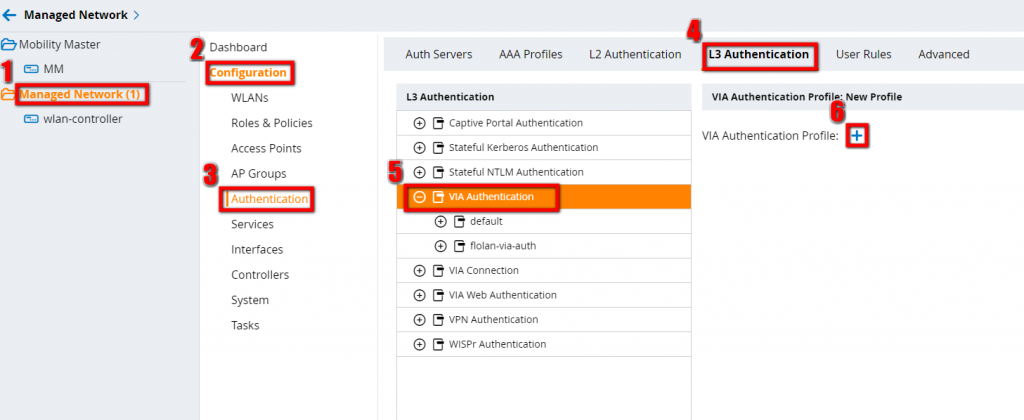
Press the plus button and configure the VIA authentication Profile:
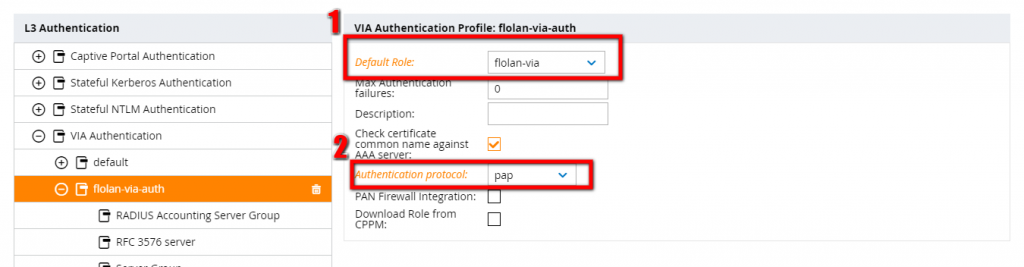
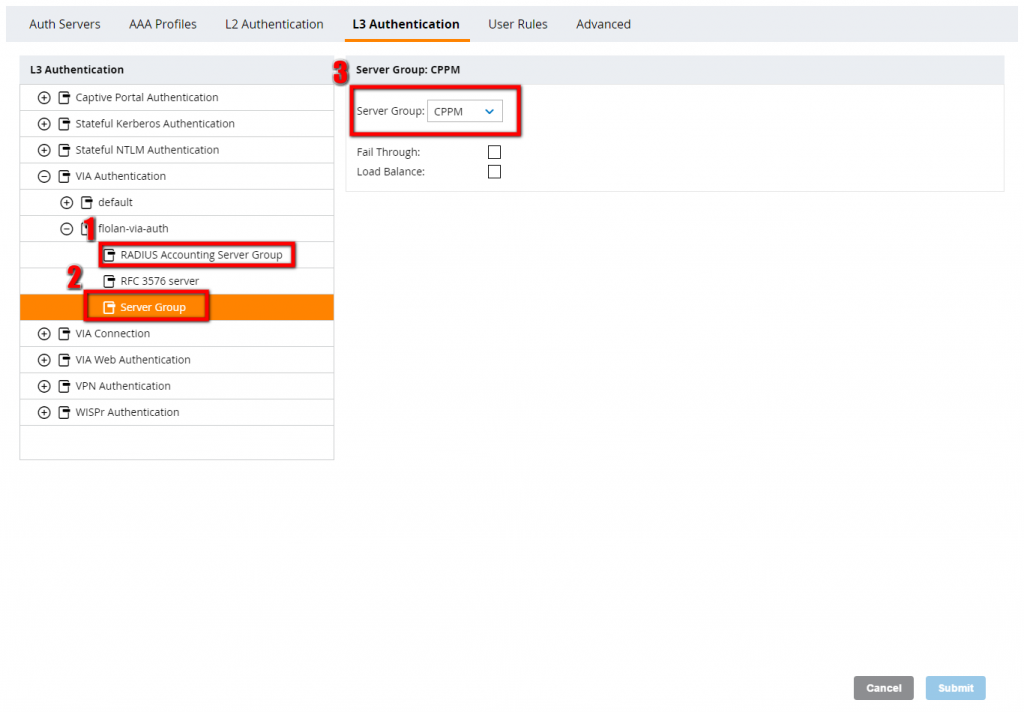
You should select the previously created user role and an authentication protocol. I assume, that you have an authentication server, which is already configured. As this is something you have trouble with, leave me a comment and I can consider this as one of my next posts. For Radius Accounting Server Group and for the Server Group, select the appropriate authentication server :
The next step is to create the VIA connection profile, which has all items included, which are needed for the VIA client. This is the profile, which is transferred to the client and which is used to create the connection.
We are still on the same page as before and the VIA connection profiles should be visible just below the VIA authentication profiles:
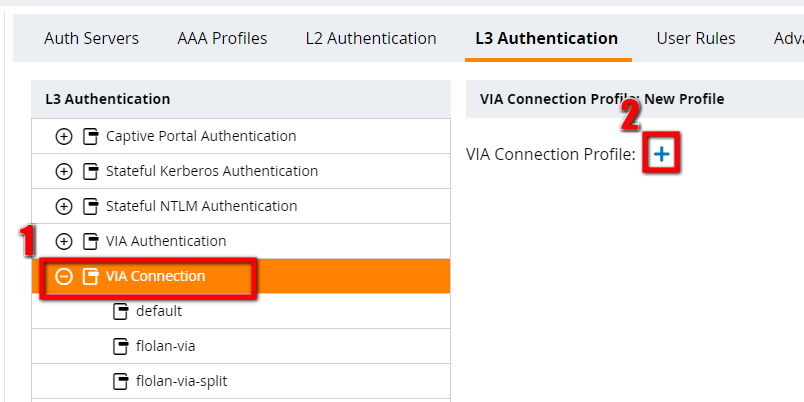
After clicking the plus sign, you will get a screen with many options to configure. I will not describe all, but will describe the important ones.
Profile Name: use a descriptive name for the profile. This will make life easier when you need to refer to the profile.
VIA Servers: Use the FQDN or IP address of all controllers, which can be used to create the connection. They should be reachable from the internet.
VIA Authentication Profiles to provision: configure the previously created VIA authentication profiles. They are ordered, so make sure, that the correct one is on the first position, if you use more than one.
VIA tunneled networks: If you use split tunnel, configure the networks, which are reachable via the tunnel here.
Those are the most important ones. If you would like to know more about the other options have a look here:
https://community.arubanetworks.com/aruba/attachments/aruba/Aruba-VRDs/49/1/VIAAppNote.pdf
On page 42, you will get an overview for all options, available.
After you have created the VIA connection profile, you can go back to the user role and select the profile for this role.
Step 3 in the picture above allows you to select the VIA connection profile for the selected role.
The last step, is to add the VIA authentication profile to the VIA web authentication profile. This is needed to allow clients the download of the profile from the controller and to allow clients to login to the controller and download the Aruba VIA client.
To configure the VIA web authentication profile search on the same page as before for the entry. Should be just below the VIA connection profile:
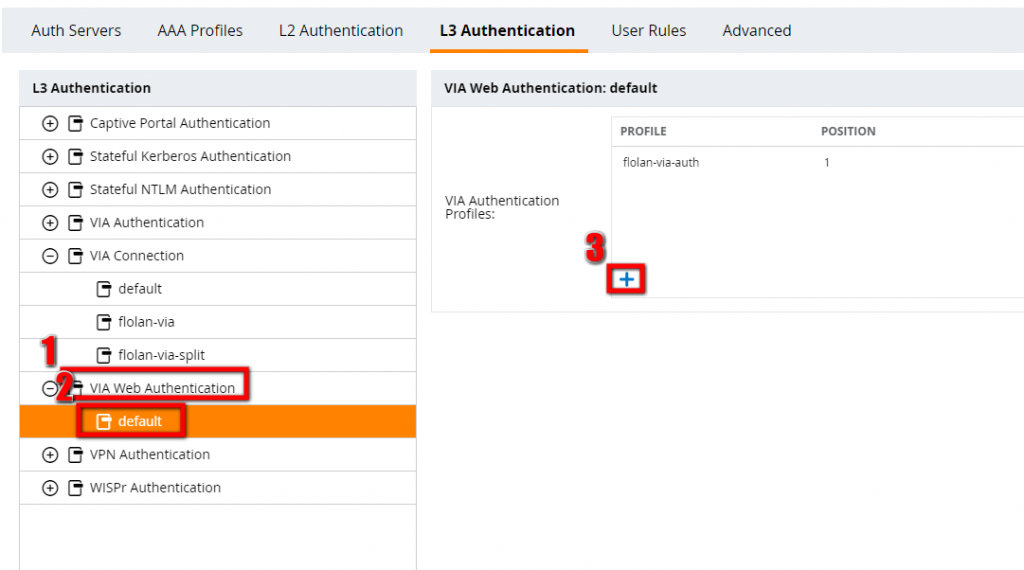
Press the plus sign and select the previously configured VIA authentication profile. Save and synchronize the configuration.
The controller comes with a pre-selected version of the Aruba VIA client, but it is possible to update this version. This allows new clients to download the latest version directly from the controller and existing clients to get an update while connected to VPN.
To update the existing package, go to “Managed Networks–>Configuration–>Services–>VPN-VIA” and upload a new version by clicking the plus sign:
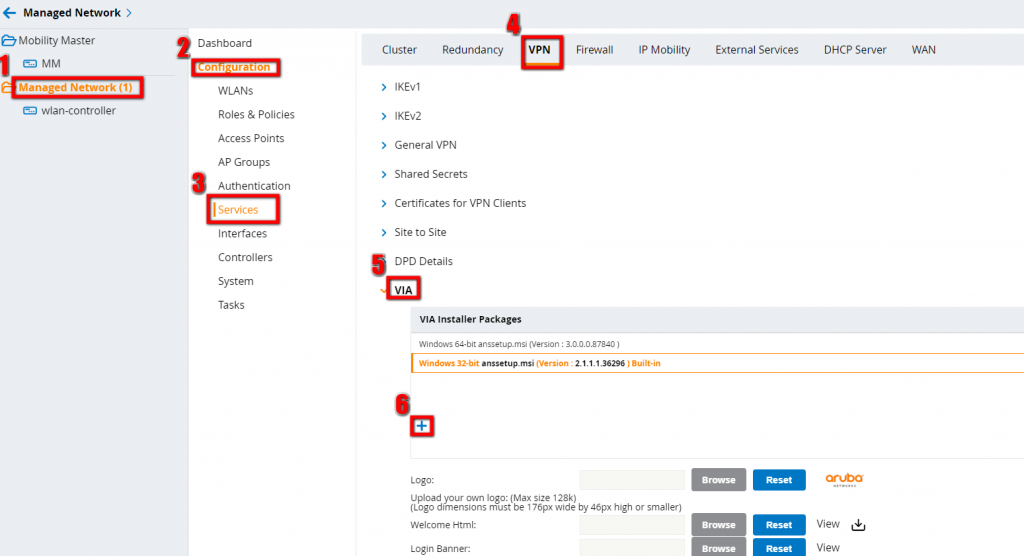
The packages are available from the Aruba Support page. You need to download the .arb file, instead of the .msi version.
If you have any questions please use the comment function below. If you would like to provide feedback please contact me or use the comment function as well.