This time I will demonstrate the Aruba central provisioning process, to zero touch deploy switches and Aruba Instant AP’s. The process is using Aruba Activate as well. But let’s start at the beginning.
What is Aruba Central
Aruba Central is the cloud-based management solution from HPE Aruba. In the past, Aruba Central was used to manage Aruba Instant AP’s and the old Aruba MAS switches. Since this year, Aruba Central also includes support for the former HPE switches.
As for many other cloud-based management systems, Aruba Central is licensed based on subscriptions and you pay only what you use.
That’s for the marketing, let’s start with the geek stuff.
Aruba Central Provisioning
Aruba Central is distributed over the world and any new device, needs to know, which part of the system is responsible for the specific device. This task is done by Aruba Activate. Activate is a free tool to provision Aruba network devices. If you use Aruba Central, Activate is automatically included in the Aruba Central provisioning process. But you can also use Activate to direct your Aruba network equipment to on premise network management solutions like AirWave.
The theoretical process looks like this, from a high level point of view:
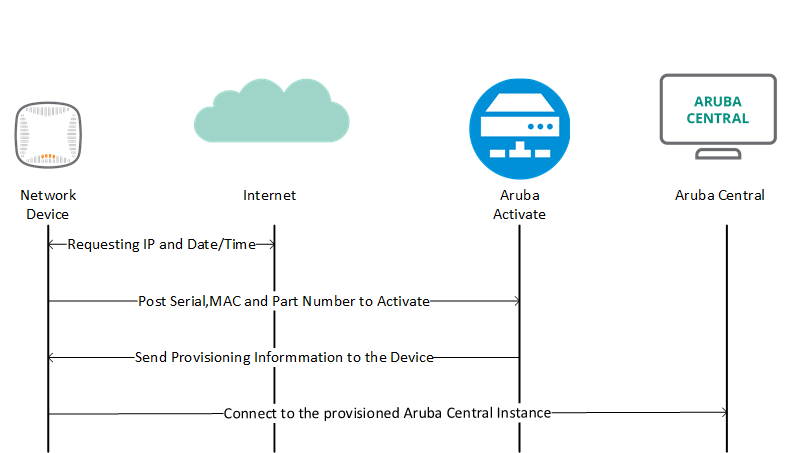
The network device boots up and requests an IP address from the DHCP server. If the DHCP reply has a DNS server
The Aruba Central Provisioning currently supports all Aruba AP’s, the controllers, and the former Aruba Switches (MAS). From the former HPE switches the following switches are supported:
- 2540
- 2920
- 2930F
- 3810M
If you are interested in the process using the on premise management solution AirWave, please leave me a comment and I can cover this in a later post.
Aruba Central Provisioning for ArubaOS Switches
For this test, I will use the 2930F switch series, running ArubaOS version 16.02.0014. The switch is factory reset and booted up. It has received an IP address from the DHCP server and is connected to Activate already. To check this, you can use the following command:
Aruba-2930F-8G-PoEP-2SFPP# show activate provision

 Configuration and Status - Activate Provision Service

 Activate Provision Service : Enabled
 Activate Server Address : device.arubanetworks.com
 Activation Key : SHH3TXCP
The successful communication with Activate is indicated by
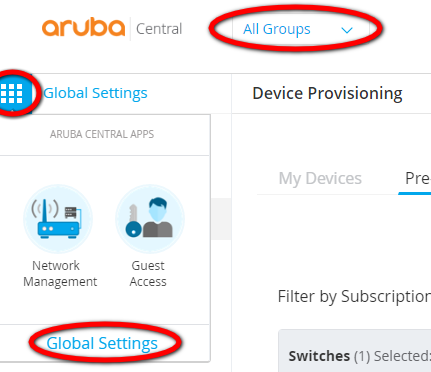
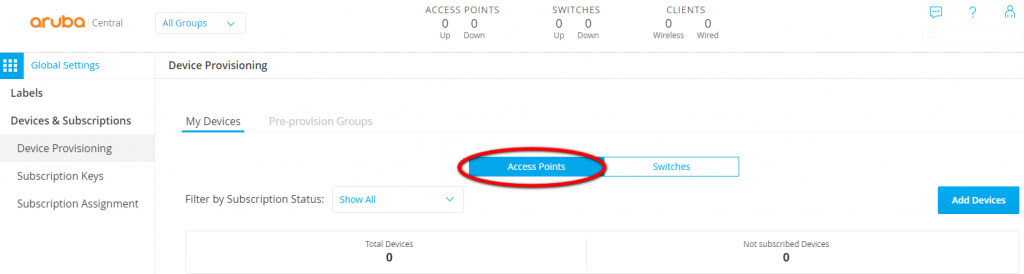
To provision the switch to your Aruba Central instance, the Activation Key is needed. Head over to your Aruba Central Instant and login. Navigate to “Global Settings” and make sure you have “All Groups” selected:
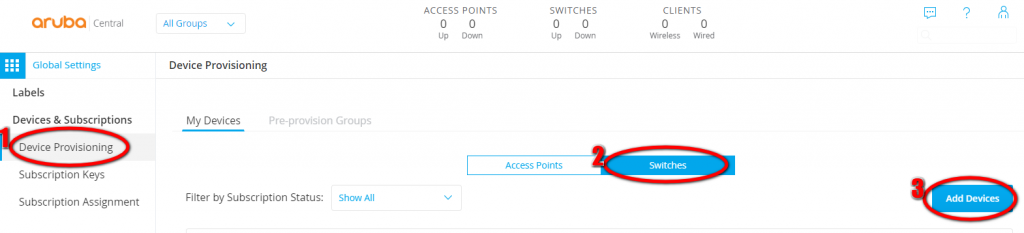
Next, click on “Device Provisioning”, select “Switches” and press “Add Devices”:
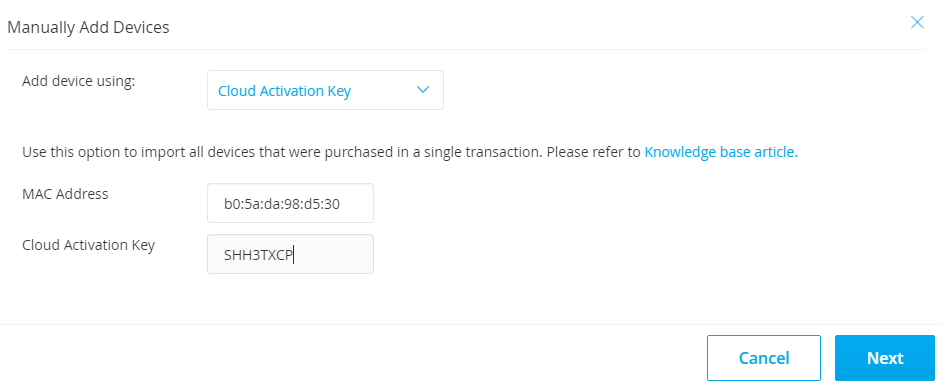
You have now a screen, where new devices can be added. On this screen, you have multiple options:
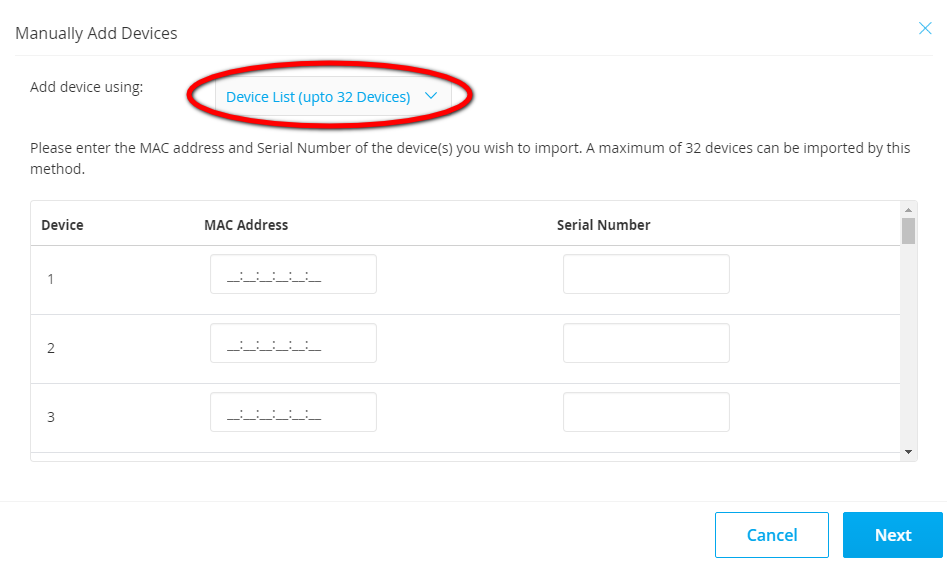
The first
Aruba-2930F-8G-PoEP-2SFPP# show system

 Status and Counters - General System Information

 System Name : Aruba-2930F-8G-PoEP-2SFPP
 System Contact :
 System Location :

 MAC Age Time (sec) : 300

 Time Zone : 0
 Daylight Time Rule : None

 Software revision : WC.16.02.0014 Base MAC Addr : b05ada-98d530
 ROM Version : WC.16.01.0003 Serial Number : CN60HKZ0T8

 Up Time : 3 hours Memory - Total : 356,975,104
 CPU Util (%) : 0 Free : 256,218,956

 IP Mgmt - Pkts Rx : 2013 Packet - Total : 6600
 Pkts Tx : 1353 Buffers Free : 4859
 Lowest : 4841
 Missed : 0
The two information you need, are highlighted. Simply copy them in the correct fields on the page. You will get a summary screen and the devices are added to your central instance.
The second
Aruba-2930F-8G-PoEP-2SFPP# show activate provision

 Configuration and Status - Activate Provision Service

 Activate Provision Service : Enabled
 Activate Server Address : device.arubanetworks.com
 Activation Key : SHH3TXCP
You will get a summary screen after clicking next. The device is now added to your Aruba Central instance.
There is also a third way, of adding devices. If you have an Activate account, you can arrange, that all orders will automatically send to your Activate account. To get all devices from Activate into Central simply enter your Activate account credentials, and all devices from Activate will be available in Aruba Central.
Aruba Central Provisioning for Instant AP’s
The process for Aruba Instant AP’s is the same as for the switches, except, you need to select Access Points, instead of Switches. There for I will only show, how to get the information.
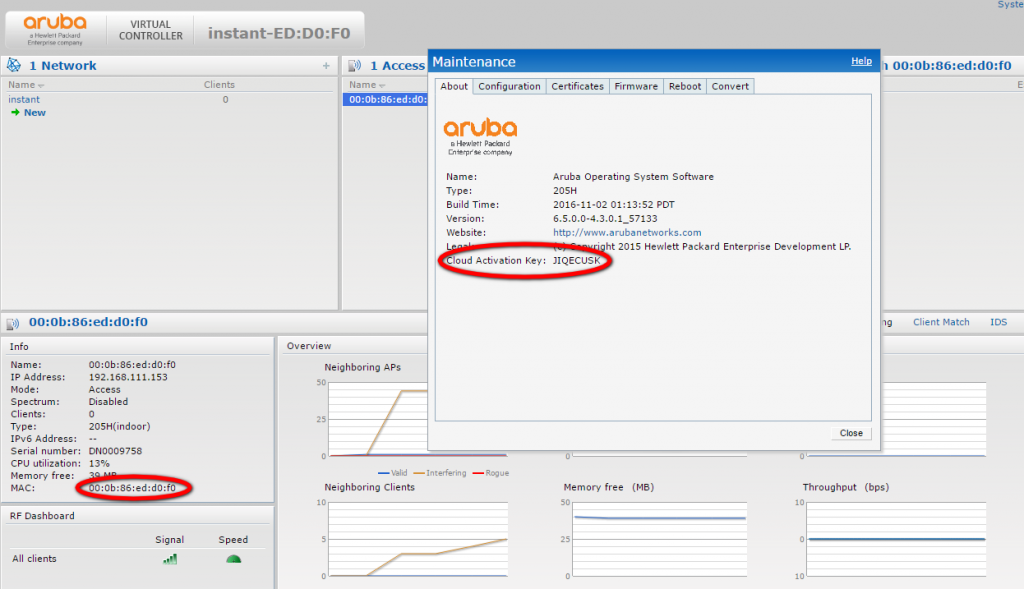
Login to the virtual controller and select the AP, which is running the virtual controller. This is the one with the star and copy the MAC address. The Cloud Activation Key is available in the Maintenance menu:
Insert those information into Aruba Central and the Instant AP is also available in your instance.
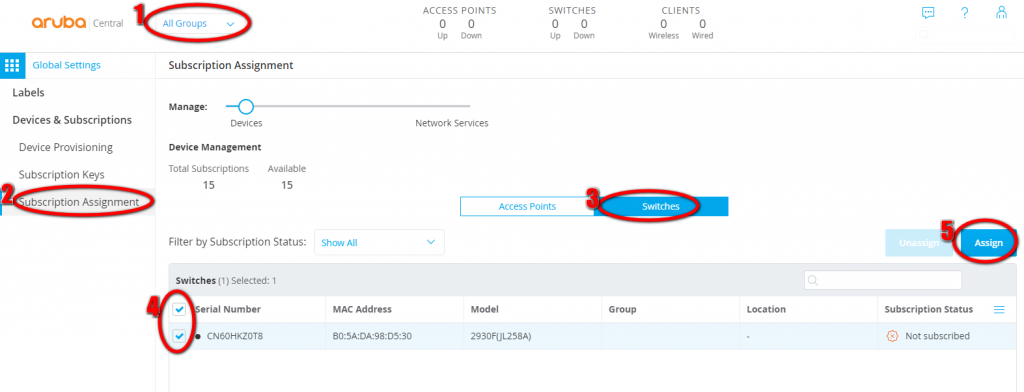
Aruba Central License Device
To get the devices finally working, you need to license the device. Go to “Subscriptions Assignments” and select “Switches” or “Access Points” and select the devices you like to license. Press the “Assign” button:
The device is now licensed and Activate is instructed to direct the device to your Aruba Central instance. If the device connects to Activate the next time, Activate includes that information in the response and the device should get online and is available within your instance.
For the switches the following command indicate this:
Aruba-2930F-8G-PoEP-2SFPP# show aruba-central

 Configuration and Status - Aruba Central

 Server URL : https://internal.central.arubanetworks.com/ws
 Connected : Yes
 Mode : Managed
 Last Disconnect Time : NA
The switch is now configurable from Aruba Central.
For Instant AP’s, there is an information on the button of the virtual controller GUI:
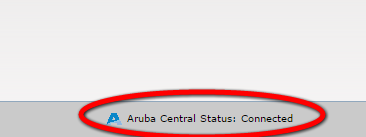
You are now able to configure the Aruba Instant AP from Aruba Central. Through the whole Aruba Central provisioning, I did not touch the devices, except for showing you some additional information.
If you have any questions please use the comment function below. If you would like to provide feedback please contact me or use the comment function as well.