This post is all about Aruba Downloadable User Roles and how to use them for wired and wireless access with dot1x and mac authentication.
If you use Downloadable User Roles, you get a central point of configuration for all access-related configurations. ClearPass, which is used as the radius server, will have all the roles available. Access devices like switches or access points can download those roles from there. If you need to change a role, you can do that on ClearPass. No need to change anything on your access devices. This makes it simple and easy to use. And only if it is easy to use it will be used by an organization and enhance security.
How does it Work
For Downloadable User Roles to work you need ClearPass. Below is the process flow for Downloadable User Roles:
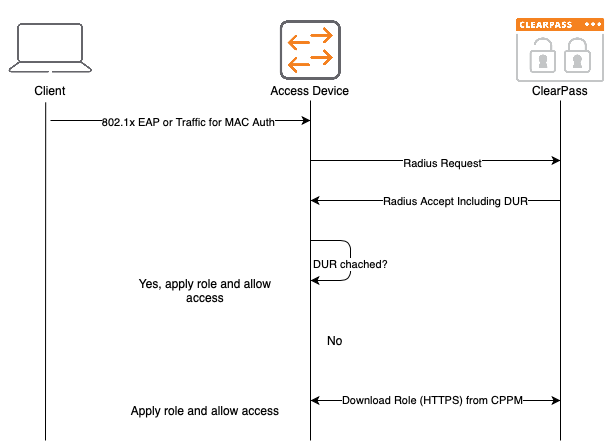
The first step to apply a Downloadable User Roles (DUR) is an authentication. It can be either a MAC authentication for devices that do not support any stronger authentication or an 802.1x authentication. The access device will send a radius request to ClearPass and will get an answer (Radius Accept) from ClearPass, including the Downloadable Role Information. This is just a Radius VSA including the name of the role and a version number.
If the role name together with the version number is already on the access device, the cached version is used and applied to the client. If the role name is not on the device or the version has changed the role is downloaded from ClearPass using HTTPS and applied to the client.
Downloadable User Roles: Prepare ClearPass
As you see in the flow chart above, the access device will download the role from ClearPass using HTTPS. To allow this, HTTPS traffic between the access device and ClearPass needs to be allowed. The access device also needs a username and a password to download the roles. To create this user login to ClearPass and go to “Administration–>Users and Privileges–>Admins Users” and create a new “Read-only Administrator”:
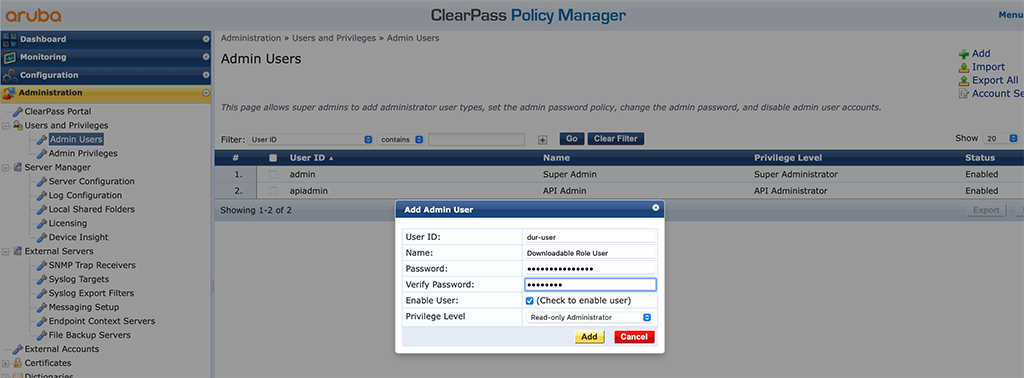
This user will be configured on the access devices to download roles from ClearPass.
Downloadable User Roles with ArubaOS Switches
Let’s start with ArubaOS Switches (formerly known as ProCurve Switches). They support Downloadable User Roles since version 16.04.008. I’m testing with 16.10.0010.
First, we need to configure some radius basics for the switch:
ip client-trackerThis will allow the switch to get the IP address of connected clients and will help with troubleshooting and monitoring.
I also set the radius source interface to be my management interface:
ip source-interface radius vlan 100Next, you need to configure the radius server itself. But before some more detailed information. As the switch will use HTTPS to download the role, the switch needs to trust the HTTPS certificate on the ClearPass server. Therefore you need to import the root CA, which has signed your HTTPS certificate for ClearPass. Fortunately, this happens automatically if configured correctly. First, here is my list of trusted root CA’s on my switch before I configured ClearPass as the radius server:
show crypto pki ta-profile

  Profile Name    Profile Status                 CRL Configured  OCSP Configured
  --------------- ------------------------------ --------------- ---------------
  IDEVID_ROOT     Root Certificate Installed
  COMODO_RSA_CA   Root Certificate Installed     No              No
  GEOTRUST_CA     Root Certificate Installed     No              No
  ARUBA_CA        Root Certificate Installed     No              No
  CUSTOM_CA       Root Certificate Installed     No              No
Now, you can add ClearPass as the radius server:
radius-server host clearpass-a.arubalab.net key aruba123 clearpass
radius-server host clearpass-a.arubalab.net dyn-authorization
radius-server host clearpass-a.arubalab.net time-window plus-or-minus-time-window 30
aaa server-group radius cppm host clearpass-a.arubalab.net
The commands above will add all needed config settings to the switch. The first one adds ClearPass as a radius server and makes the switch aware, that it is a ClearPass server. This also enables the switch to download the HTTPS CA certificate from ClearPass.
The second command enables dynamic authorization (CoA) for that radius server. The third command sets a time window for CoA packets. Just in case, the clock is not running in sync.
The last command adds the radius server to a group of servers. You can add multiple radius servers to the switch using the commands above.
Now, let’s check the Root CA list again:
show crypto pki ta-profile

  Profile Name    Profile Status                 CRL Configured  OCSP Configured
  --------------- ------------------------------ --------------- ---------------
  IDEVID_ROOT     Root Certificate Installed
  COMODO_RSA_CA   Root Certificate Installed     No              No
  GEOTRUST_CA     Root Certificate Installed     No              No
  ARUBA_CA        Root Certificate Installed     No              No
  USERTrust RS... Root Certificate Installed     No              No
  CUSTOM_CA       Root Certificate Installed     No              No
As you can see, the 5th entry is new. This is the one that signed my HTTPS certificate. In the logs it would look like this:
I 11/16/20 06:06:40 05811 CADownload: ST2-CMDR: Successfully downloaded the
            certificate from clearpass-a.arubalab.net server
I 11/16/20 06:06:40 05809 CADownload: ST2-CMDR: Successfully resolved Fqdn
            clearpass-a.arubalab.net to Ip address 10.104.104.41
The next step is to configure the user to download the roles. You configured this user already on ClearPass. So now you just need to add this user to the switch:
radius-server cppm identity dur-user key aruba123The next commands will enable authentication on the switch. It now depends on what you would like to do. I will do MAC authentication and 802.1x. If you just need one of the two, you can skip the other:
aaa authentication port-access eap-radius server-group "cppm"
aaa authentication mac-based chap-radius server-group "cppm"
I will also use accounting:
aaa accounting network start-stop radius server-group "cppm"
aaa accounting update periodic 5
Accounting is important, as ClearPass will use this to determine which session is active and therefore consumes a license. You can adapt periodic accounting updates to your needs. In my case, I set this to 5 minutes.
The last step, for the global configuration, is to enable roles and downloadable user roles:
aaa authorization user-role enable
aaa authorization user-role enable download
Let’s start the authentication before we will go into the port config:
aaa port-access authenticator activeThe final step is to enable authentication for the desired ports. I will enable mac auth and 802.1x on the ports:
aaa port-access mac-based 2/20
aaa port-access authenticator 2/20
Downloadable User Roles: ClearPass Configuration for ArubaOS Switches
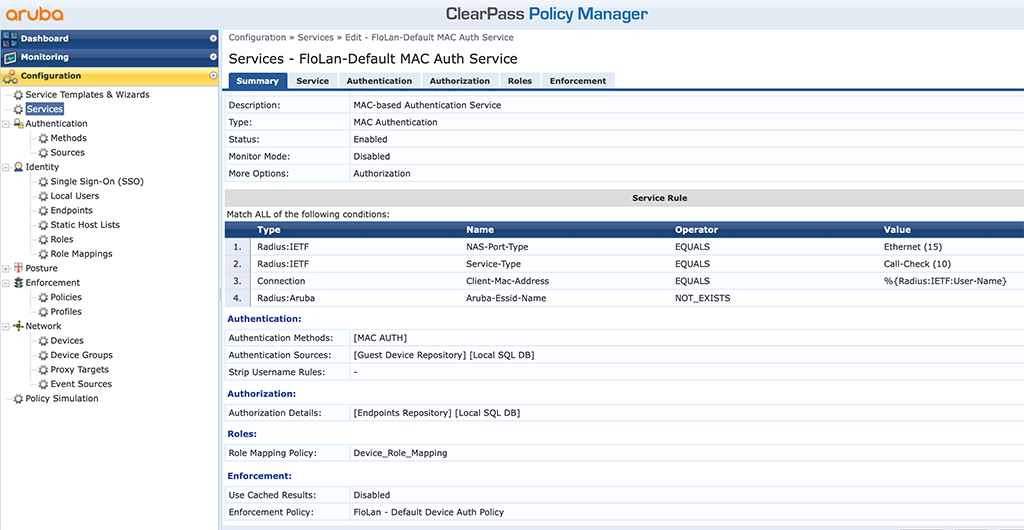
This section covers the ClearPass part for Downloadable Roles for ArubaOS Switches. I will not cover the creation of services and policies and other ClearPass-related stuff. I will create a profile, which can be used in a policy for an authentication service. But I assume that you know how to create policies and services within ClearPass.
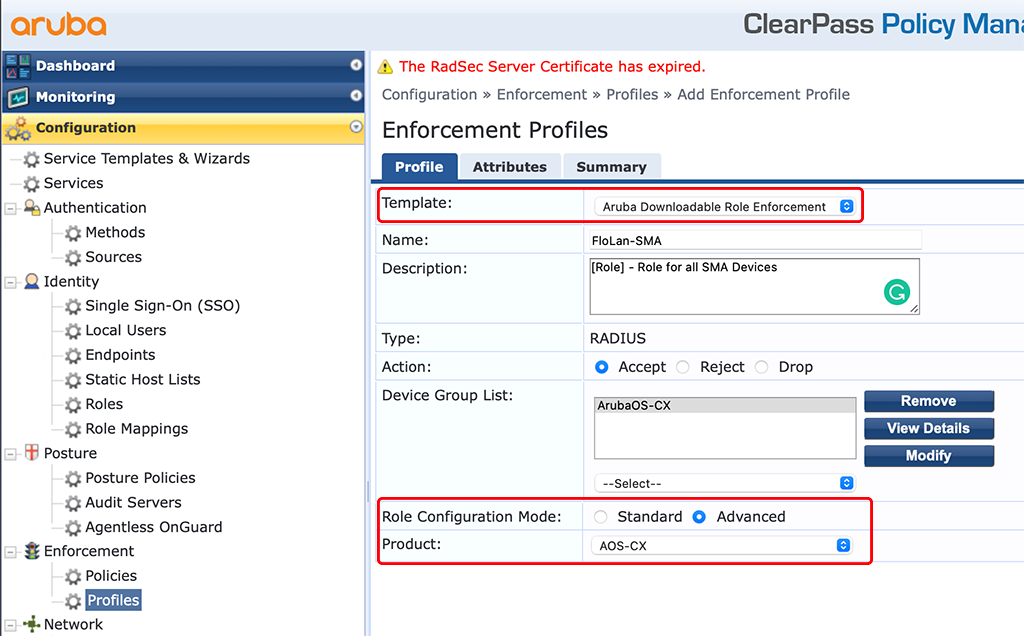
Go to ClearPass and “Configuration–>Enforcement–>Profiles” and create a new “Aruba Downloadable Role Enforcement”:
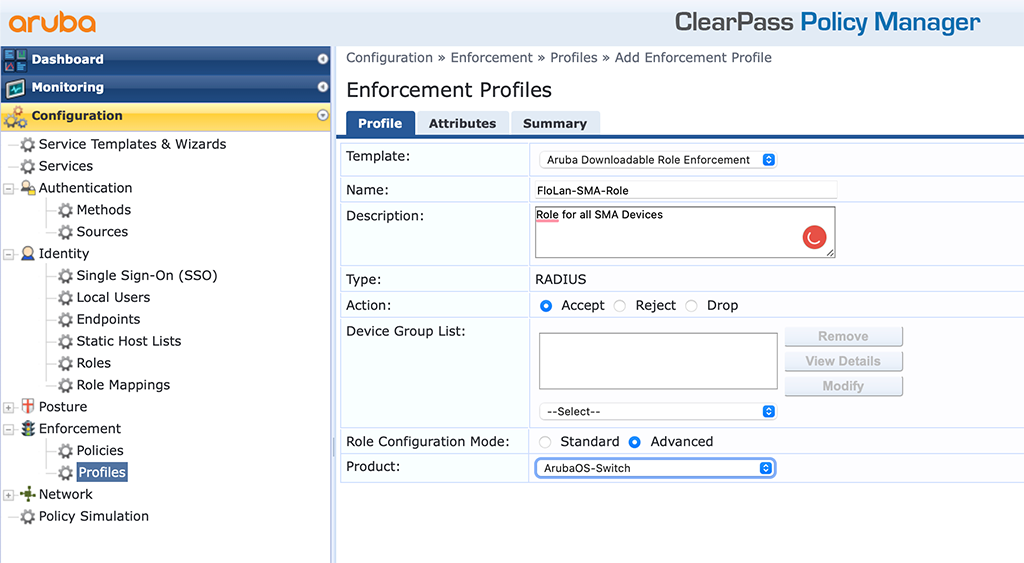
The important part is the “Template” and the “Product”. The “Name” should be a good hint for the use of the profile. I use the “Advanced” “Role Configuration Mode”. This allows to directly enter the information. With “Standard” you get a nice GUI to enter your stuff. Click “Next” to get to the “Attributes”:
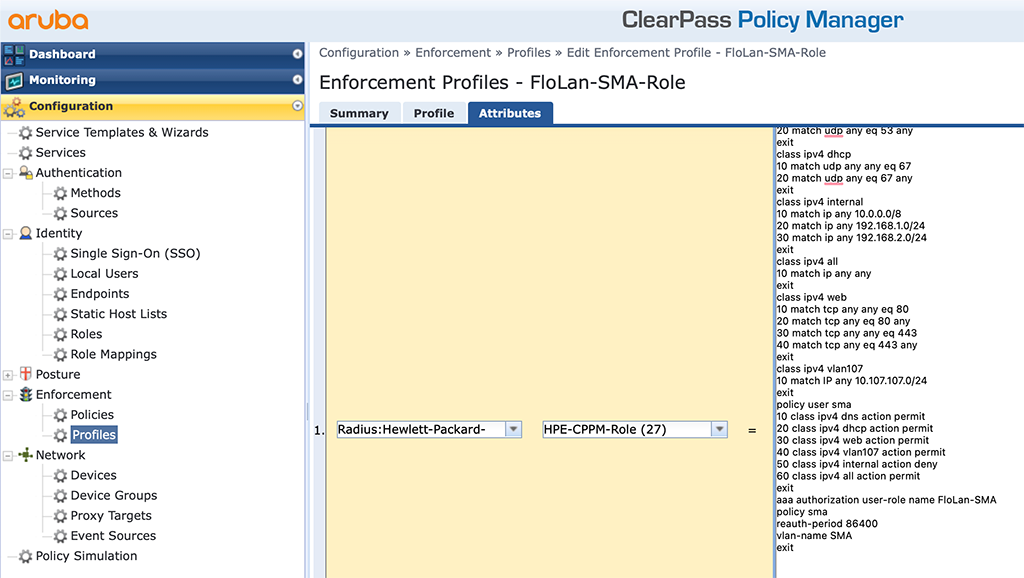
Below is the content of the text box:
class ipv4 dns
10 match udp any any eq 53
20 match udp any eq 53 any
exit
class ipv4 dhcp
10 match udp any any eq 67
20 match udp any eq 67 any
exit
class ipv4 internal
10 match ip any 10.0.0.0/8
20 match ip any 192.168.1.0/24
30 match ip any 192.168.2.0/24
exit
class ipv4 all
10 match ip any any
exit
class ipv4 web
10 match tcp any any eq 80
20 match tcp any eq 80 any
30 match tcp any any eq 443
40 match tcp any eq 443 any
exit
class ipv4 vlan107
10 match IP any 10.107.107.0/24
exit
policy user sma
10 class ipv4 dns action permit
20 class ipv4 dhcp action permit
30 class ipv4 web action permit
40 class ipv4 vlan107 action permit
50 class ipv4 internal action deny
60 class ipv4 all action permit
exit
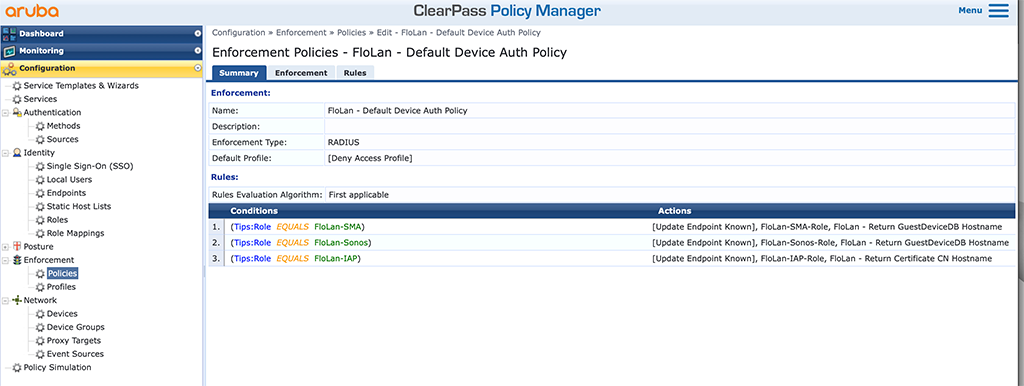
aaa authorization user-role name FloLan-SMA
policy sma
reauth-period 86400
vlan-name SMA
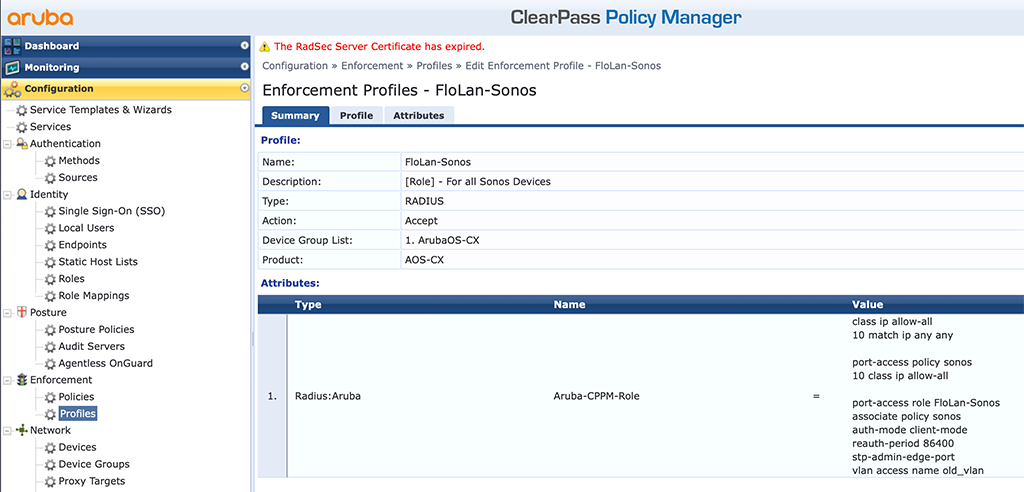
exitFirst, I create some classes like DNS, DHCP, internal networks, an all class, a web class, and a class for VLAN 107. This is to use those classes for the policy. Here I have the policy “sma” which allows DNS, DHCP, web, and traffic within VLAN 107, but denies traffic to my internal networks. The last line is an allow-all rule.
The role port is the last block, which assigns the policy to the role and sets the “reauth-period” to one day (86400 seconds).
If a device get’s this returned in ClearPass, the switch will download the role from ClearPass and apply this role to the device.
show port-access clients

Downloaded user roles are preceded by *

 Port Access Client Status

  Port  Client Name   MAC Address       IP Address      User Role         Type  VLAN
  ----- ------------- ----------------- --------------- ----------------- ----- -------------------------------------------------------
  2/20  SUNNY ISLAND  0040ad-a4c0e0     10.107.107.148  *FloLan_SMA_Ro... MAC   107
  2/20  SUNNY TRIP... 0040ad-ab95ad     10.107.107.149  *FloLan_SMA_Ro... MAC   107
  2/20  Sunny Home... 00d093-49c0d1     10.107.107.150  *FloLan_SMA_Ro... MAC   107
You can even have more details:
show port-access clients detailed

  Client Base Details :
   Port            : 2/20                  Authentication Type : mac-based
   Client Status   : authenticated         Session Time        : 31529 seconds
   Client Name     : SUNNY ISLAND          Session Timeout     : 86400 seconds
   MAC Address     : 0040ad-a4c0e0
   IP              : 10.107.107.148

   Auth Order      : Not Set
   Auth Priority   : Not Set
   LMA Fallback    : Disabled

Downloaded user roles are preceded by *

 User Role Information

   Name                              : *FloLan_SMA_Role-3036-5
   Type                              : downloaded
   Reauthentication Period (seconds) : 86400
   Cached Reauth Period (seconds)    : 0
   Logoff Period (seconds)           : 300
   Untagged VLAN                     : 107
   Tagged VLANs                      :
   Captive Portal Profile            :
   Policy                            : sma_FloLan_SMA_Role-3036-5


Statements for policy "sma_FloLan_SMA_Role-3036-5"
policy user "sma_FloLan_SMA_Role-3036-5"
     10 class ipv4 "dns_FloLan_SMA_Role-3036-5" action permit
     20 class ipv4 "dhcp_FloLan_SMA_Role-3036-5" action permit
     30 class ipv4 "web_FloLan_SMA_Role-3036-5" action permit
     40 class ipv4 "vlan107_FloLan_SMA_Role-3036-5" action permit
     50 class ipv4 "internal_FloLan_SMA_Role-3036-5" action deny
     60 class ipv4 "all_FloLan_SMA_Role-3036-5" action permit
   exit


Statements for class IPv4 "dns_FloLan_SMA_Role-3036-5"
class ipv4 "dns_FloLan_SMA_Role-3036-5"
     10 match udp 0.0.0.0 255.255.255.255 0.0.0.0 255.255.255.255 eq 53
     20 match udp 0.0.0.0 255.255.255.255 eq 53 0.0.0.0 255.255.255.255
   exit


Statements for class IPv4 "dhcp_FloLan_SMA_Role-3036-5"
class ipv4 "dhcp_FloLan_SMA_Role-3036-5"
     10 match udp 0.0.0.0 255.255.255.255 0.0.0.0 255.255.255.255 eq 67
     20 match udp 0.0.0.0 255.255.255.255 eq 67 0.0.0.0 255.255.255.255
   exit


Statements for class IPv4 "web_FloLan_SMA_Role-3036-5"
class ipv4 "web_FloLan_SMA_Role-3036-5"
     10 match tcp 0.0.0.0 255.255.255.255 0.0.0.0 255.255.255.255 eq 80
     20 match tcp 0.0.0.0 255.255.255.255 eq 80 0.0.0.0 255.255.255.255
     30 match tcp 0.0.0.0 255.255.255.255 0.0.0.0 255.255.255.255 eq 443
     40 match tcp 0.0.0.0 255.255.255.255 eq 443 0.0.0.0 255.255.255.255
   exit


Statements for class IPv4 "vlan107_FloLan_SMA_Role-3036-5"
class ipv4 "vlan107_FloLan_SMA_Role-3036-5"
     10 match ip 0.0.0.0 255.255.255.255 10.107.107.0 0.0.0.255
   exit


Statements for class IPv4 "internal_FloLan_SMA_Role-3036-5"
class ipv4 "internal_FloLan_SMA_Role-3036-5"
     10 match ip 0.0.0.0 255.255.255.255 10.0.0.0 0.255.255.255
     20 match ip 0.0.0.0 255.255.255.255 192.168.1.0 0.0.0.255
     30 match ip 0.0.0.0 255.255.255.255 192.168.2.0 0.0.0.255
   exit


Statements for class IPv4 "all_FloLan_SMA_Role-3036-5"
class ipv4 "all_FloLan_SMA_Role-3036-5"
     10 match ip 0.0.0.0 255.255.255.255 0.0.0.0 255.255.255.255
   exit

   Tunnelednode Server Redirect      : Disabled
   Secondary Role Name               :
   Device Attributes                 : Disabled
Here you can see all the details which were downloaded from ClearPass.
To make the picture complete, below are the ClearPass settings.
The Policy used to select the role:
And the services bringing everything together:
As you see in the screenshots above, the rest of the ClearPass configuration is straightforward. Nothing special. And if you need to change the role, simply change the profile with the role and new users will use this new configuration.
Downloadable User Role with Aruba CX Switches
Let’s do the same with an Aruba CX switch. I will use a 6300 running 10.06.0112.
First, you need to add the ClearPass HTTPS root certificate (or signing) to the certificate store on the switch. Unfortunately, there is no automatic way like we have with the ArubaOS-S switches, but it is also just a copy-paste thing. Use the following command to create a new ta profile with the root (or signing) ca:
CX-6300-Selm(config)# crypto pki ta-profile clearpass
CX-6300-Selm(config-ta-clearpass)# ta-certificate
Paste the certificate in PEM format below, then hit enter and ctrl-D:
CX-6300-Selm(config-ta-cert)# -----BEGIN CERTIFICATE-----
CX-6300-Selm(config-ta-cert)# MIIGEzCCA/ugAwIBAgIQfVtRJrR2uhHbdBYLvFMNpzANBgkqhkiG9w0BAQwFADCB
CX-6300-Selm(config-ta-cert)# iDELMAkGA1UEBhMCVVMxEzARBgNVBAgTCk5ldyBKZXJzZXkxFDASBgNVBAcTC0pl
CX-6300-Selm(config-ta-cert)# cnNleSBDaXR5MR4wHAYDVQQKExVUaGUgVVNFUlRSVVNUIE5ldHdvcmsxLjAsBgNV
CX-6300-Selm(config-ta-cert)# BAMTJVVTRVJUcnVzdCBSU0EgQ2VydGlmaWNhdGlvbiBBdXRob3JpdHkwHhcNMTgx
CX-6300-Selm(config-ta-cert)# MTAyMDAwMDAwWhcNMzAxMjMxMjM1OTU5WjCBjzELMAkGA1UEBhMCR0IxGzAZBgNV
CX-6300-Selm(config-ta-cert)# BAgTEkdyZWF0ZXIgTWFuY2hlc3RlcjEQMA4GA1UEBxMHU2FsZm9yZDEYMBYGA1UE
CX-6300-Selm(config-ta-cert)# ChMPU2VjdGlnbyBMaW1pdGVkMTcwNQYDVQQDEy5TZWN0aWdvIFJTQSBEb21haW4g
CX-6300-Selm(config-ta-cert)# VmFsaWRhdGlvbiBTZWN1cmUgU2VydmVyIENBMIIBIjANBgkqhkiG9w0BAQEFAAOC
CX-6300-Selm(config-ta-cert)# AQ8AMIIBCgKCAQEA1nMz1tc8INAA0hdFuNY+B6I/x0HuMjDJsGz99J/LEpgPLT+N
CX-6300-Selm(config-ta-cert)# TQEMgg8Xf2Iu6bhIefsWg06t1zIlk7cHv7lQP6lMw0Aq6Tn/2YHKHxYyQdqAJrkj
CX-6300-Selm(config-ta-cert)# eocgHuP/IJo8lURvh3UGkEC0MpMWCRAIIz7S3YcPb11RFGoKacVPAXJpz9OTTG0E
CX-6300-Selm(config-ta-cert)# oKMbgn6xmrntxZ7FN3ifmgg0+1YuWMQJDgZkW7w33PGfKGioVrCSo1yfu4iYCBsk
CX-6300-Selm(config-ta-cert)# Haswha6vsC6eep3BwEIc4gLw6uBK0u+QDrTBQBbwb4VCSmT3pDCg/r8uoydajotY
CX-6300-Selm(config-ta-cert)# uK3DGReEY+1vVv2Dy2A0xHS+5p3b4eTlygxfFQIDAQABo4IBbjCCAWowHwYDVR0j
CX-6300-Selm(config-ta-cert)# BBgwFoAUU3m/WqorSs9UgOHYm8Cd8rIDZsswHQYDVR0OBBYEFI2MXsRUrYrhd+mb
CX-6300-Selm(config-ta-cert)# +ZsF4bgBjWHhMA4GA1UdDwEB/wQEAwIBhjASBgNVHRMBAf8ECDAGAQH/AgEAMB0G
CX-6300-Selm(config-ta-cert)# A1UdJQQWMBQGCCsGAQUFBwMBBggrBgEFBQcDAjAbBgNVHSAEFDASMAYGBFUdIAAw
CX-6300-Selm(config-ta-cert)# CAYGZ4EMAQIBMFAGA1UdHwRJMEcwRaBDoEGGP2h0dHA6Ly9jcmwudXNlcnRydXN0
CX-6300-Selm(config-ta-cert)# LmNvbS9VU0VSVHJ1c3RSU0FDZXJ0aWZpY2F0aW9uQXV0aG9yaXR5LmNybDB2Bggr
CX-6300-Selm(config-ta-cert)# BgEFBQcBAQRqMGgwPwYIKwYBBQUHMAKGM2h0dHA6Ly9jcnQudXNlcnRydXN0LmNv
CX-6300-Selm(config-ta-cert)# bS9VU0VSVHJ1c3RSU0FBZGRUcnVzdENBLmNydDAlBggrBgEFBQcwAYYZaHR0cDov
CX-6300-Selm(config-ta-cert)# L29jc3AudXNlcnRydXN0LmNvbTANBgkqhkiG9w0BAQwFAAOCAgEAMr9hvQ5Iw0/H
CX-6300-Selm(config-ta-cert)# ukdN+Jx4GQHcEx2Ab/zDcLRSmjEzmldS+zGea6TvVKqJjUAXaPgREHzSyrHxVYbH
CX-6300-Selm(config-ta-cert)# 7rM2kYb2OVG/Rr8PoLq0935JxCo2F57kaDl6r5ROVm+yezu/Coa9zcV3HAO4OLGi
CX-6300-Selm(config-ta-cert)# H19+24rcRki2aArPsrW04jTkZ6k4Zgle0rj8nSg6F0AnwnJOKf0hPHzPE/uWLMUx
CX-6300-Selm(config-ta-cert)# RP0T7dWbqWlod3zu4f+k+TY4CFM5ooQ0nBnzvg6s1SQ36yOoeNDT5++SR2RiOSLv
CX-6300-Selm(config-ta-cert)# xvcRviKFxmZEJCaOEDKNyJOuB56DPi/Z+fVGjmO+wea03KbNIaiGCpXZLoUmGv38
CX-6300-Selm(config-ta-cert)# sbZXQm2V0TP2ORQGgkE49Y9Y3IBbpNV9lXj9p5v//cWoaasm56ekBYdbqbe4oyAL
CX-6300-Selm(config-ta-cert)# l6lFhd2zi+WJN44pDfwGF/Y4QA5C5BIG+3vzxhFoYt/jmPQT2BVPi7Fp2RBgvGQq
CX-6300-Selm(config-ta-cert)# 6jG35LWjOhSbJuMLe/0CjraZwTiXWTb2qHSihrZe68Zk6s+go/lunrotEbaGmAhY
CX-6300-Selm(config-ta-cert)# LcmsJWTyXnW0OMGuf1pGg+pRyrbxmRE1a6Vqe8YAsOf4vmSyrcjC8azjUeqkk+B5
CX-6300-Selm(config-ta-cert)# yOGBQMkKW+ESPMFgKuOXwIlCypTPRpgSabuY0MLTDXJLR27lk8QyKGOHQ+SwMj4K
CX-6300-Selm(config-ta-cert)# 00u/I5sUKUErmgQfky3xxzlIPK1aEn8=
CX-6300-Selm(config-ta-cert)# -----END CERTIFICATE-----
CX-6300-Selm(config-ta-cert)#
CX-6300-Selm(config-ta-cert)#
The certificate you are importing has the following attributes:
Subject: C = GB, ST = Greater Manchester, L = Salford, O = Sectigo Limited, CN = Sectigo RSA Domain Validation Secure Server CA
Issuer:  C = US, ST = New Jersey, L = Jersey City, O = The USERTRUST Network, CN = USERTrust RSA Certification Authority
Serial Number: 0x7D5B5126B476BA11DB74160BBC530DA7
TA certificate import is allowed only once for a TA profile
Do you want to accept this certificate (y/n)? y
Afterward, check the ta-profiles on the switch:
CX-6300-Selm(config)# show crypto pki ta-profile

TA Profile Name                  TA Certificate       Revocation Check
-------------------------------- -------------------- ----------------
clearpass                        Installed, valid     disabled
The next step is to add the radius server to the config as well:
radius-server host clearpass-a.arubalab.net key ciphertext AQBapVWcNJavUClNBQenFaJwwRrR+nWcJUvsQlHUbuaiOvlDCAAAAMCnYwT2Ful+ clearpass-username dur-user clearpass-password ciphertext AQBapVWcNJavUClNBQenFaJwwRrR+nWcJUvsQlHUbuaiOvlDCAAAAMCnYwT2Ful+ vrf mgmt
radius-server host clearpass-b.arubalab.net key ciphertext AQBapVWcNJavUClNBQenFaJwwRrR+nWcJUvsQlHUbuaiOvlDCAAAAMCnYwT2Ful+ clearpass-username dur-user clearpass-password ciphertext AQBapVWcNJavUClNBQenFaJwwRrR+nWcJUvsQlHUbuaiOvlDCAAAAMCnYwT2Ful+ vrf mgmt
!
To use them for authentication, add them to a group:
aaa group server radius cppm
    server clearpass-a.arubalab.net vrf mgmt
    server clearpass-b.arubalab.net vrf mgmt
Now, enable authentication (I do MAC auth and dot1x) globally:
aaa authentication port-access dot1x authenticator
    radius server-group cppm
    enable
aaa authentication port-access mac-auth
    radius server-group cppm
    enable
I also enabled accounting:
aaa accounting port-access start-stop interim 5 group cppmThis will enable accounting with interim updates every 5 minutes.
To get also the IP information for all clients it is wise to enable the client tracker on CX as well:
client track ipThe last step is to enable authentication on a per port basis. Take the following as an example:
interface 1/1/16
    no shutdown
    description Uplink_SMA
    no routing
    vlan access 1
    aaa authentication port-access client-limit 10
    aaa authentication port-access dot1x authenticator
        enable
    aaa authentication port-access mac-auth
        enable
Downloadable User Roles: ClearPass Configuration for Aruba CX Switches
Now let’s head over to ClearPass and create some profiles. I will use the same service and policy as with the ArubaOS Switches above. Please take a look there for the basic configuration and use the following paragraphs to create the CX-specific user role profiles.
Create a new enforcement profile like the one below:
The important part is the “Template”, using the “Aruba Downloadable Role Enforcement” and the “Product” with “AOS-CX”. I also use the “Advanced” “Role Configuration Mode” as this will allow me to use all available features and not only those available in ClearPass. I have created the same profiles as for the AOS-S switches above to show the differences and some examples. The first one is with a simple access VLAN and policy. Together with some basic settings for the port:
The above one is quite obvious. The only thing to note, in the policy, the “action permit” is the default value and there is no need to have it in the DUR.
Let’s take some more complex examples like this one with many classes for the policy, used within the role:
class ip dns
10 match udp any any eq 53
20 match udp any eq 53 any

class ip dhcp
10 match udp any any eq 67
20 match udp any eq 67 any

class ip internal
10 match ip any 10.0.0.0/8
20 match ip any 192.168.1.0/24
30 match ip any 192.168.2.0/24

class ip all
10 match ip any any

class ip web
10 match tcp any any eq 80
20 match tcp any eq 80 any
30 match tcp any any eq 443
40 match tcp any eq 443 any

class ip vlan107
10 match IP any 10.107.107.0/24

port-access policy sma
10 class ip dns
20 class ip dhcp
30 class ip web
40 class ip vlan107
50 class ip internal action drop
60 class ip all

port-access role SMA
associate policy sma
auth-mode client-mode
stp-admin-edge-port
vlan access name SMA
reauth-period 86400
Both examples are using an access VLAN. If you need tagged VLANs as well it can get tricky. Took me an hour to figure out how to work with trunks in downloadable user roles and VLAN names. But for my IAP’s this is necessary:
class ip allow-all
10 match ip any any

port-access policy iap
10 class ip allow-all

port-access role FloLan-IAP
associate policy iap
reauth-period 86400
vlan trunk native name IAP_Management
vlan trunk allowed name IAP_Management
vlan trunk allowed name old_vlan
auth-mode device-mode
stp-admin-edge-port
The one, which made me headaches was the “vlan trunk allowed name” one. But simply using the command multiple times for all your VLANs does the trick.
On the CX switches, you can check if everything is working with the following commands.
First check if the user is authenticated:
CX-6300-Selm# show port-access clients

Port Access Clients

Status codes: d device-mode

----------------------------------------------------------------------------------
  Port     MAC-Address       Onboarding     Status      Role
                             Method
----------------------------------------------------------------------------------
d 1/1/5    48:4a:e9:c1:5e:8a dot1x          Success     FloLan_IAP-3059-8
d 1/1/7    90:4c:81:cf:3c:22 dot1x          Success     FloLan_IAP-3059-8
  1/1/12   b8:e9:37:40:d4:11 mac-auth       Success     FloLan_Sonos-3058-2
  1/1/13   94:9f:3e:44:52:f2 mac-auth       Success     FloLan_Sonos-3058-2
  1/1/13   48:a6:b8:a9:d7:fa mac-auth       Success     FloLan_Sonos-3058-2
  1/1/14   94:9f:3e:86:75:cc mac-auth       Success     FloLan_Sonos-3058-2
  1/1/15   94:9f:3e:86:75:e8 mac-auth       Success     FloLan_Sonos-3058-2
  1/1/16   00:40:ad:ab:95:ad mac-auth       Success     FloLan_SMA-3057-6
  1/1/16   00:40:ad:a4:c0:e0 mac-auth       Success     FloLan_SMA-3057-6
  1/1/16   00:d0:93:49:c0:d1 mac-auth       Success     FloLan_SMA-3057-6
To get more details on the roles you can use the following command:
CX-6300-Selm# show port-access role clearpass

Role Information:

Name  : FloLan_IAP-3059-8
Type  : clearpass
Status: Completed
----------------------------------------------
    Reauthentication Period             : 86400 secs
    Cached Reauthentication Period      :
    Authentication Mode                 : device-mode
    Session Timeout                     :
    Client Inactivity Timeout           :
    Description                         :
    Gateway Zone                        :
    UBT Gateway Role                    :
    UBT Gateway Clearpass Role          :
    Access VLAN                         :
    Native VLAN                         :
    Allowed Trunk VLANs                 :
    Access VLAN Name                    :
    Native VLAN Name                    : IAP_Management
    Allowed Trunk VLAN Names            : IAP_Management,
                                          old_vlan
    VLAN Group Name                     :
    MTU                                 :
    QOS Trust Mode                      :
    STP Administrative Edge Port        : true
    PoE Priority                        :
    Captive Portal Profile              :
    Policy                              : iap_FloLan_IAP-3059-8
For all details you can also use the command for a specific port like this:
CX-6300-Selm# show port-access clients interface 1/1/5 detail

Port Access Client Status Details:

Client 48:4a:e9:c1:5e:8a, IAP-345
============================
  Session Details
  ---------------
    Port         : 1/1/5
    Session Time : 31400s
    IPv4 Address : 10.102.102.149
    IPv6 Address :

  VLAN Details
  ------------
    VLAN Group Name :
    VLANs Assigned  :
      Access          :
      Native Untagged :
      Allowed Trunk   :

  Authentication Details
  ----------------------
    Status          : dot1x Authenticated
    Auth Precedence : dot1x - Authenticated, mac-auth - Not attempted

  Authorization Details
  ----------------------
    Role   : FloLan_IAP-3059-8
    Status : Applied


Role Information:

Name  : FloLan_IAP-3059-8
Type  : clearpass
Status: Completed
----------------------------------------------
    Reauthentication Period             : 86400 secs
    Cached Reauthentication Period      :
    Authentication Mode                 : device-mode
    Session Timeout                     :
    Client Inactivity Timeout           :
    Description                         :
    Gateway Zone                        :
    UBT Gateway Role                    :
    UBT Gateway Clearpass Role          :
    Access VLAN                         :
    Native VLAN                         :
    Allowed Trunk VLANs                 :
    Access VLAN Name                    :
    Native VLAN Name                    : IAP_Management
    Allowed Trunk VLAN Names            : IAP_Management,
                                          old_vlan
    VLAN Group Name                     :
    MTU                                 :
    QOS Trust Mode                      :
    STP Administrative Edge Port        : true
    PoE Priority                        :
    Captive Portal Profile              :
    Policy                              : iap_FloLan_IAP-3059-8


Access Policy Details:

Policy Name   : iap_FloLan_IAP-3059-8
Policy Type   : Downloaded
Policy Status : Applied

SEQUENCE    CLASS                        TYPE ACTION
----------- ---------------------------- ---- ----------------------------------
10          allow-all_FloLan_IAP-3059-8  ipv4 permit


Class Details:

class ip allow-all_FloLan_IAP-3059-8
    10 match any any any
Downloadable User Role with Aruba Instant AP IAP
Next is the IAP. They support DUR as well. I will use Central to manage my IAP’s but DUR also works with IAP’s alone or if they are managed by AirWave.
To make the IAP work with DUR you need to add the read-only admin for ClearPass (which could be the same as with the switches above) to the radius configuration in the IAP. To add this user to the radius server in central go to the group with your IAP’s and go to “Devices” and stay with the “Access Points” tab. Now select the config button in the right upper corner of the screen and stay with “WLANs”. The configuration to add the user is directly within the SSID in the roles section. So either create a new SSID or modify an existing SSID and select “Downloadable Role” in the roles section. Now you can add the user to your radius servers:
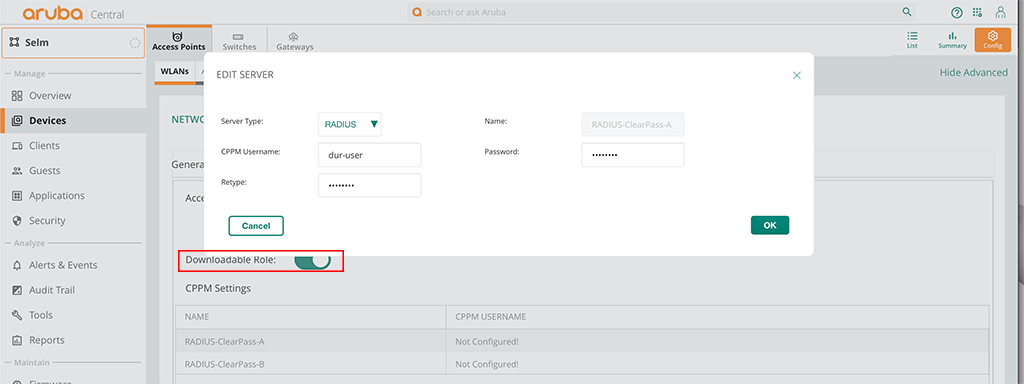
That’s all you need. You can now switch to ClearPass and create the profiles for your roles.
Downloadable User Roles: ClearPass Configuration for Aruba Instant AP’s
For the IAP’s the ClearPass configuration is as simple as for the ArubaOS Switches above. First, you need to create an Enforcement Profile. Go to “Configuration–>Enforcement–>Profiles” and create a new one:
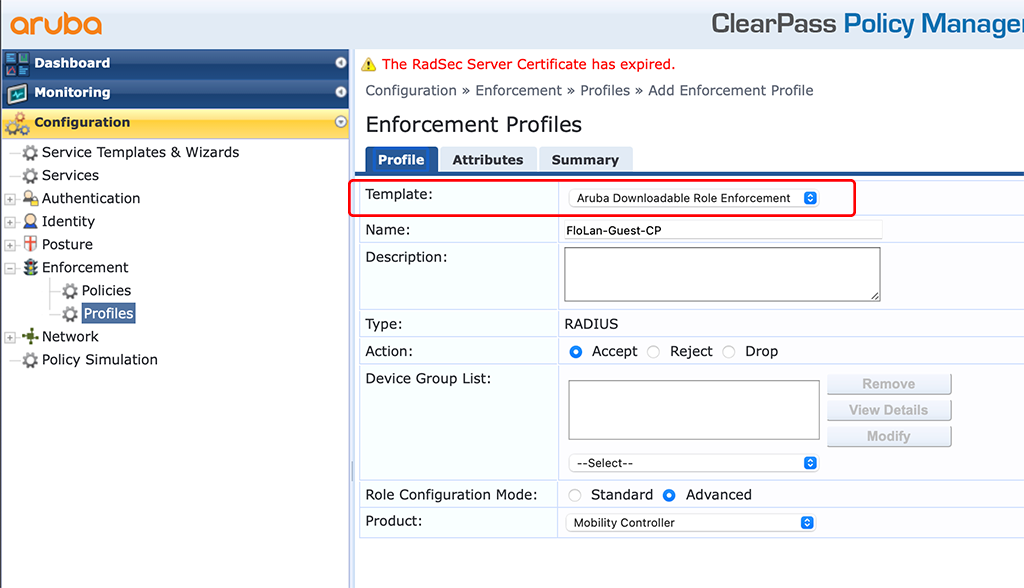
The important part is the “Template”. Select the “Aruba Downloadable Role Enforcement” in the drop-down menu. Also make sure, to select “Advanced” for the “Role Configuration Mode”. Click the “Attributes” tab and create your role. My role looks like this:
wlan access-rule FloLan-Guest
captive-portal external profile "FloLan-Guest_CPPM"
rule 10.104.104.21 255.255.255.255 match udp 53 53 permit
rule 10.104.104.22 255.255.255.255 match udp 53 53 permit
rule 10.104.104.40 255.255.255.255 match tcp 443 443 permit
rule 10.104.104.41 255.255.255.255 match tcp 443 443 permit
rule 10.104.104.42 255.255.255.255 match tcp 443 443 permit
rule any any match any any any deny
exit
There are two things to know about the role above and IAP’s role assignment.
First, I included a “captive-portal” profile within the role. This captive portal profile needs to be configured on the IAP already. There is currently no chance to download this profile as well, and the captive profile name is not allowed to have spaces within the name. With spaces in the name, it will not work.
Secondly, you cannot enforce a VLAN within the role. You need to send the VLAN as the “Aruba-User-Vlan” attribute together with the role VSA in your radius accept message.
My policy for this looks like this:
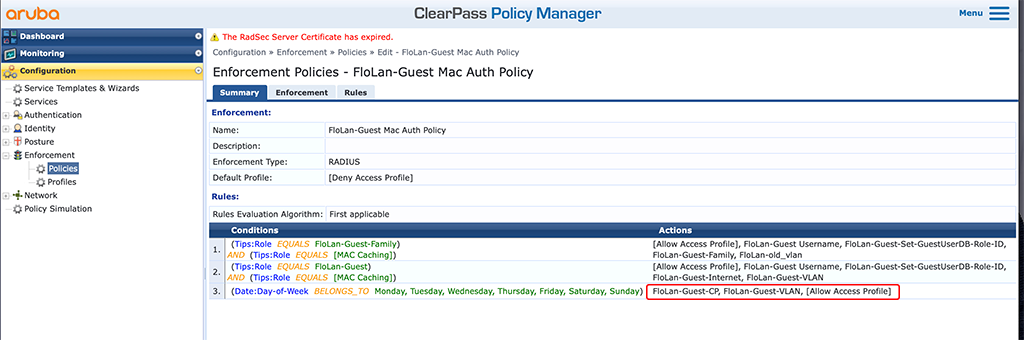
I use the created DUR profile and a VLAN profile for the action in the last policy line. This is a simple default policy that will always be triggered if all of the above will fail.
In the access tracker it will look like this:
It is the role and the VLAN in the response.
Downloadable User Role with Aruba Controller
The configuration of Downloadable User Role with an Aruba Controller is nearly the same as with an Aruba Instant AP.
First, you need to add the dur-user to your radius server configuration. Go to “Configuration–>Authentication–>Auth Servers” and select your radius server to add the dur-user:
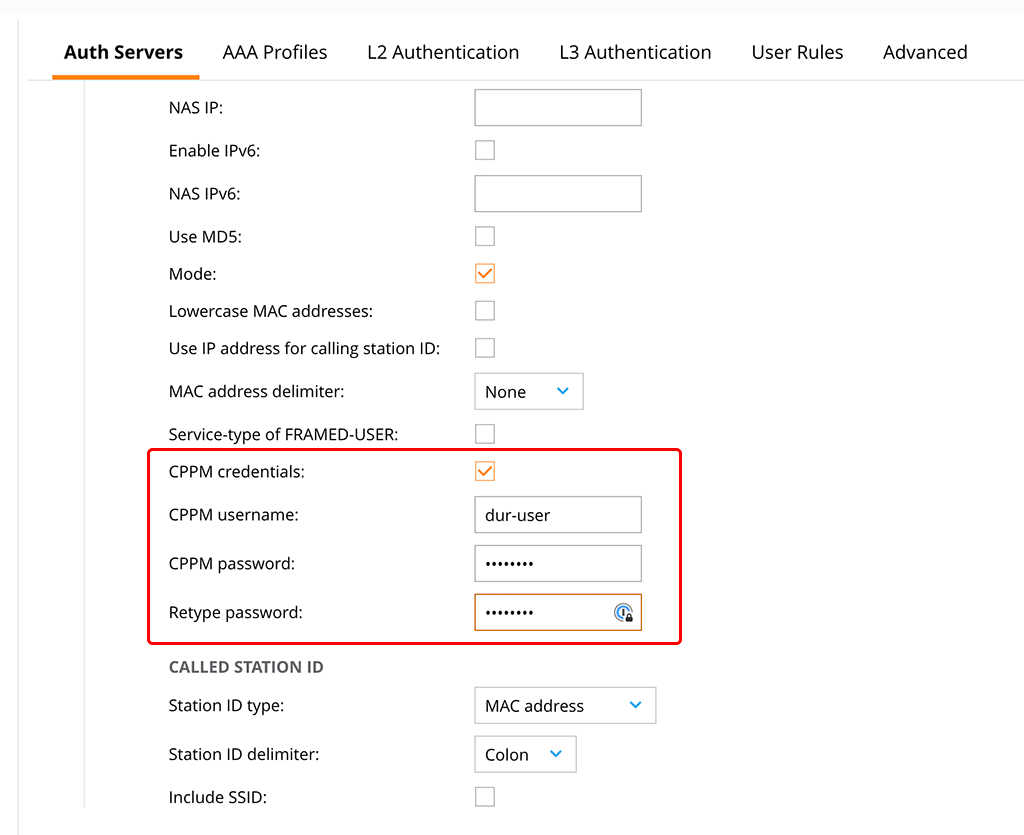
Check the “CPPM credentials” checkbox and enter the username and the password. This will allow the controller to download the role from ClearPass using the dur-user.
The next step is to create a new AAA Profile with DUR enabled. Go to “Configuration–>Authentication–>AAA Profiles” and create a new profile or change an existing one. If you change an existing profile, please save it to a different, new profile using the “Submit As” button:
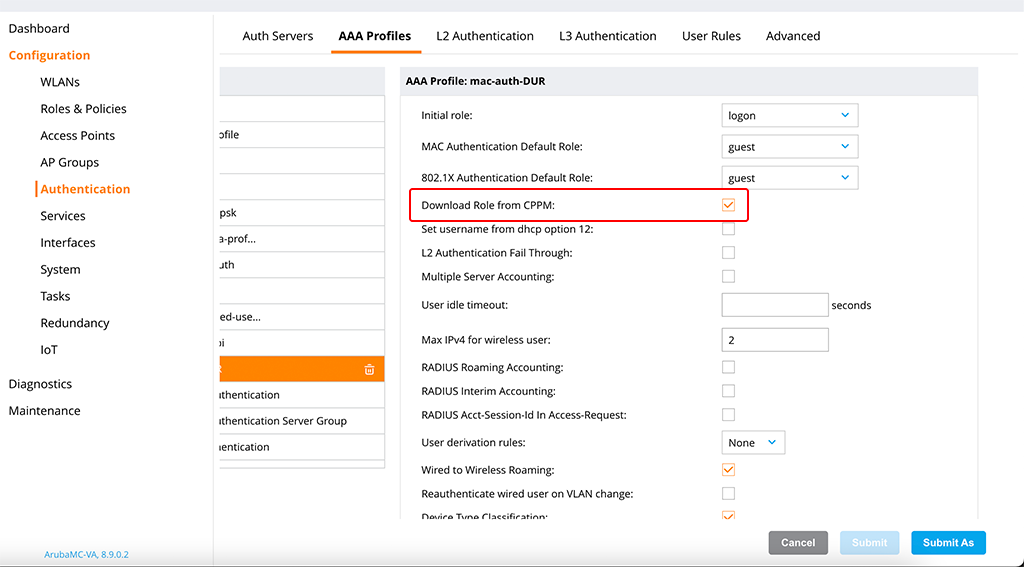
You simply need to check the “Download Role from CPPM” checkbox, to enable the download of roles from ClearPass.
You can now use this profile for your SSID’s to start authenticating clients. I will use a wired user to test the authentication and apply the policy to the VLAN, to which the user is attached. But the mechanism is the same if you would use wireless users.
Downloadable User Roles: ClearPass configuration for an Aruba Controller
For the ClearPass configuration, I assume that the configurations, done before are still there, so I will only show the Enforcement Profile, which is used to allow access to the network for the client.
To create a new Enforcement Profile in ClearPass go to “Configuration–>Enforcement–>Profiles” and use the “Add” button in the right upper corner. This time, I will use the standard mode to show you this one as well:
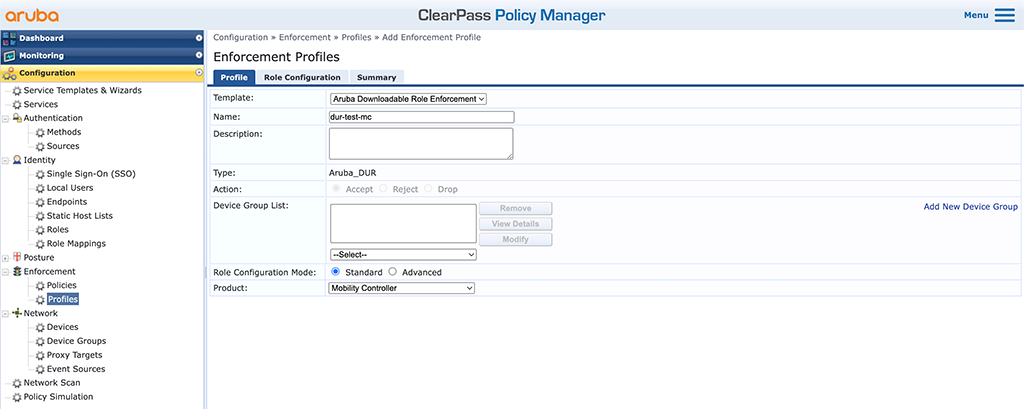
In the “Product” select box select “Mobility Controller” and use “Standard” for the “Role Configuration Mode”. Do not forget to enter a good “Name” and select “Aruba Downloadable Role Enforcement” for the “Template”. Click “Next” to get to the “Role Configuration”:
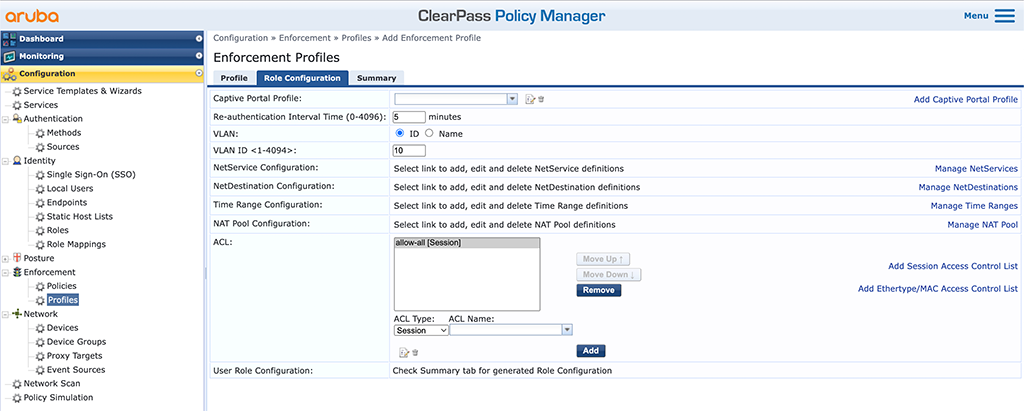
I did nothing special here. I do a 5 minutes reauth interval using the “Re-authentication Interval Time” and set the “VLAN” to 10. I also added a very simple “allow-all” “ACL”. It simply does what it says. Click “Next” to get to the summary screen:
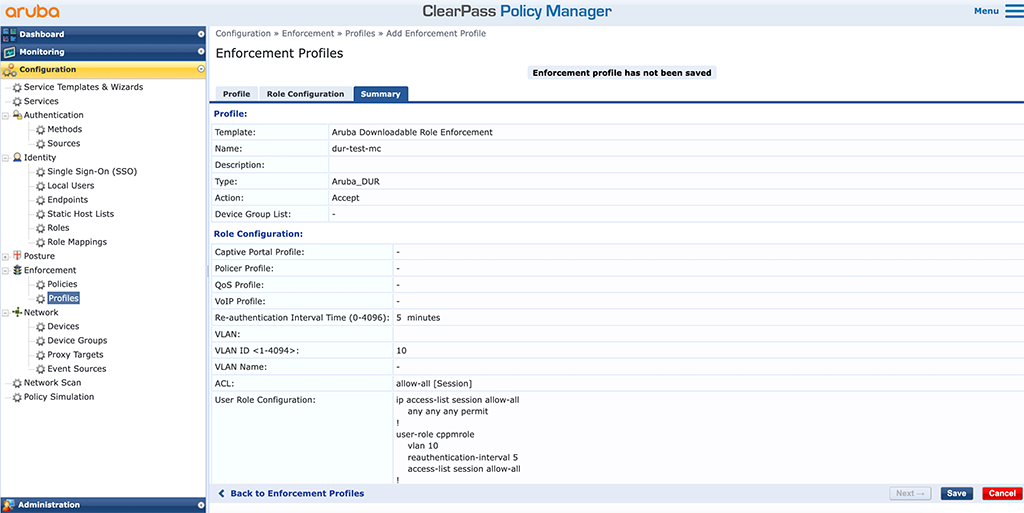
Add this profile to your service and you can start to authenticate clients:
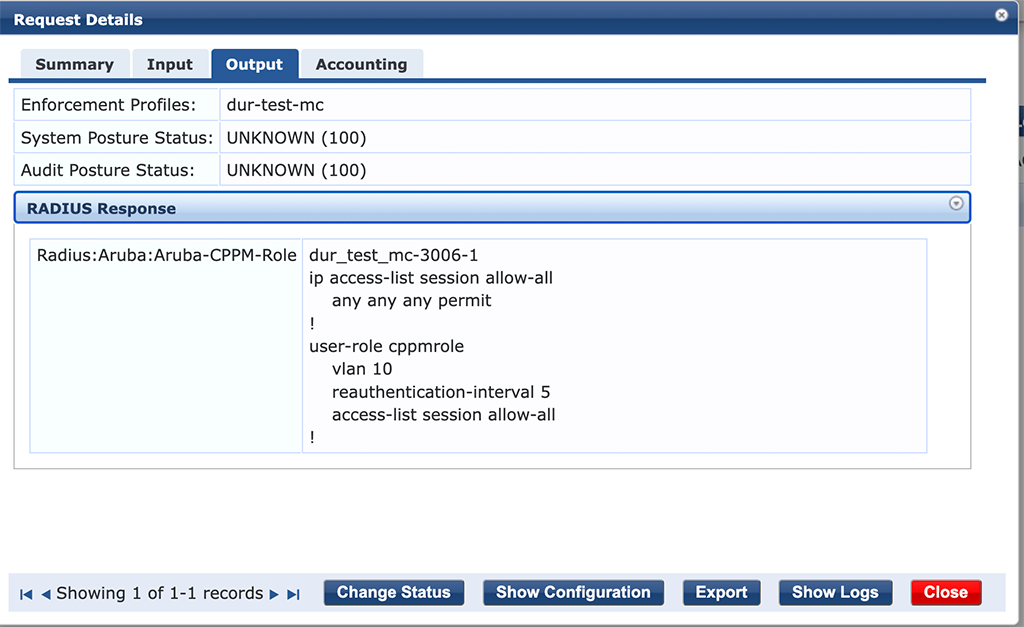
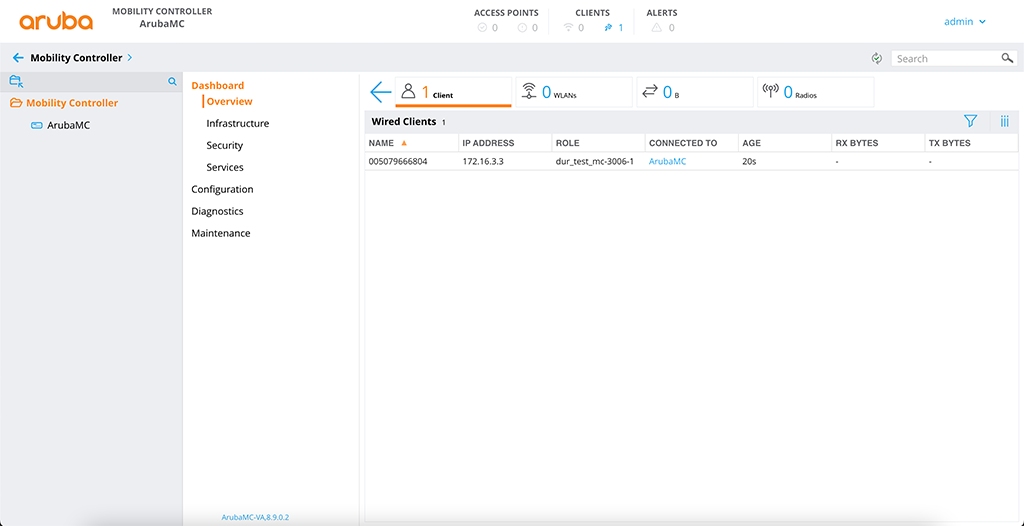
On the controller, you can see this as well:
This concludes this post about Downloadable User Roles. Did you use DUR’s in your environment?
If you find this post useful, leave me a comment and share your feedback with me. You can also buy me Pizza, using the “Buy me a Pizza” button on the right, to support this blog and keep the IT gremlin happy.
If you would like to do me a favor, share this post with your friends and social media contacts. This would really help to make this blog more popular and help others to find the information above more easily using search engines.
Share on:
Amazing
Thanks Al, really appreciated it.
Great article!
One thing should be mentioned. DUR are not supported on 2530 switches.
Hi Michael,
That is correct. But for a full-featured solution, you should always use 2930 or better.
BR
Florian
Hello Florian,
I follow the step but not working for me when I use the command:
show crypto pki ta-profile
it says my Certificate is Pending I don’t why.
any help?
thank you
Hi Mohammad,
Have you checked the logs of your device? If something goes wrong it should be mentioned there.
BR
Florian
Hello Florian,
yes, I Fix the problem it was HTTPS from Clearpass not enabled.
after that, it Works.
Like always thank you
Hi Mohammad,
thanks for sharing your fix. This will help others, looking for a solution.
BR
Florian
Perfect article. Maybe at the RADIUS Dynamic-Authorization to make it perfectly complete 😉
and “at” should be “add”
Do you know what the limits for the number of DUR are on an Aruba Controller? Is this listed somewhere (user guide doesn’t seem to have it)?
Hi Ryan,
thanks for the question. You can find the limits somewhere in documentation, but it is much easier to go to the Aruba Feature Navigator:
https://feature-navigator.arubanetworks.com/
Just select the switch, toggle the “Scale Numbers” toggle and search for “Port Access Security”. There you will find the numbers; you are looking for.
For example, the numbers for the 6300 switch:
Downloadable User Roles per port
10.04.0001 256
Downloadable User Roles per system
10.04.0001 1017
Hope this help.
BR
Florian
Hi,
Great article. One question. … while you can specify a reauth time, what about accounting interim intervals, where you want the controller ( in my case) to send back accounting data every “n” seconds. On the controller, you have two AAA options
Server provided reauth interval
use termination-action attriburte from the server
Which when using radius attributes I check.
I then send back Session-Timeout = xxx secs ,Acc-Interim-Interval = yyy secs and termination-action=1
Do i still need the 2 controller setings if i use DUR?
How can I set up the Scct settings
Rgds
Alex
Hi Alex,
I’m not 100% that I understand your request.
First, you can enable Radius interim Accounting per AAA profile. Just look into the profile and search for “RADIUS Interim Accounting:”.
The frequency can only be configured globally using the “User interim stats frequency:” option in the “Authentication Timers” section. It is not possible to set those on roles basis. Never checked if it works if you send those back, together with the role.
If you use those with local roles on the controller, I would assume that you need them with DUR as well.
BR
Florian
This article is extremely helpful, thanks for taking the time to write it all up!
I ran into one issue with my APs I wanted to share: I got a little over-descriptive in my enforcement profile names in CPPM, and it turns out there is a 32 character limit on the DUR names in Instant OS. The roles will not download if this is exceeded. It took a bit of log parsing to figure that out so might be worth mentioning here!
I also have a question for you about the ‘device’ configuration options in the DURs: does this overwrite what is configured on the port itself? For instance, if I configure STP admin-edge-mode on all my ports, but do not include that in my DUR, is the result that it is enabled or disabled?
I ask because if I run ‘show port-access clients detail’ I see under the role description “Device Attributes/Admin-edge-port: disabled” since my DUR for instant APs is setting only port-mode and PoE priority.
Hi Geoff,
The problem with this limitation is, that ClearPass will add some extra characters to the role name. You need to take them into consideration as well.
That is an interesting question. I’ve never checked on this one. My understanding would be, that everything, which is not configured in the role will not change anything in the port configuration. But I can check during the next week. Need to implement some DUR setup next week 🙂
BR
Florian
Hi Florian,
toller Artikel, ich werde versuchen, es auf Aruba 6200 und Clearpass zu implementieren, und dir sagen, ob es funktioniert oder nicht.
Hey Ventsi,
Danke für das Feedback. Mit dem 6200er sollte es genauso funktionieren. Ich hatte einen 6300er aber auf dem 6200er ist es das gleiche.
BR
Florian
Hi Florian,
Got an issue with invalid user roles, my switch is giving me the error
W 04/30/23 21:41:38 05204 dca: Failed to apply user role ArubaAPS_2-3260-1_7Z4q
to 8021X client CCD083C97B7A on port 5: user role is invalid.
How can i find out what the error is.
DUR content is
User Role Information
Name : *ArubaAPS_2-3260-1
Type : downloaded
Reauthentication Period (seconds) : 0
Cached Reauth Period (seconds) : 0
Logoff Period (seconds) : 300
Untagged VLAN :
Tagged VLAN :
Captive Portal Profile :
Policy : AllowAll_ArubaAPS_2-3260-1
Statements for policy “AllowAll_ArubaAPS_2-3260-1”
policy user “AllowAll_ArubaAPS_2-3260-1”
40 class ipv4 “Permit_All_ArubaAPS_2-3260-1” action permit
exit
Statements for class IPv4 “Permit_All_ArubaAPS_2-3260-1”
class ipv4 “Permit_All_ArubaAPS_2-3260-1”
10 match ip 0.0.0.0 255.255.255.255 0.0.0.0 255.255.255.255
exit
Tunnelednode Server Redirect : Disabled
Secondary Role Name :
Device Attributes : Disabled
Client-Limit Mac-based :
Client-Limit Dot1x :
Hi Alex,
I assume, the output is from the switch, so the role was being downloaded from CPPM already.
I think, while writing this post, I was getting this error as well and I’m sure, that there was something in the logs which points me to the error. Or you can enable debugging to get more infos.
If there is nothing in the logs, you could add a VLAN, because this is missing in the output.
Also, the name of the role which fails does not match the name of the role in the output.
BR
Florian
I am not sure if it is mandatory, but I don’t see any VLAN being pushed. Another item to check is the existence of the dur admin in CPPM and the certificate chain on the switch.
I am trying to determine if it is possible to use the DUR feature with an IAP cluster without Clearpass. I have gotten as far as running a web server the responds to requests for “/async_netd/arubacppmapi/downloadableconfig?role=” but the IAP errors with “Failed to strip XML”.
Could you post the contents of the downloaded file that Clearpass generates? I have not found any documentation on its format. I believe in your example the URL would be
https://clearpass-a.arubalab.net/async_netd/arubacppmapi/downloadableconfig?role=FloLan_Guest_CP-3054-3
Hi Andy,
Even if this looks like a nice reverse engineering project it is not supported and you could not know, when something is changed, which will break your setup. If you do not have a ClearPass server but any other radius server my recommendation is to use local user roles.
BR
Florian
Yes the name is slightly different. Whatever DUR I use has the same “extension” added to it in that message. The switch manages to download the role, if i change the role on cppm the version number on the switch updates .Also what ive noticed is if you type show port-access client you can see that 1 edge client has the DUR applied .. then everything else uses the local user roles. It’s drving me mad!. The DUR used on the mobility controller all just work.
Just trying to figure out what debug comands give me more info, currenty sending logging to a syslog server but have only managed to get same as I see in the swith log so far.
And the solution was ….. dont mix RADIUS attributes and DUR attributes. once I’d removed the RADIUS attributes for vlan named assignment and reauthentication everything sprang back into life .
Annoyingly might mean that i cannot set the interim-accounting-interval attribute if i use DURs …more testing required
hi Alex,
this is one hard requirement. Either use DUR or normal radius attributes. But you cannot mix them.
The Interim Accounting Interval needs to be set globally on the switch. I’ve never used individual accounting intervals for individual users/roles. What is the use case behind this?
BR
Florian
Hi Florian, thanks for sharing this usefull information, I have a question, how I can restrict comunication between roles?
Hi carlos,
to my understanding, this is not possible with downloadable roles. Only with local roles.
BR
Florian
Is there a cli-command on the controller to see whether the role was downloaded?
Hi Michael,
for AOS8 and AOS10 you can use the following command:
show rights downloaded-user-rolesBR
Florian
Hi, show right download
Hi, thanks for your response. I would like you to help me with another query, when I update the DUR in Clearpass cppm version it does not change automatically, this only happens until there is a new Radius event in some supplicant, the others are still authenticated and without the updated DUR, is there a parameter that should consider so that this does not require any extra action for replication?
Hi Carlos,
If you change the DUR in ClearPass, ClearPass will change the version number. If a new authentication (reauthentication) takes place the authenticator will use the version number to determine if the roles was updated. If this is the case it will download the updated role.
There is no way, to force an emmidiate update without authentication (reauthentication).
BR
Florian
Hello Florian,
thanks for the post.I find your blog very interesting. I have DUR configured for the 2930 switches. Now the first 6200 have been added. For Clearpass (portal) I use a public certificate.
With Aruba OS I have set up a job that downloads the certificate weekly to avoid problems with a certificate change. How do you do that with the CX switches? There is no longer the commando job.
Hi Wynni,
The certificate for DUR with CX switches is added manually. And to my understanding it can be changed only manually as well. You can do this with your management system for all CX swtiches at the same time.
BUT, the certificate you import, is the CA cert for the authority, which signs the https certificate in ClearPass. It should not change frequently 🙂
BR
Florian
Florian,
I’ve been through your blog a few times, and it is extremely helpful but I have a very strange issue and have a TAC case with Aruba open. I thought I would reach out and see if you might have an idea or suggestion.
The mobility conductor will not accept any kind of ACL, if the DUR is empty and does not contain any kind of ACL it accepts it on the conductor. If it contains any kind of ACL it rejects it and issues the default role.
My TAC case has been open for months and they haven’t had much of an idea, keeps getting kicked between the mobility TAC team and clearpass TAC team.
Hi David,
thanks for your feedback. Much appreciated.
If TAC is involved but cannot help easily, it looks like your problem is very specific. If you like, I can try to help, but this blog is not right place to do this. If you agree, I will send you a mail to get in touch. Just let me know, if it is OK.
BR
Florian
Florian,
Clearpass 6.11.5 fixed the issue, the roles are now accepted on the conductor and coming through properly.
I now have a new issue, the roles download and are assigned to the client as I would expect but after roaming (between buildings specifically) the clients will not reconnect but the conductor says they’re connected. Seems to be limited to android and apple devices but testing against windows now to verify. I’ve opened a new case on this issue but wanted to update you. If you have any ideas on this new issue I’m all ears!
There is also a bug in 6.11.5 that reorders DUR ACL lists if you modify an active ACL. We are finding our ACLs out of order after changing a name or destination which creates fairly significant problems when the deny is moved to the top.
David
Hi David,
thanks for the update.
Have you tested if this applies to DUR only or also LUR’s?
I was using advanced DUR’s in ClearPass most of the time. as you create the roles within the editor, I suspect you will not see this issue.
Have you created a case for this one as well?
BR
Florian
How do you enable DUR on the AOS 10.4 gateway managed by Central?
Hi Donatello,
Thanks or your question. Unfortunately, DUR is not available in AOS10.
BR
Florian
Hi Florian,
Great Article !
Can I ask what firewall rules are required for communication to allow DUR’s to work ?
I assume :
Source : switch
Destnation : CPPM cluster
Allow : https, DNS, NTP
any others ?
Thanks in advance
Hi Florian,
Great Article
Just wondering what firewall ports are required for communcation between NAD and CPPM for DUR’s to work
I assume Radius,NTP,DNS,https
Many thanks
Hi David,
thanks for your comment.
If you ask for NAD –> ClearPass, you have to allow:
– Radius Authentication and Radius Accounting
– HTTPS (for downloading the Role)
ClearPass –> NAD
– Radius CoA, if you use that
NAD –> Network
– DNS (to resolve the ClearPass DNS Name)
– NTP (or any other timesync protocol)
I think thats it.
BR
Florian