In several meetings I get the question, how can I sent different DHCP options to different devices. The answer is to use the DHCP Vendor Class Identifier, DHCP option 60.
Every device sends this option to the DHCP Server, and each DHCP Server can answer with specific options, depending on the option 60. I will use two different switches, an AubaOS switch and a Comware based switch to show the principles. I will provide a different config file for each switch via TFTP.
DHCP Vendor Class Identifier – Get Option 60
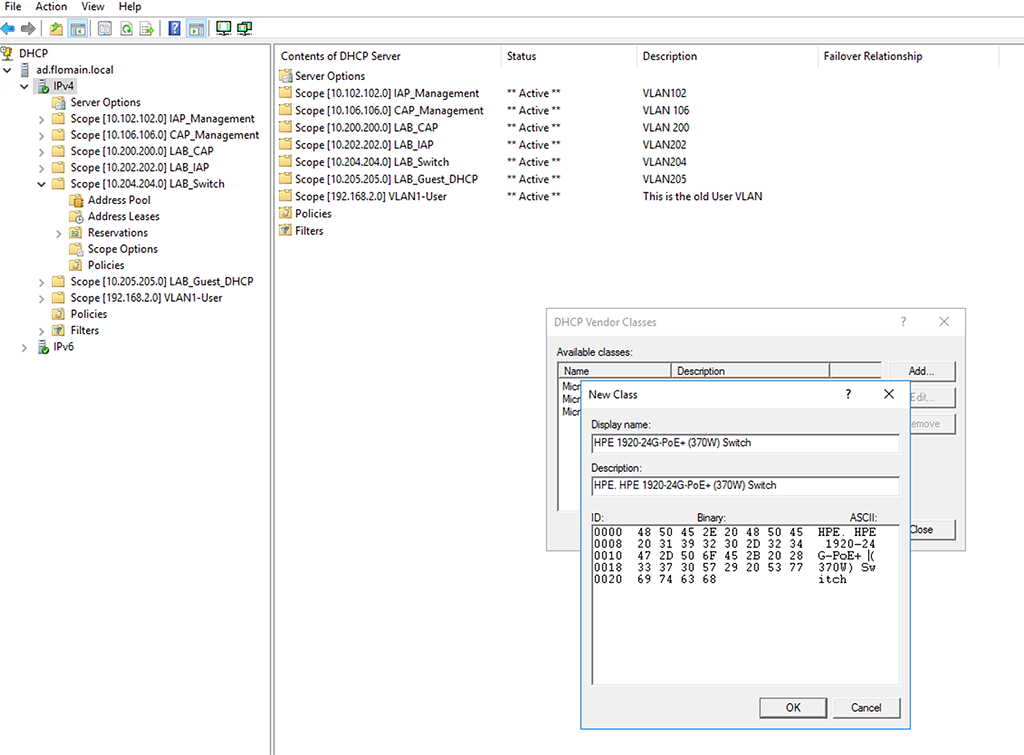
The first step is to get the information, what is in option 60 for each device. This could be the tricky part. I always do a Wireshark trace and check option 60 in the DHCP Discover itself. For the Comware Device, which is a 1920, it is this:
HPE. HPE 1920-24G-PoE+ (370W) SwitchFor the 2930F it looks like this:
Aruba JL259A 2930F-24G-4SFP Switch dslforum.orgI haven’t found this information in the manuals so far. Maybe a good point for a feature request.
DHCP Vendor Class Identifier – Configure Windows Server
If you have the value for Option 60 for each device, you can start to use them. Open the DHCP management console on the windows server and right click the IPv4 server and select “Define Vendor Classes”. In the pop-up window select “Add”, to create a new class:
After that, you just need to define a new policy for the scope. Select the scope for which you would like to configure the options and create a new policy:
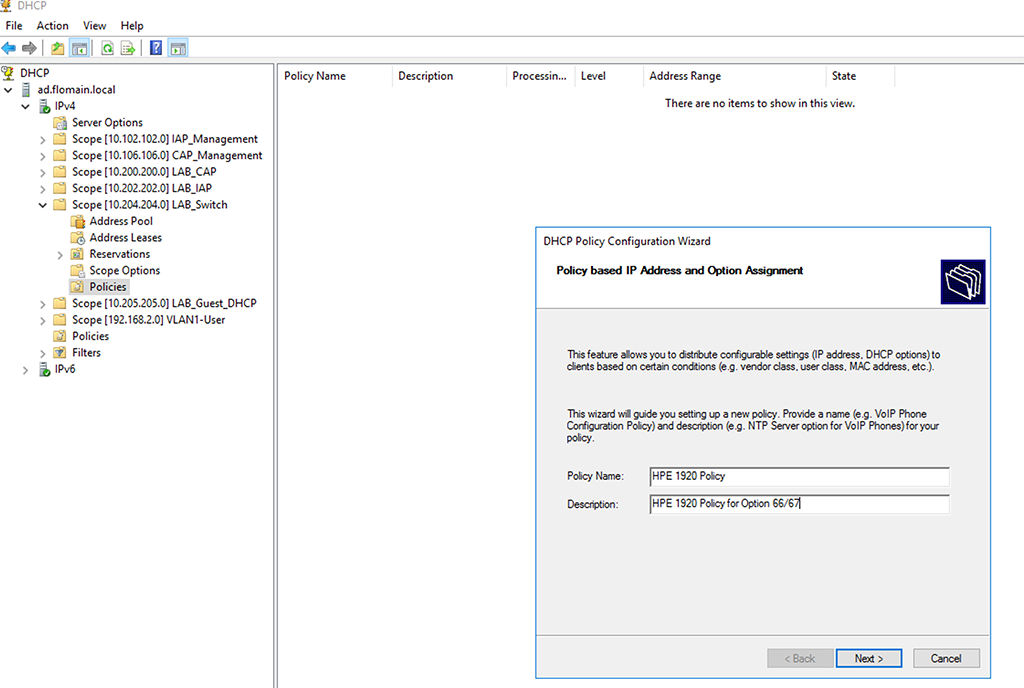
Click “Next” to get to the screen, where to define the policy rules:
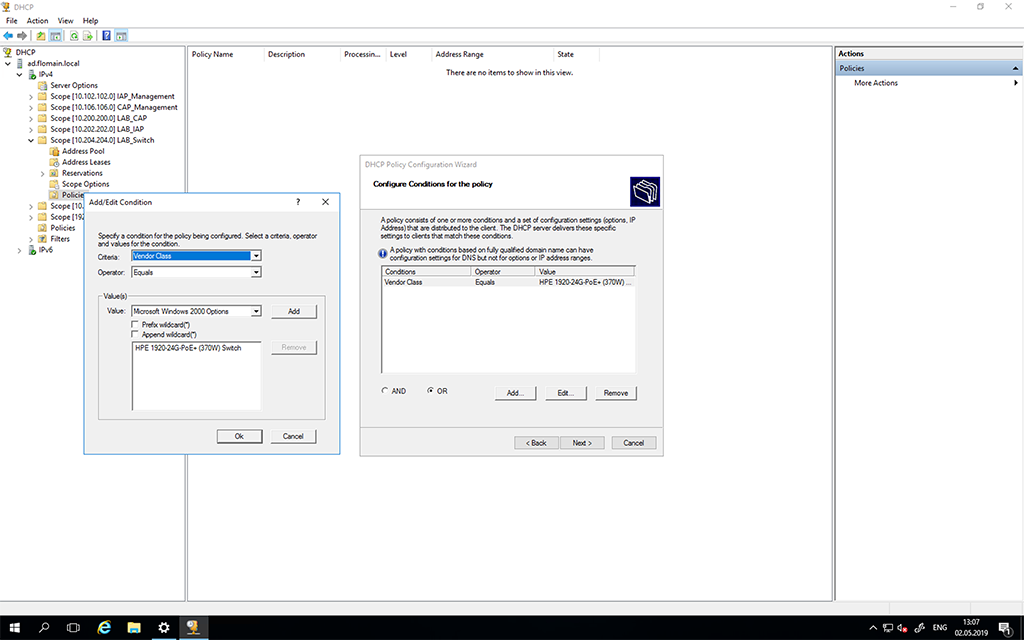
I only use the created vendor class from above as a rule to use the policy. On the next screen, I do not want to define a special IP range for those devices. They should use the same IP range as the scope itself. On the next page you can now set individual DHCP option for devices with this vendor class:
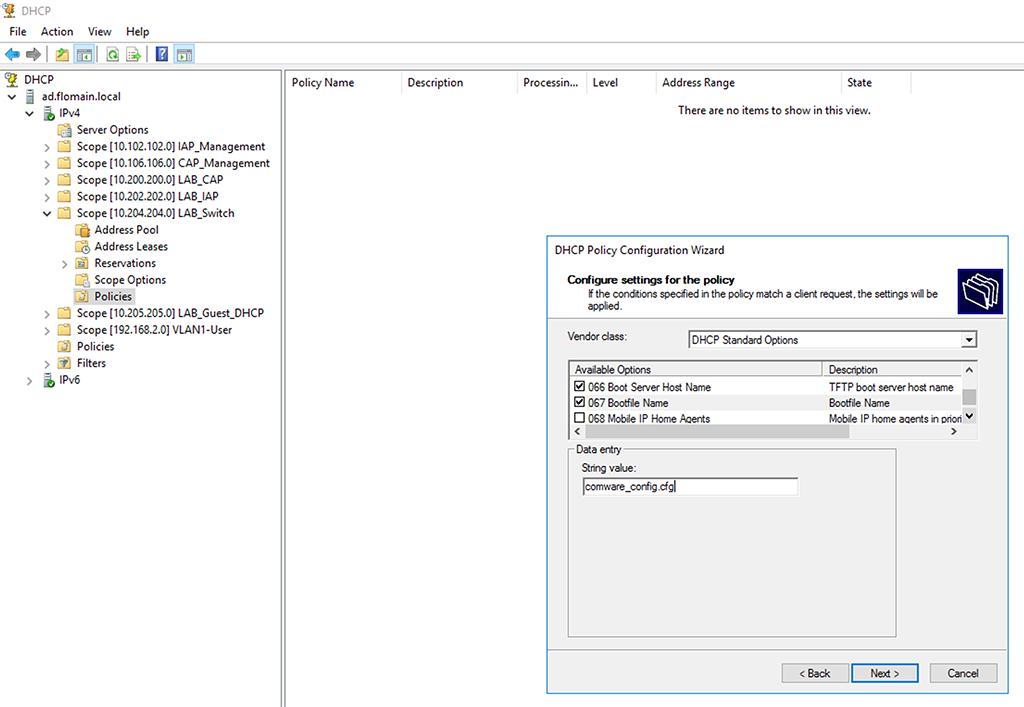
In my case, this is only option 66 and 67. The next screen is just the summary. Do this for all vendor classes, you need to configure individual options for. That is all.
DHCP Vendor Class Identifier – Configure Linux DHCP Server
If you are running a Linux DHCP server, as I do, the config is even more simple. I use the isc-
florian@devil:~$ dhcpd --version
isc-dhcpd-4.4.1
It is very easy to create a class which matches option 60 from the DHCP request. Just open the config file and add the following lines:
#Class to Match Option 60
class "Vendor-Class" {
        match option vendor-class-identifier;
}
In the subnet declaration, you can use this class to send individual options to the switch:
#VLAN 204 LAB_Switch
subnet 10.204.204.0 netmask 255.255.255.0 {
        range 10.204.204.100 10.204.204.199;
        option domain-name "lab.flomain.local";
        option broadcast-address 10.204.204.255;
        option subnet-mask 255.255.255.0;
        option routers 10.204.204.1;
        subclass "Vendor-Class" "HPE. HPE 1920-24G-PoE+ (370W) Switch" {
                option tftp-server-name "10.104.104.10";
                option bootfile-name "comware_config.cfg";
        }
        subclass "Vendor-Class" "Aruba JL259A 2930F-24G-4SFP Switch dslforum.org" {
                option tftp-server-name "10.104.104.10";
                option bootfile-name "arubaos_config.cfg";
        }
}
As you can see, quite easy. You can have multiple subclasses for all of your devices.
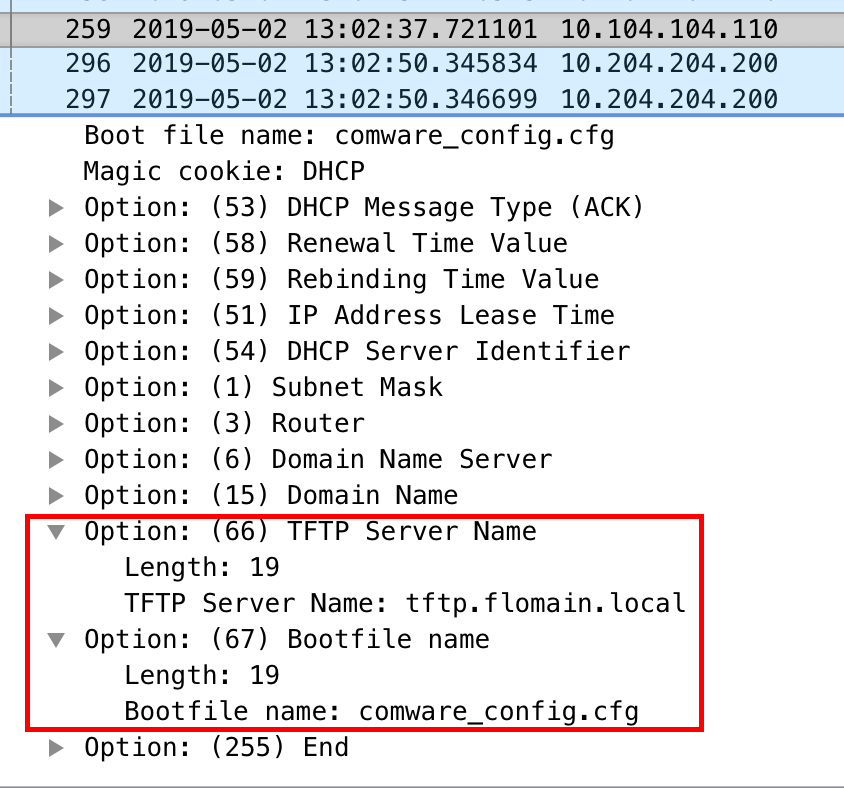
From Wireshark, you can now see, that the switch is getting those individual options:
This time, a short post. but I’ve got ask this a lot of times during the last month, so I thought it is worth it. If you find this post useful, leave me a comment and share it with your friends. If you don’t like the post, leave me a comment and tell me what you don’t like. But whatever you do, leave me a comment.
Hey Florian,
thanks for the awesome article – this just helps incredibly!
Best regards and thanks from my whole crew!
Best
Stefan
Hi Stefan,
Thanks for the feedback. Really appreciated.
BR
Florian
Hello Florian again,
we just found out about the following command:
“show dhcp client vendor-specific”
It returns the following:
Vendor Class Id = Aruba JL256A 2930F-48G-PoE+-4SFP+ Switch dslforum.org
Processing of Vendor Specific Configuration is enabled
Have fun 🙂
Best regards
Yeah, I discovered this command yesterday as well. Makes it a little bit easier. But a list of those fields for every switch would even be better.
Hello Florian!
Unfortunately I can not find a complete configuration for the ISC DHCP. Can you please publish your configuration as an example in your forum? I want to do ZTP with Aruba APs and Switch …
Hi Martin,
Thanks for your comment. If I have my home lab back online (currently I’m in the middle of relocation to my new home) I will post my whole config here.
BR
Florian
hi Martin,
It took a while to rebuild the lab completely, but here is my ISC DHCP config:
# dhcpd.conf# option definitions common to all supported networks...
option domain-name "flomain.local";
option domain-name-servers 10.104.104.21,10.104.104.22;
option ntp-servers 10.104.104.21,10.104.104.22;
default-lease-time 86400;
max-lease-time 604800;
# The ddns-updates-style parameter controls whether or not the server will
# attempt to do a DNS update when a lease is confirmed. We default to the
# behavior of the version 2 packages ('none', since DHCP v2 didn't
# have support for DDNS.)
ddns-update-style interim;
ddns-updates on;
ignore client-updates;
update-static-leases on;
include "/etc/dhcp/ddns.key";
zone flomain.local. {
primary 127.0.0.1;
key DDNS_UPDATE;
}
zone 10.in-addr.arpa. {
primary 127.0.0.1;
key DDNS_UPDATE;
}
# If this DHCP server is the official DHCP server for the local
# network, the authoritative directive should be uncommented.
authoritative;
# Use this to send dhcp log messages to a different log file (you also
# have to hack syslog.conf to complete the redirection).
#log-facility local7;
failover peer "cluster-1" {
primary;
address hellcat-1.flomain.local;
port 519;
peer address hellcat-2.flomain.local;
peer port 520;
max-response-delay 60;
max-unacked-updates 10;
mclt 3600;
split 128;
load balance max seconds 10;
}
omapi-port 7911;
omapi-key omapi_key;
key omapi_key {
algorithm hmac-md5;
secret top_secret;
}
#Class to Match Option 60
class "Vendor-Class" {
match option vendor-class-identifier;
}
#VLAN 102 10.102.102.0/24 - IAP Management
subnet 10.102.102.0 netmask 255.255.255.0 {
pool {
failover peer "cluster-1";
deny dynamic bootp clients;
range 10.102.102.100 10.102.102.199;
}
option subnet-mask 255.255.255.0;
option routers 10.102.102.1;
}
#VLAN 104 10.104.104.0/24 - local subnet without DHCP
subnet 10.104.104.0 netmask 255.255.255.0 {}
#VLAN 107 10.107.107.0/24 - IoT Network
subnet 10.107.107.0 netmask 255.255.255.0 {
pool {
failover peer "cluster-1";
deny dynamic bootp clients;
range 10.107.107.100 10.107.107.199;
}
option subnet-mask 255.255.255.0;
option routers 10.107.107.1;
}
#VLAN 108 10.108.108.0/24 - IoT Network
subnet 10.108.108.0 netmask 255.255.255.0 {
pool {
failover peer "cluster-1";
deny dynamic bootp clients;
range 10.108.108.100 10.108.108.199;
}
option subnet-mask 255.255.255.0;
option routers 10.108.108.1;
}
#VLAN 202 10.202.202.0/24 - LAB_CAP_Management
subnet 10.202.202.0 netmask 255.255.255.0 {
pool {
failover peer "cluster-1";
deny dynamic bootp clients;
range 10.202.202.100 10.202.202.199;
}
option subnet-mask 255.255.255.0;
option routers 10.202.202.1;
option domain-search "lab.flomain.local";
option domain-name "lab.flomain.local";
subclass "ArubaAP-Class" "ArubaAP" {
option vendor-class-identifier "ArubaAP";
option master 10.201.201.30;
}
}
#VLAN 204 LAB_Switch
subnet 10.204.204.0 netmask 255.255.255.0 {
pool {
failover peer "cluster-1";
deny dynamic bootp clients;
range 10.204.204.100 10.204.204.199;
}
option domain-name "lab.flomain.local";
option broadcast-address 10.204.204.255;
option subnet-mask 255.255.255.0;
option routers 10.204.204.1;
subclass "Vendor-Class" "HPE. HPE 1920-24G-PoE+ (370W) Switch" {
option tftp-server-name "10.104.104.10";
option bootfile-name "comware_config.cfg";
}
subclass "Vendor-Class" "Aruba JL259A 2930F-24G-4SFP Switch dslforum.org" {
option tftp-server-name "10.104.104.10";
option bootfile-name "arubaos_config.cfg";
}
}
#vlan 4000 192.168.2.0/24 - old VLAN for clients
subnet 192.168.2.0 netmask 255.255.255.0 {
pool {
failover peer "cluster-1";
deny dynamic bootp clients;
range 192.168.2.100 192.168.2.199;
}
option subnet-mask 255.255.255.0;
option routers 192.168.2.1;
}
hope this helps in your setup.
BR
Florian
Well done! This is just the information I was looking for, and presented very clearly. Thank you!
Hi Jacques,
Thanks for the feedback. Really appreciated. If you are looking for more or different information about this or other network-related stuff, just let me know. It is very helpful for me to know, what you are looking for.
BR
Florian
Hey Flo,
have you also tried dhcp option 145 for Aruba Switches (for updating firmware)?
Hi Andy,
I haven’t tried by myself for this post, but I know from earlier projects that it will work. Also have a look into this document:
If the provided firmware file with option 145 will not match the one on the system, the switch will download and install the new file.
BR
Florian
Hey Flo,
i’m sorry. I asked not the right way. My question was: how is the option 145 named in isc-dhcp-server. I tried it in the past only with Windows DHCP Servers. Is this the “option bootfile-name” and this can be used with configs AND images? I’m not sure. Perhaps you can give me an example.
Andy
Hi Andy,
I haven’t tried by myself but the following looks interesting. You should read until the end 🙂
https://community.arubanetworks.com/community-home/digestviewer/viewthread?MID=20500
If I find the time, I might test by myself but I think it will take time to find a timeslot during the next weeks.
BR
Florian
Really appreciate the technical details on this, thank you
Thank you very much for this excellent article.
I still have a question: What if different devices uses the same Vendor Class. The Cisco switches that I have uses “CiscoPnP” on both. Any idea on how can I do to distinguished them?
Hi CasimirEX,
If they send the same request (same attributes in the request) you have no chance. You should ask Cisco how they would do it.
Maybe they use different MAC OUI’s and you can use this on the DHCP Server to build some policies. But this is just a guess.
Many thanks,
Florian