With modern architectures and campus designs, you do not need spanning tree anymore. But how could you protect from spanning tree BPDU’s and loops in the access area, e.g. from external devices?
The classical scenario is the cleaner, putting the free cable into the switch because it is in his way. ArubaOS switches have some good answers to this and other scenarios and protect your network from unwanted loops and spanning tree BPDU’s.
Protect from Spanning Tree and Loops: Loop Protection
The first and easiest one is loop protection. This feature protects from unwanted loops in the access area, e.g. someone connects a cable twice to the same switch. Loop protection use control packets and send these packets out to all ports with loop protection enabled. To do this, the port must have an untagged VLAN. If no untagged VLAN is configured for the port, no control packets are sent. If the switch sees such a packet on another port, the loop is detected. The switch can now shut down the port to avoid network problems.
You configure loop protection on a per-port basis:
switch2(config)# loop-protect 9This command enables loop protection for port 9. You can check this with this command:
switch2(config)# show loop-protect

 Status and Counters - Loop Protection Information

  Transmit Interval (sec)     : 1
  Port Disable Timer (sec)    : 100
  Loop Detected Trap          : Disabled
  Loop Protect Mode           : Port
  Loop Protect Enabled VLANs  :


       Loop    Loop     Detected  Loop   Time Since  Rx            Port
  Port Protect Detected on VLAN   Count  Last Loop   Action        Status
  ---- ------- -------- --------- ------ ----------- ------------- --------
  8    Yes     Yes      NA        1      1d,1h,27... send-disable  Down
  9    Yes     No       NA        0                  send-disable  Up
This command also shows the “Time Since Last Loop”. The default behavior is to disable the port which sends the control packet. You can change this to do nothing, or you can disable both ports:
switch2(config)# loop-protect 9 receiver-action
 send-disable          Disable the sending port when a loop is detected.  This is the default.
 no-disable            Do not disable the sending port when a loop is detected.
 send-recv-dis         Disable the sending and receiving port when a loop is detected.
You might also define how long the port stays in the disable mode:
switch2(config)# loop-protect disable-timer
 <0-604800>            Enter a number.
0 disables the port forever. Any other value disables the port for the time of the value in seconds.
You can also fine tune the interval, the control packets are sent. The default is a value of 5 seconds. You can narrow it down to 1 second or slow it down to 10 seconds:
switch2(config)# loop-protect transmit-interval
 <1-10>                Enter a number.
For management purpose, you can send a trap when a loop is detected:
switch2(config)# loop-protect trap loop-detectedFrom the show command above, you see my default values. Those can be adjusted to your environment.
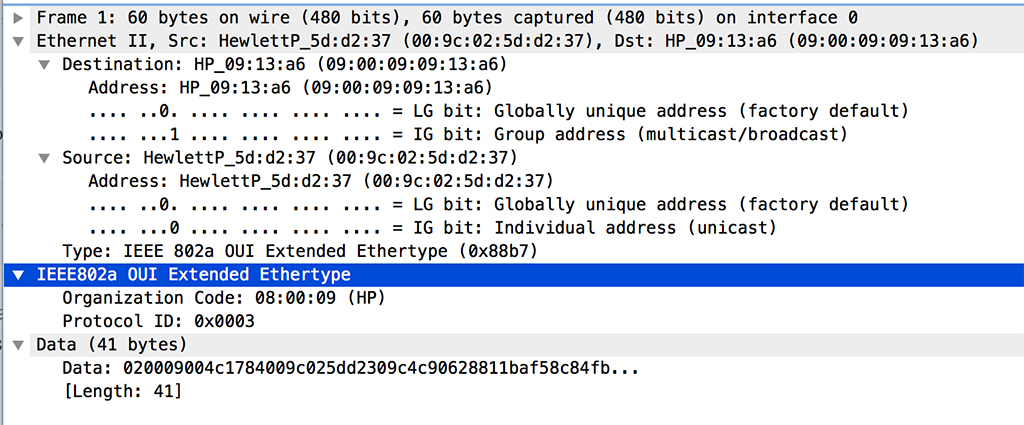
Below is a control packet:
What kind of loops are protected now:
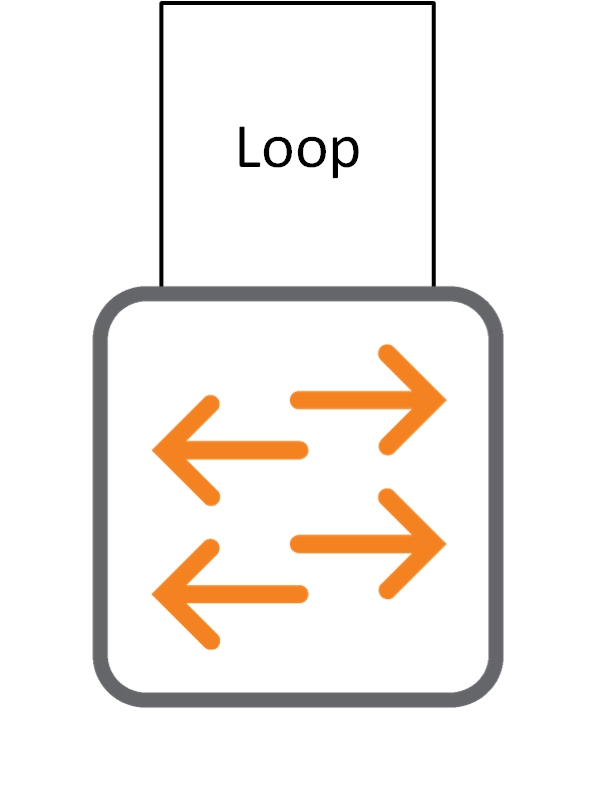
A Loop directly on the Switch:
This is the obvious one. Someone connects the same cable twice, to the same switch.
A Loop on a Device connected to the Switch:
This is more tricky. Let’s assume someone connects a switch or even a hub (not sure if you can even buy hubs today) to the access switch and produces a loop there. Loop protection can identify this and blocks the port as well.
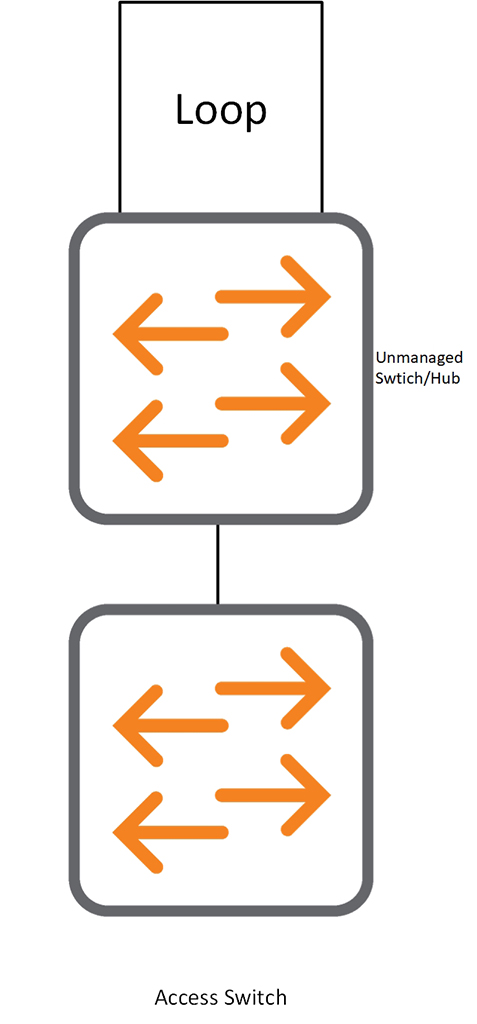
From the packet snipped above, you can see that the destination MAC address is a multicast address. Therefore the unmanaged switch/hub forwards the packet on all ports with the help of the loop, the packet comes back to the access switch.
A loop between two Access Switches:
This scenario assumes, you have at least two access switches and they are connected to each other. A user connects an unmanaged switch/hub to both of the switches.
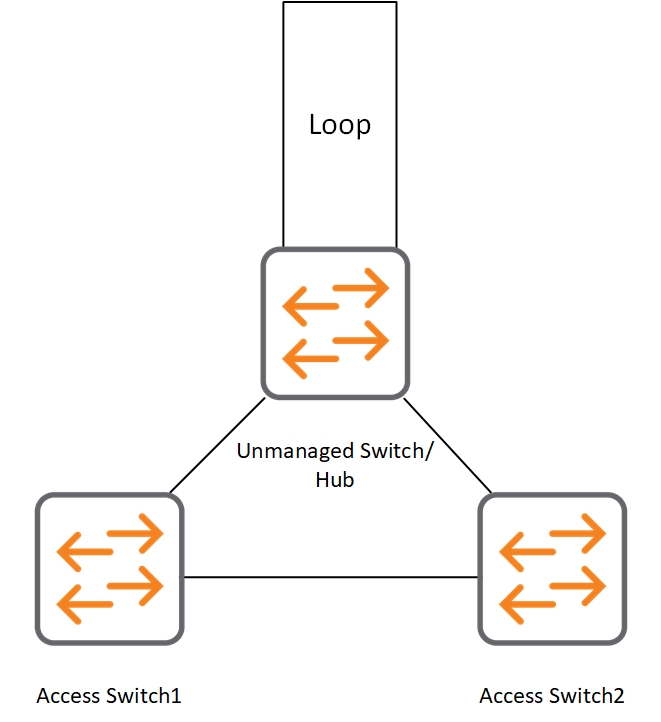
Loop protection protects you in this scenario as well. Even if the loop on the unmanaged switch/hub is not present, the ports on the access switches are blocked. But only if both access switches have the same VLAN’s. If the unmanaged switch/hub is in VLAN 1 on “Access Switch1” and VLAN 100 on “Access Switch2” the loop is only detected if “Access Swtich2” knows VLAN 1 or “Access Switch1” knows VLAN 100. One of the VLAN’s, preferably both, are configured on the link between both access switches.
The reason is, that loop protection works with normal multicast L2 frames. As opposed to BPDU’s, those frames are VLAN aware. BPDU’s are always untagged on the port (not true for PVST) and therefore the VLAN does not matter.
In Case of different VLAN’s, you should consider BPDU protection.
Protect from Spanning Tree and Loops: BPDU Filtering
Loop protection helps to protect against loops. But what about misconfigured devices or intruders. Imagine, someone connects a device to the network which is running spanning tree as well. This device is configured to be the root bridge. If you did not have some kind of protection against such devices, they could bring you in trouble by confusing your spanning tree. This could be a denial of service attack to bring you down.
But there is hope. With BPDU filtering you can do something. If you enable BPDU filtering on a port, this port drops all BPDU’s (incoming and outgoing). This means the port is not part of spanning tree at all. And if someone tries to attack you on this port, all BPDU’s are dropped as well. No chance for bad people.
To enable BPDU filtering on a per port basis you enable spanning tree first:
switch2(config)# spanning-tree enableAfterwards, you enable BPDU filtering:
switch2(config)# spanning-tree 9 bpdu-filter
The BPDU filter allows the port to go into a continuous
forwarding mode and spanning tree will not interfere, even if
the port would cause a loop to form in the network topology.
If you suddenly experience high traffic load, disable the port
and reconfigure the BPDU filter with the CLI command(s):
"no spanning tree PORT_LIST bpdu-filter"
"no spanning tree PORT_LIST pvst-filter"
Read the warning carefully, because this is important. A port with BPDU filtering enabled will always forward traffic and stays always in forwarding state. When not carefully thinking what you are doing, you can create loops easily.
To check the configuration use this command:
switch2(config)# show spanning-tree 9

 Multiple Spanning Tree (MST) Information

  STP Enabled   : Yes
  Force Version : MSTP-operation
  IST Mapped VLANs : 1-4094
  Switch MAC Address : 009c02-5dd230
  Switch Priority    : 32768
  Max Age  : 20
  Max Hops : 20
  Forward Delay : 15

  Topology Change Count  : 10
  Time Since Last Change : 1 secs

  CST Root MAC Address : 000b86-be8400
  CST Root Priority    : 32768
  CST Root Path Cost   : 20000
  CST Root Port        : 10

  IST Regional Root MAC Address : 009c02-5dd230
  IST Regional Root Priority    : 32768
  IST Regional Root Path Cost   : 0
  IST Remaining Hops            : 20

  Root Guard Ports     :
  Loop Guard Ports     :
  TCN Guard Ports      :
  BPDU Protected Ports :
  BPDU Filtered Ports  : 9
  PVST Protected Ports :
  PVST Filtered Ports  :

  Root Inconsistent Ports  :
  Loop Inconsistent Ports  :

                 |           Prio              | Designated    Hello
  Port Type      | Cost      rity State        | Bridge        Time PtP Edge
  ---- --------- + --------- ---- ------------ + ------------- ---- --- ----
  9    100/1000T | 20000     128  Forwarding   | 009c02-5dd230 2    Yes Yes
If you do a trace on the port, you will see no BPDU’s. If you send BPDU’s to the port, they are dropped without notice.
Protect from Spanning Tree and Loops: BPDU Protection
As opposed to BPDU filtering, BPDU protection protects against incoming BPDU’s. If a BPDU is received, the port is disabled. This makes it a more secure option to protect against external misconfigured devices or bad people, trying to confuse your spanning tree.
To use BPDU protection, you need to enable spanning tree first, like BPDU filtering above. Afterwards, you enable BPDU protection with this command on a per-port basis:
switch2(config)# spanning-tree 9 bpdu-protectionTo check the configuration, use the command below:
switch2(config)# show spanning-tree 9

 Multiple Spanning Tree (MST) Information

  STP Enabled   : Yes
  Force Version : MSTP-operation
  IST Mapped VLANs : 1-4094
  Switch MAC Address : 009c02-5dd230
  Switch Priority    : 32768
  Max Age  : 20
  Max Hops : 20
  Forward Delay : 15

  Topology Change Count  : 28
  Time Since Last Change : 12 mins

  CST Root MAC Address : 000b86-be8400
  CST Root Priority    : 32768
  CST Root Path Cost   : 20000
  CST Root Port        : 10

  IST Regional Root MAC Address : 009c02-5dd230
  IST Regional Root Priority    : 32768
  IST Regional Root Path Cost   : 0
  IST Remaining Hops            : 20

  Root Guard Ports     :
  Loop Guard Ports     :
  TCN Guard Ports      :
  BPDU Protected Ports : 9
  BPDU Filtered Ports  :
  PVST Protected Ports :
  PVST Filtered Ports  :

  Root Inconsistent Ports  :
  Loop Inconsistent Ports  :

                 |           Prio              | Designated    Hello
  Port Type      | Cost      rity State        | Bridge        Time PtP Edge
  ---- --------- + --------- ---- ------------ + ------------- ---- --- ----
  9    100/1000T | 20000     128  Forwarding   | 009c02-5dd230 2    Yes Yes
If you trace the port, you see a lot of STP messages. But, if you answer them or send BPDU’s the port gets into the “BPDU Error” state:
switch2(config)# show spanning-tree 9

 Multiple Spanning Tree (MST) Information

  STP Enabled   : Yes
  Force Version : MSTP-operation
  IST Mapped VLANs : 1-4094
  Switch MAC Address : 009c02-5dd230
  Switch Priority    : 32768
  Max Age  : 20
  Max Hops : 20
  Forward Delay : 15

  Topology Change Count  : 28
  Time Since Last Change : 19 mins

  CST Root MAC Address : 000b86-be8400
  CST Root Priority    : 32768
  CST Root Path Cost   : 20000
  CST Root Port        : 10

  IST Regional Root MAC Address : 009c02-5dd230
  IST Regional Root Priority    : 32768
  IST Regional Root Path Cost   : 0
  IST Remaining Hops            : 20

  Root Guard Ports     :
  Loop Guard Ports     :
  TCN Guard Ports      :
  BPDU Protected Ports : 9
  BPDU Filtered Ports  :
  PVST Protected Ports :
  PVST Filtered Ports  :

  Root Inconsistent Ports  :
  Loop Inconsistent Ports  :

                 |           Prio              | Designated    Hello
  Port Type      | Cost      rity State        | Bridge        Time PtP Edge
  ---- --------- + --------- ---- ------------ + ------------- ---- --- ----
  9    100/1000T | 20000     128  BpduError    |               2    Yes No
Any port in this state will be disabled forever. Or until you enable the port manually:
switch2(config)# interface 9 enableTo change this behaviour you can set a global timeout period:
switch2(config)# spanning-tree bpdu-protection-timeout 60The command above set the timeout for the port. If the port receives a BPDU, the port is set to “BpduError” state for the time in the timeout. Afterwards, the port is set into the enable state again.
The last option is for monitoring. With the command below you tell the switch to send a trap upon receiving a BPDU:
switch2(config)# spanning-tree trap errant-bpduMy recommendation is to use BPDU filter on all ports to other switches. So, on all uplinks. And BPDU protection on all other ports. This protects you from bad BPDU from outside of your environment. I assume that you do not use STP in your environment for loop protection between switches, because of technologies like VSF or IRF. If you do not use such technologies but STP, do not use BPDU filter on uplinks.
Do you use STP in your environment? Why, or why not? Tell me in the comment section below.
If you find this post interesting, leave me a comment and share it with your friends. If you don’t like the post, leave me a comment and share it with your enemy. But whatever you do, leave me a comment, now.
good article!
Thanks!
Marco
Thanks, Marco for your feedback. Really appreciated.
Hallo Florian,
Danke für den Artikel!
Ist es so zu verstehen, dass Loop-Protect nur OHNE aktiviertes Spanning-Tree Sinn macht? Und mit zusätzlich aktiviertem STP sogar kontraproduktiv ist?
Grüße, Andreas
Hi Andreas,
thanks for your question. you can use loop protect and spanning tree together, but as mentioned in the post, I would recommend BPDU protection, as this brings more features and can work across VLAN’s. I see loop protection as an old feature from times, were BPDU protection was not available. I hope this answers your question.
BR
Florian
BPDU Filter on all Uplinks? So every Switch would make him self the root switch? I Would recommend to put a BPDU-Protect on all Client Ports, BDPU-Filter on WAN links like MPLS (Providers often have STP enabled) and allow BPDU on Uplinks to other Switches
Hi jAyR,
you are correct, BPDU Filter on uplinks does not make sense, except, and this was my assumption that you build a loop-free environment by using either no duplicates links or by using technologies like VSF, VSX, IRF and links aggregations.
If you run spanning tree in your network, BPDU Filter in uplink ports does not make sense at all. You are fully correct.
Does it make it more clear?
BR
Florian
Good read, thanks. We have a stack of 6 Aruba 2930m switches, and one standalone 2930m switch in another part of the building connected via SFP fiber to the stack controller. The IT people want to enable multiple VLANs for phones, servers, printers and dekstops, STP and loop protection etc to prevent loops and abuse on the network. Would you recommend STP and loop protection in this instance? Thanks again
Hi comclusive,
If you have the stack of 6 2930m switches running VSF, they functioning as one logical device. If you connect the 2930m in the other building to that stack, you would use a link aggregation. This means, no loops can occur. So from a technical point of view, there is no need to spanning tree between the logical stack 2930m switches and the 2930m in the other building.
But you need to protect your access ports from loops, like some put a cable from one port to another on the same device. And this is exactly the scenario I describe within the post above.
BR
Florian
Hello Florian,
First of all amazing article about spanning tree and Loop Protection! Haven’t read anything before that compares BPDU Protection and Loop Protection, super interesting point of view and I agree.
Second I have a doubt, is there any overhead on using both Loop Protection and BPDU Protection on edge ports at the same time?
I understand BPDU Protection is enough by itself but would like to cover some edge cases like for example, the other switch that you dont manage has bpdu filter configured in the ports you connect, your switch wont see the looped bpdu’s and thus bpdu protection wont shutdown the port in case of a loop but Loop Protect will do. (I know super hard to happen, but would like to cover all the cases)
Hi Luis,
thanks for the feedback, much appreciated.
Good point, haven’t thoght of that scenario. From my point of view, both feature shoud work on the same port and help in the scenario you mentioned.
BR
Florian
why it doesnt work