In this post, I describe the different ways to deploy a controller with ArubaOS 8. Controller Deployment is significantly easier with ArubaOS 8 and it is the first time, that we see Zero Touch Provisioning for controllers.
With ArubaOS 6.x it was not possible to have a complete Zero Touch Provisioning process. The fact, that you have to configure stuff like the IP of the local controller, made this impossible. With ArubaOS 8 you configure everything on the Mobility Master (MM). There is no need to configure something on the controller. You even have no chance to. The configuration mode is blocked.
Nevertheless, you have the option to deploy the controller the old way. This is the first part of this post. Afterwards, I show you how the Zero Touch Provisioning works.
Controller Deployment: The Manual Way with PSK
The first part is about the manual deployment of controllers. This is still possible and much faster than with 6.x.
I assume, that you have the MM up and running and IP connectivity is possible between the Managed Device (MD) and the MM.
The communication between MM and MD is protected with IPSec. In my case, I use IPSec with PSK. You can also use certificates. In this scenario, I use the PSK option. Therefore you need to make the MM aware of the PSK. Connect to the MM and create the PSK:
(MM) *[mynode] #cd /mm
(MM) *[mm] #configure terminal
Enter Configuration commands, one per line. End with CNTL/Z
(MM) *[mm] (config) #localip 10.201.201.10 ipsec comcomcom
I always create the PSK at the “mm” level. If you have multiple MM controller, this makes the configuration on all of them.
In this setup, the MD has a static IP. If you need to have a dynamic IP for the MD you can use the MAC for authentication, instead of the IP:
(MM) *[mm] (config) #local-peer-mac 00:0c:29:35:c2:cf ipsec test123The “local-peer-mac” is the MAC of the MD. If the MD is a hardware controller you need to use the MAC from the VLAN interface, which is used to connect to the MM. If the MD is a virtual controller, you need to use the MAC from the management interface.
You need the MAC address to arrange the controller in the configuration hierarchy, as well. My current hierarchy has a folder named “LAB”:
(MM) *[00:0b:86:be:84:00] (config) #show configuration node-hierarchy

Default-node is not configured. Autopark is disabled.

Configuration node hierarchy
----------------------------
Config Node                      Type    Name
-----------                      ----    ----
/                                System
/md                              System
/md/Haan-Live                    Group
/md/Haan-Live/00:0b:86:be:84:00  Device  wlan-controller
/md/LAB                          Group
/mm                              System
/mm/mynode                       System
I will place the new controller in the folder “LAB”:
(MM) *[mm] (config) #configuration device 00:0C:29:35:C2:CF device-model MC-VA /md/LAB
(MM) *[mm] (config) #show configuration node-hierarchy

Default-node is not configured. Autopark is disabled.

Configuration node hierarchy
----------------------------
Config Node                      Type    Name
-----------                      ----    ----
/                                System
/md                              System
/md/Haan-Live                    Group
/md/Haan-Live/00:0b:86:be:84:00  Device  wlan-controller
/md/LAB                          Group
/md/LAB/00:0c:29:35:c2:cf        Device
/mm                              System
/mm/mynode                       System
I create the new device with the first command. The second one is to check. The new device has no “Name”. After the device connects to the MM, this field is populated as well with the hostname of the MD.
Now, it is time to start the MD.
During bootup of the MD you have the chance to configure all options to connect to the MM:
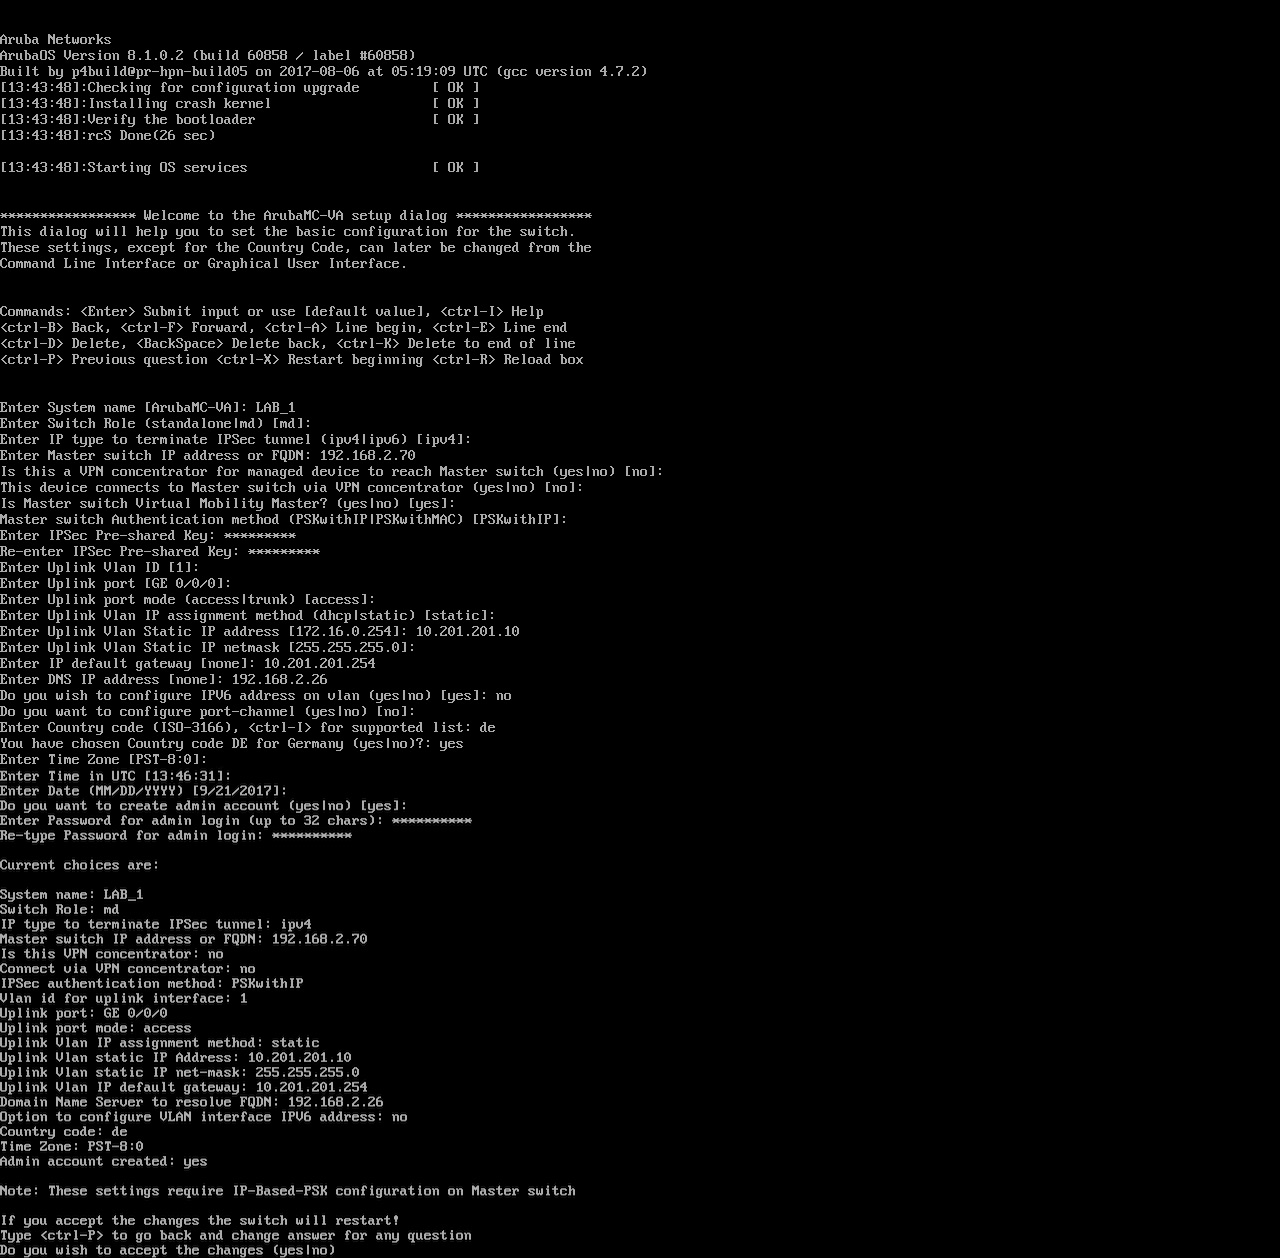
The scenario above is for one MM without a VPN concentrator. I will build this in a later post. The scenario is also only for the “PSKwithIP” option. If you choose the MAC for authentication you need to change this to “PSKwithMAC”.
The most important pieces of information are the IP of the MD, the IP of the MM and the shared secret. You can change the rest afterward on the MM anyway. But those are important to initially connect to the MM.
You accept the configuration at the end and the MD starts rebooting. Afterward, the MD connects to the MM using IPSec and gets the configuration from the “Group” “/
(MM) *[mynode] #show switches

All Switches
------------
IP Address     IPv6 Address  Name             Location          Type    Model       Version        Status  Configuration State  Config Sync Time (sec)  Config ID
----------     ------------  ----             --------          ----    -----       -------        ------  -------------------  ----------------------  ---------
192.168.2.70   None          MM               Building1.floor1  master  ArubaMM-VA  8.1.0.2_60858  up      UPDATE SUCCESSFUL    0                       363
10.201.201.10  None          LAB_1            Building1.floor1  MD      ArubaMC-VA  8.1.0.2_60858  up      UPDATE SUCCESSFUL    10                      363
192.168.2.50   None          wlan-controller  Building1.floor1  MD      Aruba7005   8.1.0.2_60858  up      UPDATE SUCCESSFUL    20                      363

Total Switches:3
Controller Deployment: The Manual Way with Certificate
To use a PSK for authentication is not the best way. So, to improve the situation, you can use a certificate for the IPSec connection. With the CLI wizard, it is not possible to use a certificate for IPSec during the initial configuration tasks. But, you can change this afterward. Choose either “PSKwithIP” or “PSKwithMAC” from above and wait until the controller is fully connected to the MM.
To make this work, you have to create certificates for the MM and all MD’s. In my lab, I use the CA from ClearPass. You can use whatever you like to create the certificates, but keep one thing in mind. The subject of the certificate has to include the MAC of the controller. The MAC, you use, in the commands to configure the MD<–>MM connection later on.
You need 2 certificates for every controller. The root CA certificate and a client certificate. The root CA certificate is the same for all controllers. The client certificate is unique and has the controller MAC address in the subject.
Upload the certificates to the controller. This is the same for every MM and MD. Just different levels of the hierarchy. To upload the client certificate to an MD or MM select the MD or MM in the hierarchy and go to “Configuration–>System–>Certificates–>Import Certificates”:
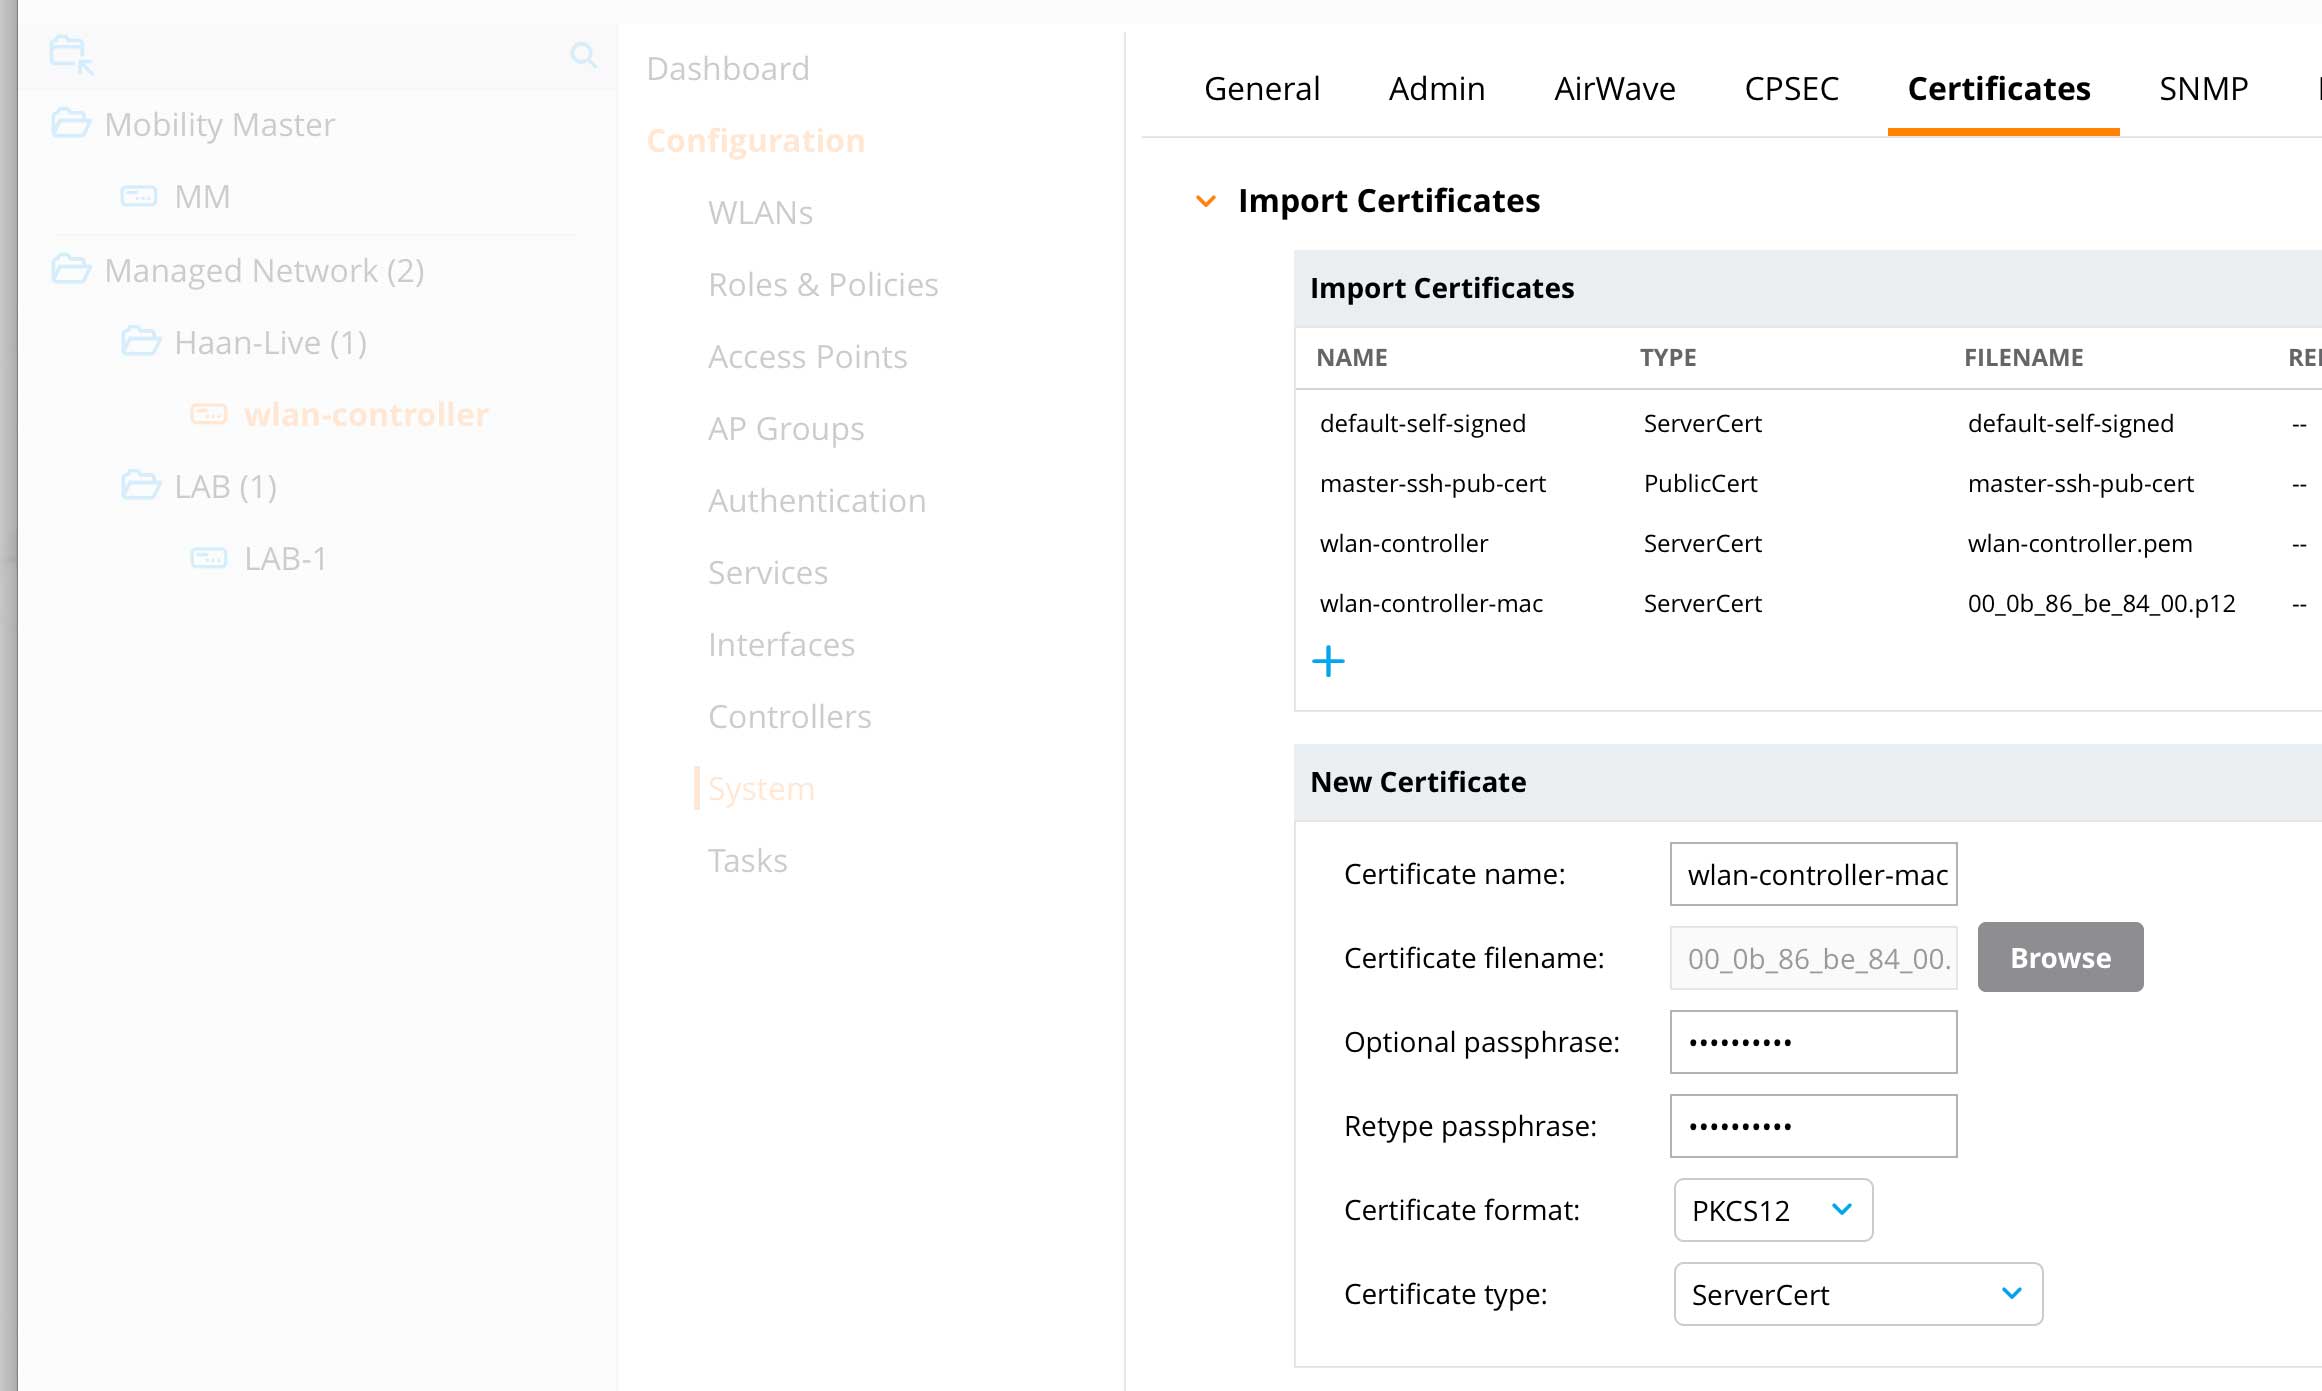
Select a unique “Certificate Name” and select the certificate from your computer. The certificate includes a private key. A passphrase protects this key. You specify the passphrase during export or creation of the certificate. Enter the passphrase as well. Without the passphrase, the controller is not able to get the private key and cannot use the certificate. Select the “Certificate format” and the “Certificate type”. The client certificate is always a “ServerCert” and the root CA certificate is always “TrustedCA”. Click the submit button to upload the certificate. Do this for all MD’s and the MM.
Next step is to create an entry for MD with a custom certificate on the MM:
(MM) ^*[mm] (config) # local-custom-cert local-mac 00:0b:86:be:84:00 ca-cert flomain-root server-cert mm-macNow, you can change the connection settings for the MD with this command in the MD context:
(MM) *[00:0b:86:be:84:00] (config) #masterip 192.168.2.70 ipsec-custom-cert master-mac-1-c 00:0c:29:c7:29:3b ca-cert flomain-root server-cert wlan-controller-mac interface vlan 1The controller will reboot and use the custom certificate for the connection.
To check if a certificate is used for the authentication, use this command:
(MM) *[mynode] #show crypto isakmp sa

ISAKMP SA Active Session Information
------------------------------------
Initiator IP                              Responder IP                              Flags       Start Time      Private IP
------------                              ------------                              -----     ---------------   ----------
192.168.2.50                              192.168.2.70                              r-v2-c    Nov 15 21:34:12     -

Flags: i = Initiator; r = Responder
       m = Main Mode; a = Agressive Mode; v2 = IKEv2
       p = Pre-shared key; c = Certificate/RSA Signature; e =  ECDSA Signature
       x = XAuth Enabled; y = Mode-Config Enabled; E = EAP Enabled
       3 = 3rd party AP; C = Campus AP; R = RAP;  Ru = Custom Certificate RAP; I = IAP
       V = VIA; S = VIA over TCP

Total ISAKMP SAs: 1
The “c” flag indicates, that you use a certificate. To check which certificate, use this command:
(MM) *[mynode] #show crypto isakmp sa peer 192.168.2.50

 Initiator IP: 192.168.2.50
 Responder IP: 192.168.2.70
 Initiator: No
 Initiator cookie:5081e3cdf4f0f5c9 Responder cookie:be8ad9caa747eef7
 SA Creation Date: Wed Nov 15 21:34:13 2017
 Life secs: 28800
 Initiator Phase1 ID: C=DE S=NRW L=Haan O=Flomain OU=WLAN Controller (7005) CN=00:0b:86:be:84:00 [email protected]
 Responder Phase1 ID: C=DE S=NRW L=Haan O=Flomain OU=WLAN Controller (VMM) CN=00:0C:29:C7:29:3B [email protected]
 Exchange Type: IKE_SA (IKEV2)
 Phase1 Transform:EncrAlg:AES128 HashAlg:HMAC_SHA1_96 DHGroup:2
 Authentication Method: RSA Digital Signature 4096-bits
 IPSEC SA Rekey Number: 0
 Ipsec-map name: default-local-master-ipsecmap-00:0b:86:be:84:00

(MM) *[mynode] #
You cannot see the name of the certificate but from the “Initiator Phase1 ID” and the “Responder Phase1 ID” you can get the subjects for both certificates. And those match my certificates.
Controller Deployment: ZTP with Activate
To deploy controllers without touching them, you use Activate. Activate is a cloud-based tool to provision devices.
I assume that you are somehow familiar with Activate. The first step is to add the MD to Activate. This step is an automatic process. Aruba adds any device to your Activate account which is ordered from you.
After the device is in Activate, move it to the “Folder” of choice. All devices in this “Folder” get the same provisioning rule.
Create a new “Provisioning Rule” in Activate for the folder with the MD. Change to the “Setup” view and select the folder with the MD. Now click the “New” link in the “Rules” section:

Select the “Folder” with the MD as the “Parent Folder”. The “Provisioning Type” is “Managed Device to Master Controller”. I do not have any redundancy. But here you can select the type of your redundancy, with “Redundancy Level”. Put the node path into the “Config Node Path” field. This is the hierarchy level on the MM, where the device will be placed. Now, you select the MM mac address from the list of “Master Controller”. This assumes the MM is in Activate as well. You cannot use the ZTP with Activate if you did not add the MM to Activate as well. Also, specify the IP of the MM in “Master Controller IP”. You can also change the “Rule Name” if you need.
For monitoring purposes I also add a “Rule” to notify me of any new provisioning event:
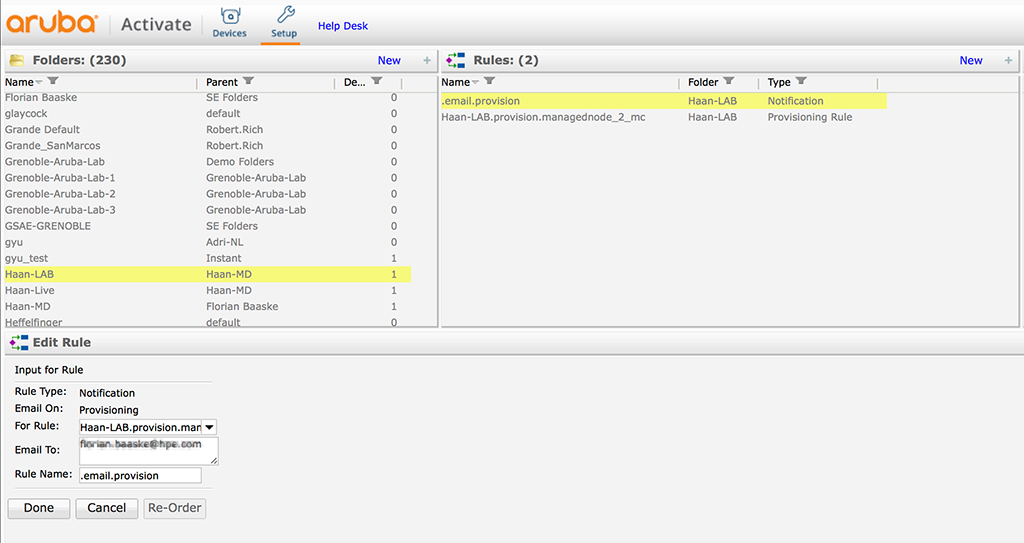
You simply select the provisioning rule, which triggers the mail notification.
Now, let’s go to the MM. You need to configure Activate in the MM. This is my Activate configuration:
activate
    whitelist-enable
    username "[email protected]"
    password 60f72ede33b80f645d6d0dbf00a1edb6353552f8727a3f56
“username” and “password” are your Activate credentials. You check the configuration with the following command:
(MM) *[mynode] #show activate

activate
--------
Parameter                                        Value
---------                                        -----
Activate AP Whitelist Service                    Enabled
Activate Device Whitelist Service                Enabled
Activate URL                                     https://activate.arubanetworks.com/
Provision Activate URL                           https://device.arubanetworks.com/
Activate Login Username                          [email protected]
Activate Login Password                          ********
Periodic Interval for AP WhiteList Download      1
Periodic Interval for Device WhiteList Download  24
Add-Only Operation                               Enabled
Custom cert to upload to Activate                N/A
Server cert to be used for IPSEC                 N/A
To trigger a sync use this command:
(MM) *[mynode] #activate syncNow, let’s start the MD. The MD boots up and offers you the wizard, from the scenario above. This time, do not enter anything and wait for the MD to connect to Activate:
Starting auto provisioning
Registered for NTP Sync
Using port gigabitethernet 0/0/1 for auto provisioning
Initiated DHCP, awaiting DHCP response

Auto-provisioning is in progress. It requires DHCP and Activate servers
Choose one of the following options to override or debug auto-provisioning...
    'enable-debug'  : Enable auto-provisioning debug logs
    'disable-debug' : Disable auto-provisioning debug logs
    'mini-setup'    : Start mini setup dialog. Provides minimal customization and requires DHCP server
    'full-setup'    : Start full setup dialog. Provides full customization

Enter Option (partial string is acceptable):

Received DHCP response, My IP = 10.201.201.206, Mask = 255.255.255.0, GW = 10.201.201.254, DNS = 192.168.2.26
Master info not received from DHCP, trying activate
Provisioning Parameters not received from Activate, will retry after 30 secondsReceived Activate response, My Role = md, Master  = 10.100.100.70, Master MAC = 00:0C:29:C7:29:31, Hostname = 7205-Test, Country code = DE, Redundant Master MAC = none, VPN IP = none, VPN MAC = none, Redundant VPN MAC = none, Secondary Master = none, Secondary Master Mac = none, Redundant Secondary Master Mac = none, Secondary VPN IP = none, Secondary VPN MAC = none, Secondary Redundant VPN MAC = none
Master = 10.100.100.70 auto-discovered from Activate

copying ca-cert


[20:23:39]:Starting rebootme
The MD get all the information from Activate. These are the information from the provisioning rule, from above. But also the ca-certificate from the MM. To check the certificate from the MM, the MD needs this ca certificate. The MM uploads the ca certificate during the initial sync with Activate. After the MD has all the information, it reboots. During this time you can check the MM config and search for the new MD:
(MM) *[mm] #show running-config | include local-custom
Building Configuration...
local-custom-cert local-mac "00:1a:1e:03:21:28" ca-cert factory-ca-cert server-cert self-signed-field-cert
and
(MM) *[mm] #show local-cert-mac


Local Switches configured by Local Certificate
-----------------------------------------------
Switch IP of the Local  MAC address of the Local  Cert-Type    CA cert          Server cert
----------------------  ------------------------  ---------    -------          -----------
                        00:1a:1e:03:21:28         SS Internal  Factory-CA-Cert  Self-Signed-Server-Cert
                        00:0b:86:be:84:00         Custom       flomain-root     mm-mac
                        00:0c:29:35:c2:c5         Custom       flomain-root     Factory-Server-Cert
Here you see the difference in using a custom certificate or the self-signed certificates for the MM<–>MD connection. This is the MD part if the config:
masterip 10.100.100.70 ipsec-custom-cert master-mac-1-c 00:0C:29:C7:29:31 ca-cert sc-root-ca server-cert factory-cert interface vlan 4094That is everything. Without ever touching the MD it is up and running on the MM.
Did you use the ZTP function of ArubaOS 8? Or any other ZTP functions of the other products. Tell me what you love about this feature and what you would change to make it even better.
If you find this post interesting, leave me a comment and share it with your friends. If you don’t like the post, leave me a comment and share it with your enemy. But whatever you do, leave me a comment, now.
Hey!
Good read. I tried the ZTP and got to the point where you are, I just have problem with the part after that. If I configure the vlan I want for the permanent management on a different port, then push down the controller config to use PSK with uplink vlan “none” then I lose the controller (ofc I plug in the new management vlan to the port and I add vlan-new as controller management IP). Is there a way to purge this 4094 config after I have the controller online, or does it stay in forever? Whats the workflow after?
Thanks in advance!
Cheers!
Daniel
Hi Daniel,
thanks for your comment.
I haven’t tried this as to my knowledge it is wise to stay with the VLAN 4094.
From a theoretical point of view, the it should be possible to remove following this path:
1. create the new Management VLAN
2. assign an IP to the new management VLAN
3. make sure, the MM and the MD can communicate using the new Management VLAN
4. make the new Management VLAN IP, the new controller IP
5. configure the MD to connect to the MM using the new controller IP
This would require several reboots, but from my point of view, it should work. But I have never tried. Maybe a good idea for the future.
BR
Florian
Florian, I am trying to use ZTP to connect a 7005 and a virtual MM. I have followed your example here as well as other information, but cannot get the MD to connect to the MM. The MD seems to get the provisioning information from Activate, but doesn’t show up in the MM.Is there a step-by-step guide to configure both the MM and the MD for ZTP?
Hi Forrest,
thanks for your question. It could have many reasons, that the MD cannot connect to the MM. First of all, make sure, that the connection between Activate and the MM is working and that the MD is created within the device list of the MM.
Make sure, that there is IP connectivity between the MM and the MD. Also, check the logs on the MD. They can give a hint of what is not working.
Hope this helps.
BR
Florian
Florian, I found by setting up the MD controller in the MM using a certificate and it’s MAC address, the MD connects to the MM using the Activate configuration. I can then reach the IP of the MD. Unfortunately, I think I ended up in the same spot as Daniel. Port 0/0/3 is in VLAN 4094. It seems I need to configure 0/0/3 for VLAN 10.
Hi Forrest,
VLAN 4094 is the default VLAN for MM discovery if you use zero-touch provisioning. You need to change this afterward if you will not use this VLAN in your setup.
BR
Florian
I like this idea. But my question is with a new Mobility Master, I have a standalone controller with several SSID, AAA, Clearpass, Airwave, etc settings, as a regular controller would have. I want to use this unit as the template for a group of 50 APs.
I don’t want to print out the config and look around in the GUI to get it to work. I’d like to get the global config and the specific config items for the first controller on the MM with as little work as possible.
Using ZTP for the 50+ remaining controllers makes sense, once I get the original config items onto the MM.
THanks,
Ambi
Hi Ambi,
There are several ways of migrating from a standalone controller to an MM-managed controller. You did not mention if you run 6.x on the standalone one or already 8.x. If you run 6.x you might use the migration tool. I have never used it by myself but it should do the job.
On the other hand, and this is my recommended option, is to start from scratch. This will help to get rid of old unused stuff and to clean up the config. You can use parts of the old config and reuse them on the MM by simply doing a copy paste, there is no need to use the GUI. Just keep an eye on the level (Global/Group/Controller) before pasting something.
Hope this helps.
BR
Florian