Ever wondered why you can’t use MAC authentication and get the correct username for monitoring purposes, for example? Actually, with ClearPass you can use MAC authentication with a username. You can return the correct username, not the MAC address so that monitoring applications can use this username instead of the MAC address.
Configure the Controller for MAC Authentication
I use an Aruba WLAN controller for this setup. The controller is running AOS 8.0.1.0 and is configured with a PSK-based SSID. For this scenario, I enable MAC authentication on the controller for this SSID and I use the guest database from ClearPass to authenticate the clients.
The SSID is already there and I assume you know how to create an SSID with an Aruba controller. If you have questions on creating an SSID, leave me a comment and I can help you out. To enable MAC authentication for an SSID go to “Managed Network–>Configuration–>WLANs” and select the SSID you like to change and go to the “Security” tab:
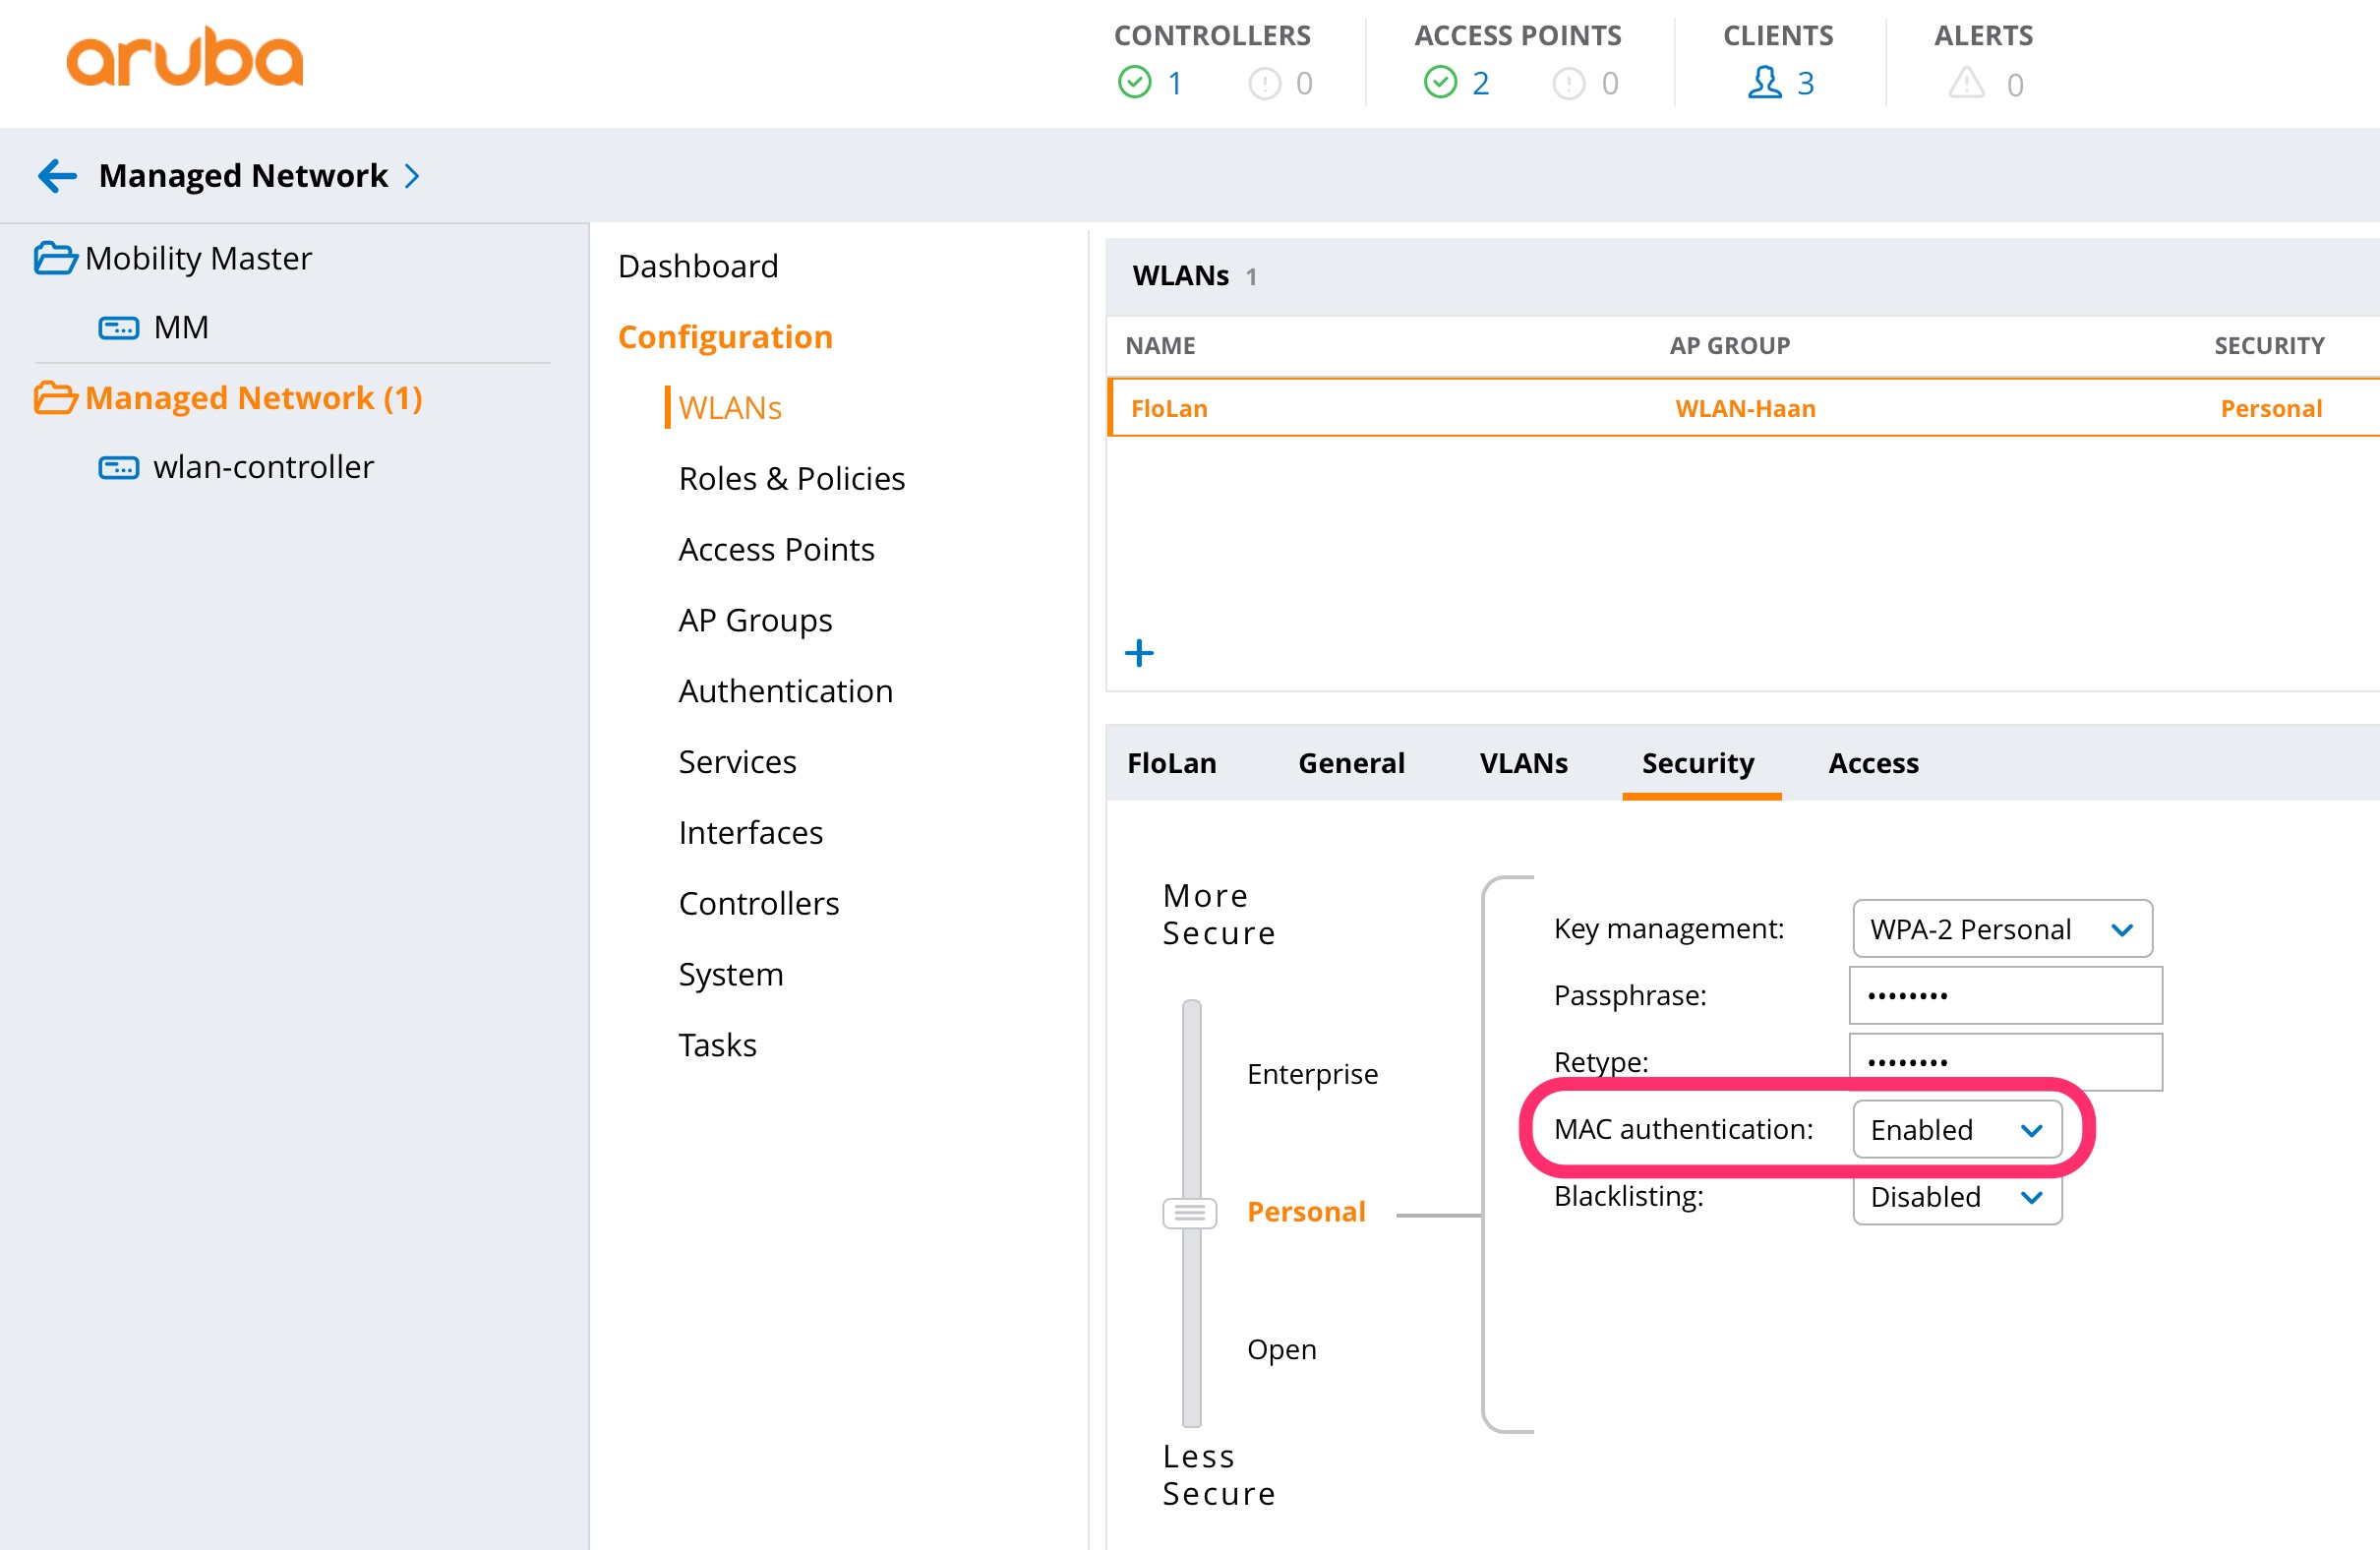
Enable MAC authentication and press the submit button. Do not forget to submit pending changes to synchronize the changes to all controller in the group.
Afterward, create the authentication profile for the SSID. Go to “Managed Network–>Configuration–>Authentication” and select the “AAA Profiles” tab. I have already a profile for my SSID. To create a new one click the “+” sign. You get the same screen as below, but with the option to change the name for the profile:
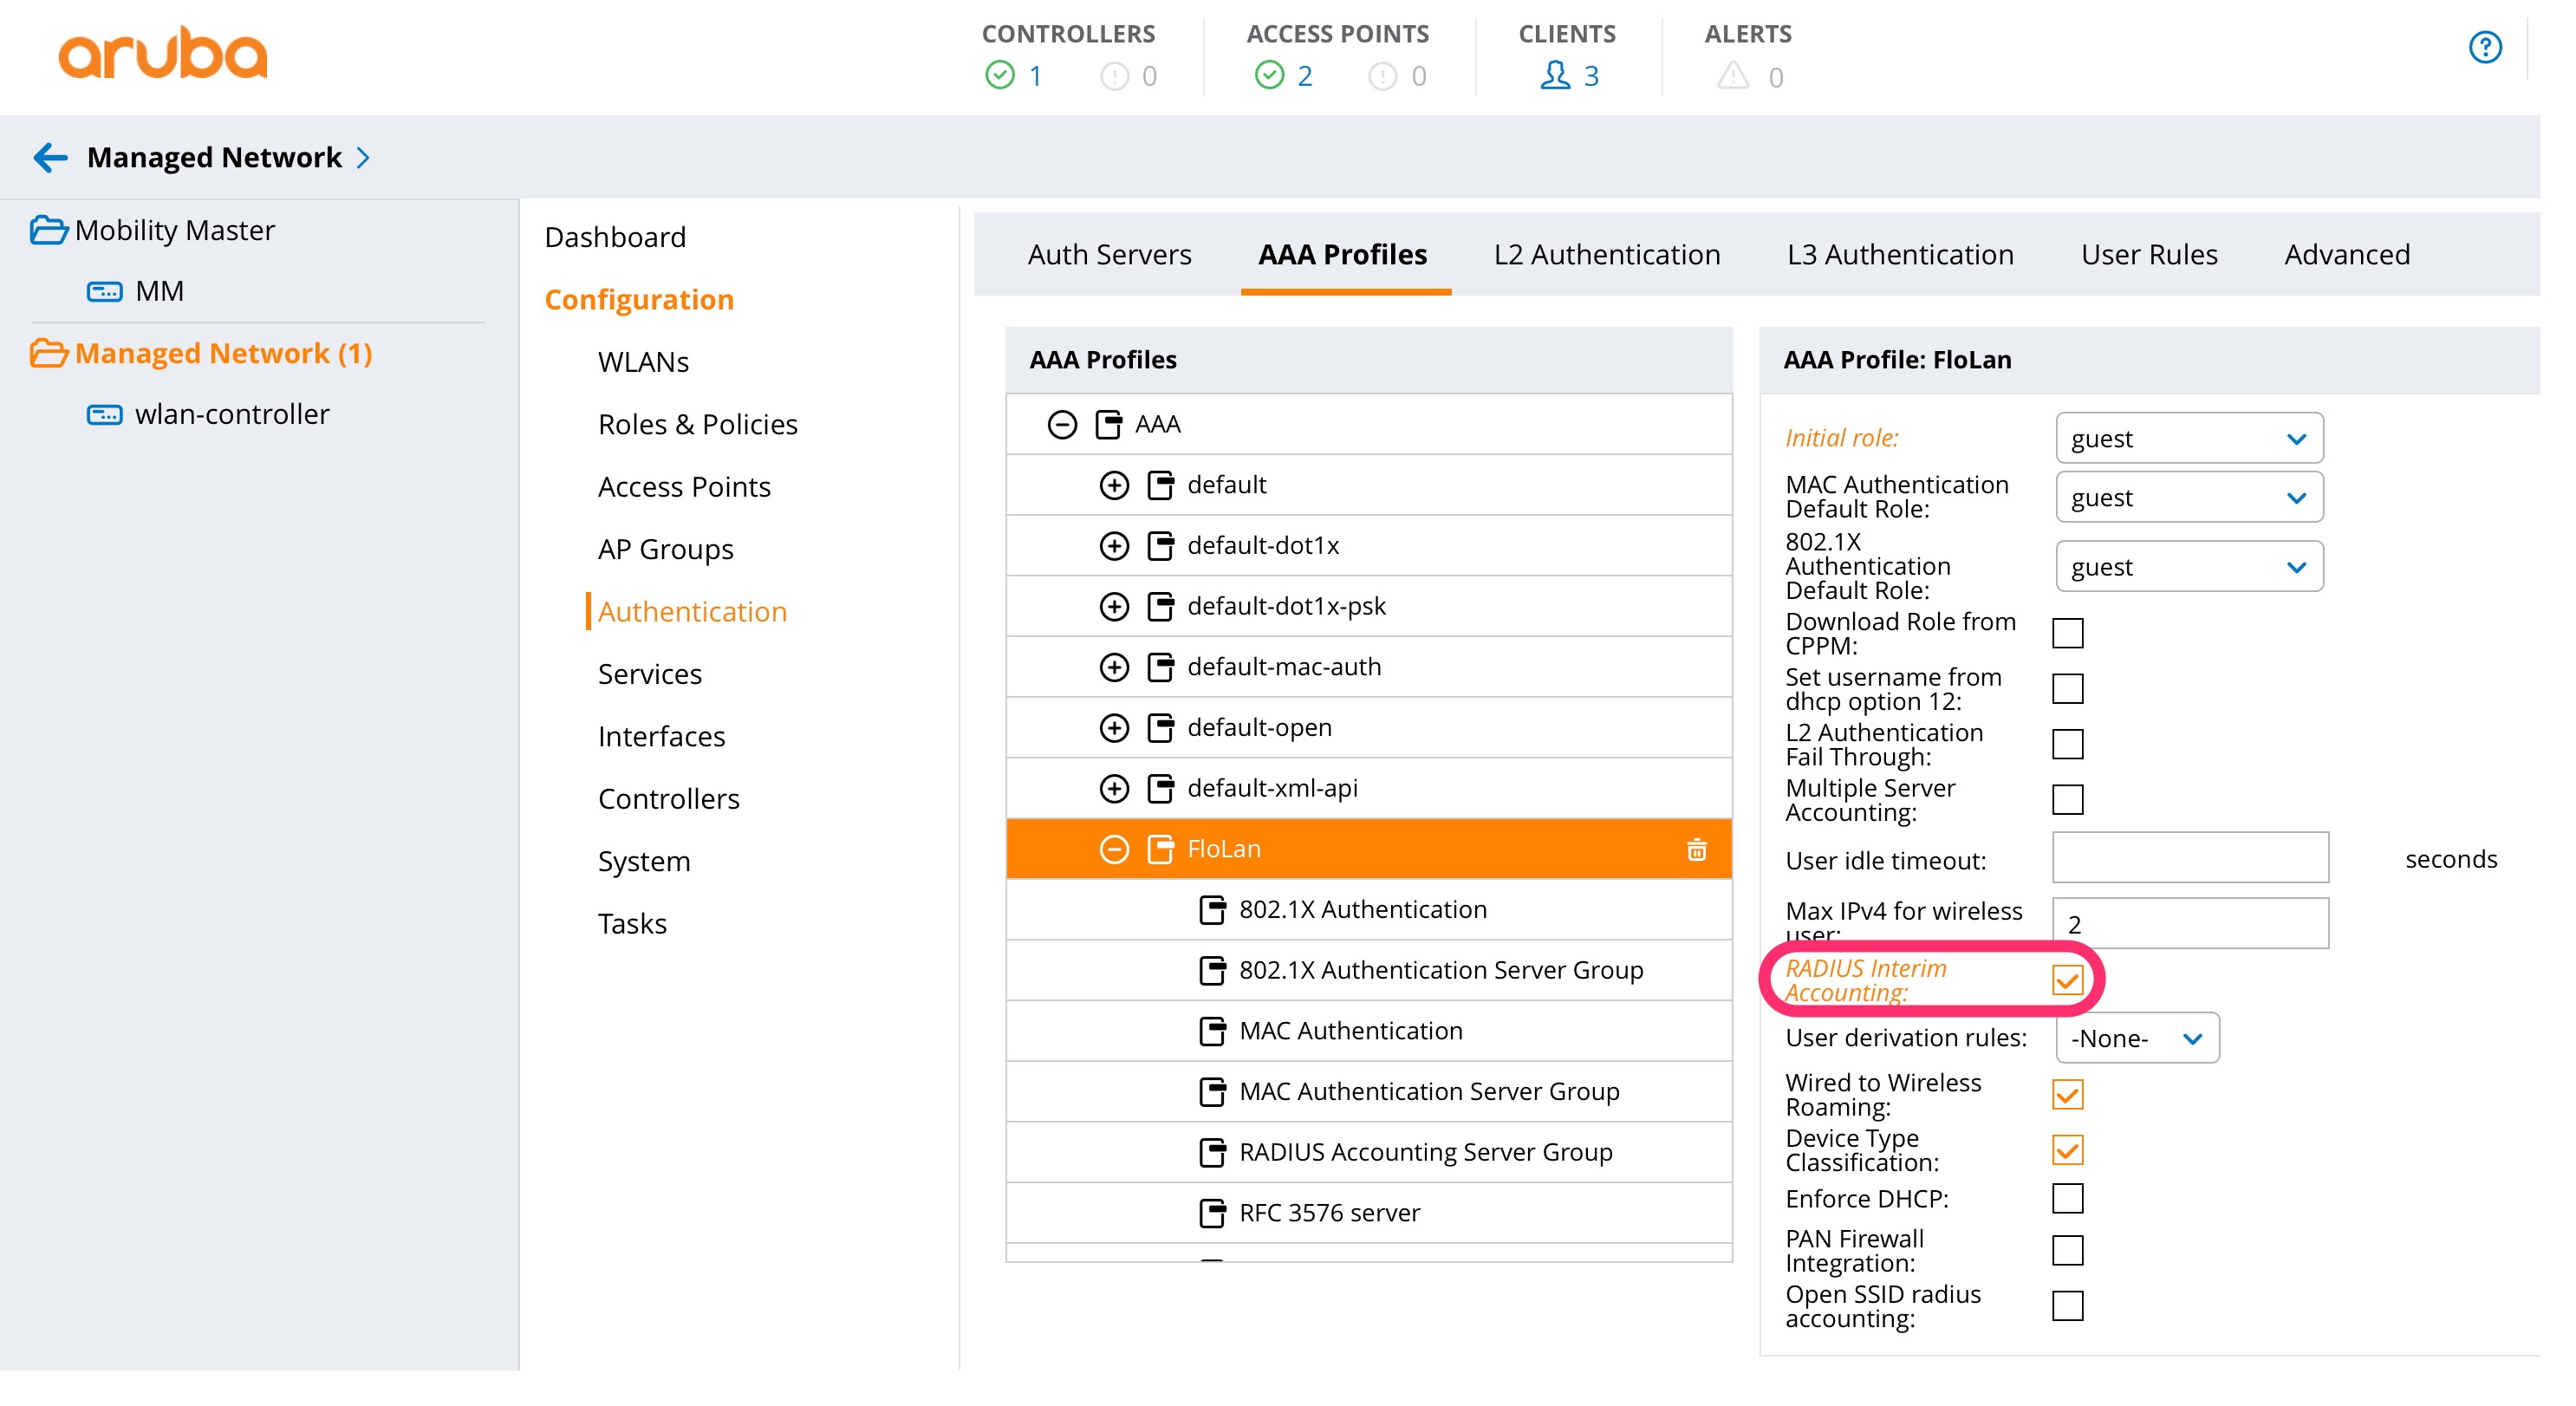
The important part is to enable “Radius interim Accounting” to get the accounting information during the session and not only at the end. Also, define the “Initial Role” and “MAC Authentication Default Role”. Even, if we override those rules from ClearPass it makes sense to use some roles with limited access rights. The initial role is used for clients which get a reject from the radius server. I will use this role, later on, to redirect unknown clients to the guest portal. Save the changes. Now select “MAC Authentication” below the profile you have created:
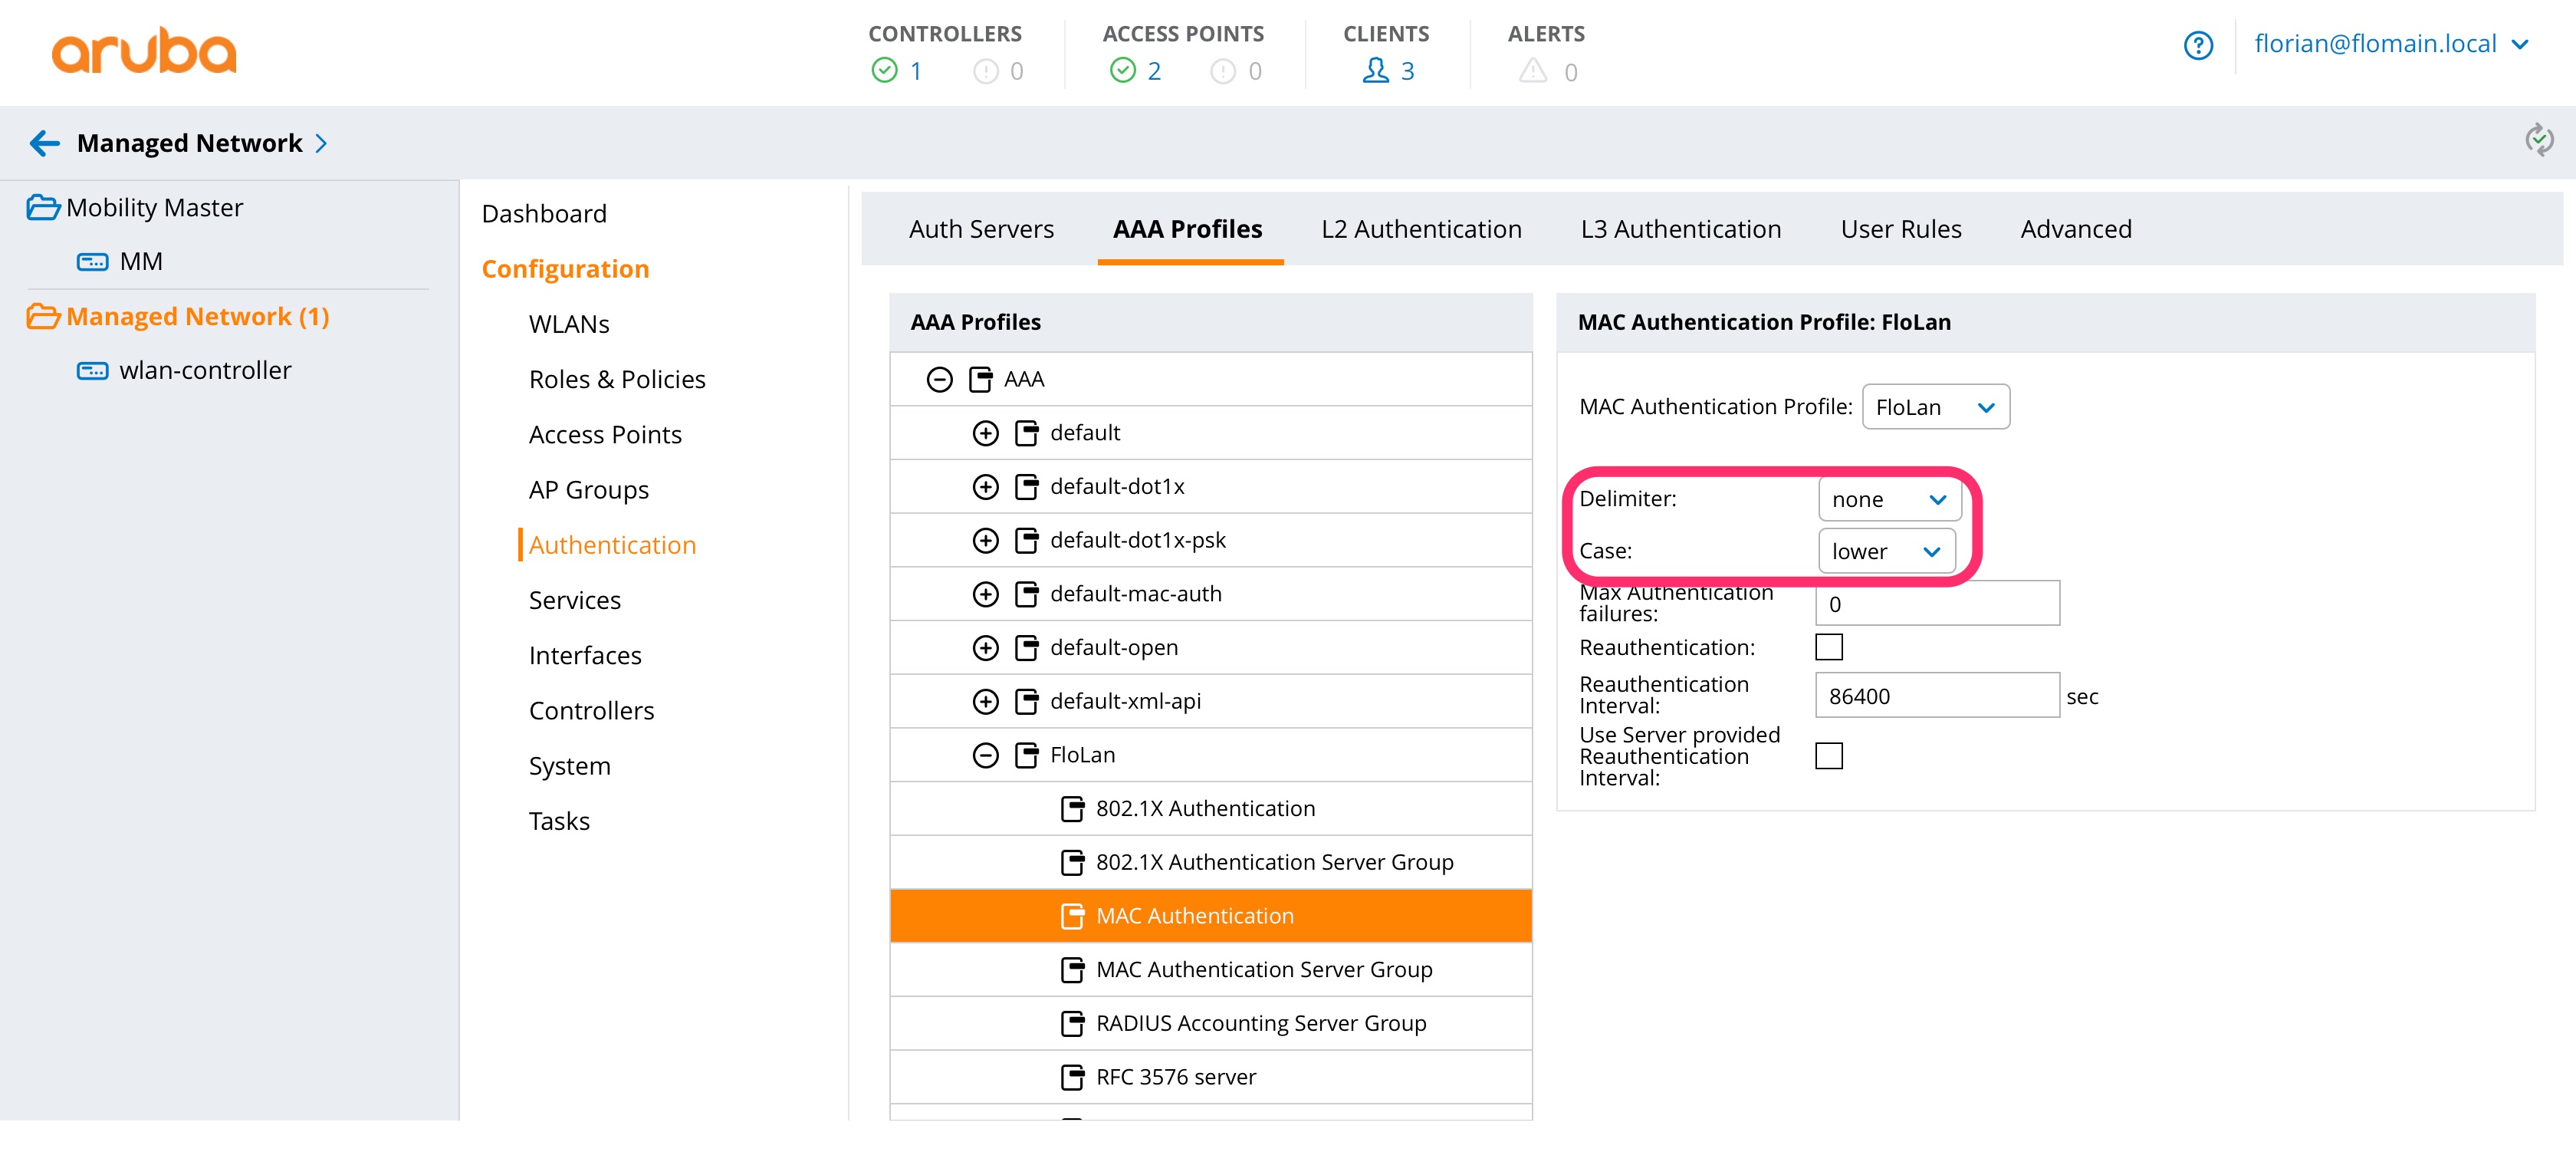
The important options are the “Delimiter” and the “Case”, which have to match the configuration on ClearPass and your endpoint database. For ClearPass and the guest device database, you can use the settings from the picture above.
Next is the “MAC Authentication Server Group”. Just below the entry of “MAC Authentication”. Select the “Server Group” with ClearPass. This has to be created first and I assume you know how to create an “Auth Servers” “Server Group”.
Last, but not least, do the same for “Radius Accounting Server Group”, if you need accounting.
The controller is ready to go and the next part is ClearPass.
MAC Authentication with Username using ClearPass
I use the internal guest device database from ClearPass to authenticate the clients. For the username, I use the “Device Name” field. You can use any database you like and of course use different fields for the username.
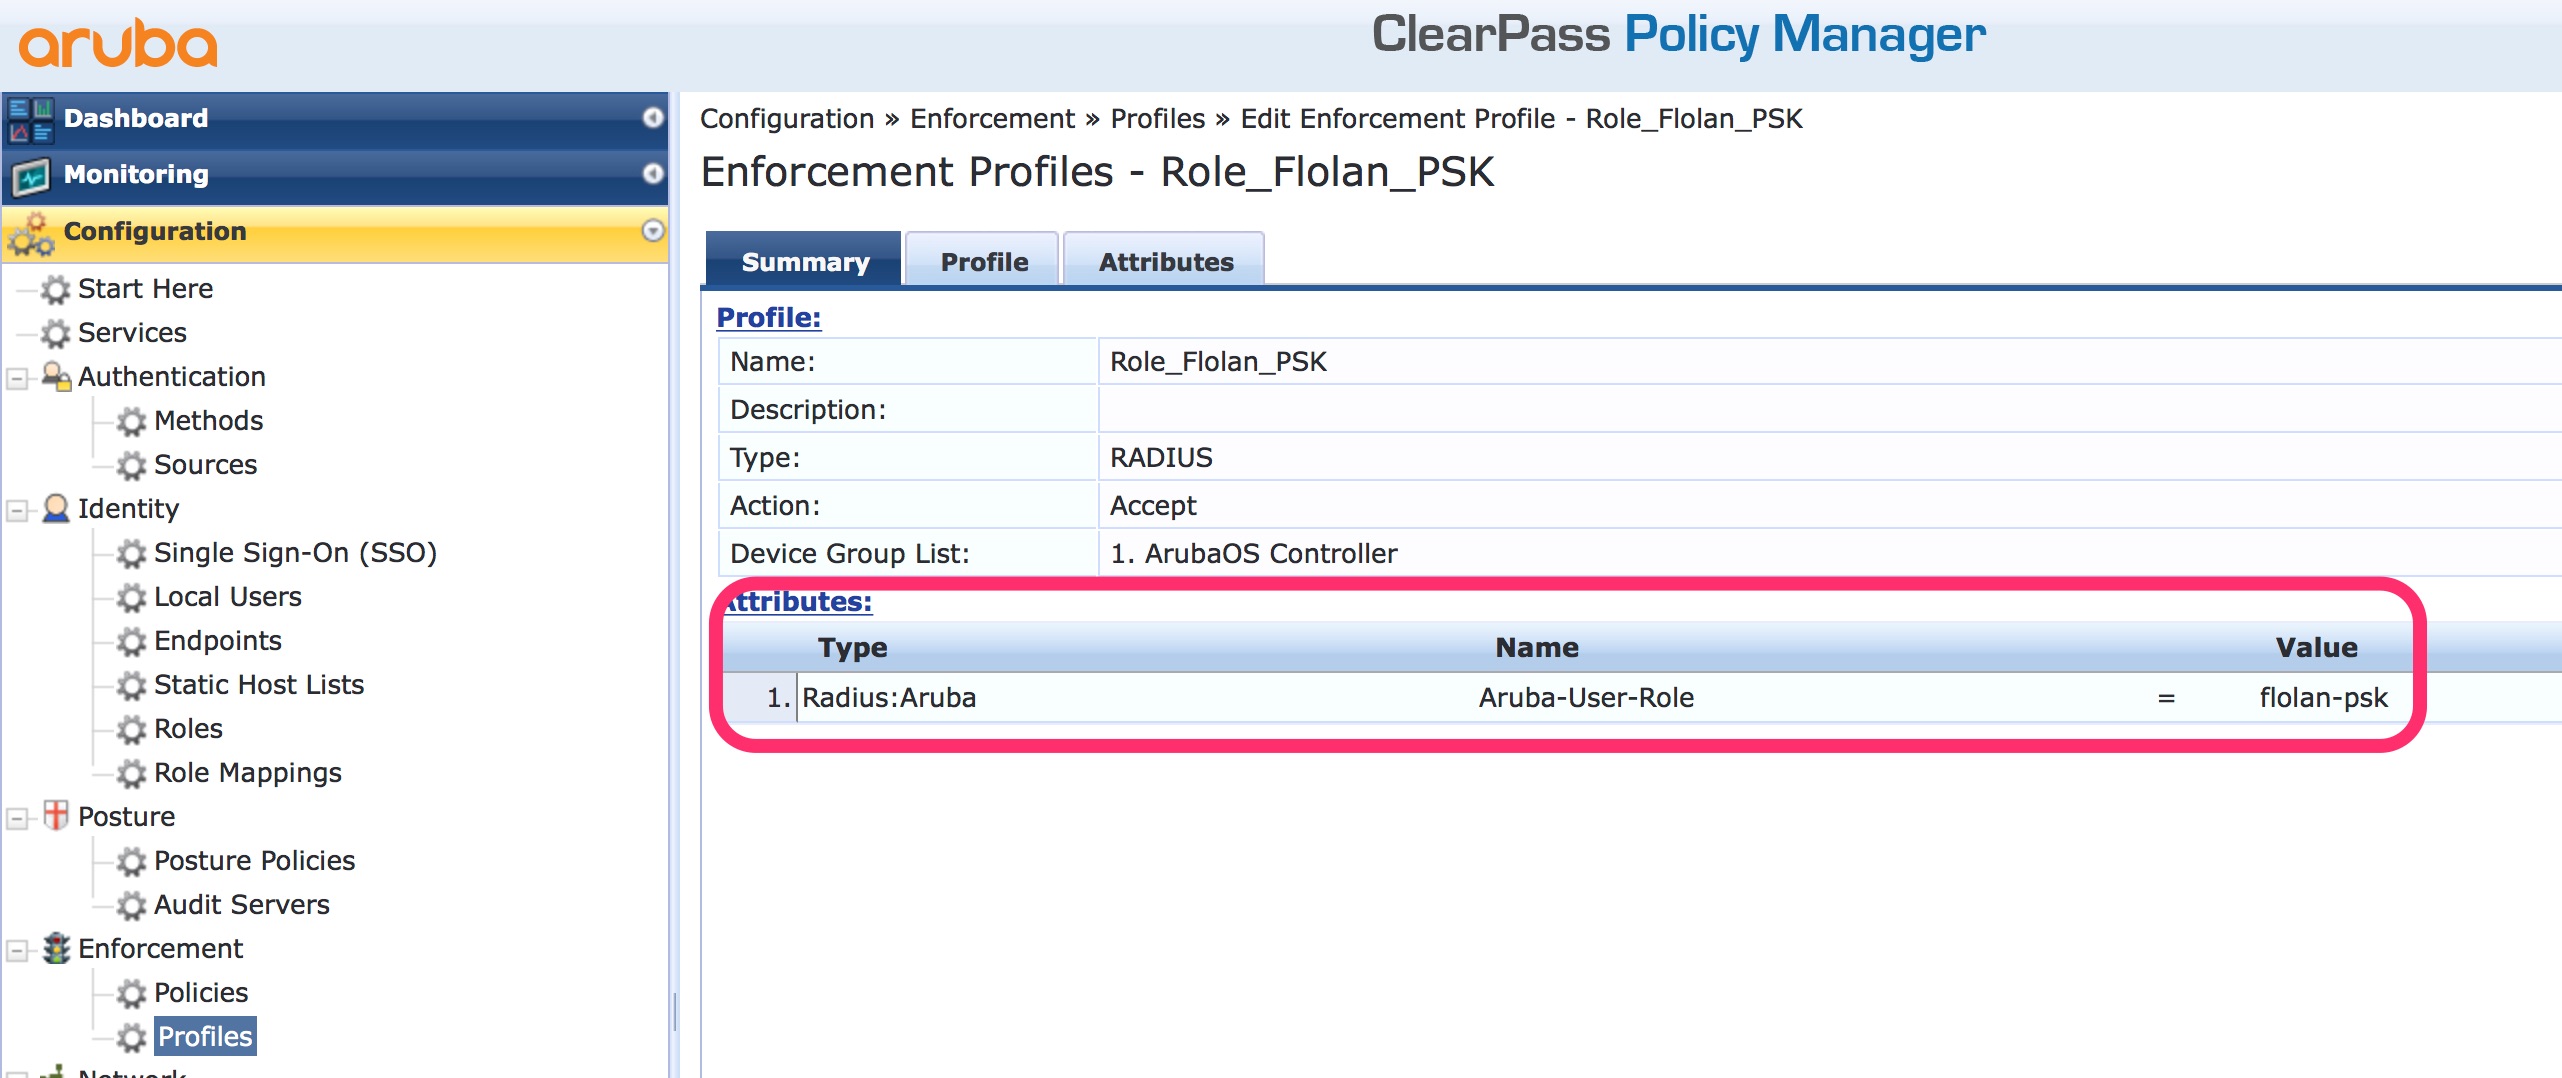
The first step is to create two profiles. The first one returns username:
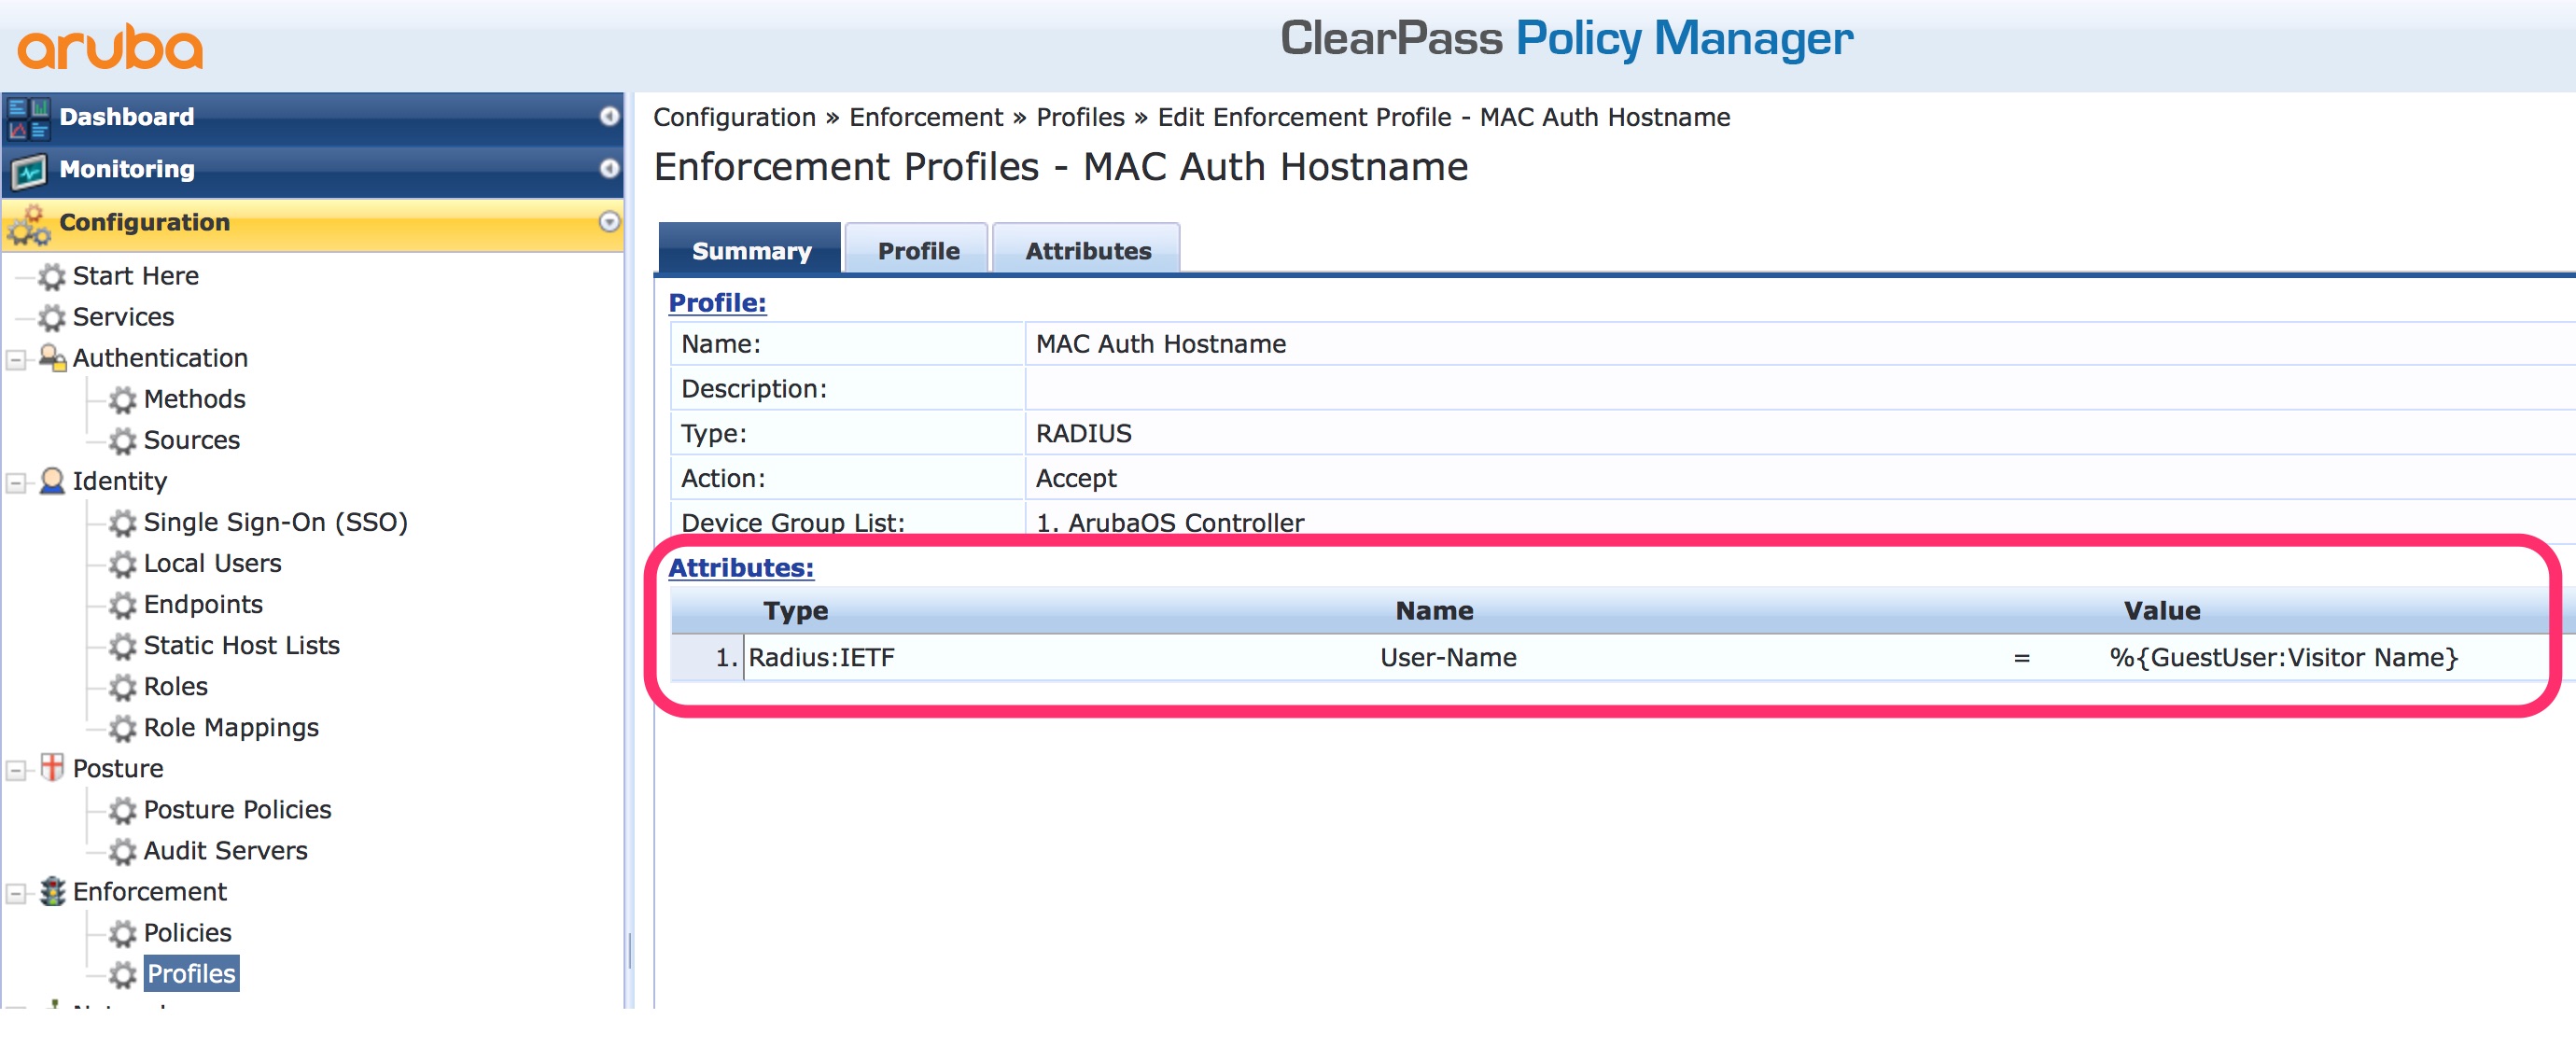
This is an “Aruba Radius Enforcement Profile”. The profile returns the “Device Name” from the guest device database as the radius username. To get this information use the “GuestUser:Visitor Name” variable. And this is the trick to get visibility within MAC authentication.
The second profile overrides the role for MAC authentication:
This profile assigns the “flolan-psk” role to all users.
To bring the profiles together create a new “Enforcement Policy”:
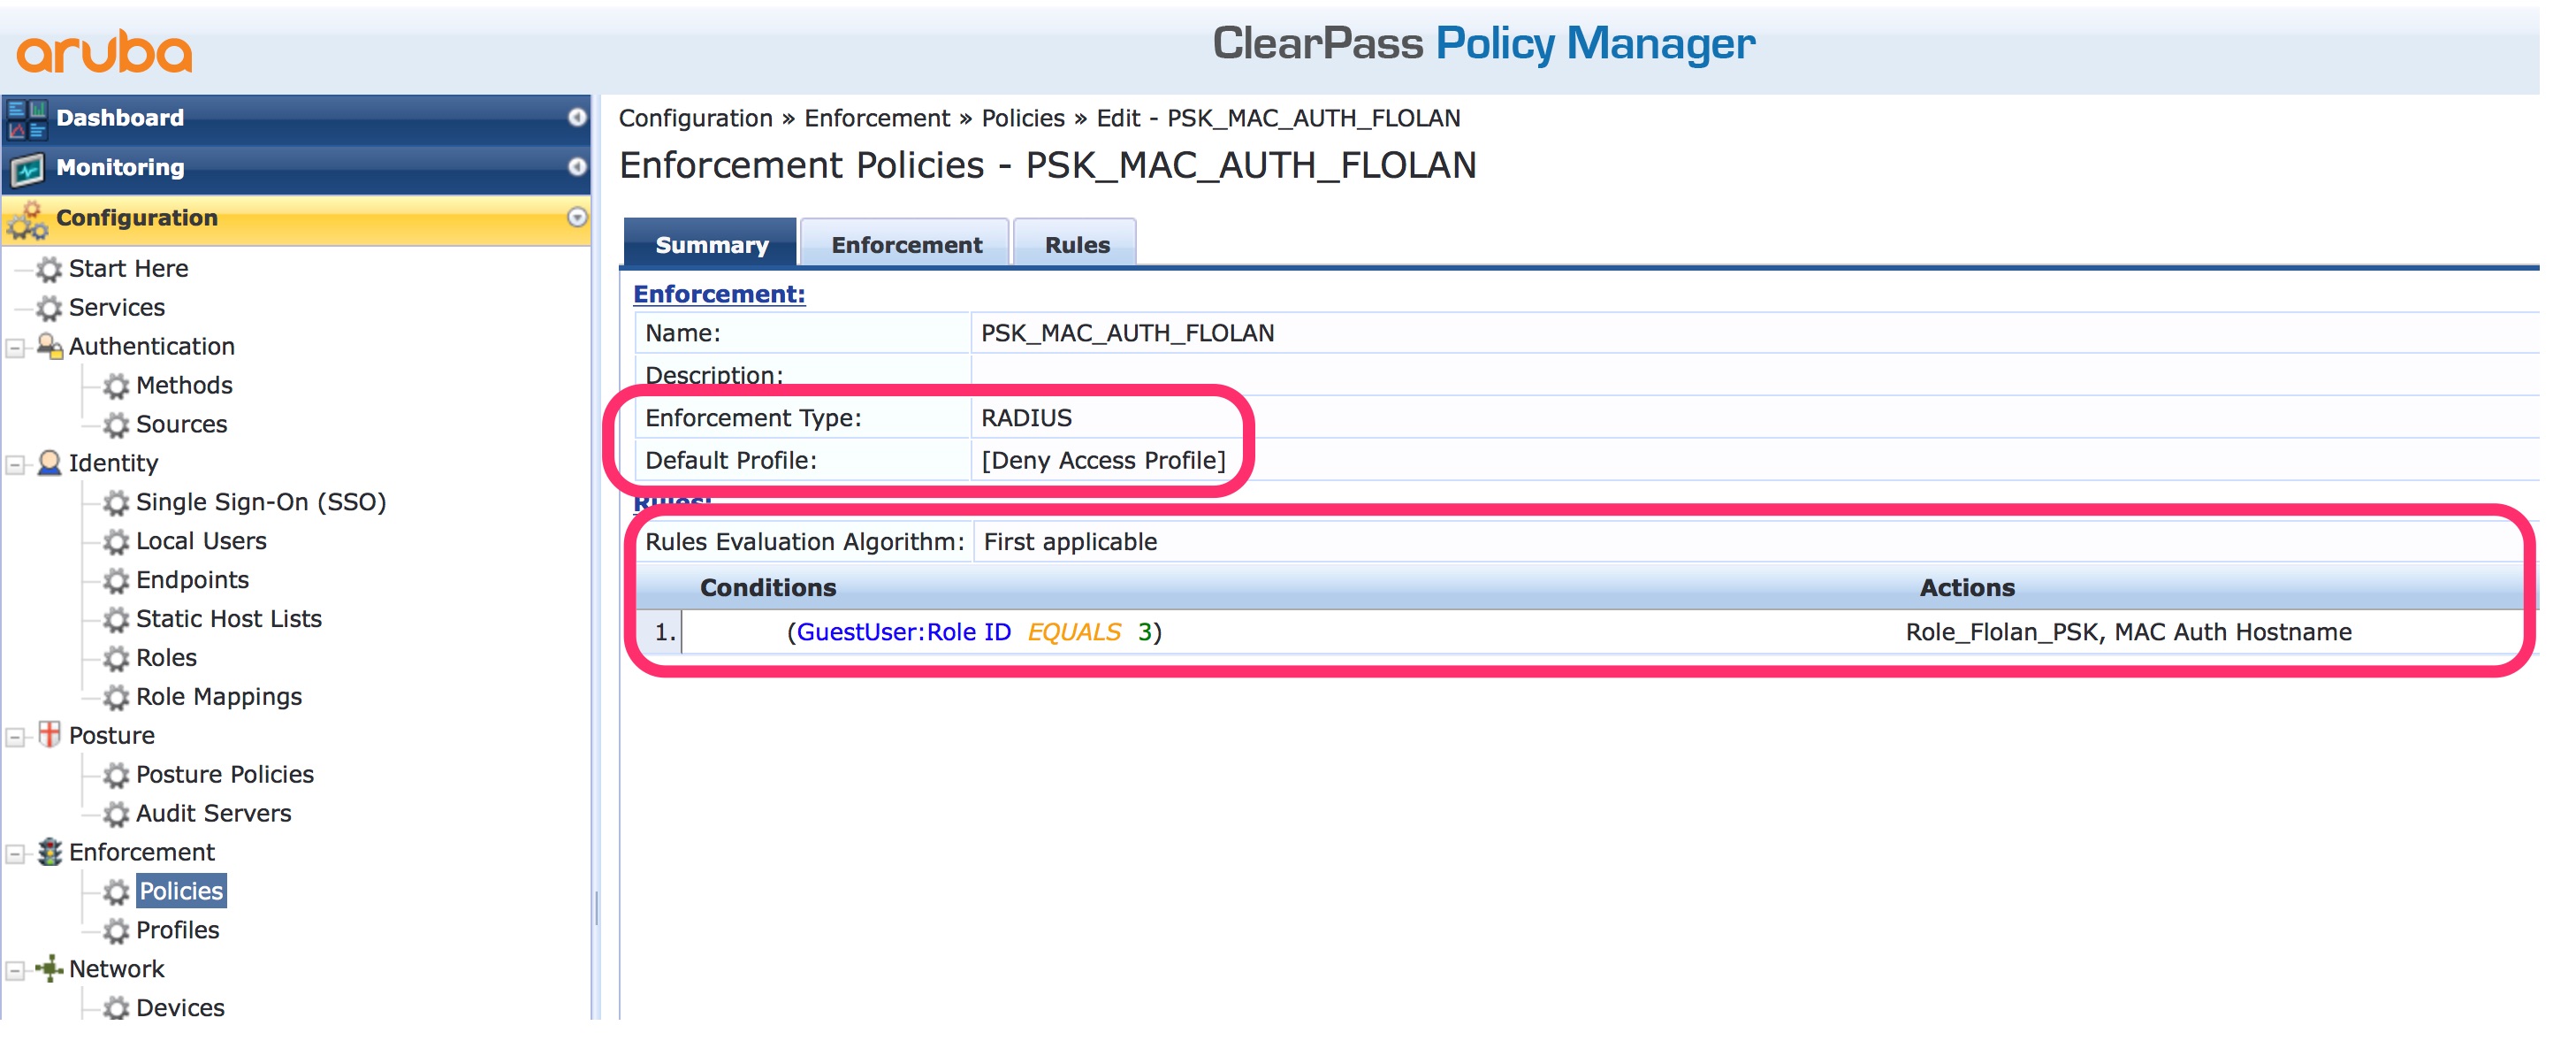
This policy allows any client from the guest device database with the roleID of “3” and applies the two create profiles. The roleID 3 is the default “Employee” role.
To finally bring everything together, create a “Service” for the authentication:

Use the MAC authentication template for the service and define the “Service Rules” to your needs. The one above are for a wireless connection using the SSID “FloLan”. The “Authentication Source” is the “Guest Device Repository” and the method is “MAC_AUTH”. For the enforcement part, use the created policy.
The Benefit in using the guest device database, it is not consuming any licenses.
To get interim accounting information you need to enable this function on ClearPass. Go to “Administration–>Server Manager–>Server Configuration” and select your ClearPass server. Switch to the tab “Service Parameters” and select the “Radius server” as service type:

Set the red marked option to “True” and ClearPass logs interim accounting packets as well.
Now, check the monitoring part:
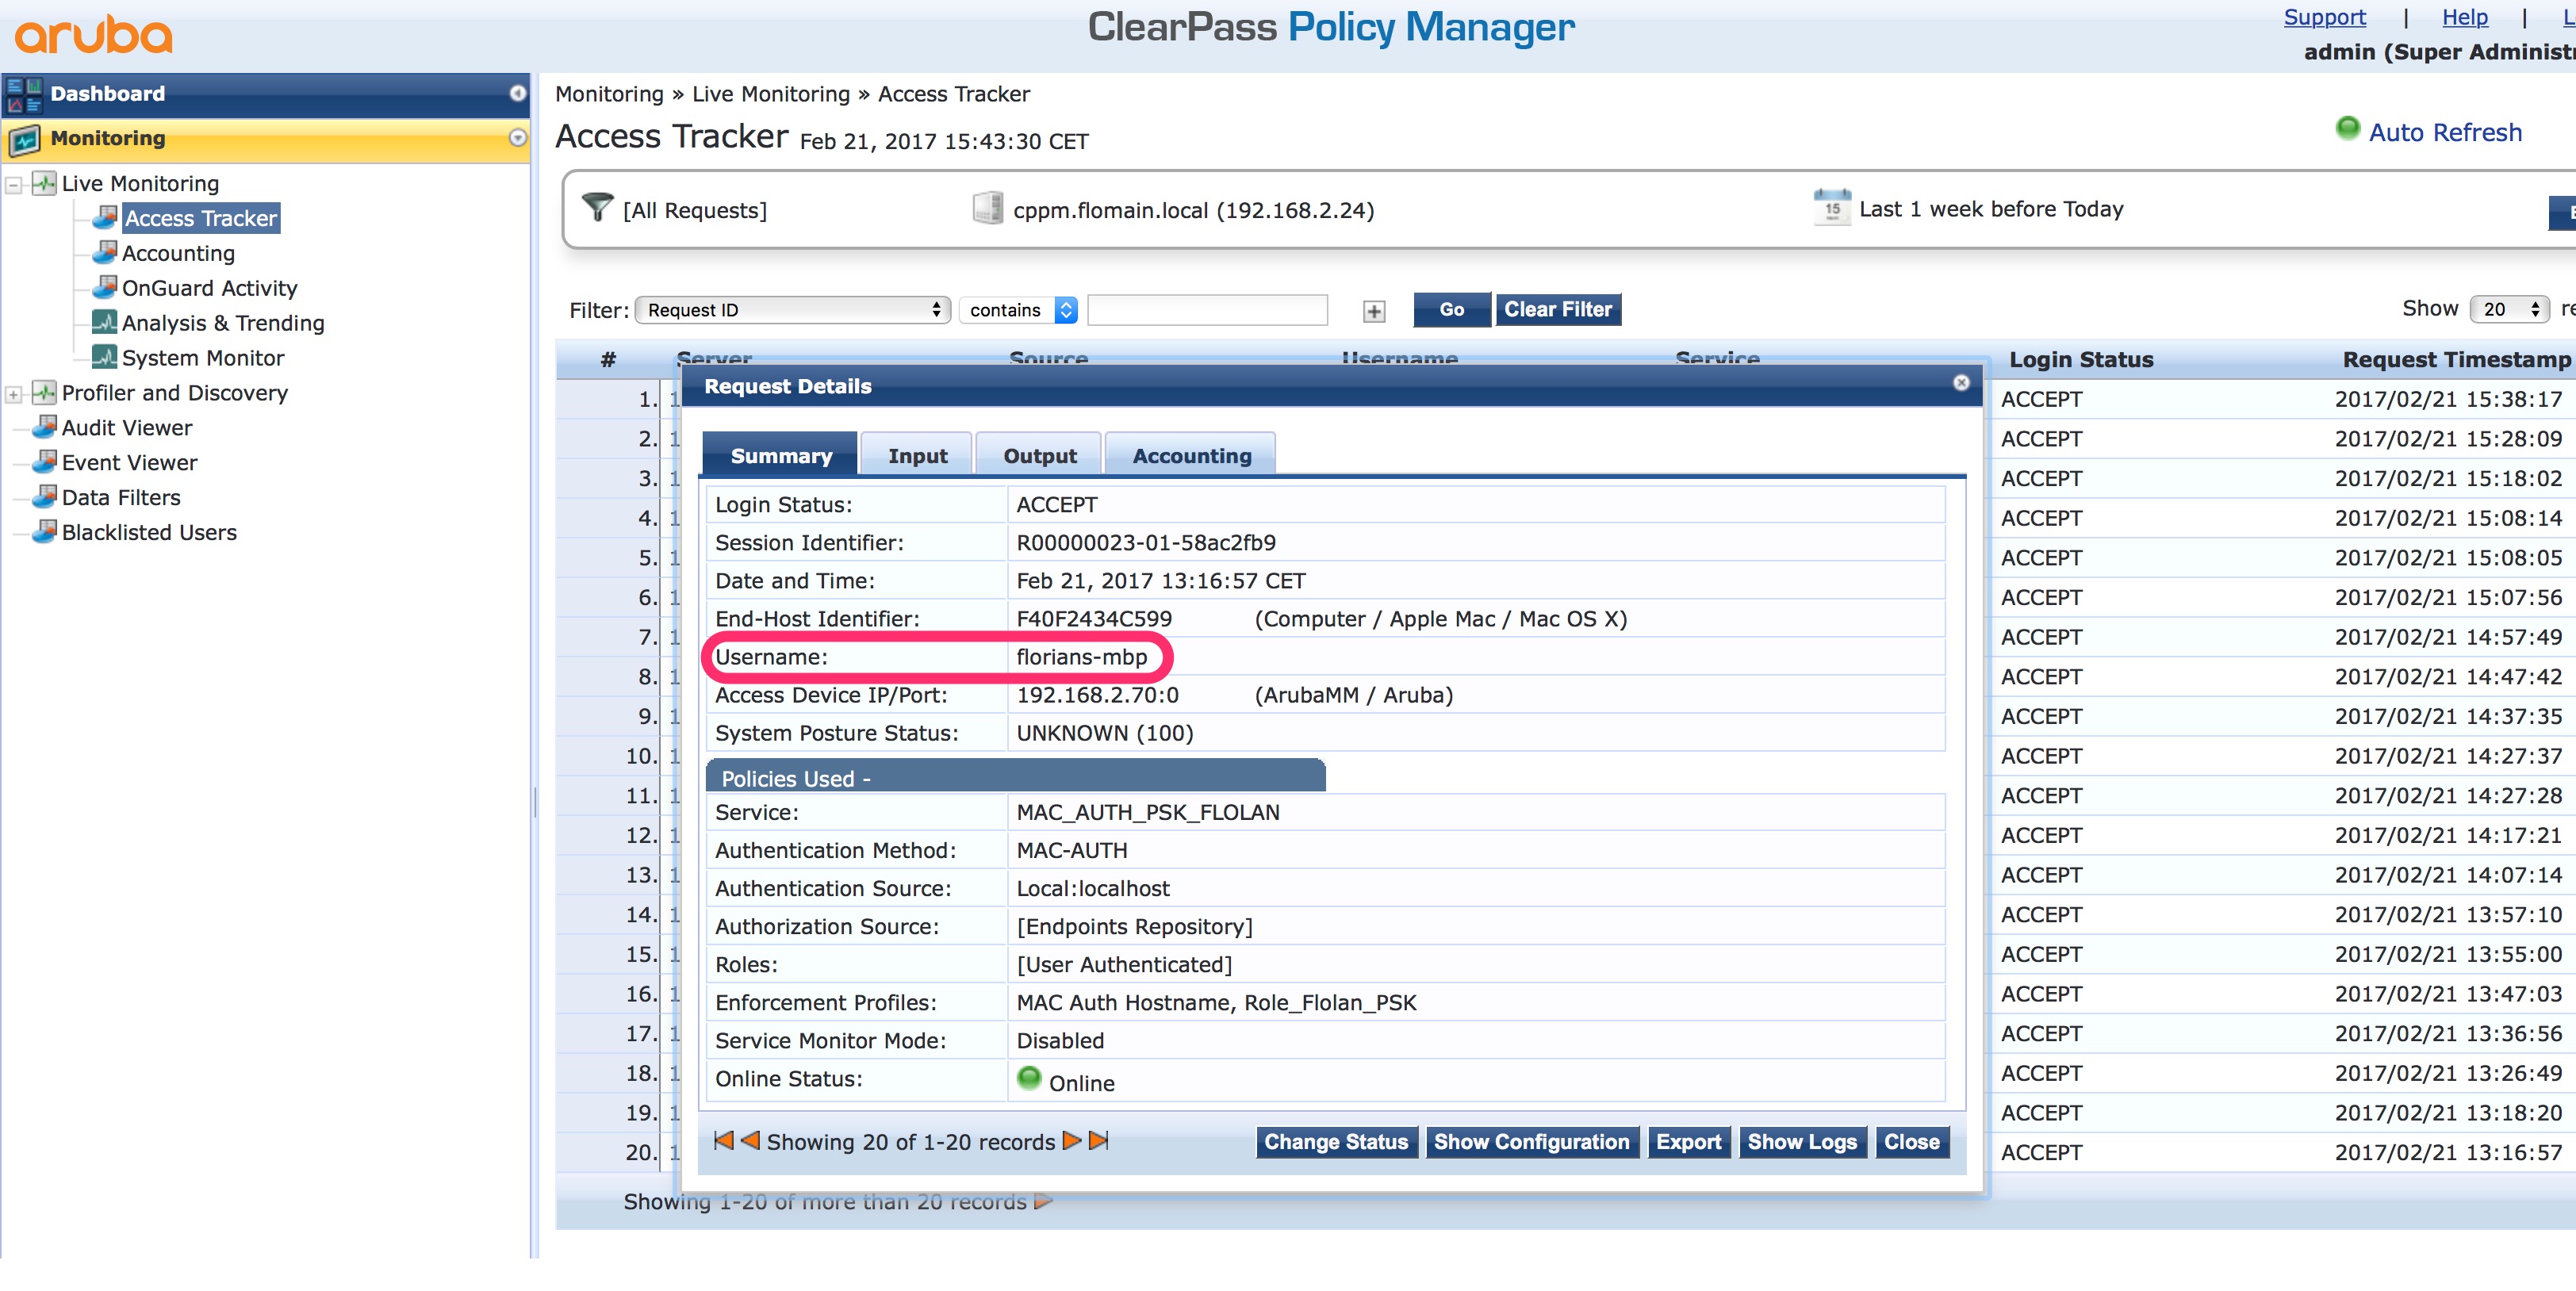
The screenshot above is from a successful authentication. You can see, that the username is not the MAC address.
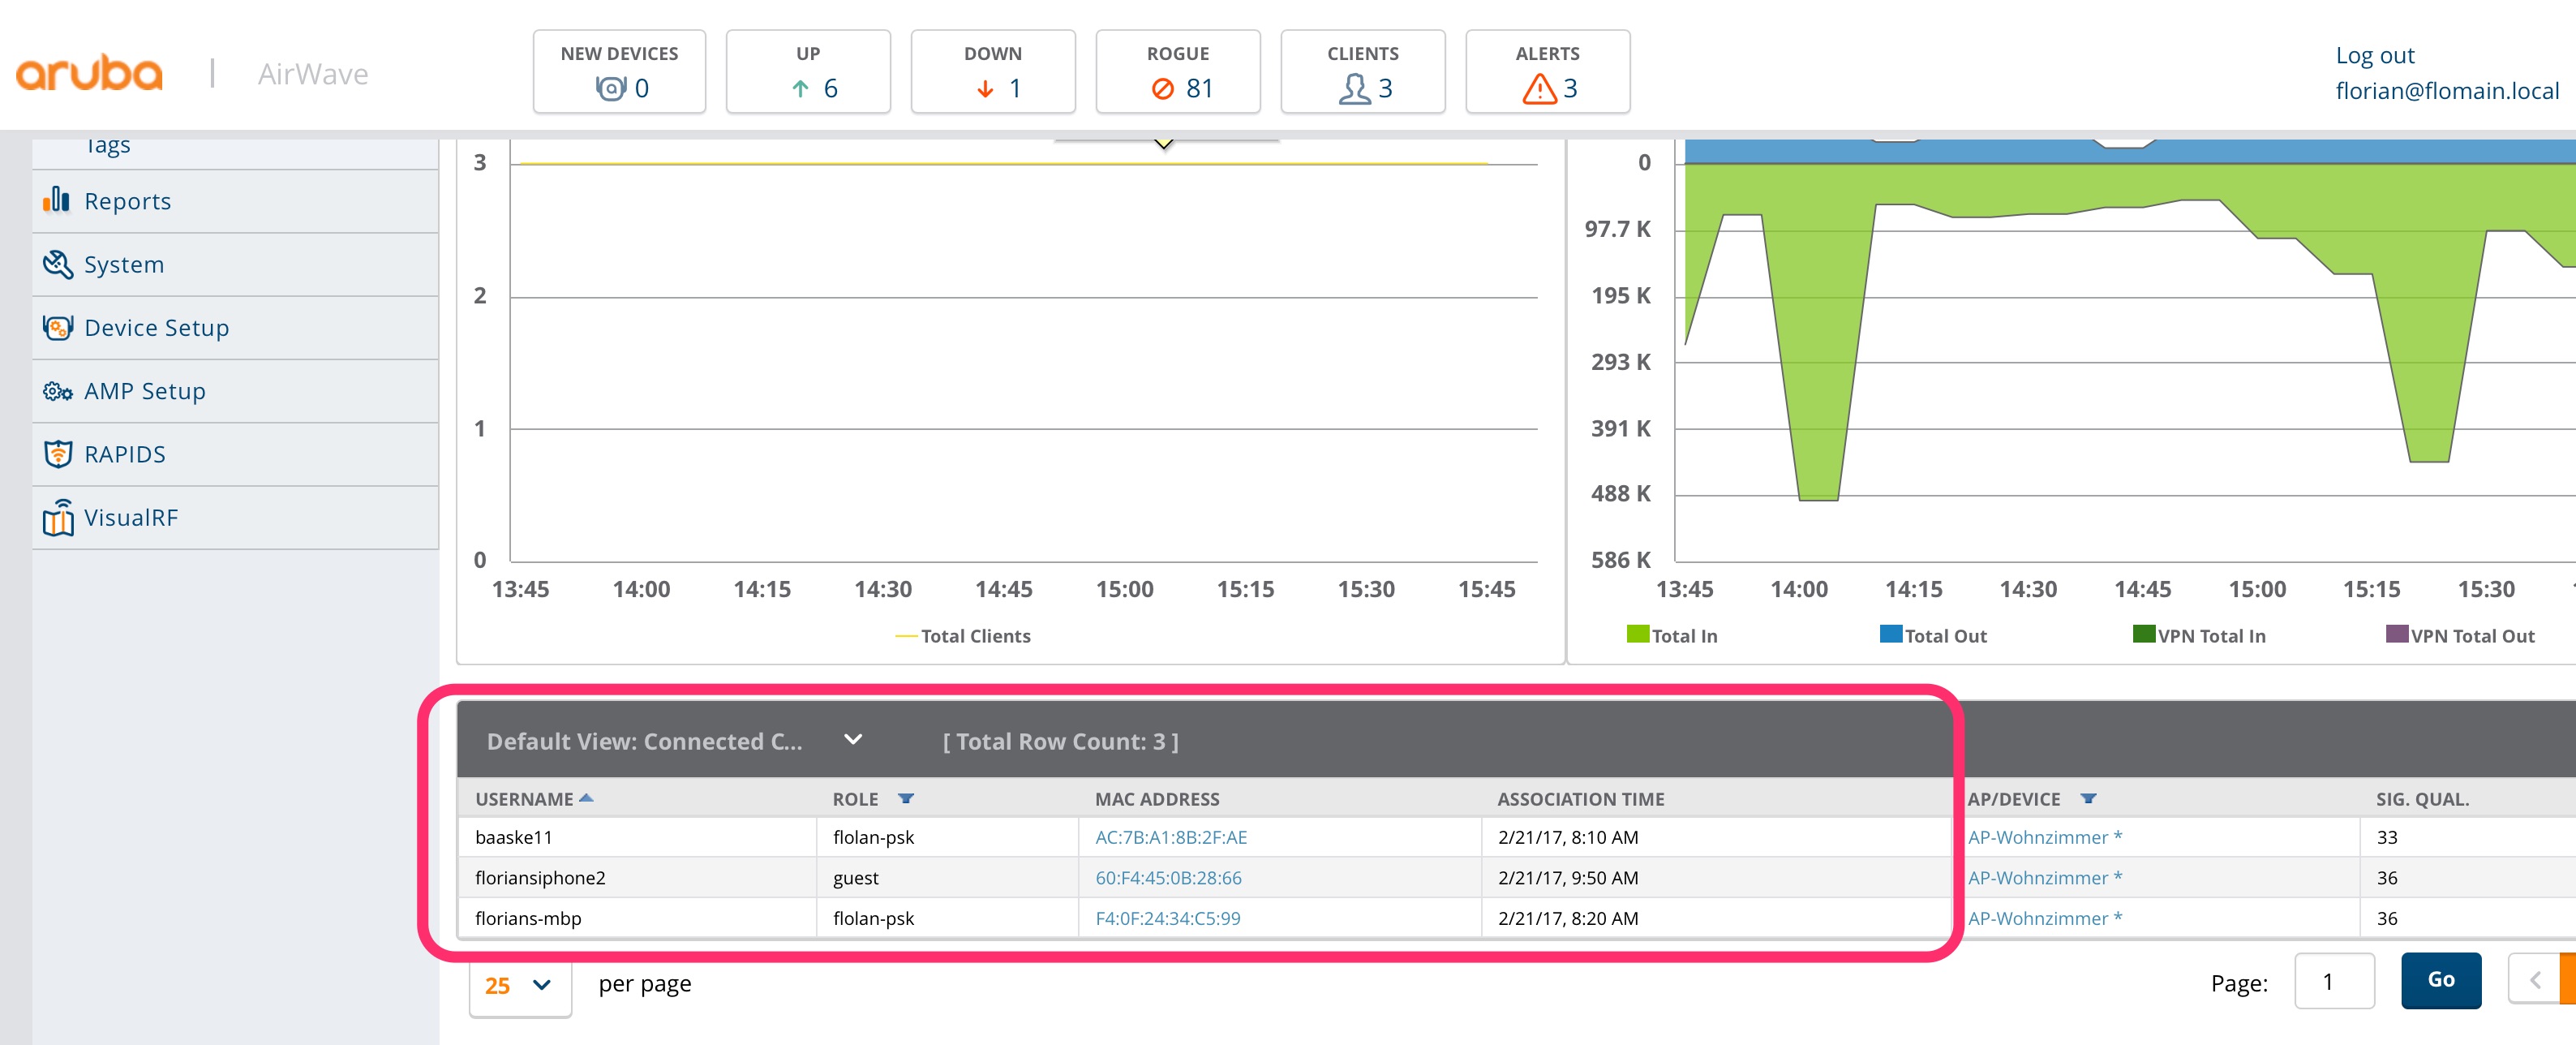
Finally, also check AirWave:
This could make life much easier during troubleshooting. What are your experiences with MAC auth and troubleshooting? Leave a comment below and let us discuss the topic above.
Hi, can help me on how to bind users in internal database into a specific MAC address so that a username and password cannot be use in other computer with different MAC address?
Hi benji,
What exactly are you trying?
My understanding is, that you have different users, working with different devices and a user should only be allowed to log in using a specific device, defined through the mac address. correct?
How do you authenticate the devices?
Can you share this roles mapping ?
Hi attaporn,
I haven’t used any role mapping in my example. But you can use whatever role mapping you would like to use. ClearPass will give you full flexibility.
BR
Florian
Florian your Aruba posts are top shelf. Its amazing how often I google some Aruba related topic and your blog appears. Please don’t ever stop 🙂
hi Brett,
Thanks for the feedback. Really appreciated. Actually, after a long time, while my real life (2 young Kids (Babys), a new Home, and lots of work during my regular working hours) I managed to get regular time for blogging again. So you will see new posts during the next weeks 🙂
BR
Florian
HI Florian!
Your information helped me a lot
Let me ask you one more question,
How many macs can be registered on the controller when using mac authentication without clearpass on the 7240 controller?
Hi Choi,
thanks for the feedback.
For the 7240 it is 32k, nut I would not recommend doing this, as the options to manages those are extremely limited and having that many macs in the internal DB could be a management nightmare.
BR
Florian
Hello,
This has been very helpful but I have a question about COA. I have a “blackhole” VLAN that I use for unkown devices. If a device connect that doesn’t have a Guest Device in Clearpass, it puts that device in an isolated VLAN.
Currently I find the devcies MAC address in either Clearpass or the Mobility Controller and create a Guest Device for it. I then have to kick the wireless device and have it rejoin to get its new role.
I would love to have a way that I can use COA to do this once I have created the Guest Device. If I try to do this manually with a Radius Dynamic Authorization in Access Tracker it fails with a “Session-Context-Not-Found” message.
Do you know of a way to run COA against Guest Devices?
Thanks
Hi Erik,
Thanks for your comment. Much appreciated.
From my point of view, doing a CoA from Access tracker should work. No matter of this is a guest device or not.
If CoA is not working it might be a miss configuration either in clearpass or your access device.
What type is your access device? And are you using the correct CoA template? Do you have accounting enabled?
Just some starting questions to get this analyzed.
BR
Florian