This article is all about the ClearPass RestAPI. My goal is to give you a short overview of the capabilities of the ClearPass RestAPI and show one possible use case. Maybe you can comment on the article and describe your use case.
I’m working on a project with the need to onboard a device with ClearPass. The problem, this specific device is not supported in ClearPass Onboard and the device is not able to use the web-based onboarding process. It clearly is a problem of the device, but with the help of the ClearPass RestAPI it is possible to create a custom onboarding script for this specific device and solve customer needs.
During the process of defining the script, I started working with the ClearPass RestAPI and in this article, I give an introduction to this API. The article is not about programming, but how to use the RestAPI within a program or script.
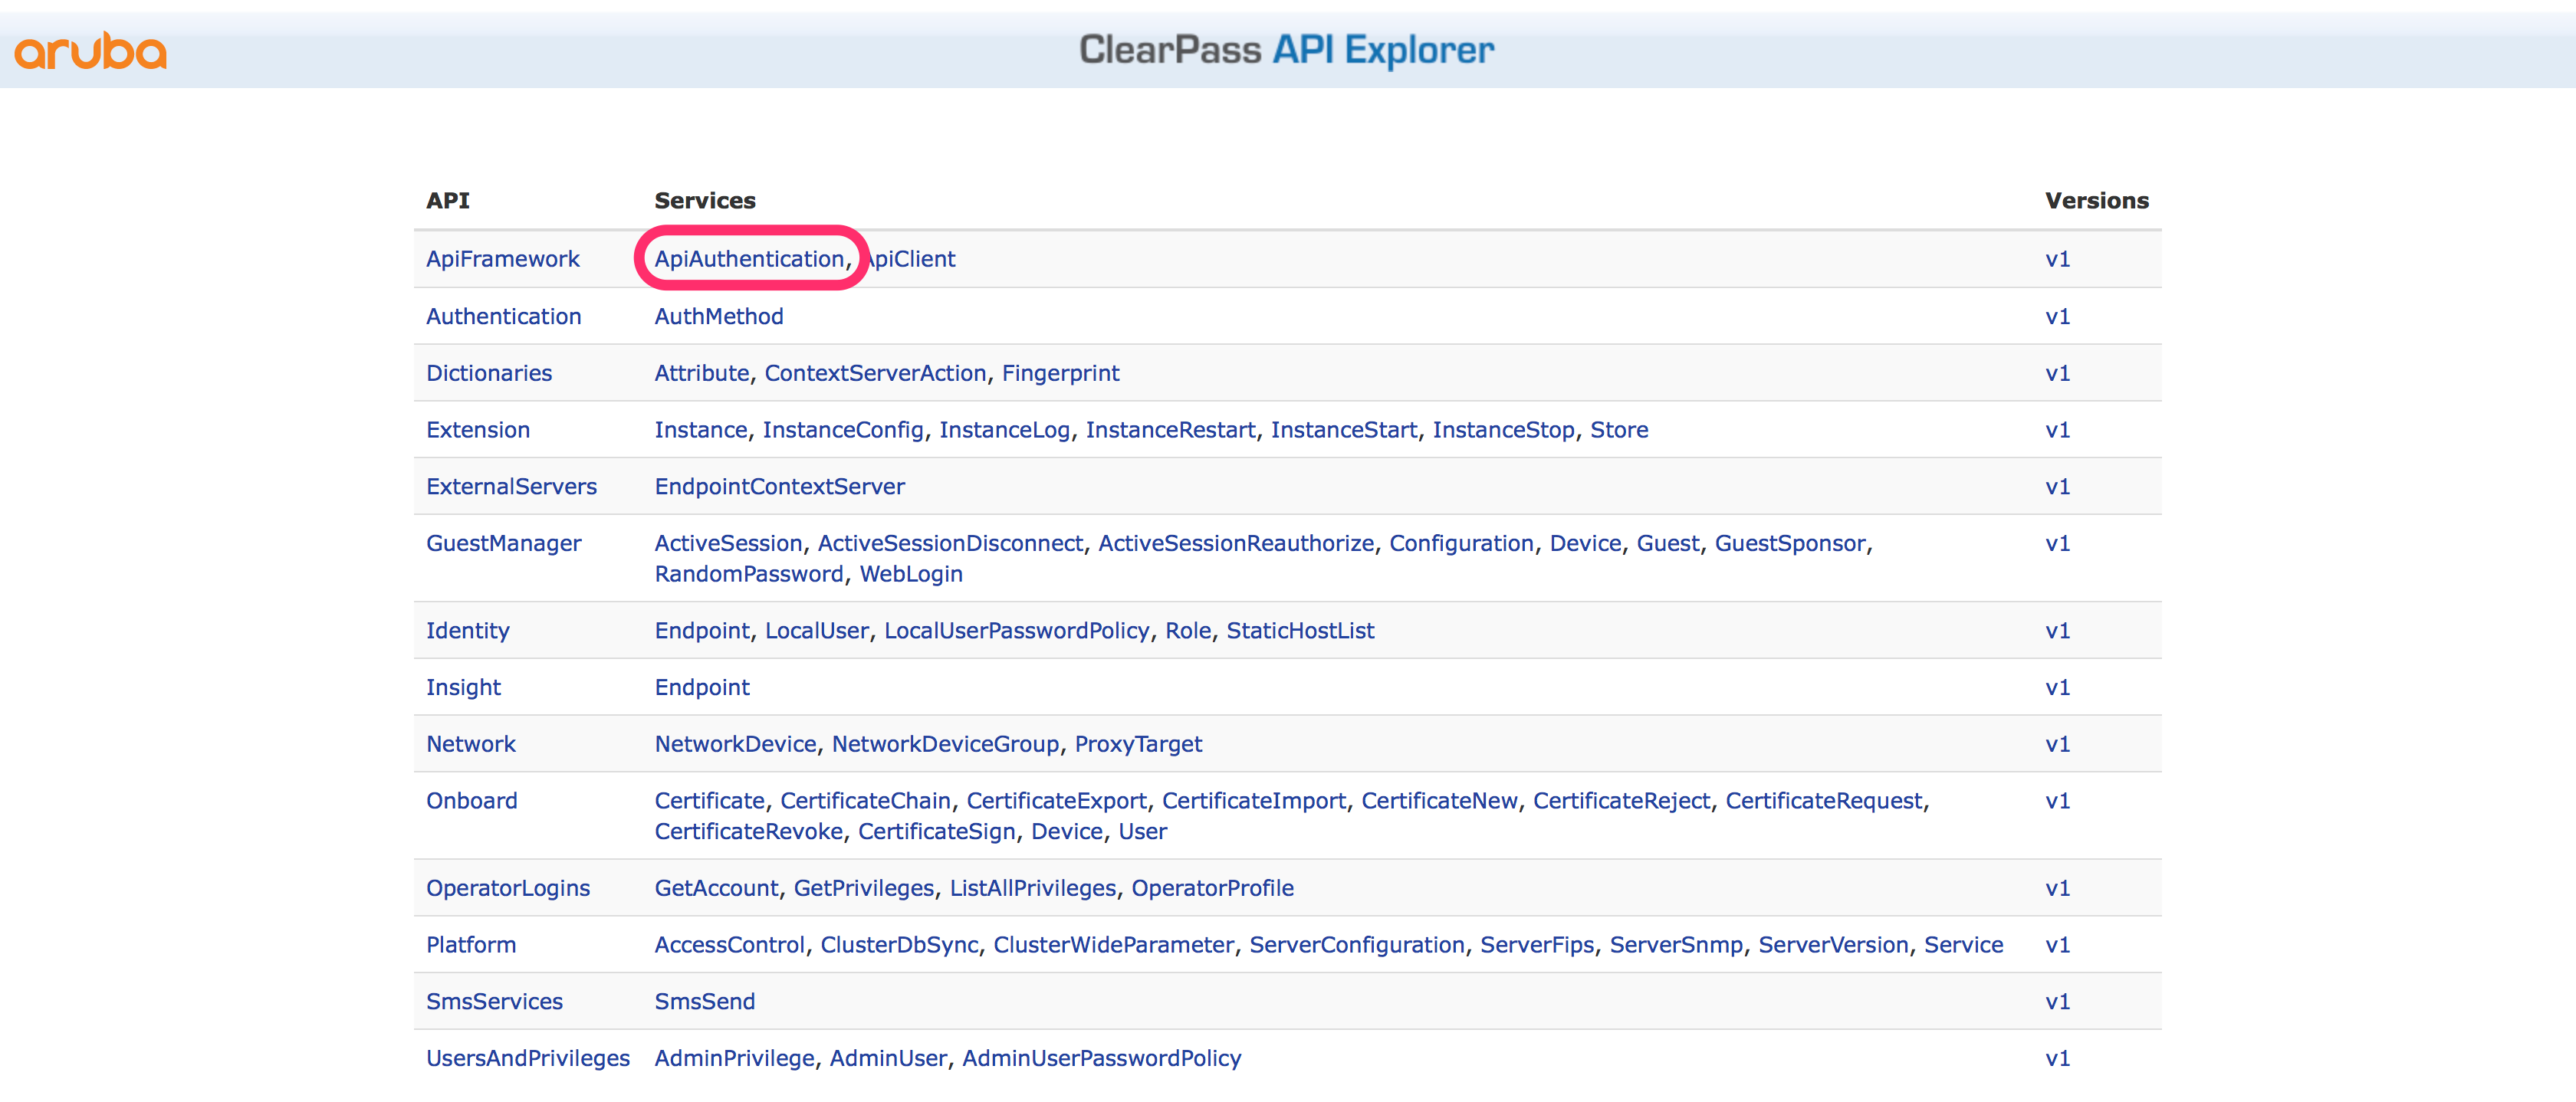
ClearPass RestAPI Authentication
Access to the ClearPass RestAPI is protected by OAuth2. To get access to the RestAPI with OAuth2 you have 2 options in ClearPass:
- Password
- Client Credentials
Both options create a secure way to authenticate but use different methods and both have different use cases. The password based authentication use the credentials of the user, using the App to authenticate against the ClearPass RestAPI. This allows visibility for the user behind the app and is useful for processes like onboarding or guest management. The second option needs a user for every App and the App itself authenticates against the API. There is no visibility for the user behind the App. This is very useful for server to server interaction, whereas the first one is preferred for user-specific processes.
The second part of the authentication is the client secret. This token must be kept secure and is included in every authentication request. If you use the token in an environment, which is not secure, you can authenticate without the token as well. But only with the password-based method.
Create a ClearPass RestAPI Client
The first step is to create a client to use the API. Consider this client as the App definition on ClearPass. Without this client, access to the API is not possible.
To create the client open ClearPass Guest and go to “Administration–>API Services–>API Clients” and click the “Create API Client” button:
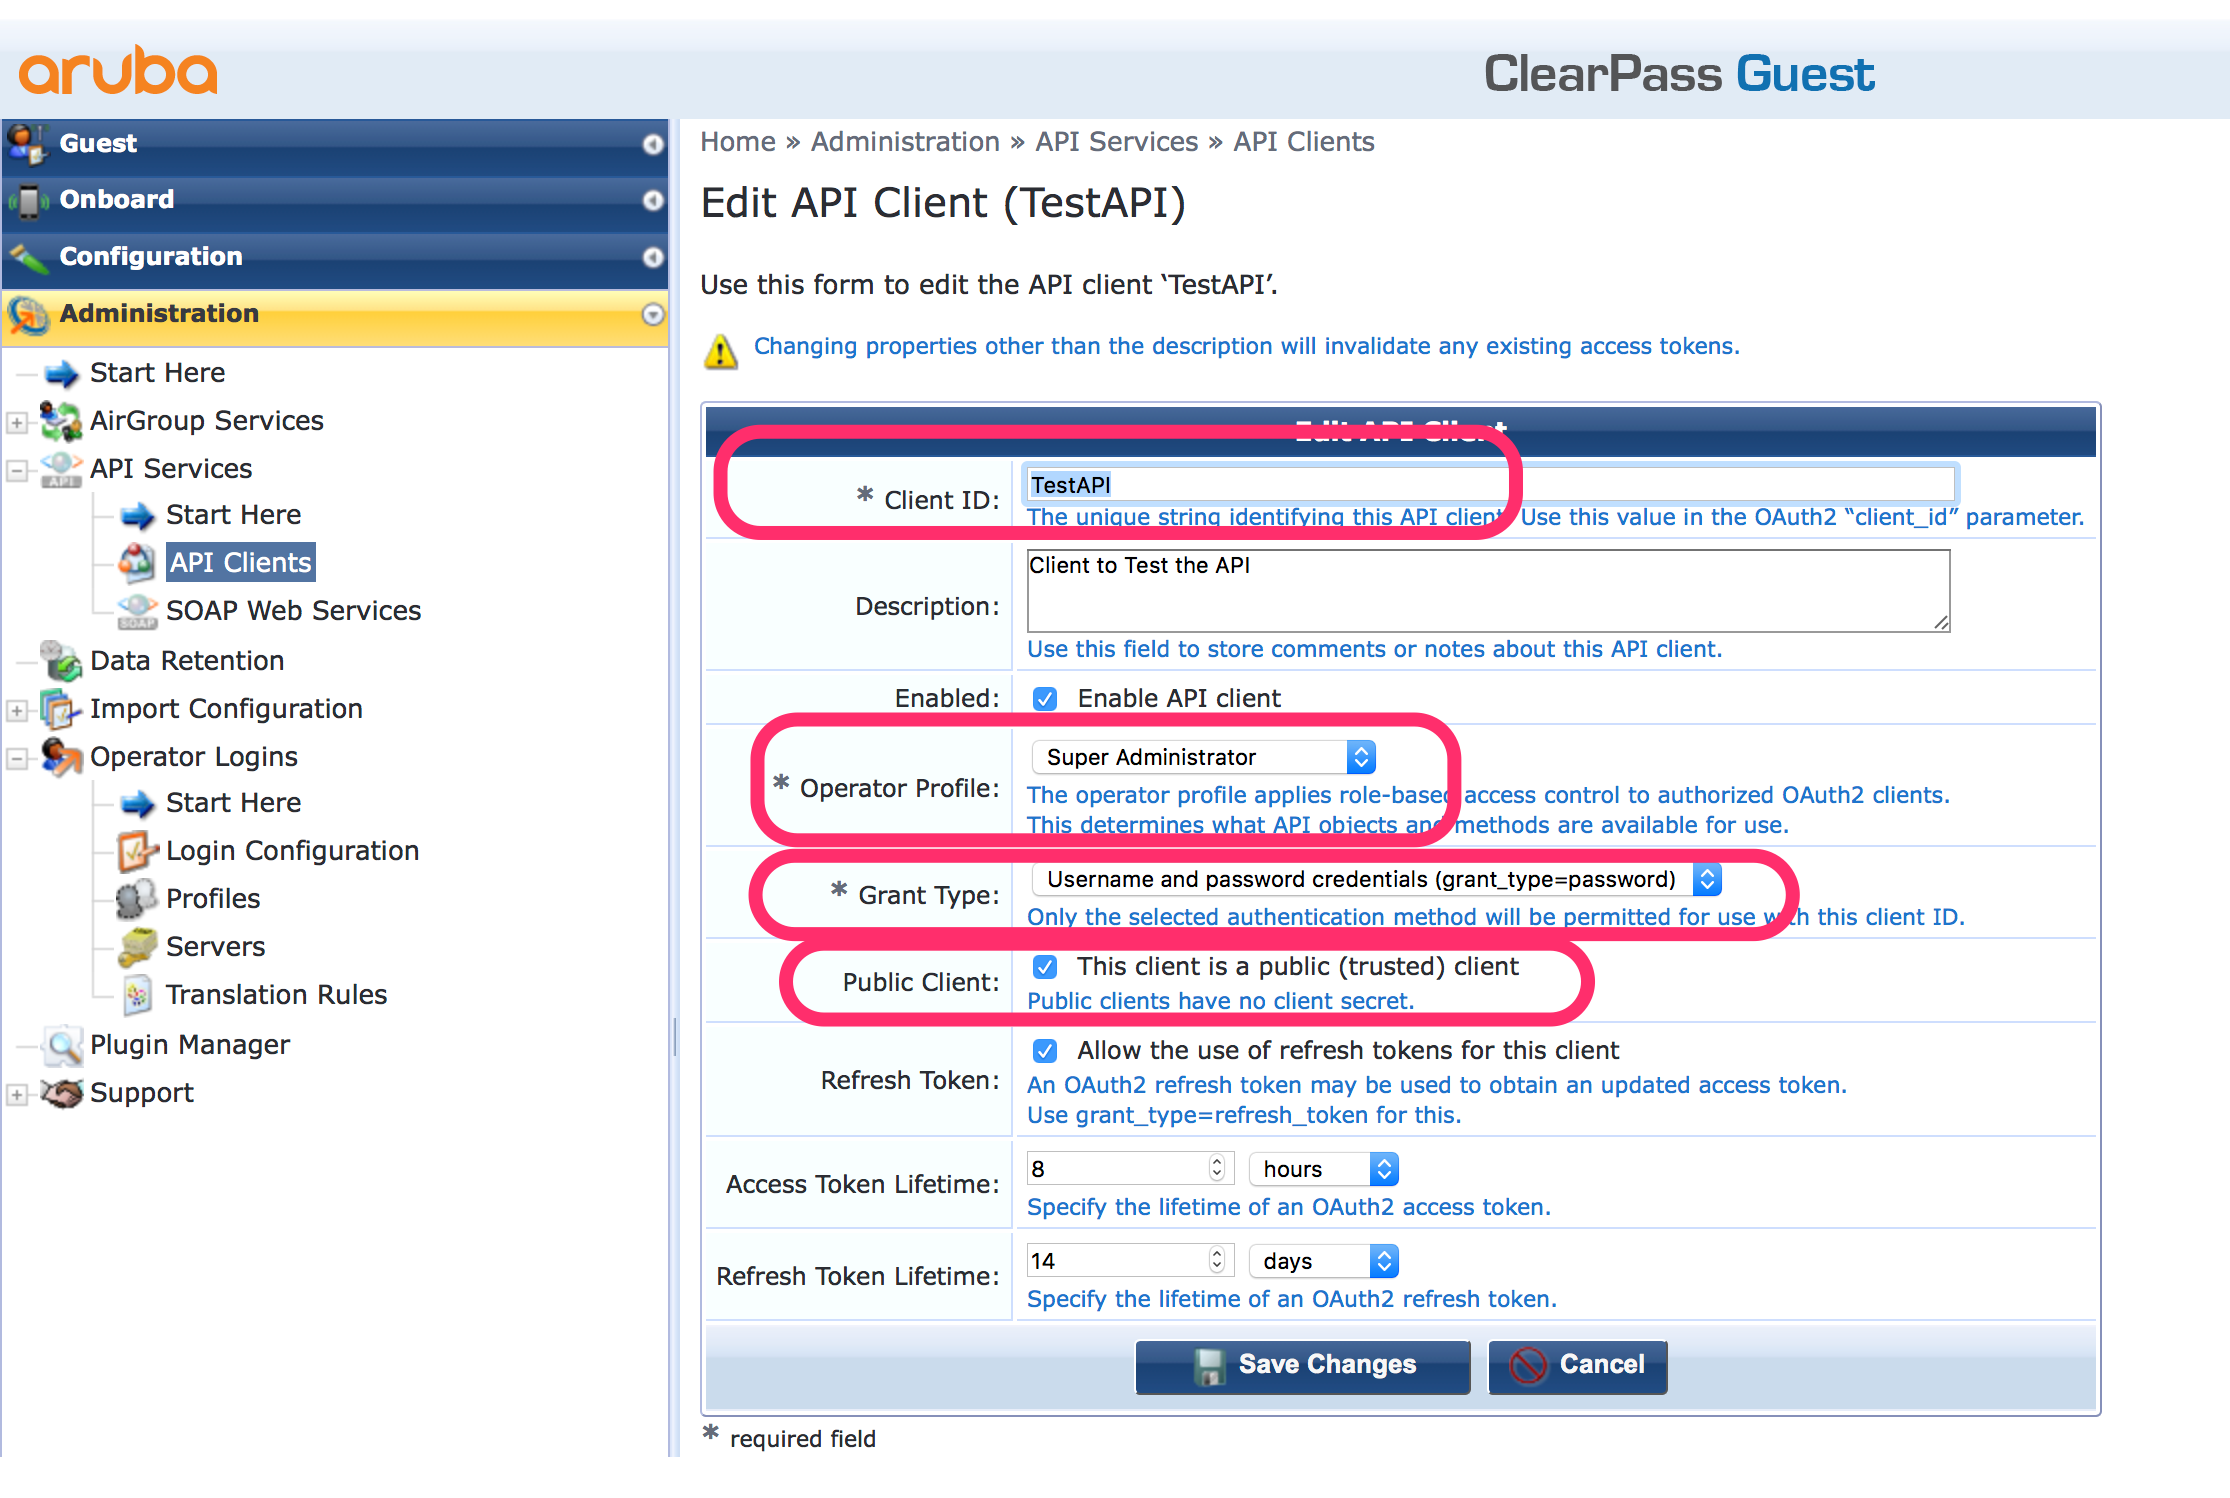
The “ClientID” is very important and creates the connection between the user and the API. The “Operator Profile” has to include the RestAPI access rights. With the “Grant Type” you define the OAuth2 authentication method. In my case, I chose the password-based method. I also choose the “Public Client” option to remove the need for the client secret.
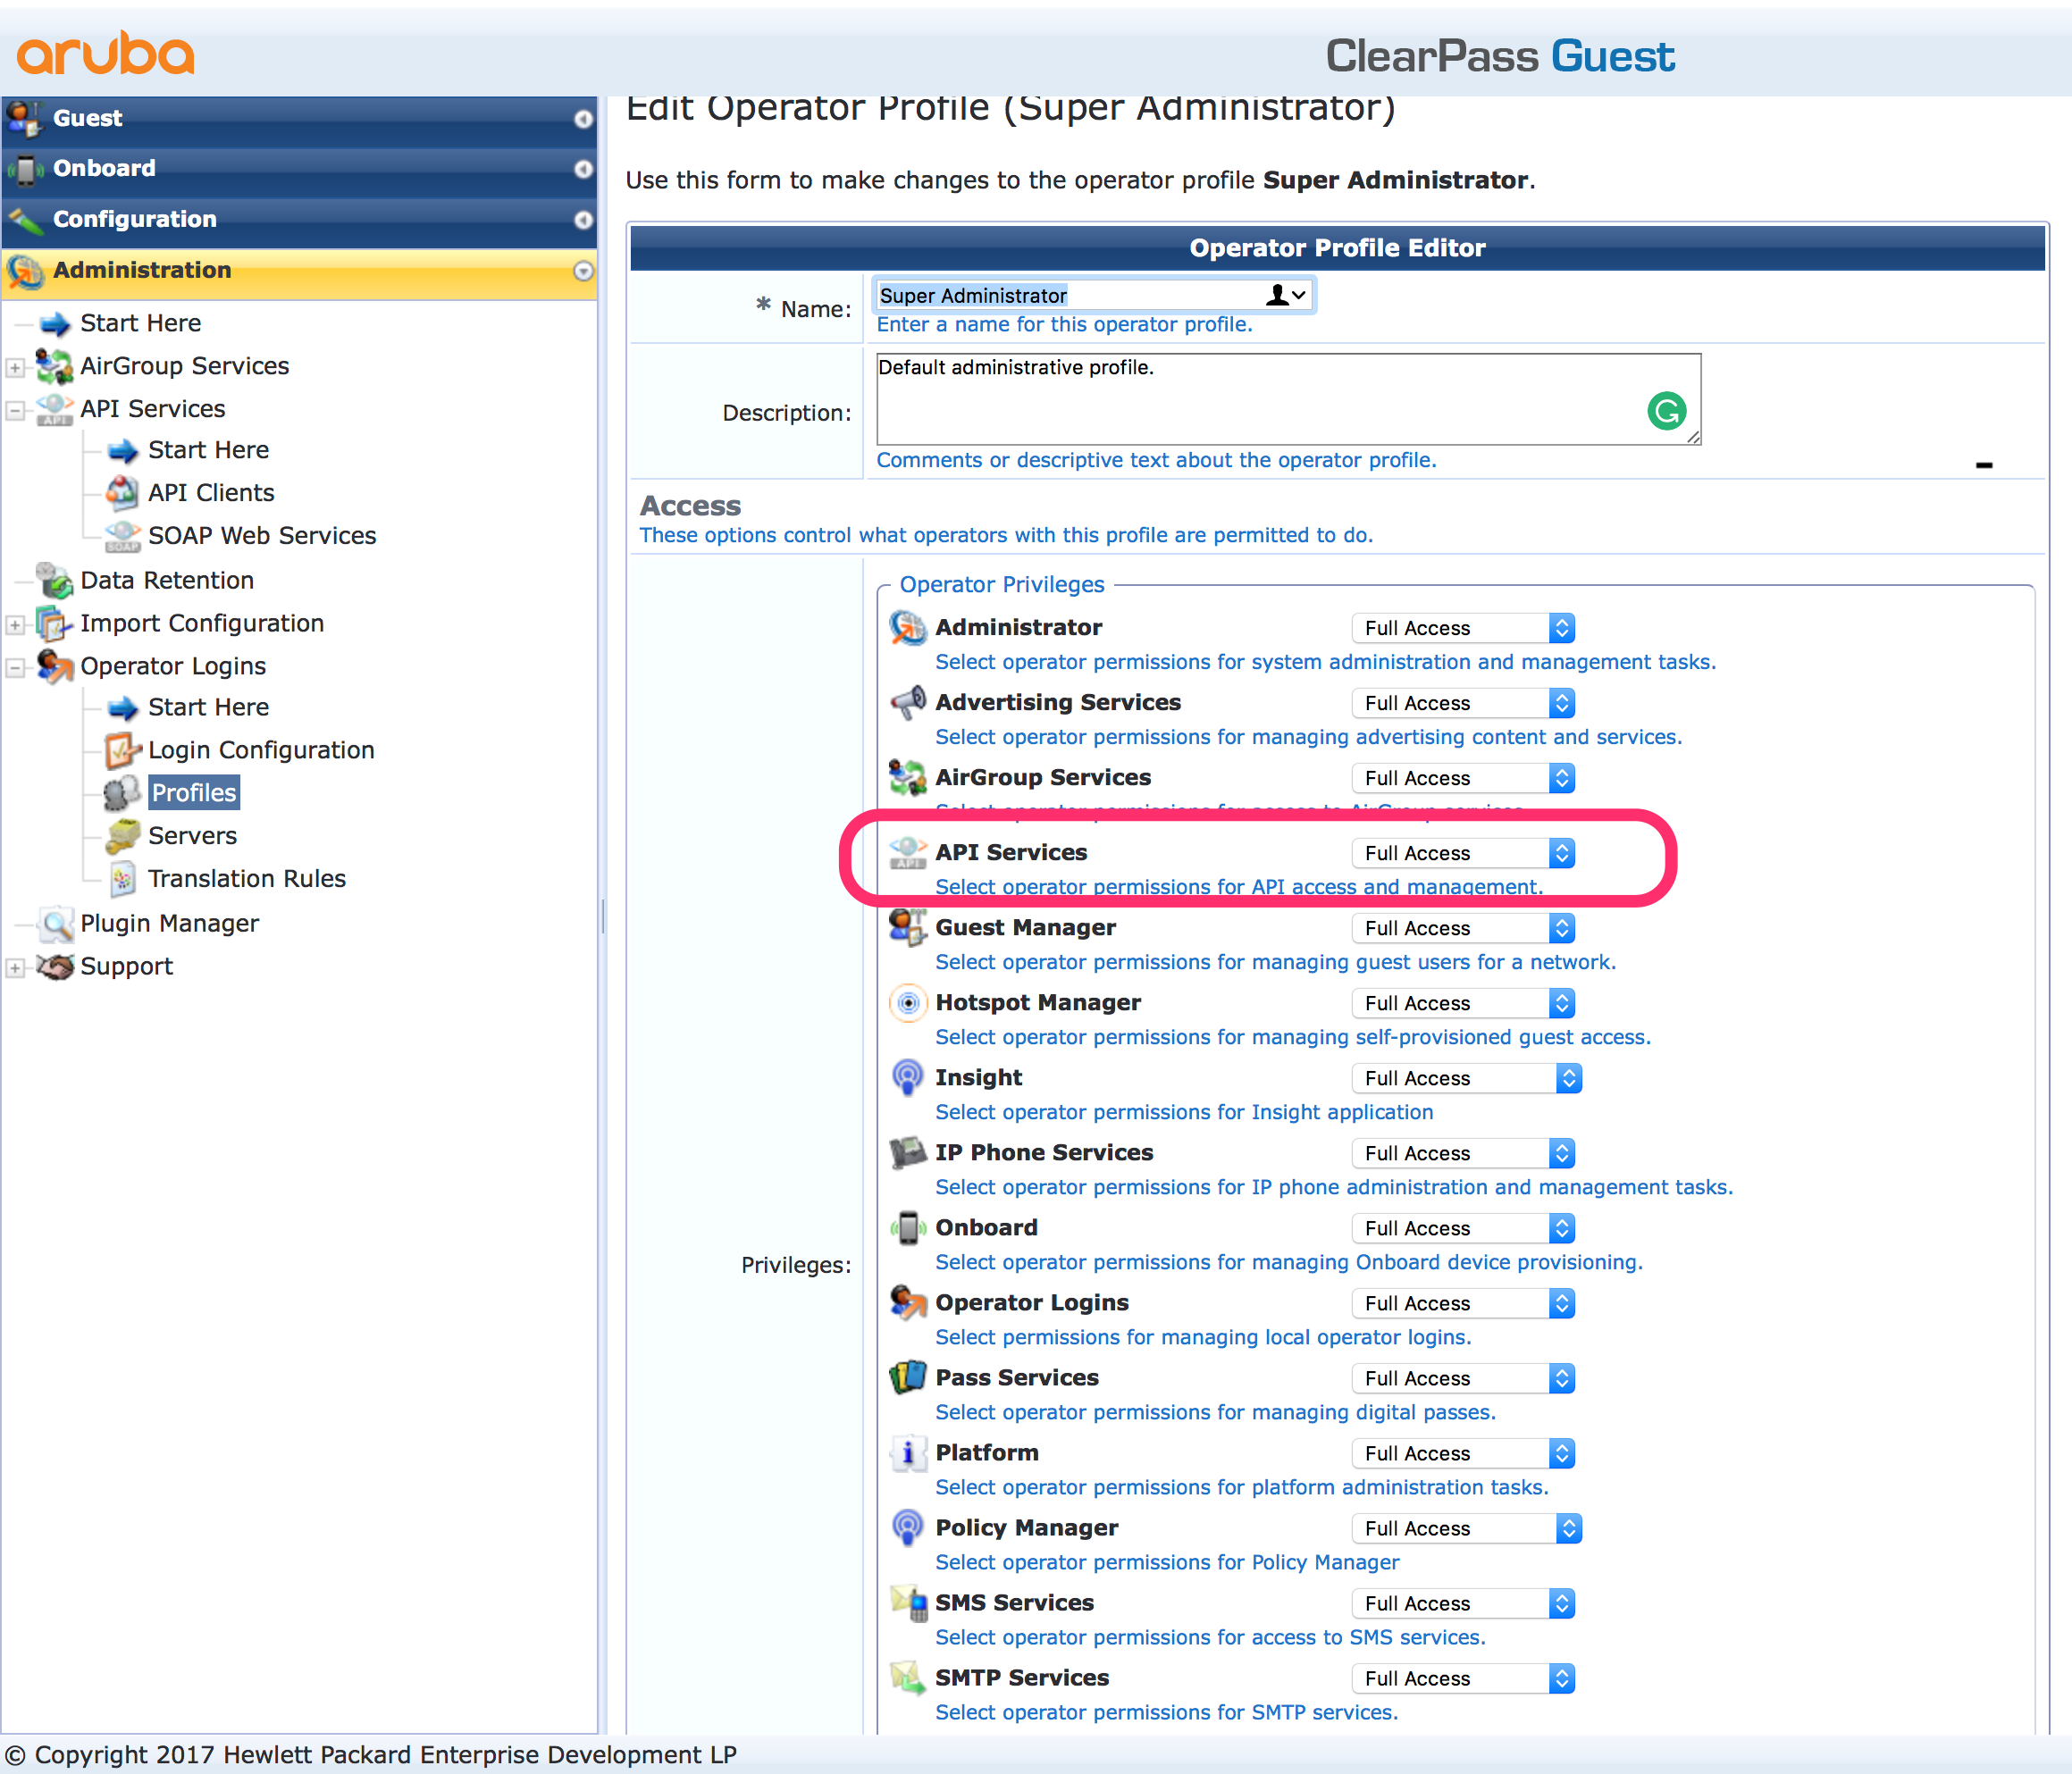
Check the profile for RestAPI access rights. Go to “Administration–>Operator Logins–>Profiles” and select the profile you have chosen before. Click edit and check the RestAPI access rights:
ClearPass RestAPI Authentication Service and User
As the API client is only like a profile, when you select the password-based authentication, we also need a real user. This user can authenticate against the RestAPI. You can use your existing user database and grant access to the API by returning the same profile as for the API client. First, I create the user. In my example, in the local user database.
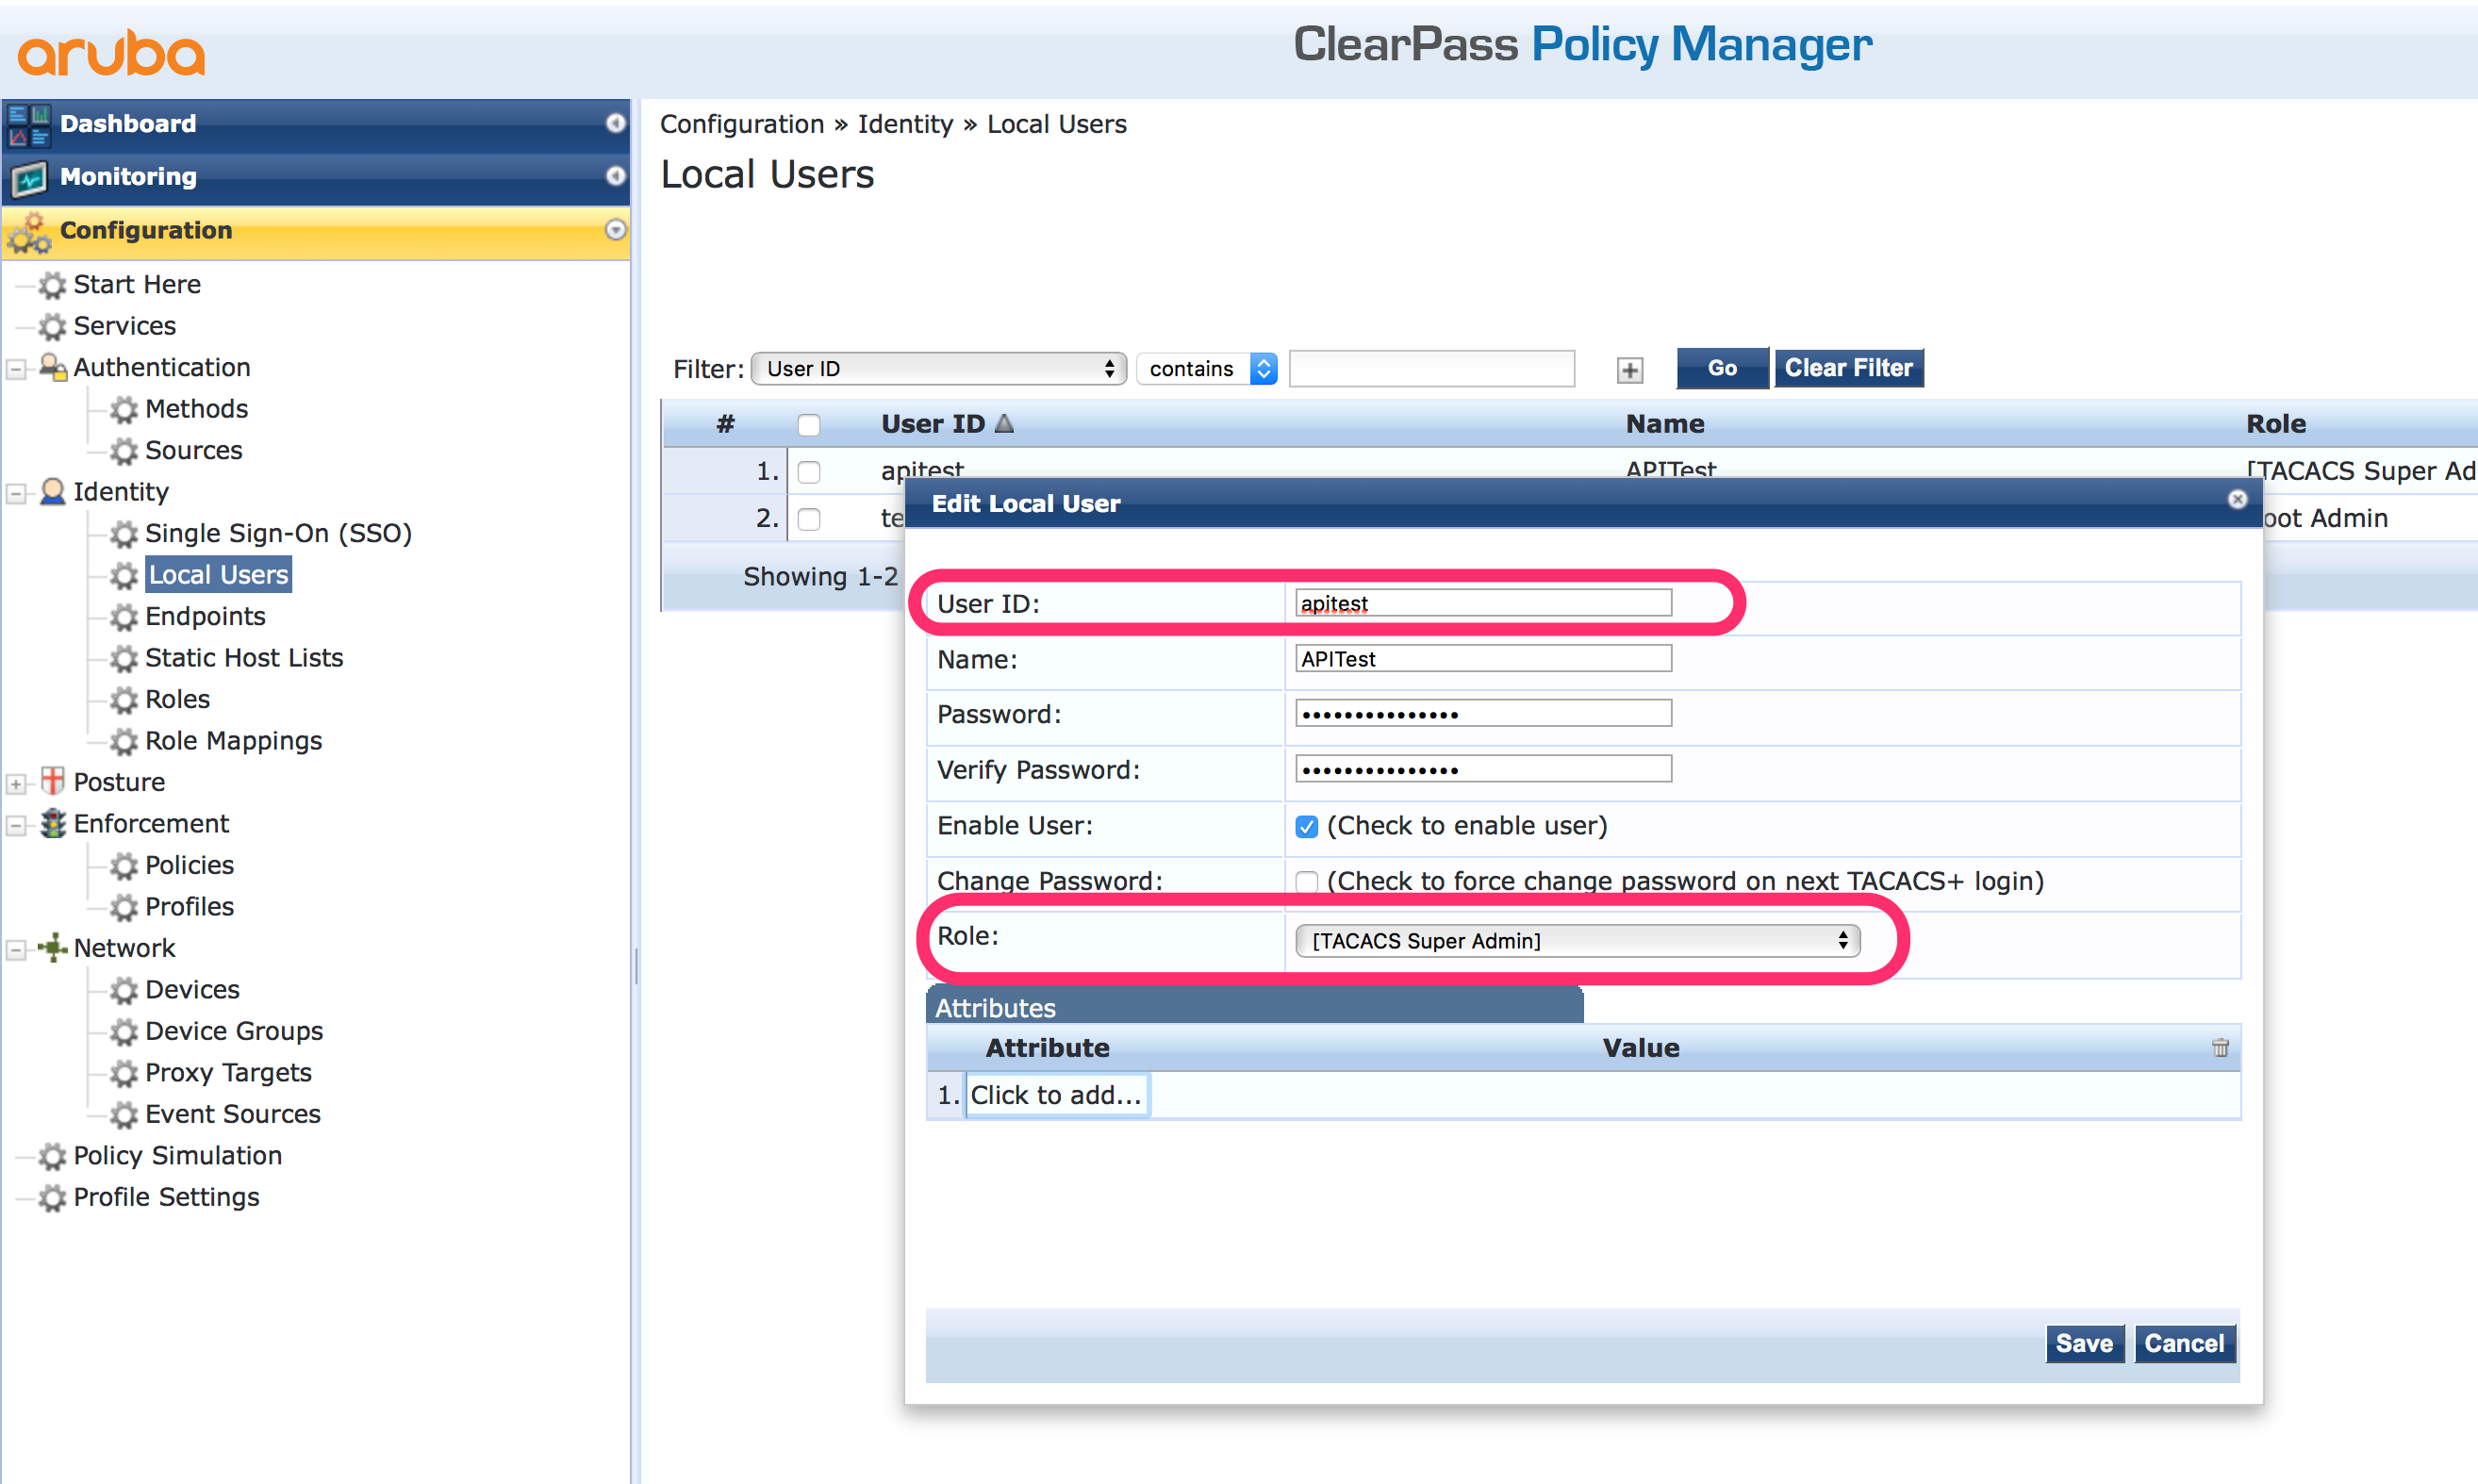
I use the “Super Admin” role to match the API client role in my example. If you use Active Directory, for example, you can also use the membership of a group to determine the role. Define this mapping in the enforcement profile later on.
First, create an authentication service for OAuth2. To start, go to “Configuration–>Start Here” and select “OAuth2 API User Access”:
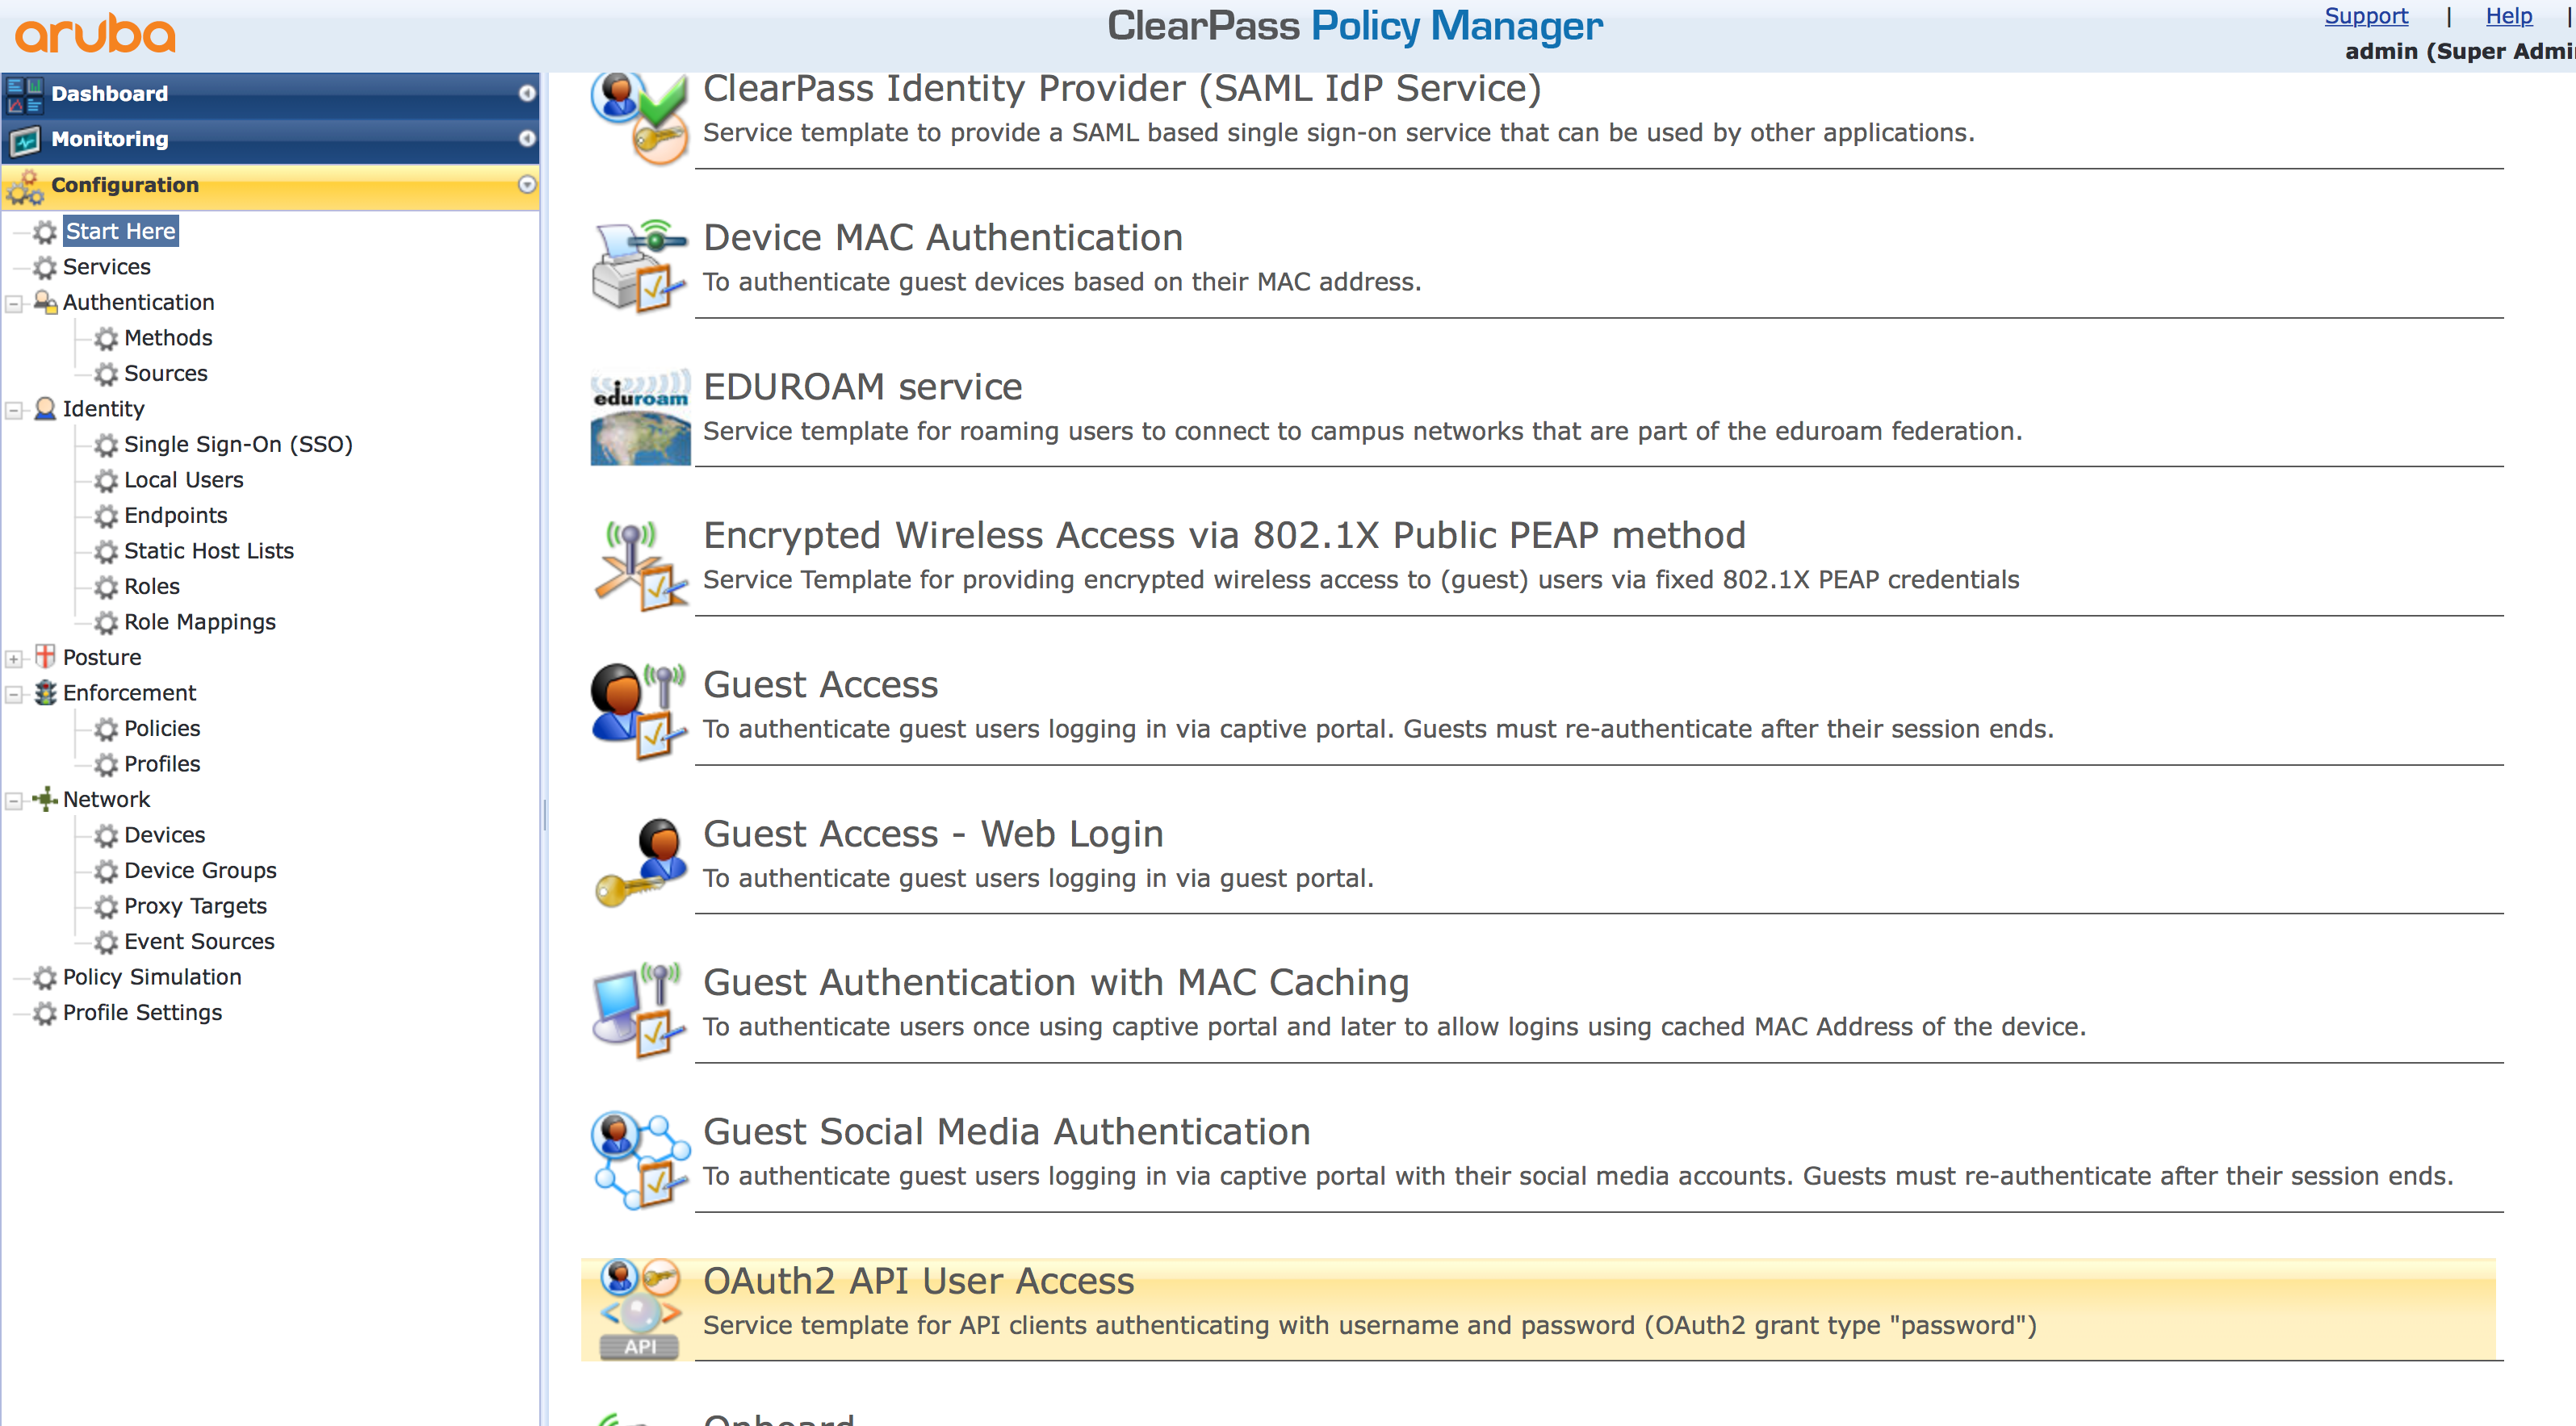
Select “OAuth2 API User Access” to get the following screen:

Simply give the Service a name and press the “Add Service” button. Afterward make sure, that the user repository you use is selected for this service and also that the correct user role is returned.
Authenticate with the ClearPass RestAPI
The first step is to authenticate against the API. This generates a token for every request you send to the API. To get this token, there is an authentication function within the ClearPass RestAPI and you need to pass the authentication data in JSON format to this API function. I use CURL to work with the RestAPI. This is as close as possible to the way you would script it in an app. To just test the API there is also an API Explorer. For this part of the article, I show both options, the CURL and the API Explorer option.
The URL for authentication is the following:
https://[CPPM IP or hostname]/api/oauthTo use this URL for authentication use the following CURL syntax:
curl -X POST "https://[CPPM IP or hostname]/api/oauth" \
-H "Content-Type: application/json" \
-d '{"grant_type":"password", \
"username":"apitest", \
"password":"test", \
"client_id":"TestAPI"}' \
-m 30 \
-v \
-k
The answer is like this:
{"access_token":"cbeaf2577030ef76052eb5e7536c01dfd550dcbf", \
"expires_in":28800, \
"token_type":"Bearer", \
"scope":null, \
"refresh_token":"8395aa020b034f6900807c0f7e9147b8e05e8254"}
You can test the same behavior with the API Explorer. Access the API Explorer on the same page as you create the API clients. Click the text “API Explorer” in the right upper corner and select the “ApiAuthentication”:
This brings you to the authentication part. Select the “/oauth” call:
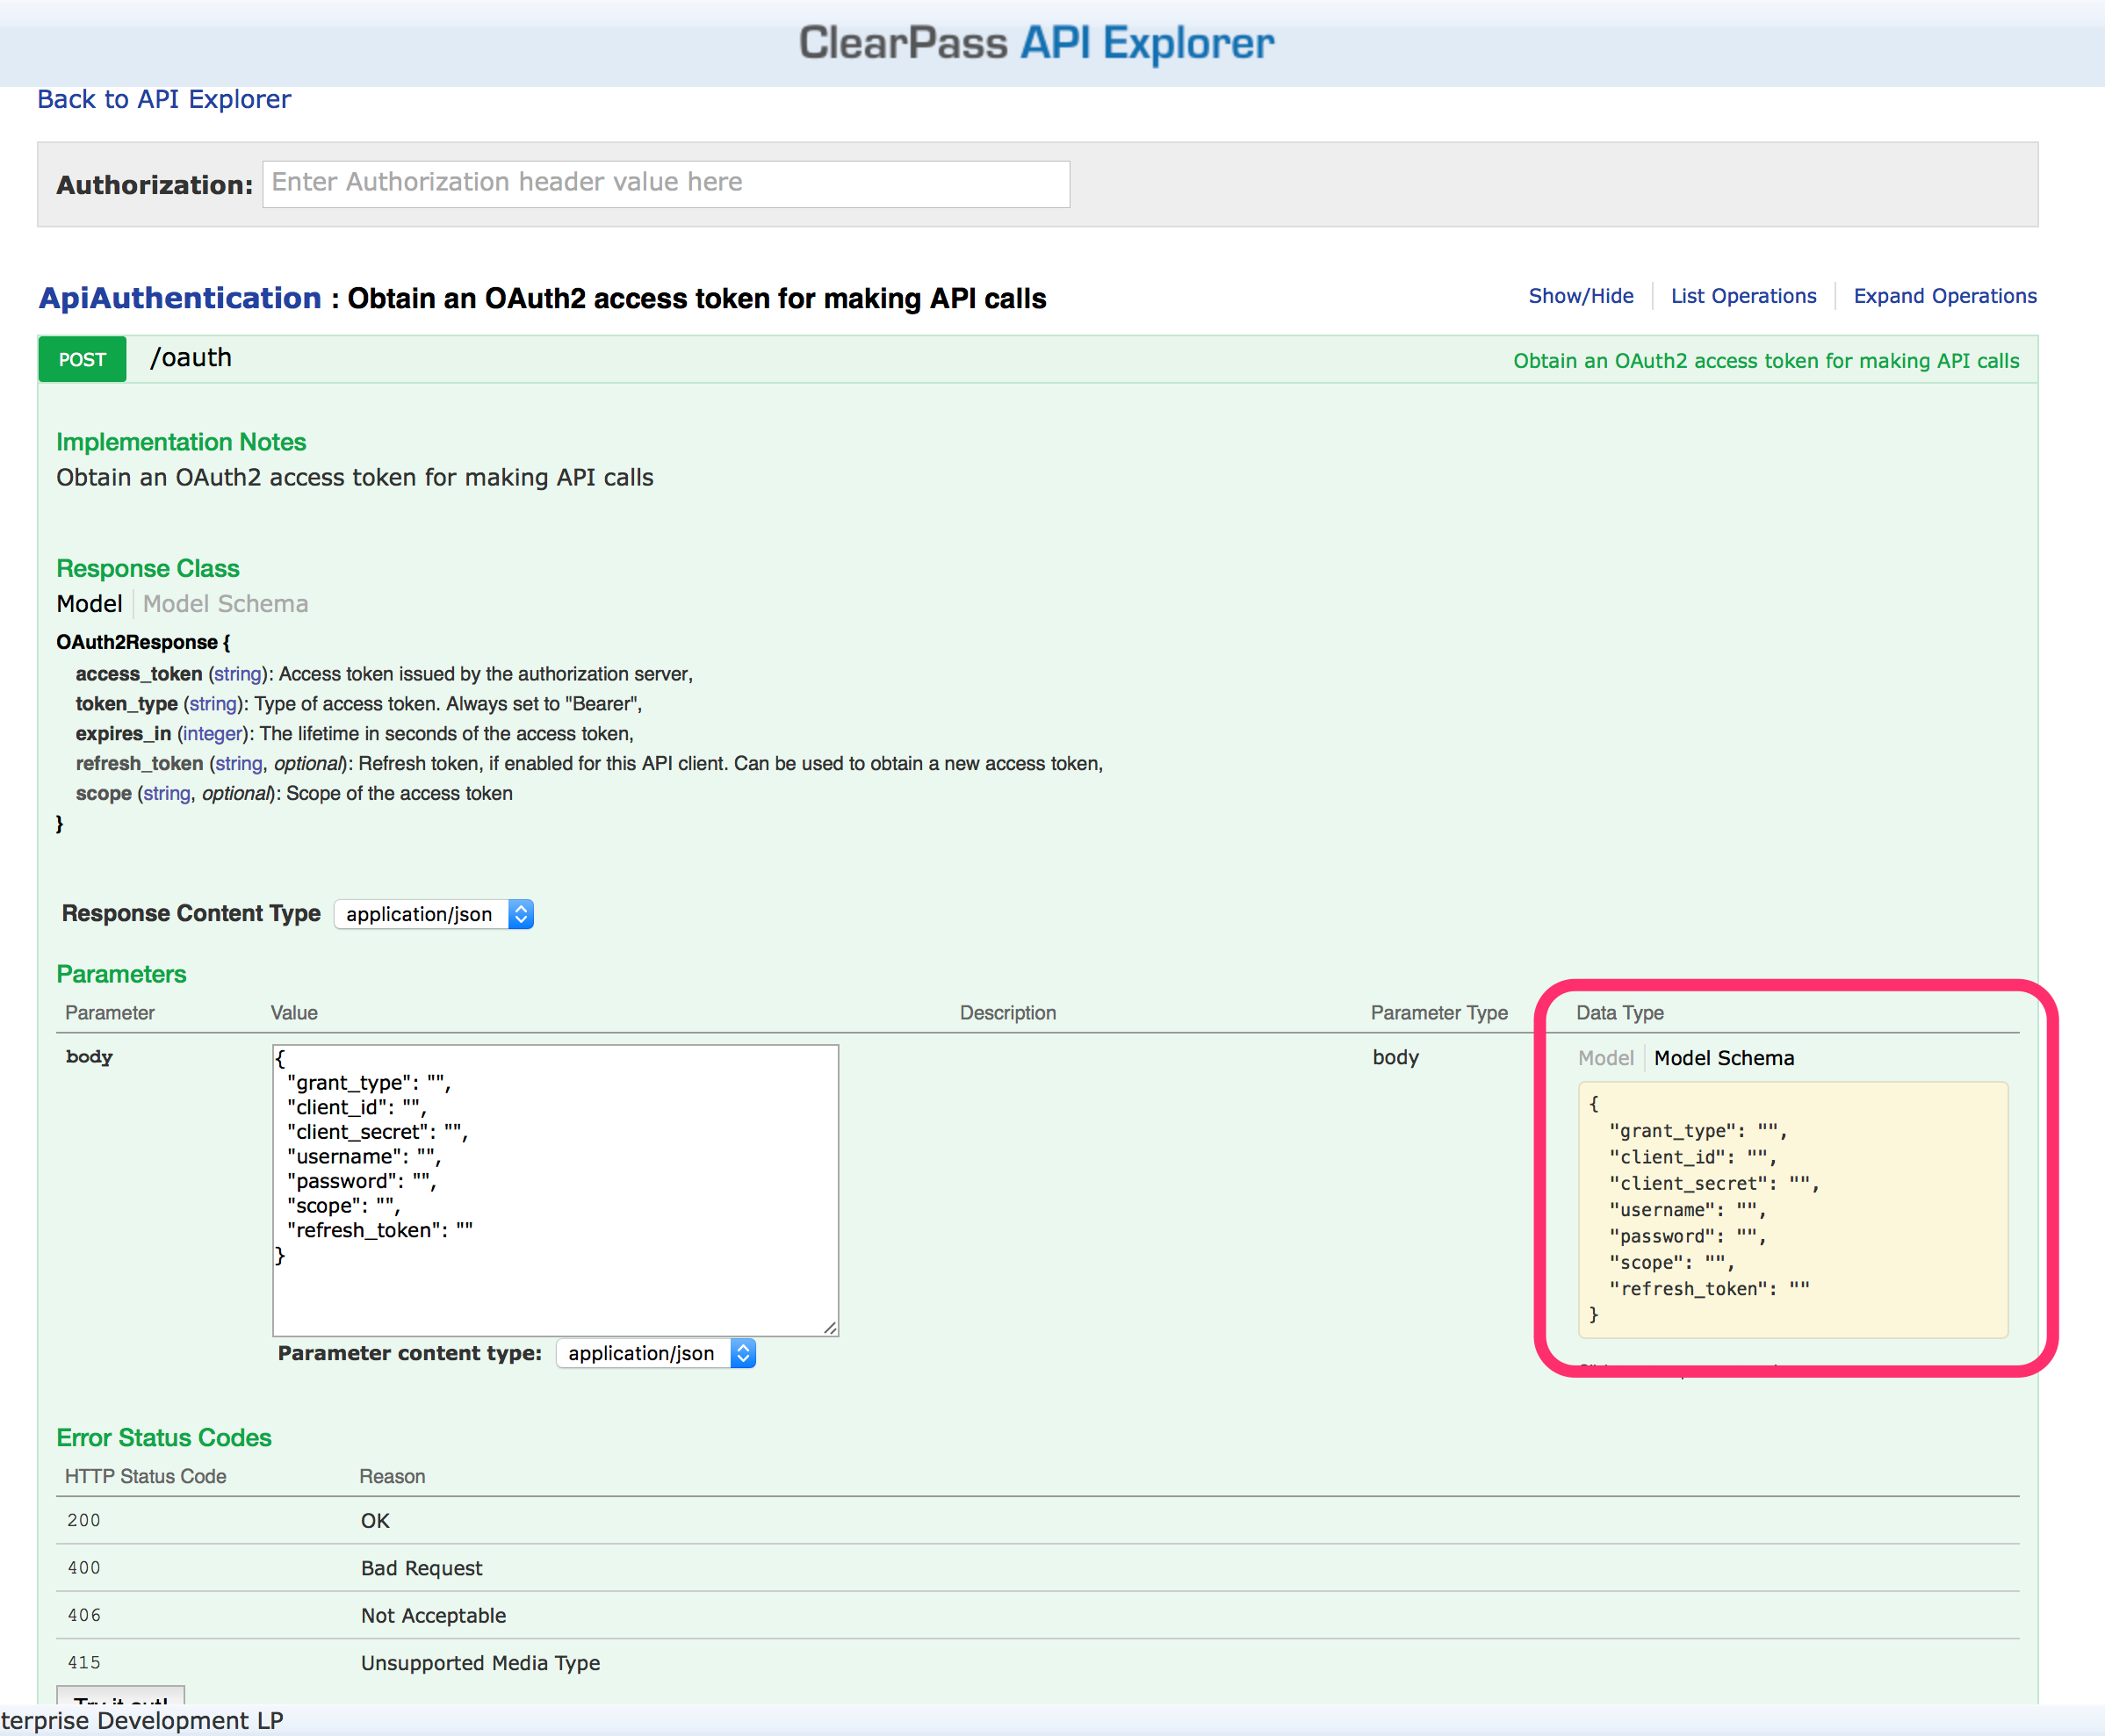
Select the “Model Schema” and click into the yellow box. This prepopulates the body, as in the screen capture above.
Fill in the same information as above with CURL and press the “Try it out!” button. You can remove those options, not present in the JSON example above.
With both methods, you get an access token from the RestAPI. Use this token for every request you send. Below is the example with CURL to include the token in the request:
curl -X GET "https://[CPPM IP or hostname]/api/api-client" \
-H "Content-Type: application/json" \
-H "Authorization: Bearer cbeaf2577030ef76052eb5e7536c01dfd550dcbf" /
-m 30 \
-v \
-k
The request returns all API clients from the system. But the interesting stuff is the way, the authentication token is used. You need to put the token type, “Bearer” and the access token in the request header.
Do the same with the API explorer:
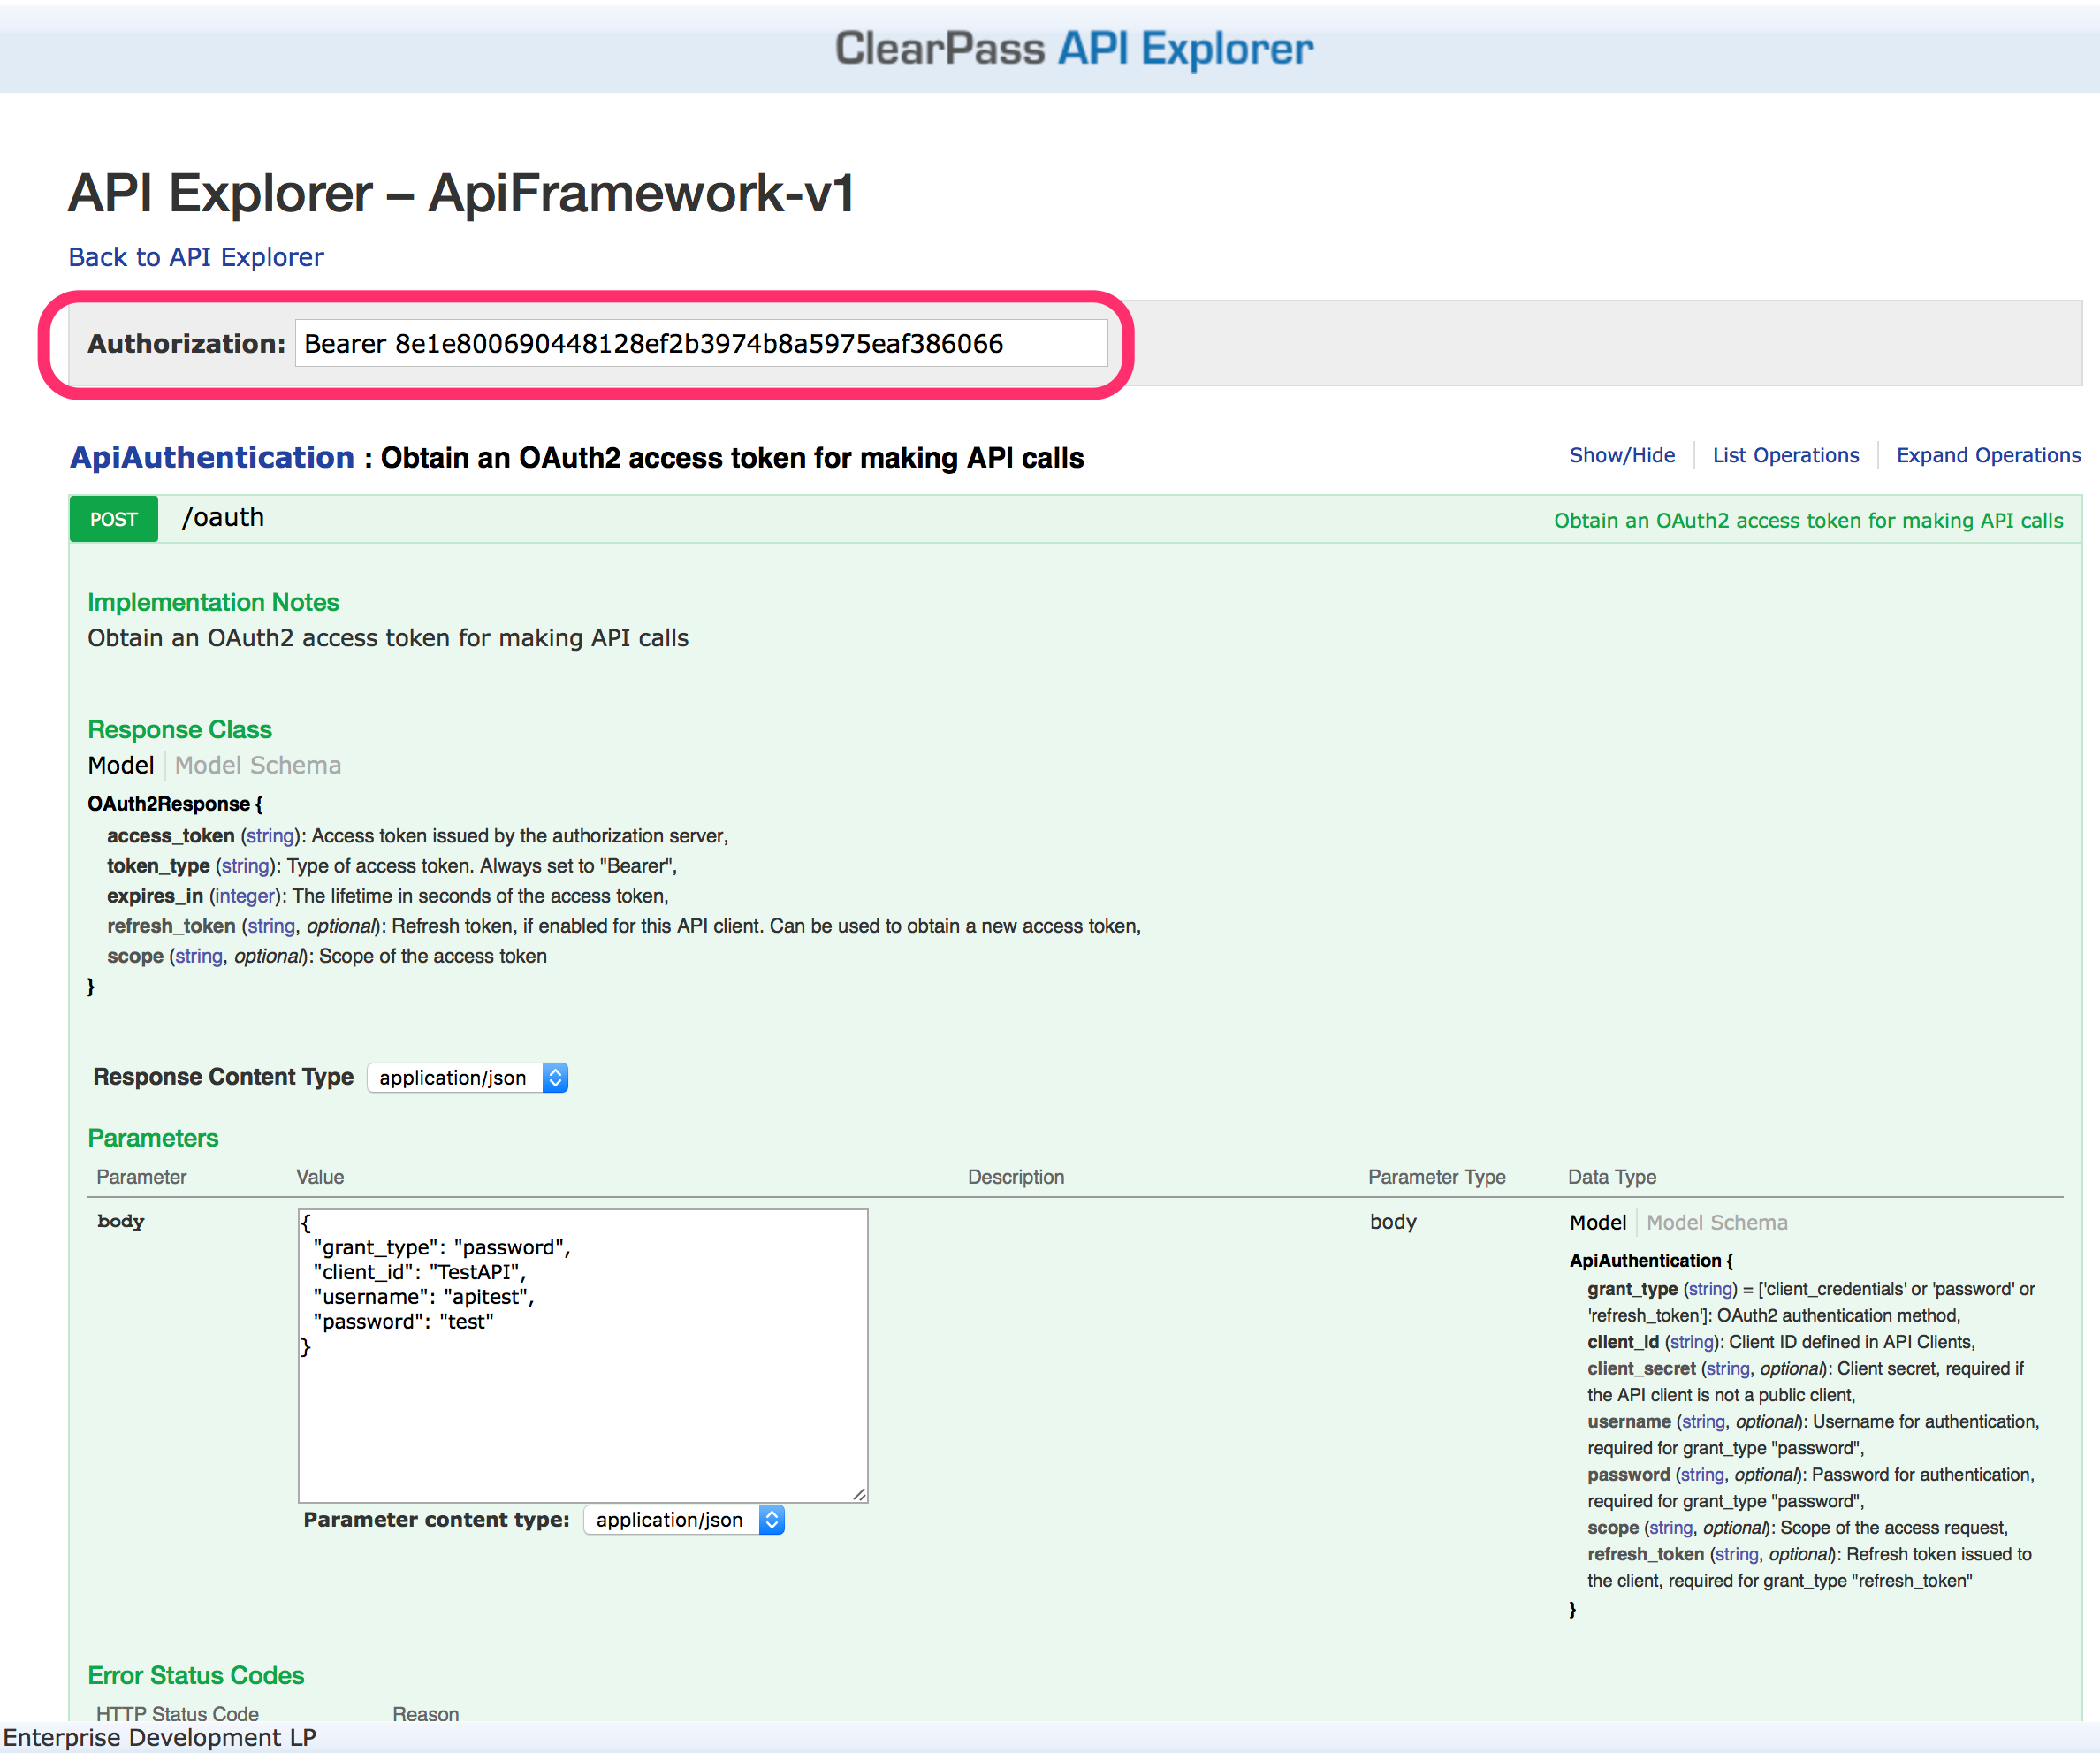
You have now access to all API functions.
ClearPass RestAPI Download CA Certificate
The following example shows the steps to create a custom Onboard app. This is not about programming, but how to use the API for some important functions during the onboard process.
The first step is to download the CA certificate with the API. You need to know the certificate ID of this certificate. As the steps with the API Explorer will be the same, I concentrate on CURL implementation from now on.
I know the name of the CA Certificate. This allows for filtering when searching the certificate ID:
curl -X GET "https://[CPPM IP or hostname]/api/certificate?7\
filter=%7B%22ca_name%22%3A%22Onboard%20Authority%22%7D&sort=%2Bid&\offset=0&\
limit=25&\
calculate_count=false" \
-H "Content-Type: application/json" \
-H "Authorization: Bearer cbeaf2577030ef76052eb5e7536c01dfd550dcbf" \
-m 30 \
-v \
-k
The filter is a parameter in the URL. The filter itself is JSON encoded, but with the escape, characters do not look like this:
filter=%7B%22ca_name%22%3A%22Onboard%20Authority%22%7DBelow is the JSON encoded filter:
{"ca_name":"Onboard Authority"}The answer contains two important pieces of information. The certificate id. This id is used to download the certificate:
"id": 216And the ca_id:
"ca_id": 2The ca_id is used to select the correct CA for the client certificate request later on. Now, download the ca certificate:
curl \
-X POST "https://[CPPM IP or hostname]/api/certificate/216/export"\
-H "Content-Type: application/json" \
-H "Authorization: Bearer cbeaf2577030ef76052eb5e7536c01dfd550dcbf" \
-d '{"export_format":"p12","inclu_chain": true,"export_password": "test","export_password2": "test"}' \
-m 30 \
-v \
-k
As you can see, I use the certificate id in the URL. The answer from the server is the certificate. Make sure, you can save the file somewhere.
The next step is to create a client certificate:
curl \
-X POST "https://[CPPM IP or hostname]/api/certificate/new" /
-H "Content-Type: application/json" /
-H "Authorization: Bearer cbeaf2577030ef76052eb5e7536c01dfd550dcbf" \
-d '{"ca_id": 2,\
"cert_type": "tls-client",\
"country": "DE",\
"state": "NRW",\
"locality": "Haan",\
"organization": "flomain.local",\
"organizational_unit": "Onboard",\
"common_name": "API Test Cert",\
"email_address": "[email protected]",\
"key_type": "rsa_4096",\
"device_type": "MacBook",\
"device_udid": "udid of the device",\
"device_imei": "emei of the device",\
"device_serial": "serial of the device",\
"mac_address": "mac address of the device",\
"product_name": "MBP",\
"product_version": "2016",\
"user_name": "Username",\
"issue_cert": true,\
"device_name": "Florians MBP"}' \
-m 30 \
-v \
-k
The CURL command above creates a new certificate. Some of the arguments are optional. and there are more if needed. The answer from the server has the certificate id included:
"id":223Use this to download the certificate as in the example above for the ca certificate.
Following the article, you have created a client certificate and downloaded the client and the ca certificate. You can now install both certs on the device and create the SSID profile. But this depends on the app you write. The important part for ClearPass was the way to use the RestAPI.
What are your experiences or expectations to the ClearPass RestAPI? What are your use cases? Leave a comment below and let us discuss the topic above.