In this post I would like to show how I created an IPSec tunnel between my lab and my workstation. I have a static IP only for my lab, but not for the workstation and I was looking for an easy way to interconnect both to do some wireless testing without sitting in the noisy lab.
The solution is quite easy to implement and could be used in every situation where you have only one static IP. We will use GRE for the inner tunnel and IPSec for the outer tunnel.
I have used a MSR900 and the VSR router for the test, but it will work with all devices supporting GRE and IPSec tunnel.
Configure the Device with the Static IP
This is the MSR900 router running Comware 5.
The first
interface LoopBack1
 ip address 172.16.1.1 255.255.255.255
#
You can use whatever IP you would like to use. There is no need for this IP to be reachable from anywhere. To preserve public IP’s use a private one.
Now we will create the GRE tunnel:
interface Tunnel1
 description IPsec over GRE for mobilevpn
 ip address 192.168.4.1 255.255.255.0
 source LoopBack1
 destination 172.16.1.2
The IP address will be used within the tunnel connection, between both endpoints. The destination IP will be the corresponding loopback interface of the other device and source will be the created loopback interface.
The configuration for the inner tunnel is done and we can start the configuration of the IPSec tunnel. We will start with an ACL to restrict traffic within the IPSec tunnel to GRE:
acl number 3010 name mobilevpn
 rule 10 permit gre source 172.16.1.1 0 destination 172.16.1.2 0
Next step is to create an ike proposal:
ike proposal 100
 encryption-algorithm aes-cbc 128
 dh group2
We will now create the
ike peer mobilevpn
 exchange-mode aggressive
 proposal 100
 pre-shared-key cipher $c$3$BI/hULBHpJf2Yn6KL3Mvkp+NRtN39ofxQ+DiDA==
 id-type name
 remote-name mobilevpn
 nat traversal
You have to use the aggressive exchange mode to be able to use name as the id-type. We will use the ike proposal, configured before and a pre shared key for authentication. If your connection needs to pass a nat gateway, you can enable nat traversal.
The next step is to create a transform set. The transform set is used to configure the IPSec connection as an IPSec tunnel, using specific encryption and authentication algorithms:
ipsec transform-set hpn-ipsec-transport
 encapsulation-mode tunnel
 transform esp
 esp authentication-algorithm sha1
 esp encryption-algorithm aes-cbc-128
The last
ipsec policy mobilevpn 10 isakmp
 security acl 3010
 ike-peer mobilevpn
 transform-set hpn-ipsec-transport
The last
interface Ethernet0/0
 port link-mode route
 nat outbound
 ipv6 address auto
 ip address 16.57.128.119 255.255.255.128
 ipsec no-nat-process enable
 ipsec policy mobilevpn
As I have enabled NAT on the interface, I use the “ipsec no-nat-process enable” to exclude the packets, entering the IPSec tunnel from the NAT process.
I have also set some global settings for keepalive timer and so on:
ike local-name LAB-RTG
ike sa keepalive-timer interval 30
ike sa keepalive-timer timeout 90
ike next-payload check disabled
#
ipsec sa global-duration time-based 86400
ipsec anti-replay window 1024
Beside the first one, the rest are optional, but you have to make sure, that they are the same on both devices.
Configure the Device with Dynamic IP
This is a VSR router running Comware 7 on my Laptop.
The steps are more or less the same as above. I will only highlight the differences.
The first step is to create the loopback interface:
interface LoopBack1
 description Tunnel-end-point
 ip address 172.16.1.2 255.255.255.255
Now, you have to create the inner GRE tunnel:
interface Tunnel0 mode gre
 description Tunnel to LAB_RTG
 ip address 192.168.4.2 255.255.255.0
 source LoopBack1
 destination 172.16.1.1
As you can see, we will now use the loopback address of the other device as the destination.
We also have to create an ACL:
acl number 3000
 rule 10 permit gre source 172.16.1.2 0 destination 172.16.1.1 0
With Comware 7, an IPSec tunnel is configured differently as with Comware 5. Again, we will start with the
ike proposal 100
 encryption-algorithm aes-cbc-128
 dh group2
Next step is to create a keychain, which is the pre shared key:
ike keychain keychain1
 pre-shared-key address 16.57.128.119 255.255.255.255 key cipher $c$3$V5jXuzPTNU8ka5dGPlrV7isWVUqITBToLXRLlg==
Now, we have to create an ike profile:
ike profile profile1
 keychain keychain1
 exchange-mode aggressive
 match remote identity fqdn LAB-RTG
 proposal 100
This profile will include the keychain and the proposal. The profile will also configure aggressive mode and can be matched to the remote identity. That way, the router know, which profile to use for which remote connection.
The next step, is to create the transform set:
ipsec transform-set tran1
 esp encryption-algorithm aes-cbc-128 3des-cbc
 esp authentication-algorithm sha1
This will specify the encryption and authentication algorithm. These must match the ones on the other device.
To put everything together, create an IPSec policy:
ipsec policy mobilevpn 10 isakmp
 transform-set tran1
 security acl 3000
 remote-address 16.57.128.119
 ike-profile profile1
In the policy, the remote address is configured. This is the main difference between the configuration of the other device.
The last step is to apply the policy to the outgoing interface:
interface GigabitEthernet2/0
 ip address dhcp-alloc
 nat outbound
 ipsec apply policy mobilevpn
You can also set some global parameters:
ipsec anti-replay window 1024
 ipsec sa global-duration time-based 86400
#
 ike invalid-spi-recovery enable
 ike keepalive interval 30
 ike keepalive timeout 90
 ike identity fqdn mobilevpn
Beside the last one, all the others are optional, but need to match the ones on the other switch.
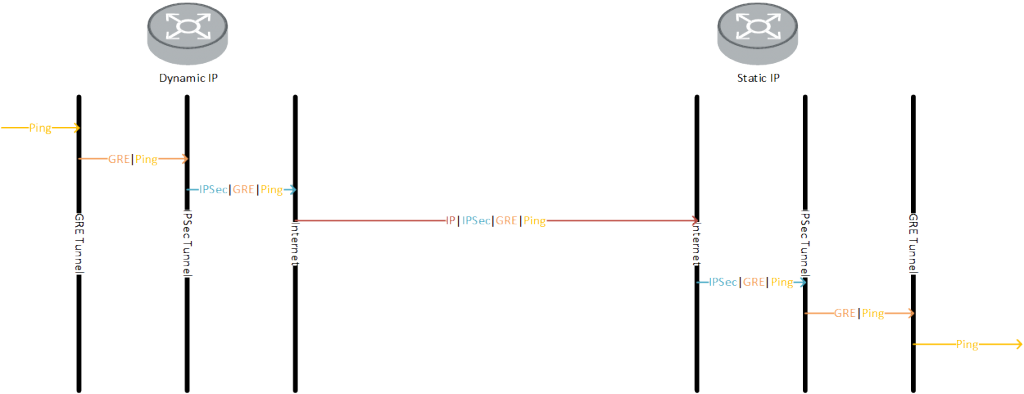
How does the IPSec tunnel work
Let’s say, you would like to to ping “192.168.4.1” from the device with the dynamic IP. The device will look through the routing table and will find the destination using the tunnel “0” interface.
Therefore the ping packet is encapsulated into GRE and send to the GRE tunnel destination, which is “172.16.1.1”.
The device will again go through the routing table and will use the default route to reach this IP. Therefore it will use the gigabit 2/0 interface. As the packet will match to the ACL, this packet will be send, using the IPSec tunnel using the configured IPSec policy.
In the policy, the remote destination is configured and the device will try to establish an IPSec tunnel to the device, which is configured under remote-address.
Thats how the other device with the static IP learn the IP of the device with the dynamic IP. They will establish the IPSec tunnel.
After the tunnel is established, the ping packet, which is actually encapsulated in GRE will now encapsulated into IPSec by applying the ESP header in front of the GRE header and is send through the IPSec tunnel. On the other side, the IPSec header is striped from the packet. We have now the GRE packet which is send to 172.16.1.1. As this is the IP of a local loopback address, it is delivered to that address and the GRE header is striped of. We have now the ping packet. The device will send an answer to this packet, using the same procedure , but the other way around. The figure below should demonstrate the concept.
If you have any questions regarding this post or if you would like to provide feedback, you can use the comment function below.