In this post I will show, how to sync user accounts from Active Directory and use them for iMC Tacacs+ to authenticate on switches or other network related devices. The iMC Tacacs+ server is available as a separate module for iMC. For this post I use the latest available versions for iMC and iMC Tacacs+ which are:
- iMC PLAT 7.1 (E0303P06)
- iMC TAM 7.1 (E0302P06)
The benefit of using iMC Tacacs+ is to offer a separate login for every administrator and the ability to log every command an administrator issues at the device. As most of the administrators also have an Active Directory account it makes sense to sync the iMC Tacacs+ accounts against the Active Directory to have one central tool for user management.
Sync iMC Tacacs+ with an Active Directory
To use Active Directory as the user database for iMC Tacacs+ server you need to configure a LDAP server and a sync policy. Both steps will be explained below. To start head over to iMC and login. Now, navigate to “User–>Device User Policy–>LDAP Service–>LDAP Servers”. Click “Add” to create a new LDAP server entry:
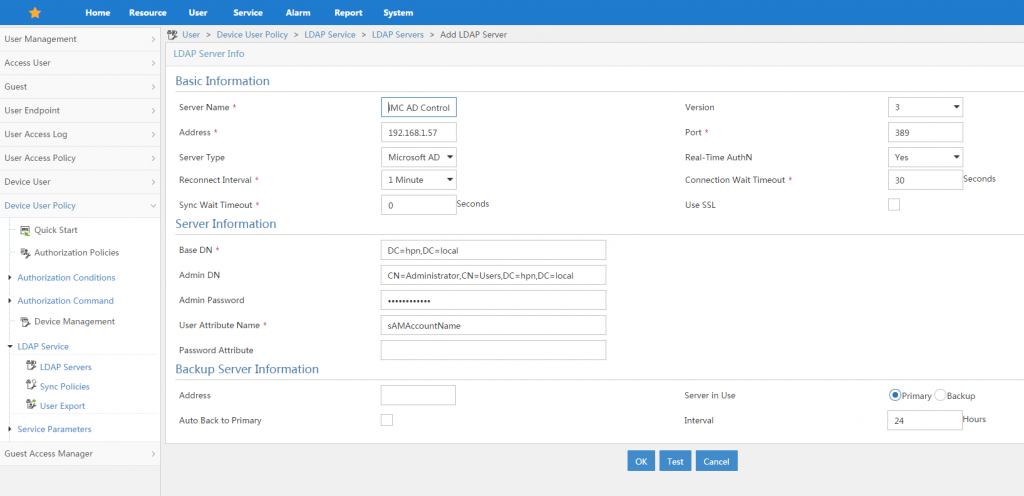
You have to enter a “Server Name” which is just a description for your documentation. Enter the “Address”, which have to point to an Active Directory domain controller. Select “Microsoft AD” as the “Server Type”. You also have to enter the “Base DN”, the “Admin DN” and the “Admin Password”. If you not sure, what the “Base DN” and “Admin DN” is, look at my previous post:
How To: iMC Operator Login using Active Directory
You can also add “Backup Server Information”, which is not needed in my test setup. After completing the steps above, click “Test”, to check whether the connection to the Active Directory is working. If this is the case, click “OK” to save the settings.
The next step is to create a sync policy. This is needed to define which users to sync and which policy to assign to synced users. Go to “User–>Device User Policy–>LDAP Service–>Sync Policies” and click “Add”:
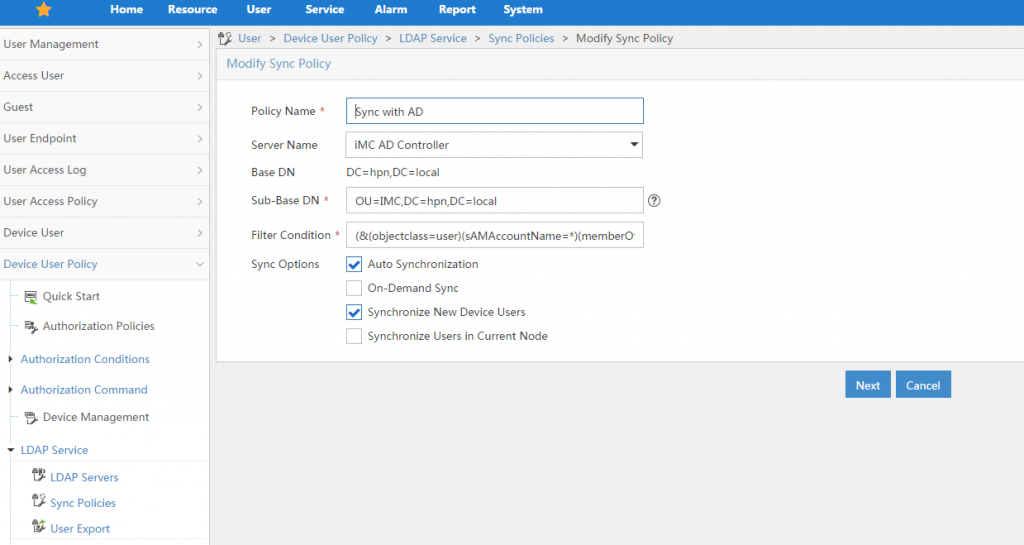
Enter a name for the policy and define the “Sub-Base DN”. This is used to define which users should be synced, as it makes no sense to sync all users from AD. I have all my users, which should have access to network devices under the organisation unit “IMC”. Therefore I use this as the “Sub-Base DN”. Maybe you have a organisation unit for you IT department and you can use this as a separator. To filter users in this organisation unit, you can use the “Filter Condition”. I use a group membership, to allow users to get synced. My group is called “NetworkDeviceAdmin” and the filer looks like this:
(&(objectclass=user)(sAMAccountName=*)(memberOf=CN=NetworkDeviceAdmin,CN=Users,DC=hpn,DC=local))To get to the next screen, click “Next”:
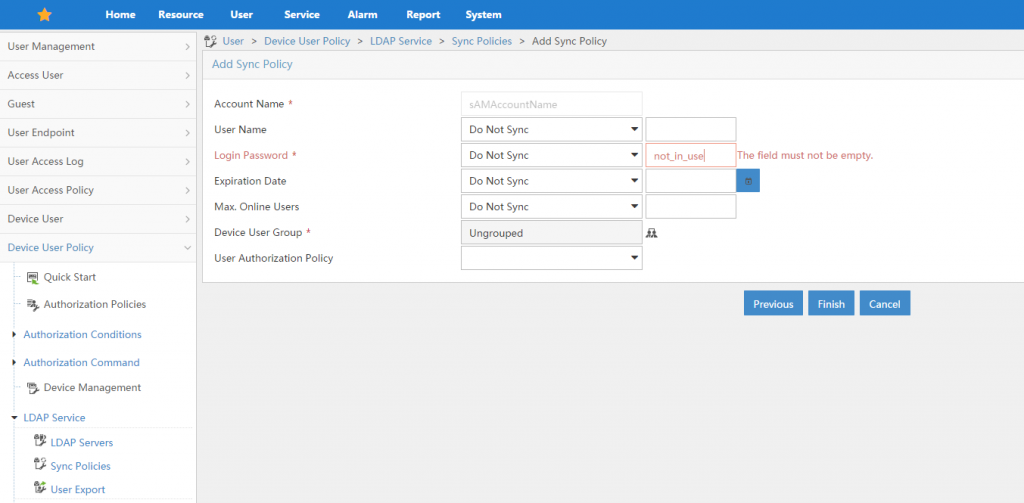
Within this screen you can configure the attributes which should be synced from Active Directory. Normally, I did not sync any attributes from Active Directory. For other LDAP server implementations, it could be possible to sync the “Login Password”, but not for Active Directory”. This is not an issue, as the account will be marked as a LDAP account and every authentication request will be checked with the LDAP server, but as the field could not be empty, I entered a dummy password, which will never be used for any LDAP account. You can also define the “User Authorization Policy” which defines the access rights of the user. I will describe those policies and how to use them in a later post, therefore I leave this field empty. to save the policy, click “Finish”.
You are now back in the list of “Sync Policies”. By clicking on the “Synchronize” link, you can initially sync all accounts:

You should see, that x device users are synchronized successfully. Those users are now in the iMC Tacacs+ database. the next step would be to configure the devices to use iMC Tacacs+ and configure “Authorization Policies”. I will show this in the next post.
If you have any questions or feedback feel free to use the comment function below.