In this post I will describe the setup of a captive portal authentication with local authentication, which means, that the accounts will be created on the controller itself. No additional software or tool’s are required. This will fit for small environments but also has its limitations.
For this test, I used the latest available firmware, which is:
[Unified_Controller_Master]dis version
HP Comware Platform Software
Comware Software, Version 5.20.109, Release 2507P22
Copyright (c) 2010-2014 Hewlett-Packard Development Company, L.P.
LSU3WCMD0 uptime is 5 weeks, 6 days, 15 hours, 45 minutes
For the unified controllers, I would always recommend, working with the latest release, but always have a look into the release notes, before upgrading.
The captive portal on the Unified controller works like a L2 firewall, blocking all traffic on the interface, on which the portal is bind on. Keep this always in mind, as this will explain most of the issues.
Prepare the Controller for Captive Portal
In this section, we will create the VLAN for the clients and configure the NATing. you can also route the clients, but this would mean, you have to insert the client network into your routing table and/or use official IP addresses, which is mostly not possible or allowed by security guidelines.
We will start with creating the VLAN:
[Unified_Controller_Master]vlan 50
[Unified_Controller_Master-vlan50]name Local_WLAN_Portal
I will use VLAN 50 on the controller for the portal. Now, we need to create the VLAN interface for VLAN 50:
[Unified_Controller_Master-vlan50]inter vlan 50
[Unified_Controller_Master-Vlan-interface50]description Local_WLAN_Portal
[Unified_Controller_Master-Vlan-interface50]ip ad 10.1.50.1 24
This will configure the IP 10.1.50.1 on this interface, which will be the default gateway for all clients in this VLAN. You can also use an external gateway, e.g. your router or firewall. The configuration will be the same.
I will also create the DHCP server on the controller, to serve all clients within VLAN 50, with IP addresses directly from the controller. Therefore you did not need to create a scope on your DHCP server, which will maybe also serve internal clients.
[Unified_Controller_Master]dhcp server ip-pool local_portal_authentication extended
[Unified_Controller_Master-dhcp-pool-local_portal_authentication] network ip range 10.1.50.10 10.1.50.200
[Unified_Controller_Master-dhcp-pool-local_portal_authentication] network mask 255.255.255.0
[Unified_Controller_Master-dhcp-pool-local_portal_authentication] gateway-list 10.1.50.1
[Unified_Controller_Master-dhcp-pool-local_portal_authentication] dns-list 192.168.1.57
[Unified_Controller_Master-dhcp-pool-local_portal_authentication] domain-name hpn.local
Now, we need to put the scope onto the VLAN interface:
[Unified_Controller_Master-Vlan-interface50]dhcp select server global-pool
[Unified_Controller_Master-Vlan-interface50]dhcp server apply ip-pool local_portal_authentication
In order to configure NATing, you need to create an ACL, which will match the source IP address, in our case 10.1.50.1/24.
#
acl number 2000 name NAT_Portal_Local
rule 0 permit source 10.1.50.0 0.0.0.255
rule 5 deny
#
Now, we just need to bind this ACL with the NAT statement to the outgoing interface. In my environment, this is the VLAN interface 3:
[Unified_Controller_Master]interface Vlan-interface 3
[Unified_Controller_Master-Vlan-interface3]nat outbound 2000
We are done, with the preparation. We can now start with the configuration of the SSID.
Configure the Service Template for Captive Portal
I will create an open SSID without any encryption. If you which, you can use also encryption for the SSID, like WPA2.
Before I configure the SSID, I will create the WLAN interface, which can be considered as the logical interface, the client will be connected to.
[Unified_Controller_Master]interface WLAN-ESS1
[Unified_Controller_Master-WLAN-ESS1] description Portal_Local
[Unified_Controller_Master-WLAN-ESS1] port access vlan 50
It is configured as a normal interface. I just put the port into VLAN 50, which means, every client, connected to the SSID, which is bind to this port will be in VLAN 50. Now, I will configure the SSID:
[Unified_Controller_Master-WLAN-ESS1]wlan service-template 1 clear
[Unified_Controller_Master-wlan-st-1] description local portal with local auth
[Unified_Controller_Master-wlan-st-1] ssid local_portal
[Unified_Controller_Master-wlan-st-1] bind WLAN-ESS 1
[Unified_Controller_Master-wlan-st-1] service-template enable
I configure the service template as clear with the SSID “local_portal” and bind this template to the created WLAN interface.
The l
[Unified_Controller_Master-wlan-st-1]wlan ap ap01
[Unified_Controller_Master-wlan-ap-ap01] radio 1
[Unified_Controller_Master-wlan-ap-ap01-radio-1]  service-template 1
[Unified_Controller_Master-wlan-ap-ap01-radio-1]  radio enable
[Unified_Controller_Master-wlan-ap-ap01-radio-1] radio 2
[Unified_Controller_Master-wlan-ap-ap01-radio-2]  service-template 1
[Unified_Controller_Master-wlan-ap-ap01-radio-2]  radio enable
[Unified_Controller_Master-wlan-ap-ap01-radio-2]quit
The SSID will now be visible. You can now test basic connectivity by connection to the SSID. You should get an IP address and be able to use the SSID without any restrictions, as we did not configured the portal yet.
Configure the Captive Portal
Now, I will configure the captive portal on the controller to intercept all traffic in VLAN 50. The first thing is to create the portal globally.
[Unified_Controller_Master]portal server LOCAL ip 10.1.50.1The IP is the IP of the controller in VLAN 50. As the portal will restrict all traffic on VLAN 50, we need to create an exception to let DNS work. As the DNS server is not within VLAN 50. This is done with the help of free-rules, which acts as a white-list. Everything, allowed through a free-rule is always permitted when working with portals, which means, be careful what you really allow.
[Unified_Controller_Master]portal free-rule 1 source ip 10.1.50.10 mask 24 destination ip 192.168.1.57 mask 32 udp 53
[Unified_Controller_Master]portal free-rule 2 source ip 192.168.1.57 mask 32 udp 53 destination ip 10.1.50.0 mask 24
Those two rules allow the communication from VLAN 50 to the DNS server and the way back.
Before binding the portal to the VLAN interface, we need to select the protocol, which should be used, in my case it is HTTP, but you can also choose HTTPS if required.
[Unified_Controller_Master]portal local-server httpWith this option
[Unified_Controller_Master]interface Vlan-interface 50
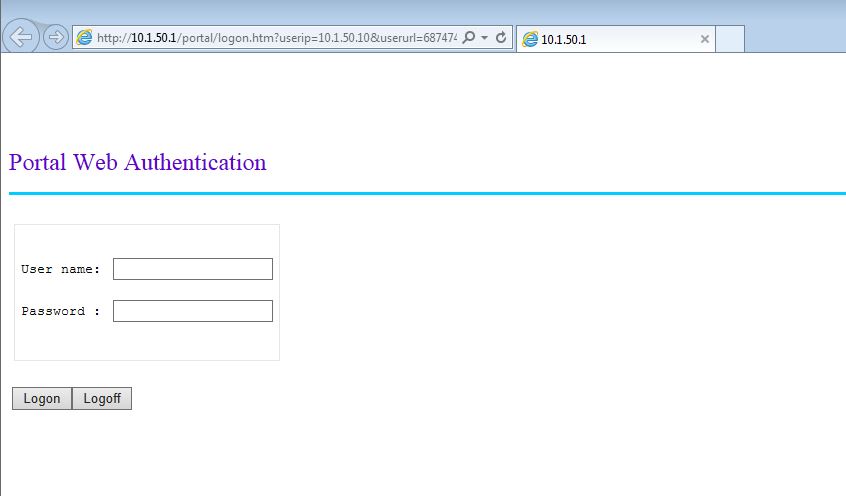
[Unified_Controller_Master-Vlan-interface50]portal server LOCAL method directFrom now on, every HTTP request is redirected to the local portal on the controller. You should test now if it works:

This is the standard captive portal page. Of curse, this page can be modified
Create a User for Captive Portal Authentication
The last step would be to create users for captive portal authentication. Normally, this authentication method is used to authenticate guest. Therefore the creation of such accounts needs to be very simple, to let non IT stuff do the job. Actually, there are three ways of creating guest accounts.
- per CLI
- per Web GUI on the controller
- per Web GUI in IMC
I only recommend option two and three for non-IT stuff :), but I will show all three options of doing it.
Doing it with the CLI is very fast and easy, but not that user-friendly as a Web GUI. Creating an account for testing purpose or troubleshooting works very well.
[Unified_Controller_Master]local-user guest-cli
New local user added.
[Unified_Controller_Master-luser-guest-cli] password cipher $c$3$Kyu2pXrUaD+QJOdwtlbJETWGojePQ4By
[Unified_Controller_Master-luser-guest-cli] authorization-attribute user-role guest
[Unified_Controller_Master-luser-guest-cli] service-type portal
This will create the local user “guest-cli” with a password and the service type portal. This means, the user can only use the portal, but has no rights to get access to the controller. This user is now able to authenticate via the portal. Even if it is very fast and really easy to create accounts in that way, you would not allow non IT guys working logging into the controller’s CLI to create accounts.
A much more user-friendly way of creating accounts is to use the web GUI of the controller. As the web GUI itself is running by default, you just need to create an account which has only the rights to create accounts:
[Unified_Controller_Master]local-user "guest admin"
New local user added.
[Unified_Controller_Master-luser-guest admin] password cipher $c$3$ECWGHC0N+wgm3idwW83nkFqeWusnVPTx
[Unified_Controller_Master-luser-guest admin] authorization-attribute level 2
[Unified_Controller_Master-luser-guest admin] authorization-attribute user-role guest-manager
[Unified_Controller_Master-luser-guest admin] service-type web
This will create an account which is able to create users. The user role is guest manager and the service type is web, which means, this account can use the web GUI but no other authentication types, like ssh or portal. If you use this account to log into the system, it will bring you to this page:
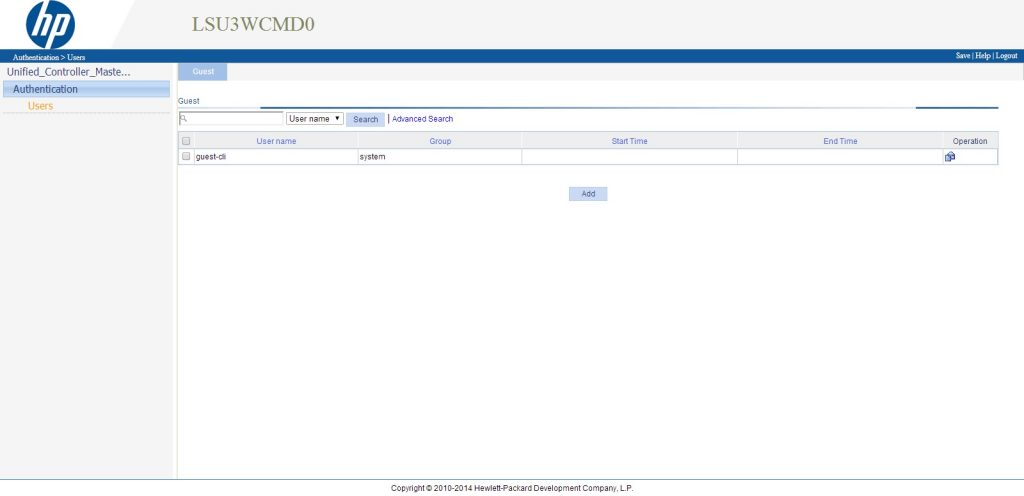
If you are familiar with the web GUI of the controller, you will see, it is the same GUI except, that only the user’s part is available. As we already created an account, this is also visible here. To create an account within the GUI simply press “Add” at the bottom:

The creation is very self-explanatory. One thing, which is very useful, you can create accounts in batches, which means, you simply check the
After clicking “Apply” the user is created and should be visible on the list.
The draw back of both methods above is, that you will create accounts only for the specific controller, you logged into. When working with two or more controllers, for high availability, you have to create those accounts on all controllers, in order to successfully fail over with all accounts. To create accounts for two or more controllers, you can use the Guest Access Manager or GAM, which is part of the base platform of IMC. You do not need the UAM module for that.
To use GAM for account creation, you have to prepare it first. Log in into your IMC and go to “Users–>Guest Access Manager–>Guest Access User Group”. Basically, you can create controller groups on this page, which will be used to create the accounts on. Just click “Add”:

Fill in all the required information, which should be self-explanatory. The important stuff is the “Device User Group”. Here you need to select all controllers, which should have the account on. Click “OK” to save your input.
Next step, is to create an account, which can use GAM. This works quite the same as on the local controller, you need to create a guest admin. Go to “User–>Guest Access Manager–>Guest Access Operator” and press “Add”:
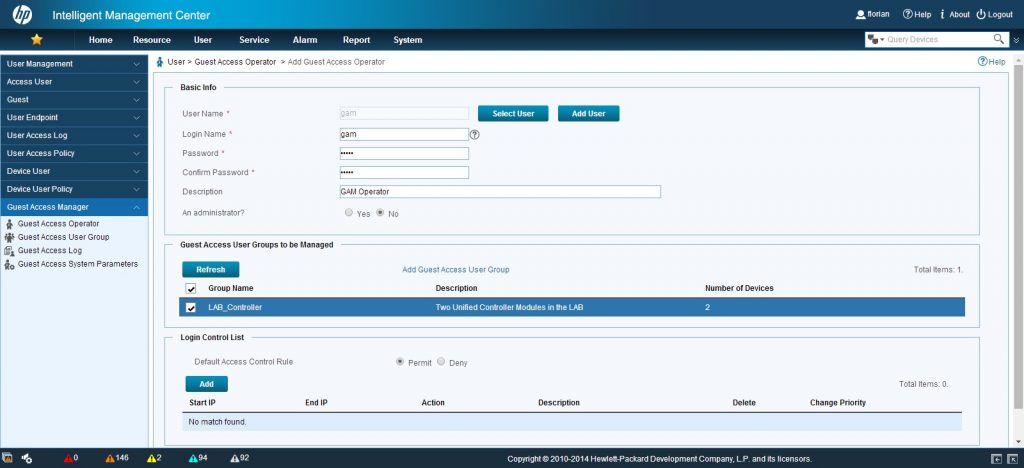
On this page, you have to either select an already created platform user or create a new one. Set a password and select the created “Guest Access User Group”. Press the “OK” button at the bottom of the page.
With this created account, you are now able to log into the GAM portal on the IMC server. This is reachable via this URL:
https://your-imc-ip:your-imc-port/gam
Log into this page with your created credentials and you should see this page:
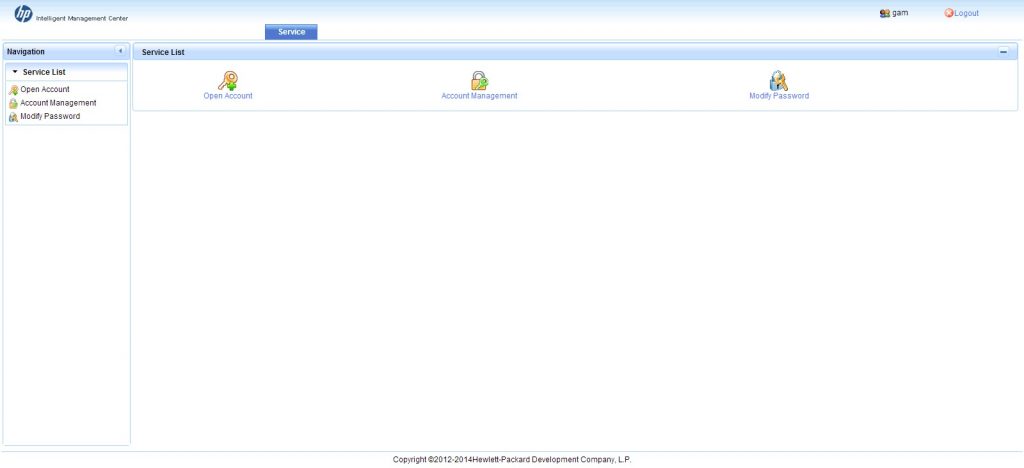
The GAM portal is very simple and easy to use. You only have three options. Create an account, manage created accounts and change your password. I will start
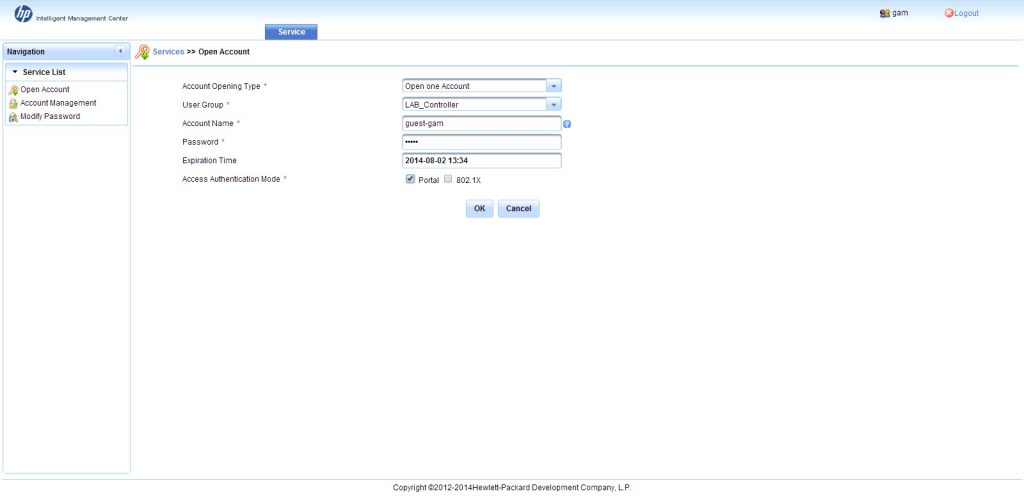
Select the opening type, I will just create one account, but feel free in your choice. Fill in the other fields as required and check the “Portal” check box at the bottom. Press “OK” to create the account. You see, that the account is created. What actually happens, the account is create on every controller in the user group. After the process is finished, you can print the guest account to give it to the client.
Going back to the main page and clicking “Account Management” will bring you to this screen:
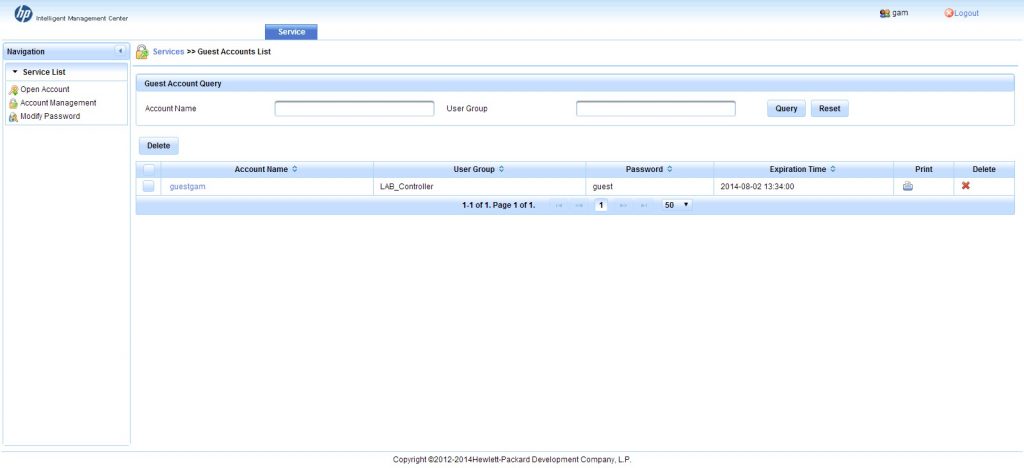
The account management page lists all created account. On this page you can delete them or print them again. If the list is longer then just my test account, you can also search for a specific account. As you see, you are not able to modify an account. This is not possible in GAM.
I will not show the “Modify Password” page, as this is self-explanatory.
As you have now accounts configured, you can try to authenticate with the created credentials, which should work without any issues.
To get detailed information on the account usage you need to use UAM for authentication which will be described in a later post.
You can find more information and support links on the HP Networking site http://www.hp.com/go/networking