
This post is about ClearPass Onboard and how to configure it in a simple environment for a TLS based SSID with Google Workspace as the Identity Provider.
What is ClearPass Onboard
ClearPass Onboard is an additional license for ClearPass which provides a certificate authority of many different flavors and the tools to rollout network access profiles to devices. During the rollout you can use the certificate authority to provide a certificate to those devices for TLS based authentication.
During this onboarding process you can use different authentication options like AD based authentication or even Single SignOn using SAML or OAuth.
The Certificate Authority can also be used to provide certificates using SCEP or EST. I will show this in a later post.
For this post I use ClearPass Onboard to connect my personal devices at home with my secure SSID. ClearPass Onboard will provide the configuration and the certificate for the device. ClearPass Policy Manager will authenticate the user during the onboarding using SSO with Google Workspace and later using radius when the user connects to the SSID.
For enterprise environments I recommend ClearPass onboard for BYOD devices. Company owned devices are often managed by AD or Intune or other EMM (Enterprise Mobility Management) or MDM (Mobile Device Management) tools. I would use those tools to rollout network access configurations and certificates instead of ClearPass Onboard. But whenever you need to rollout network access configurations and certificates to devices, not managed by any of those tools I would highly recommend to look at ClearPass Onboard.
ClearPass Onboard Network Settings
Now, let’s go into the dirty stuff. Go to the Login Page of your ClearPass, but do not use the Policy Manager button. Use the ClearPass Onboard button. The login window will be the same, but you will get redirected directly to the ClearPass Onboard part. Here, go to “Onboard→Configuration→Network Settings”:
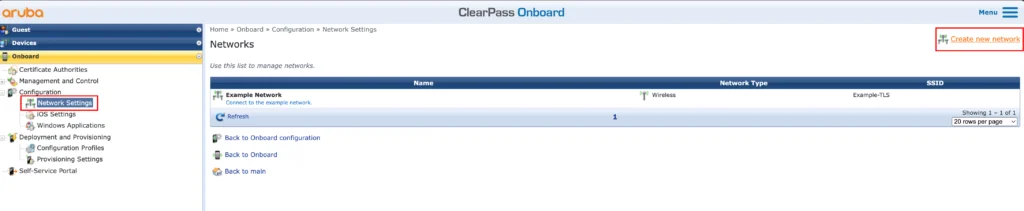
This will bring up the “Network Settings” page. On this page you create the Network Settings, or Profiles, which will be pushed to your devices. You can have multiple Network Settings and they can include configurations for wireless and/or wired networks.
Use the “Create new network” button to start the configuration:
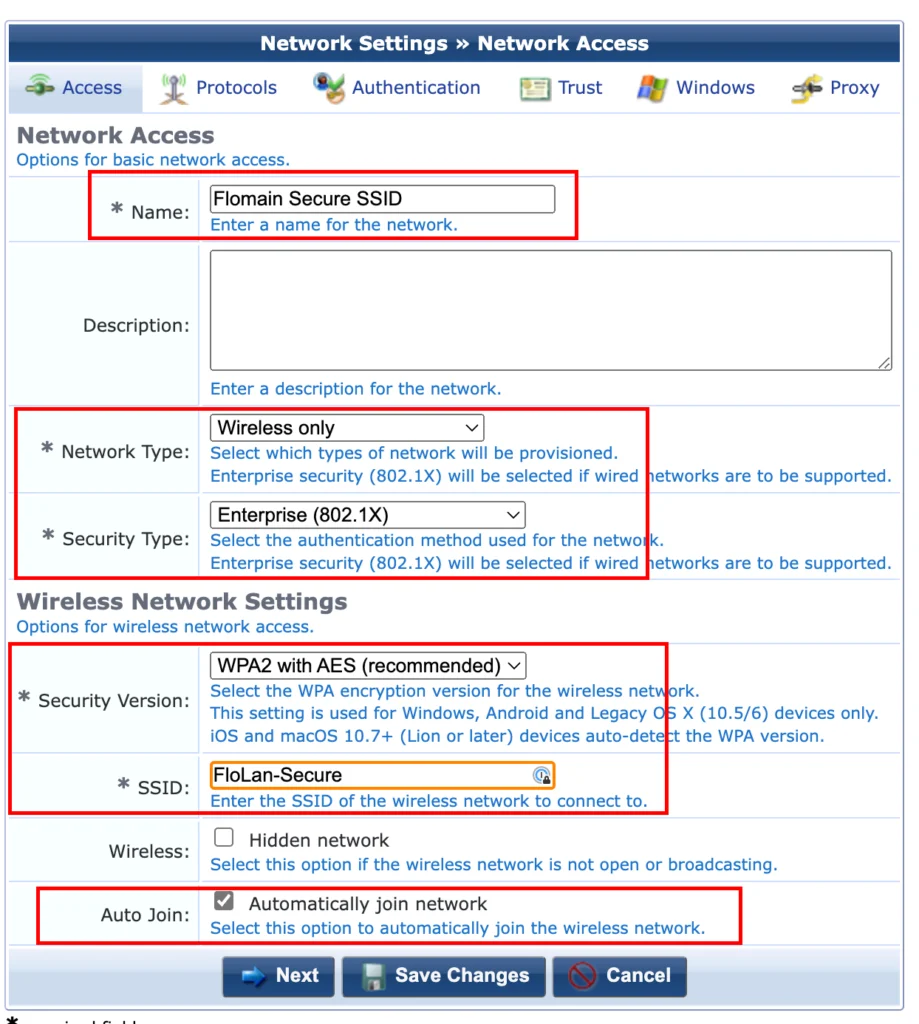
The configuration consists of multiple steps and we go over each step. The first one is the “Access” tab. This one defines the “Name” of the network profile, which will be used in the table on the “Network Settings” page and also if you reference the Network Setting. So choose wisely.
My network will be a secured wireless network, so my “Network Type” is “Wireless only” and the Security Type” is “Enterprise (802.1X)”.
For the “Security Version”, I select “WPA2 with AES (recommended)”. Even if it says WPA2, it will also work with WPA3, which is the one I use. The last two options, “SSID” and “Auto Join” should be self explanatory. Click “Next” to get to the next screen:
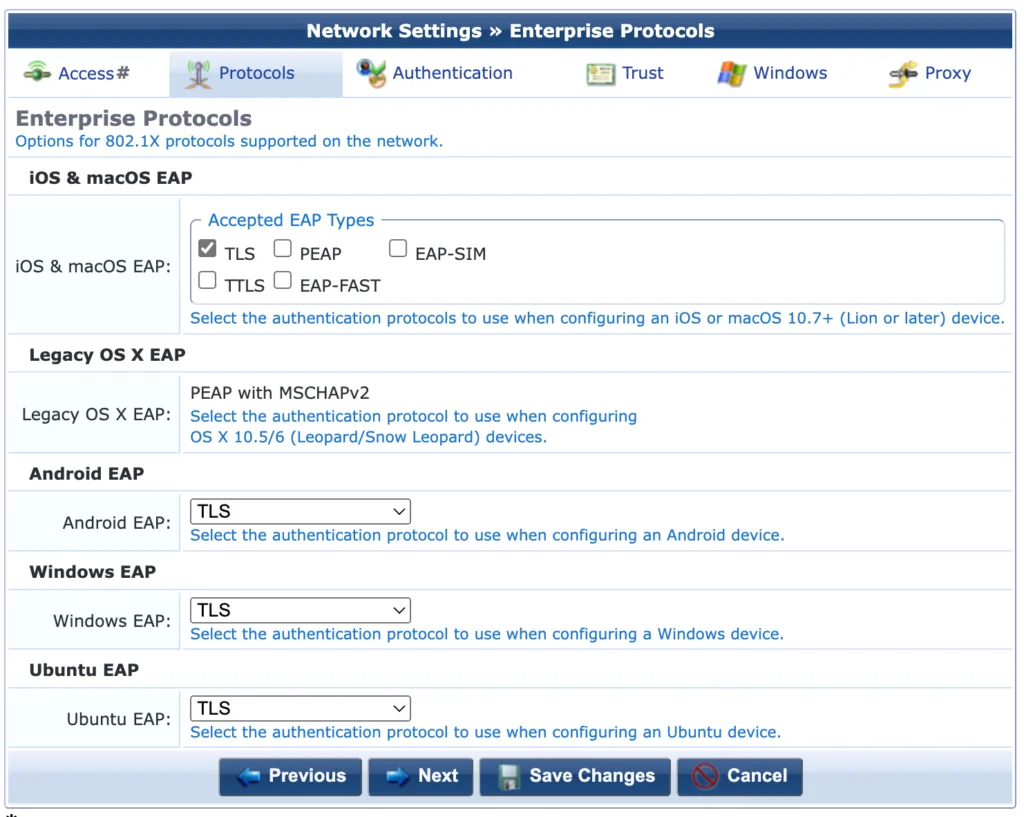
In the “Protocols” tab I select “TLS” as the only option to authenticate. This is the most secure one. Click “Next” to get to the next screen:
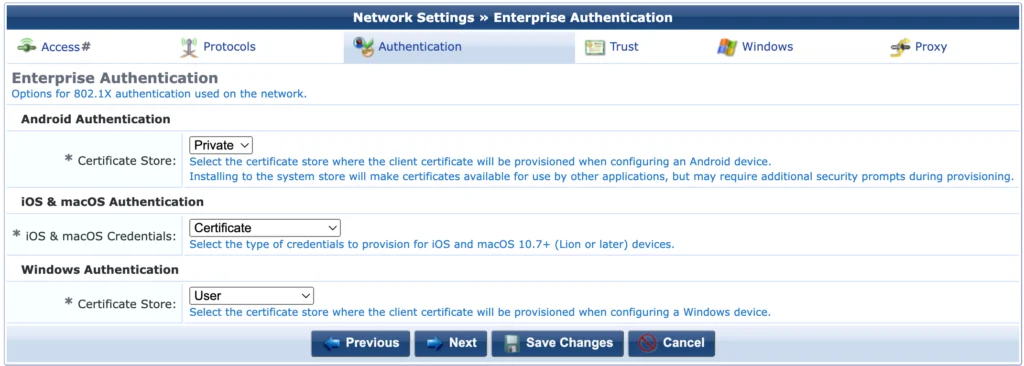
In the “Authentication” tab, I use the default settings. Go to the next screen:
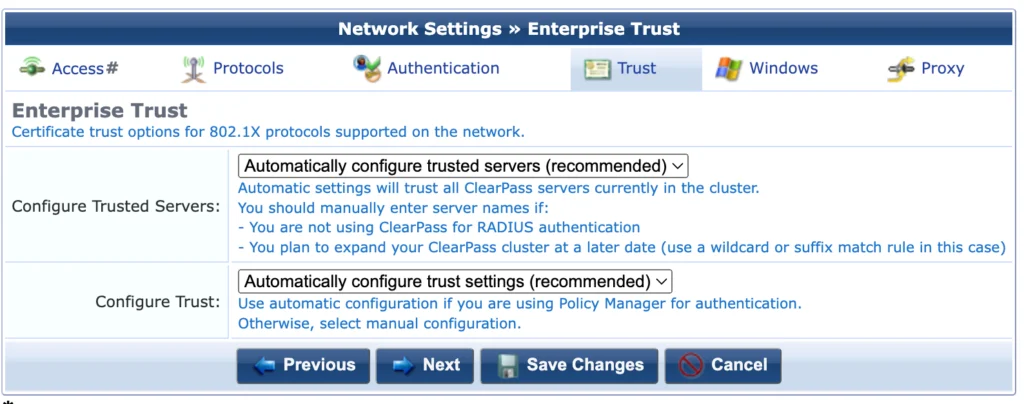
The next screen is “Trust” and again, I use the defaults here. Go to the next screen:
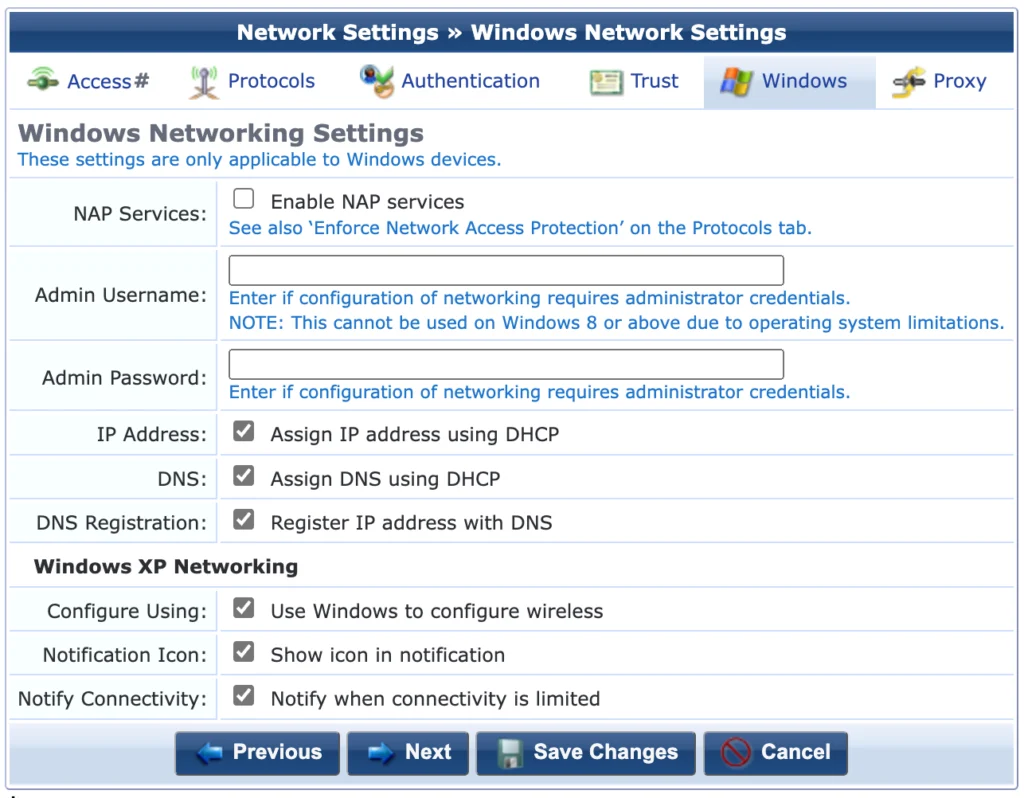
I do not use Windows devices in my environment, so no need to change something here as well. Go to the next screen:
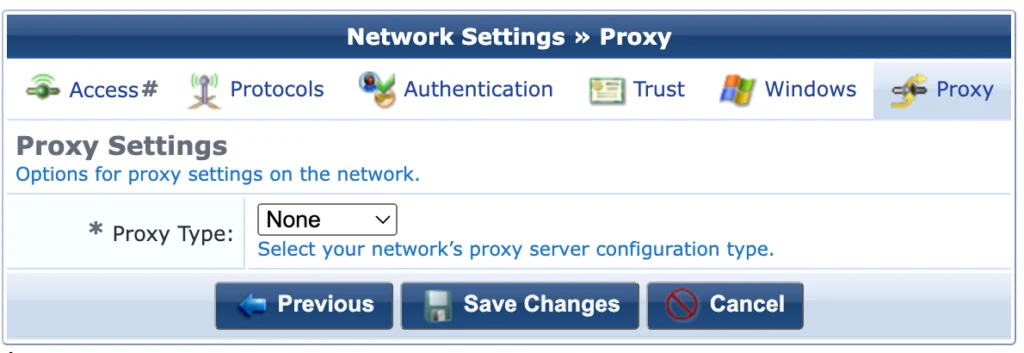
I do not use a proxy, so no changes here. This is also the last tab for the “Network Settings” wizard. “Save Changes” to create this profile.
That’s all you need. You can create additional “Network Settings” if required.
ClearPass Onboard Configuration Profiles
We created the Network Settings in the previous section. With ClearPass Onboard you cannot only provision Network Settings, but also many other settings, like VPN profiles. To put all those different things into one package, ClearPass Onboard is using Configuration Profiles. To create such a Configuration Profile go to “Onboard→Deployment and Provisioning→Configuration Profiles”.
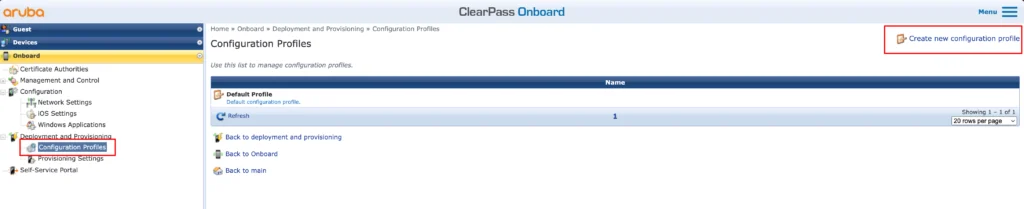
This will bring up a new page with a list of all Configuration Profiles. There is one Default Profile, but we will create a new one, with a click of the “Create new configuration profile” link:
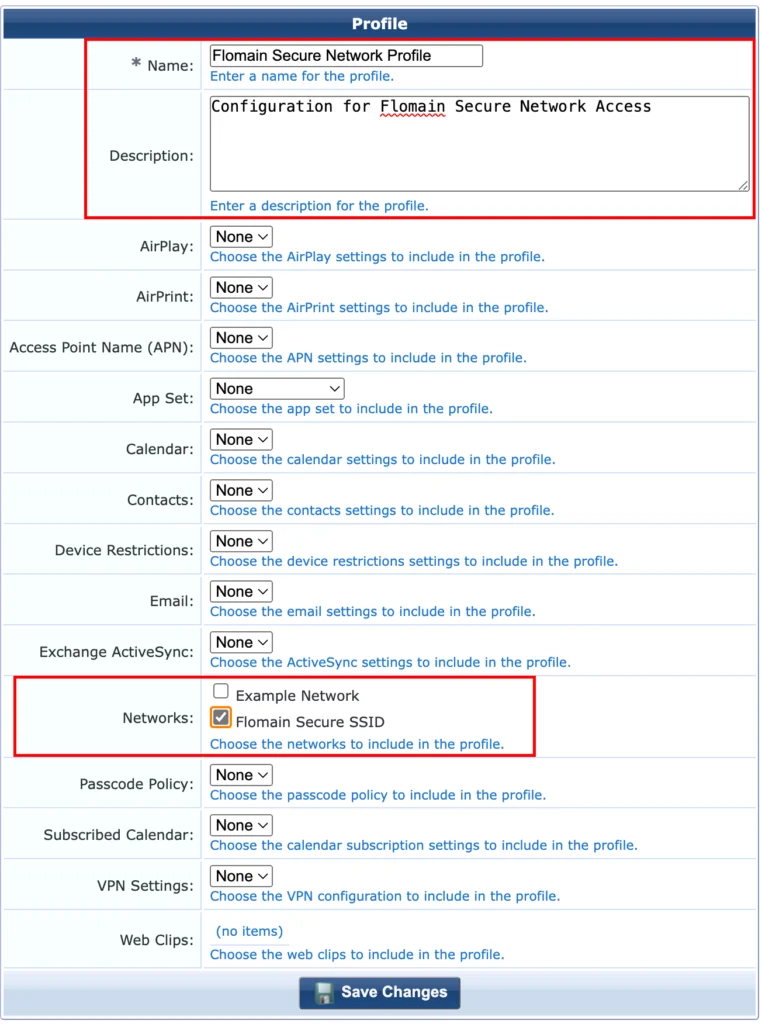
For my simple setup, I just provision the SSID, the profile looks very simple. Just provide a good “Name” and “Description”. Select the created Network Profile in the “Networks” section. Click “Save Changes”. That’s it. You now have the Configuration Profile ready.
Before we can create the page, which will actually roll out the Configuration, we need to create the certificate authority.
ClearPass Onboard Certificate Authority
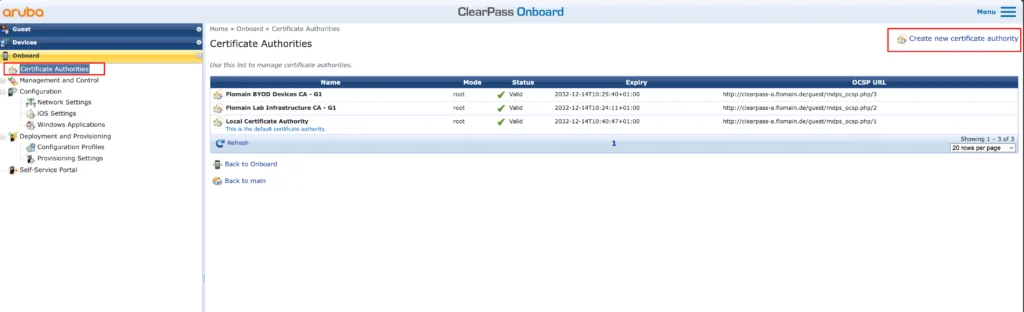
The following will create a new Certificate Authority (CA) for the onboarding process. I will not dig deeper into the general creation of CA’s within ClearPass as this would go far beyond the intention of this post.
Actually, creating a new CA within ClearPass is very easy. Go to “Onboard→Certificate Authorities” and use the “Create new certificate authority” link to start:
This will bring up a wizard with many different options but only a few of them are important to serve as an onboarding CA:
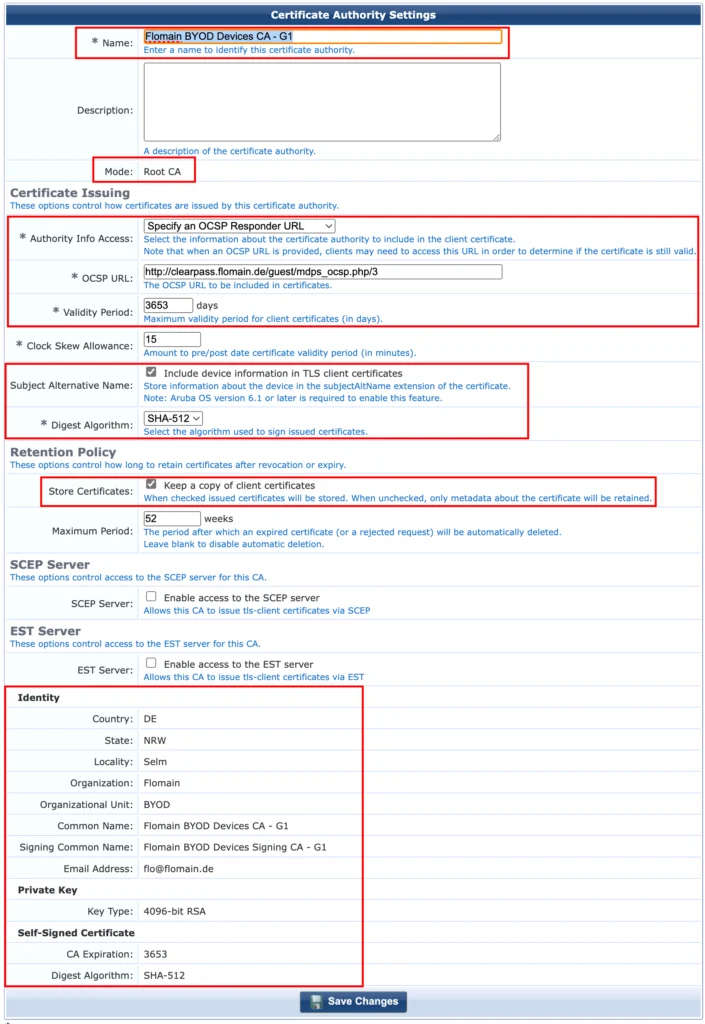
Make sure to define a descriptive “Name”, following your internal naming convention. The CA above will only be used for Bring-Your-Own-Device (BYOD) enrollments, therefore it is running in “Root CA” “Mode”. There are other modes available as well, but this would go beyond the scope of this post.
I use OCSP to check if a specific certificate is still valid or revoked. To run those requests against the publisher VIP in my ClearPass setup I need to change the default OCSP URL, which will default to the FQDN of the ClearPass host. This makes sure that even after a failover to the standby publisher, the correct URL is used.
To change the default OCSP URL use “Specify an OCSP Responder URL” in the “Authority Info Access” field. This will bring up the “OCSP URL” field and enable it for inputs. Simply change the hostname to the ClearPass VIP.
I also make the CA valid for a very long time, to avoid changing the Root CA too frequently. In my case I use 3653 days which is 10 years. Should be long enough.
I check the “Subject Alternate Name” checkbox to store all available information in the certificate as well. I will show them later, when we actually create certificates. This information can be used during authorisation within the policy, if required.
For the “Digest Algorithm” use “SHA-512”.
In the “Retention Policy” section I chose to keep a copy of the certificates. I find this useful for troubleshooting and documentation.
SCEP and EST are not required at the moment so leave them disabled.
In the identity section enter the details required or follow my example.
I use a 4096bit RSA for the key size. According to this page TLS Key Size: Why Bigger isn’t Always Better | Fastly | Fastly, a 2048bit RSA key will provide security until 2030 a larger one will go beyond this. I will also use the created TLS certificate to connect to a WPA3 SSID and for WPA3 you will need at least a 3072bit RSA key for the client certificates, according to the page here: WPA3 Issues With Clearpass | Security (arubanetworks.com). Having a smaller key for the CA feels not right. So going with 4096bit for the RSA key should be fine. We will see this later in the client certificates as well.
After that you can create the new CA. We can now go back to the provisioning part.
ClearPass Onboard Provision Settings
This section is about bringing everything together. Afterwards, the Onboarding configuration is ready to be used. We just need to configure the services afterwards.
To get started, go to “Onboard→Deployment and Provisioning→Provisioning Settings”:
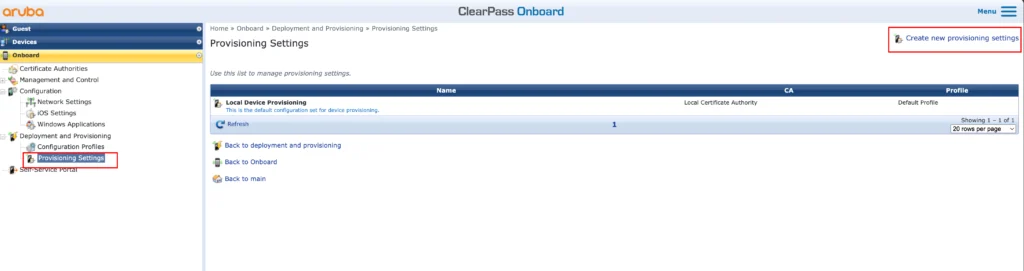
On this page use the “Create new provisioning settings” link. Follow the wizard to go through all steps:
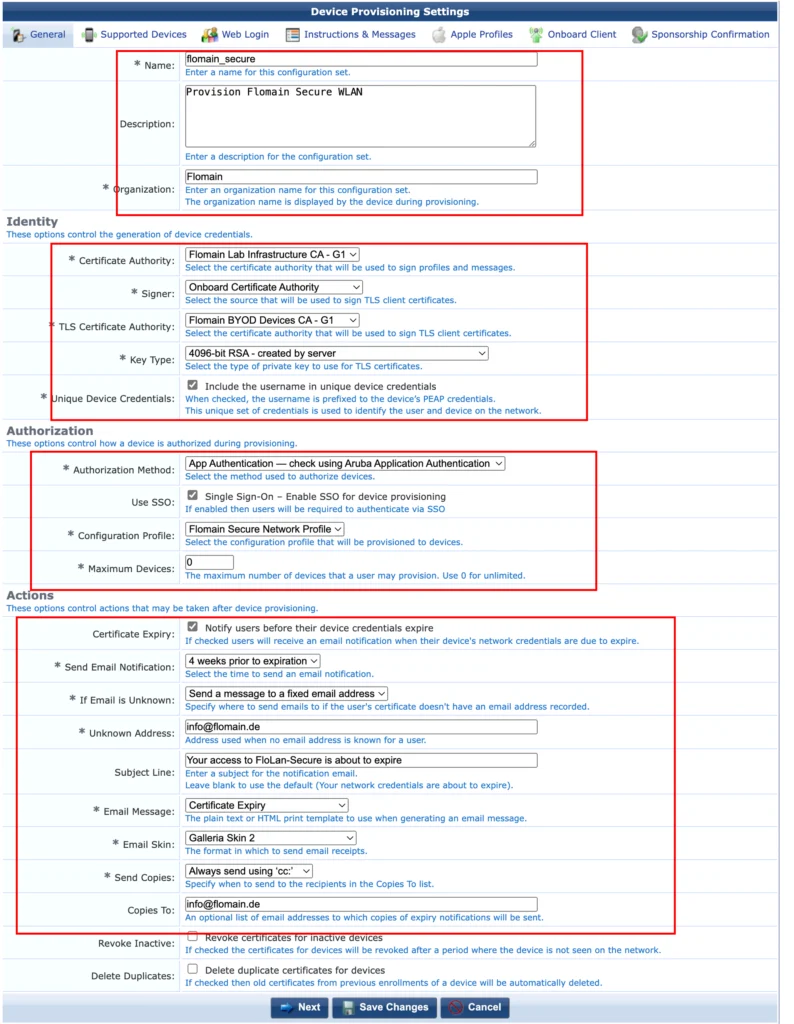
First, enter a “Name” for the settings.
A good “Description” is always a good idea and the “Organisation” name will help users to notify this as a valid internal app.
Now, let’s look into the “Identity” section. Here it gets a little bit tricky. The first select box, “Certificate Authority”, is used to define the CA, which should sign the profiles. All devices need to trust this CA, as Apple devices will stop working, if they don’t trust the CA, which signed the profile itself. This has nothing to do with the certificate the client will get. I use my Infrastructure CA. During onboarding, the user will download the CA public cert and need to manually set the trust.
The “Signer” is simply the selection between getting a TLS certificate from Onboarding or from Active Directory Certificate Service. As I do not have ADCS, I use the Onboard option. For BYOD use cases I would suggest using a separate CA for BYOD devices. ClearPass Onboard is a very good fit.
The “TLS Certificate Authority” is just the Onboard CA, which should provide the TLS certificates to clients. As I use Onboard for that, I can simply select one of the previously created CA’s.
Be careful with the “Key Type”. Smaller keys are faster, but less secure. I use WPA3 for the SSID, which requires at least a 4096 bit key. Other keys are available as well. Smaller RSA keys should not be a problem, except for security needs. Other keys like X9.62/SECG or NIST/SECG might leak client support.
I also include the username in the device credentials.
Next, look into the “Authorization” section. Here you define the authorization requirements. As we use SSO (Single Sign-On) the “App Authentication” is the recommended option. Check the “Use SSO” checkmark. To find out how to use SSO with ClearPass follow this link ClearPass SSO with Google Workspace.
Select the created “Configuration Profile” and define how many devices a single user can onboard. For my environment an unlimited number of devices is fine but check for your rules before continuing.
In the “Actions” section you define what ClearPass should do with expired certificates or those which will expire in the near future. Depending on your needs, use this section to inform your users or remove expired certificates.
If you are done, click “Next”:
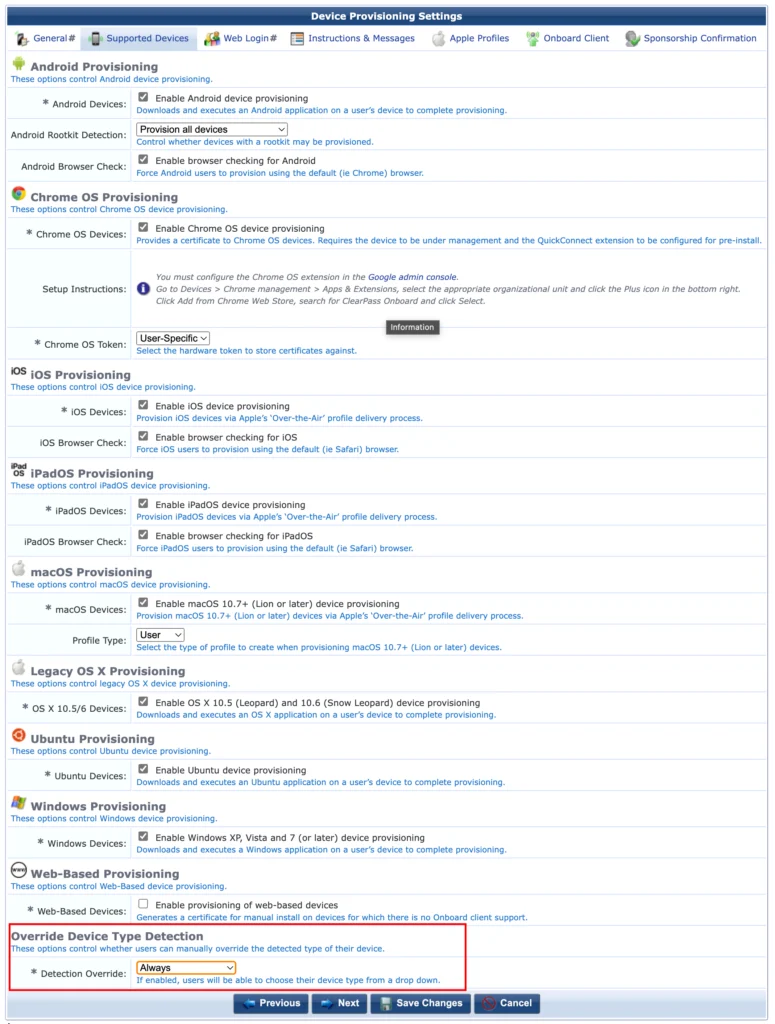
The new page will allow you to configure “Supported Devices”. For my environment I choose to support all devices, but change this to your needs and requirements.
Keep an eye on the last section, “Override Device Type Detection”. Here you can decide, if the user will be able to override the automatic detection. It could be useful, if ClearPass detects the device incorrectly.
Click “Next”:
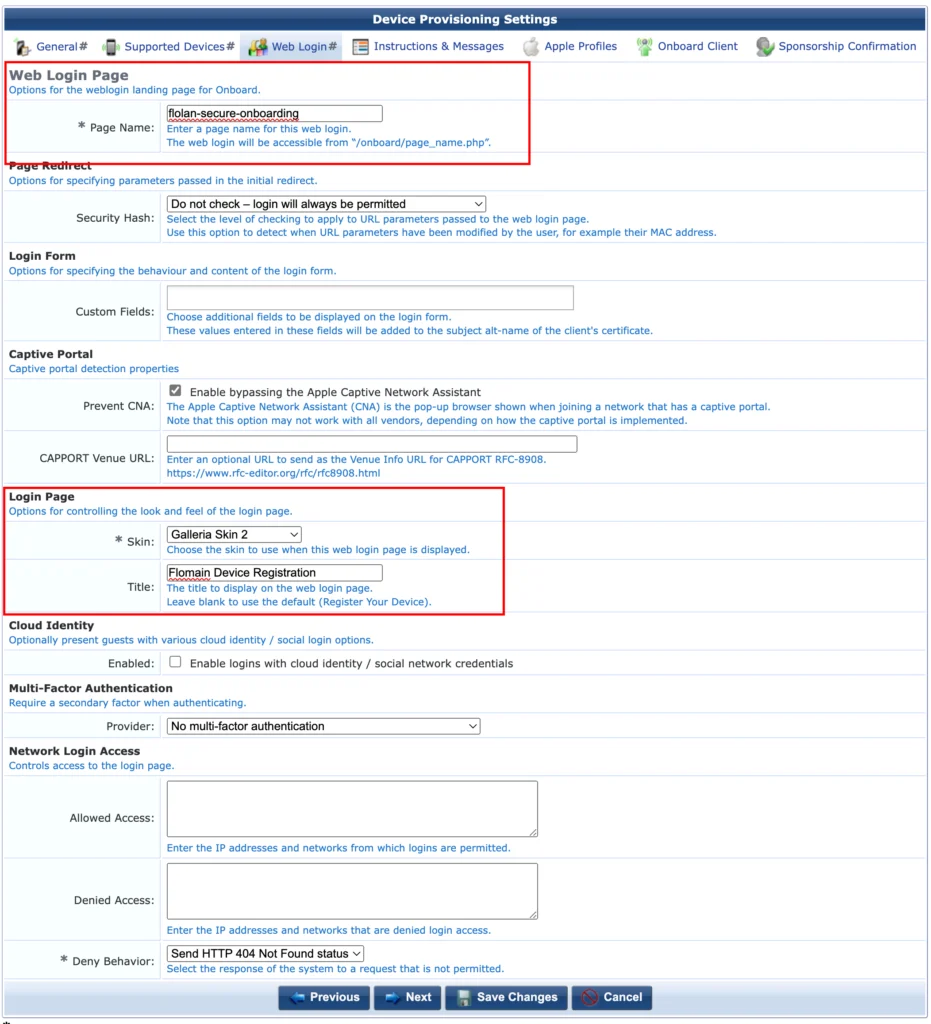
The next page allows you to configure the web page, which is displayed to the user. There are only three important options. First, define a “Page Name”. This will also be displayed in the URL of the browser. Next, the “Skin”. Select one which is awesome. Maybe the one, which follows your brand. Last, but not least, the “Title”. Define a good title, as this will be presented to your users.
Use the other options to your needs and click “Next”.
I left the “Instructions & Messages” page untouched. Here you can create individual messages to your users, if required. The default settings are fine for my needs. If you need to change them, here is the page to start.
The next page is “Apple Profiles”:
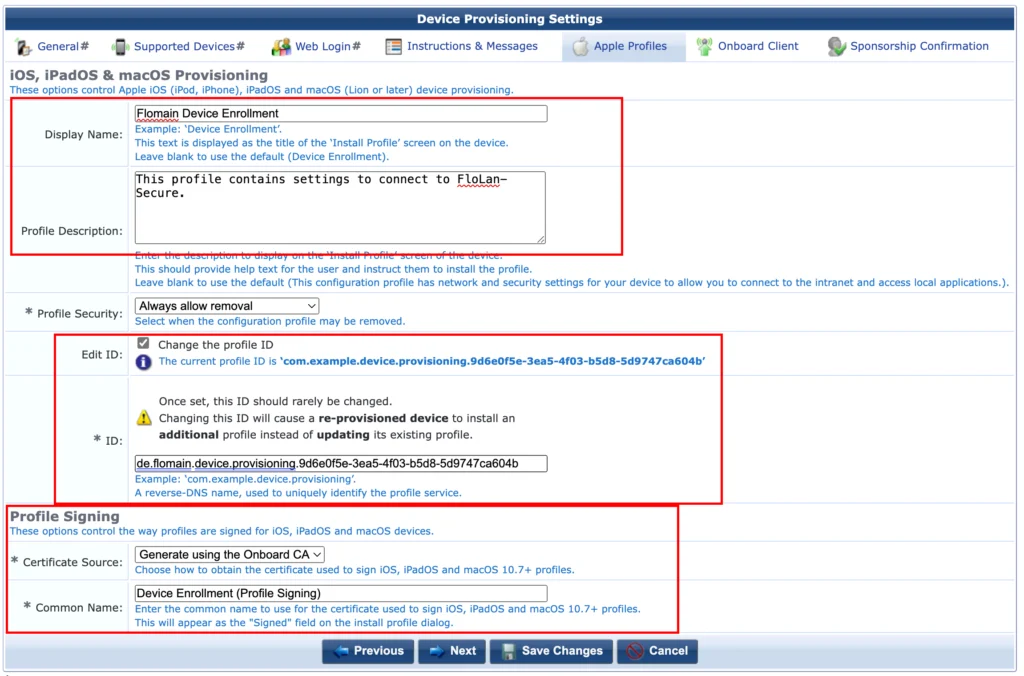
As I use mostly Apple devices (I don’t get credits for this 😉) this page is the most important one for me. Use the “Display Name” to show your users what this profile is used for and use the “Profile Description” to go into more details. Not sure if they really read this, but just to be sure.
Change the “ID” to use your organization’s DNS name. This somehow reminds me of my old Java programming days, long ago.
The last section, “Profile Signing” is important. Here you define how the profile is signed. This is very important, as Apple devices will only accept profiles, signed by a trusted source. Make sure, they trust the certificate or the onboarding will fail.
Click “Next”:
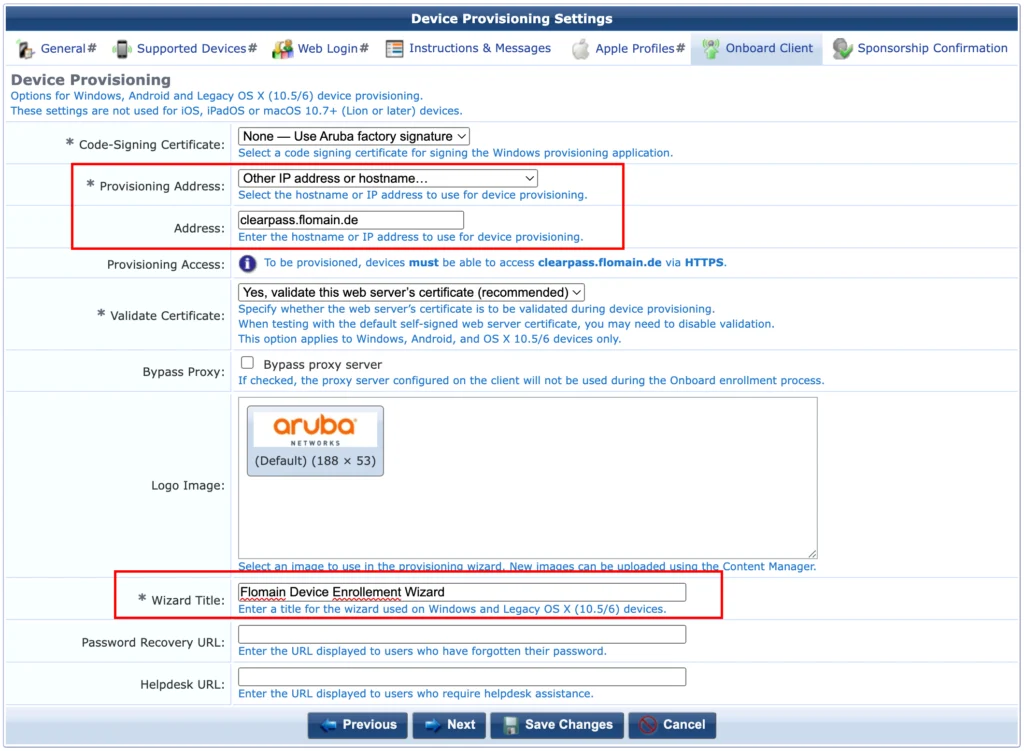
This page defines how to handle all other devices, which are not Apple devices or which are old Apple devices.
This will use the legacy Onboard App. I have changed the “Address” to match my publisher VIP. At least make sure that the address is using a DNS name or IP address, which is in the web server certificate for your ClearPass. This also requires the web server certificate of ClearPass to be trusted by all clients.
Also make sure that the “Wizard Title” is meaningful for your users. You can also add URLs for “Password Recovery” and “Helpdesk” pages.
Click “Next” to get to the last page of this wizard. If you want to use a “Sponsor Confirmation” use this page to configure all required information. I do my authorization with the help of SSO. Therefore I do not need any additional sponsor confirmation.
Save everything and you are done.
Enable SSO for Onboarding
The next would be to enable SSO for Onboarding as well. If you followed my instructions here it should be an easy one. If not, have a look at it and come back after you have everything in place.
Go back to the Policy Manager and go to “Configuration→Identity→Single Sign-On (SSO)”:
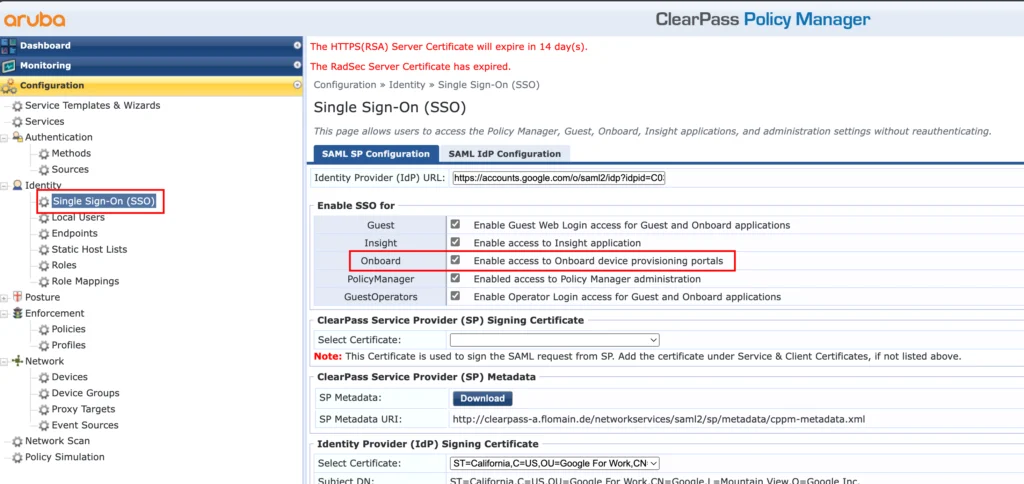
If everything is already in place, you just need to enable “Onboard” to use this for authentication during device onboarding.
Create the required Services
To make the onboarding process work seamlessly you need to create some services, which authenticate and authorize users and devices during the onboarding process.
Let’s start with the SSO service. In the Policy Manager got to “Configuration→Services”:
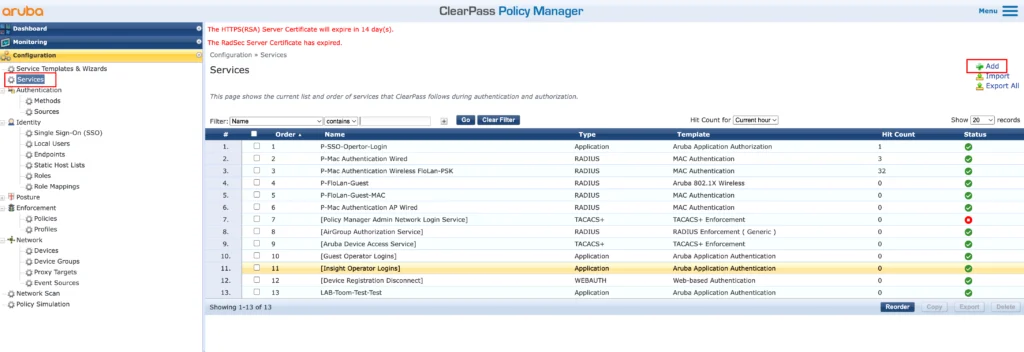
Create a new service using the “Add” button in the right upper corner:
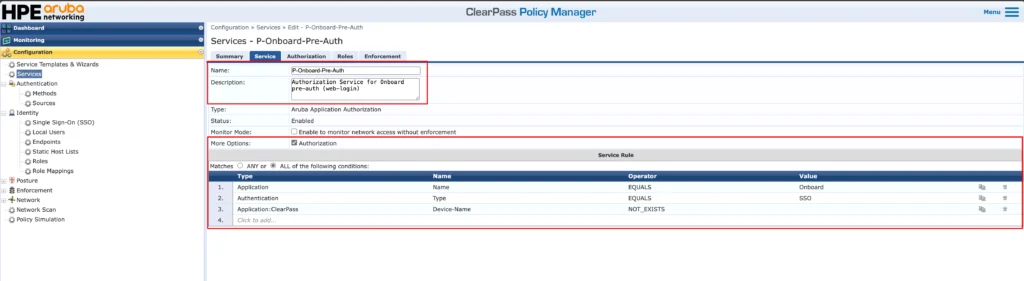
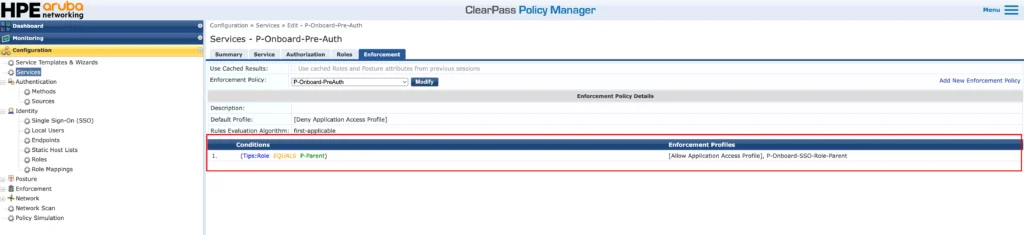
Give that service a good self-explaining name. Usually this service is called the “Pre-Auth” service, as it is used to authenticate the user when accessing the onboarding portal. In our case we use SSO for that, so the “Type” is “Aruba Application Authorization”.
Make sure, the checkmark for “Authorization” is set under “More Options” and that you have the “Service Rules” set as in the screenshot above. Those are the minimum requirements. You can add more, like the page name to use this service only for a specific onboarding page, if you have multiple of them.
Go to the next section:

Here simply use the “[Onboard Device Repository]” as the source for authorization attributes. Go to the next section:
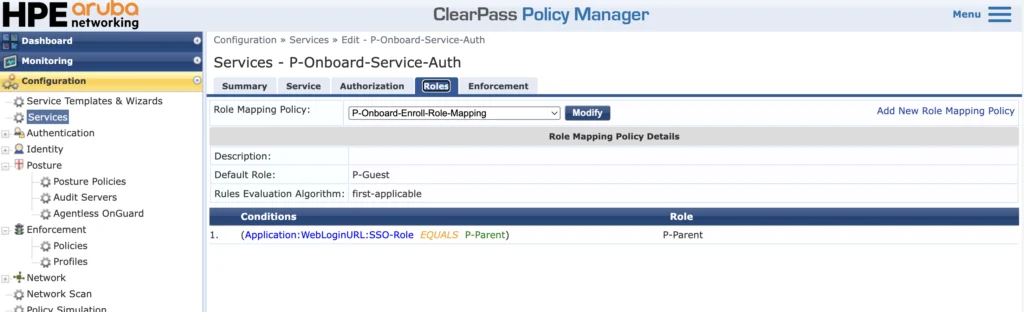
I would highly recommend using role mapping. The above is just an example where I use the roles or groups returned by SSO to assign a Tips role to the user. This makes your life in the next step much easier.
Go to the next section:

The “Enforcement” section is the most important one. Here you define, based on conditions, what will happen with the user. I have a fairly easy enforcement profile, which will allow access for all users, with the role “P-Parent”.
For all users with that role, ClearPass will return the default “[Allow Application Access Profile]” and the “P-Onboard-SSO-Role-Parent” profile. This profile looks like this:
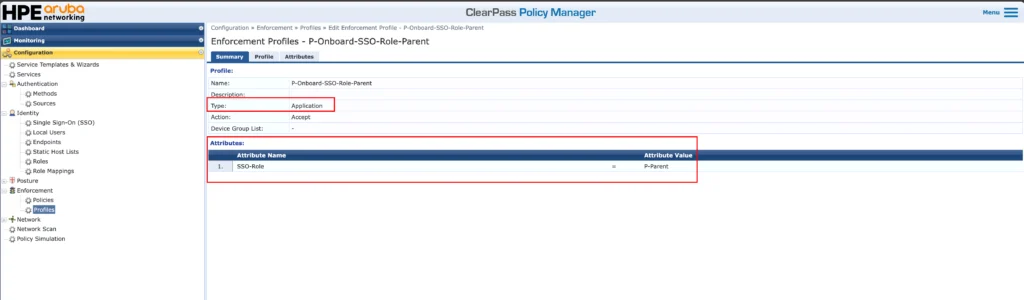
The profile is simple as well. The “Type” of this profile is “Application” and it will return the “SSO-Role”. I need this later, as I do not have the option to do an LDAPS request against my Workspace account. If you can use LDAPS (or LDAP) or even use EntraID for authorization you don’t need this profile at all. I will explain later during the setup what exactly I’m doing with that role information. Just to keep you reading 😂
The next service is used to authorize the rollout of the certificate. It might look like this is double work, but this service will allow for setting some certificate properties as well. Create a new service with the “Aruba Application Authorization” as “Type”:
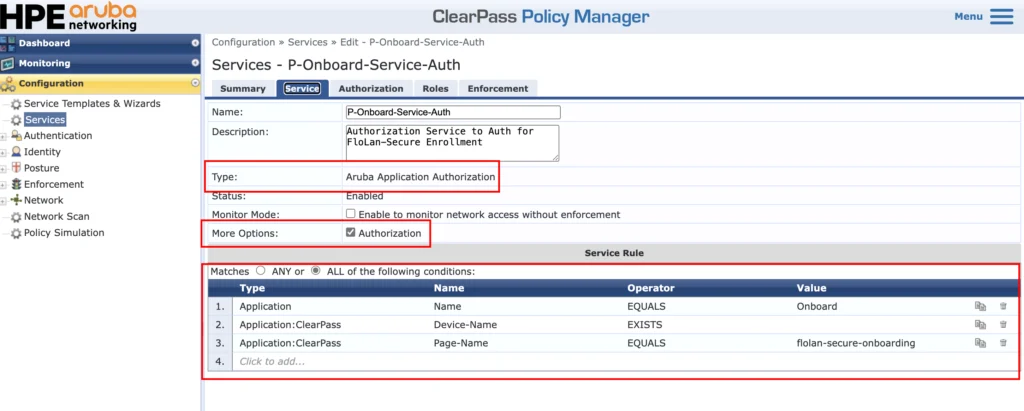
Make sure to check “Authorization” under “More Options” and use the “Service Rules” from the screenshot above.
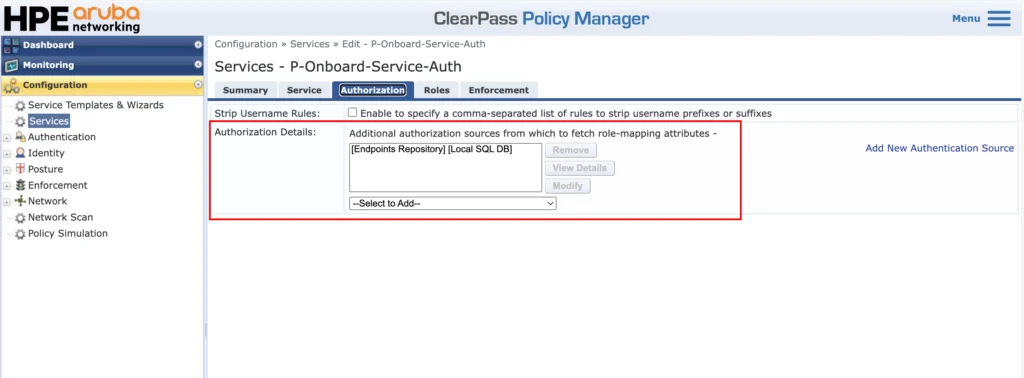
For “Authorization” use the “[Endpoints Repository]”:
I have a fairly easy role mapping for this service:
I use the SSO role, which was returned with the previous service to map a TIPS role.
The role mapping is important. With the help of the TIPS role I can assign different properties to the certificate, using enforcement profiles:

I have only one role and for all users with that role I use the default “[Allow Application Access Profile]. This will simply allow the certificate rollout. The second one, which is the “P-Onboard-Cert-Lifetime-6Month”, will set the certificate lifetime to 6 months.
Here you can see that it is fairly easy to assign different lifetimes to different users in different groups. Below is the enforcement profile for reference:
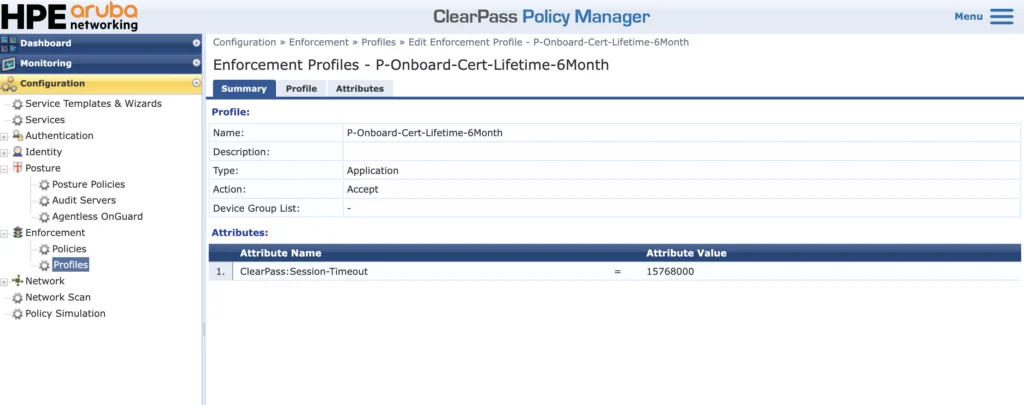
The “ClearPass:Session-Timeout” is the lifetime of the certificate in seconds.
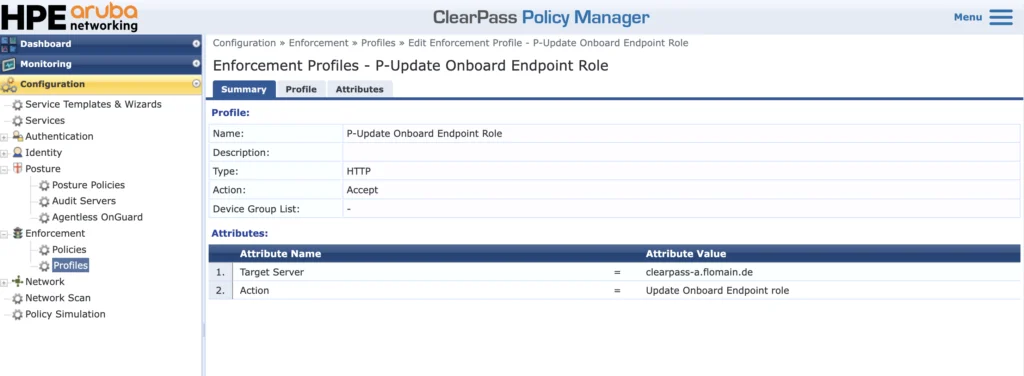
The last enforcement profile, “P-Update Onboard Endpoint Role”, is used to save the SSO role into the Endpoint Repository. This is needed only for my lab setup, as I do not have the option to access that information using LDAPS from Google while authenticating the WLAN clients, connecting to the SSID. The recommendation for production environments is to use LDAPS or any other way to authorize a user and get their group membership.
For your reference, below is the profile:
And the server action:
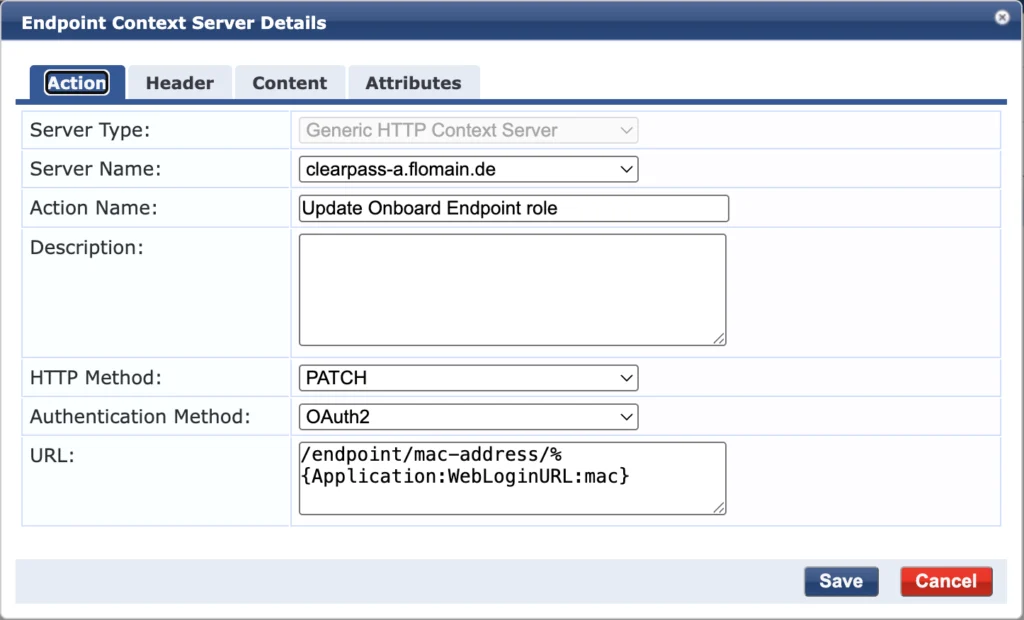
And the payload content:
{
    "attributes": {
        "Onboard-Role": "%{Application:WebLoginURL:SSO-Role}"
    }
}
The last required service is the dot1x authentication service for the provisioned SSID. This is a standard dot1x service which checks the certificate to authenticate the user. If you need to add authorization as well, add your identity store, like AD or EntraID, and use the attributes from that store for authorization.
In my case, I can’t do that, as I cannot do LDAPS against my google workspace account. There I have added the user role to the endpoint as an attribute, as described above. This is just a workaround to overcome this limitation.
For your reference, here is the service definition:
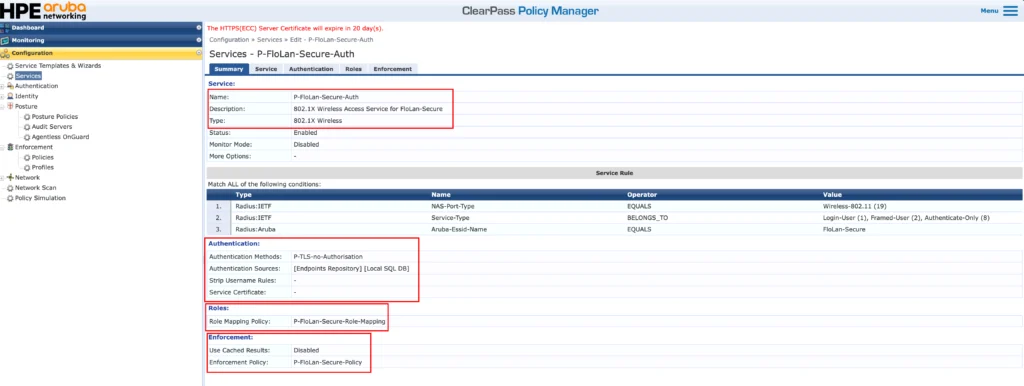
The service is a “802.1X Wireless” service type. Use the service conditions, which match your environment.
As described above, I do not use authorization, for the mentioned reasons. Therefore I use a TLS method, which does not use authorization as well. It will only check if the user provided certificate is valid. Afterwards, I use the saved role information from the endpoint to assign the correct role. The enforcement uses that role to provide access. Very easy and simple. Your service might be more complex.
I will not show how to create the SSID itself. It is a simple dot1x enabled SSID. There are no special needs, except that the ClearPass server should be used for authentication. The rest depends on your environment.
The Onboarding Process
For some thoughts about the distribution of the Onboarding URL, read the next chapter. For this one, I assume that the user is already on the Onboarding page. But before that and because of the SSO we configured earlier the user needs to authenticate:
The authentication is visible in the ClearPass Access Tracker. It is using the first service, the pre auth service, for this. For my example it would look like this:
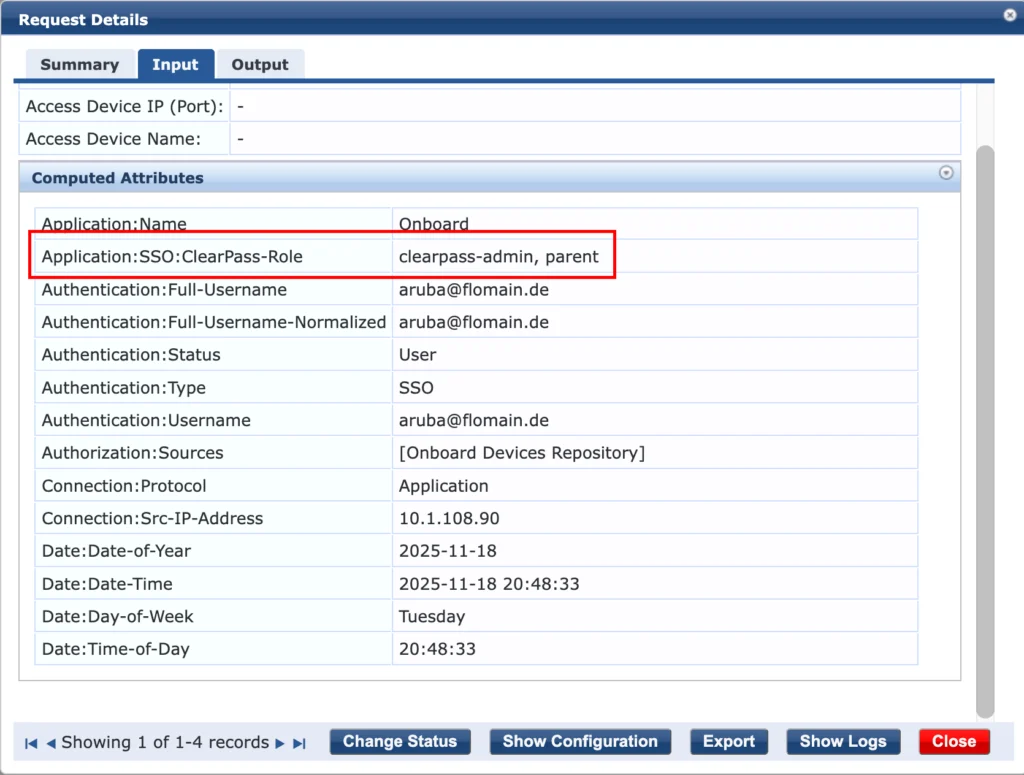
Here you can see that Google returned the user roles from the IdP to ClearPass. We use this role and forward it to the Onboarding application:
This allows the use of this role for the next step. But back to the device:
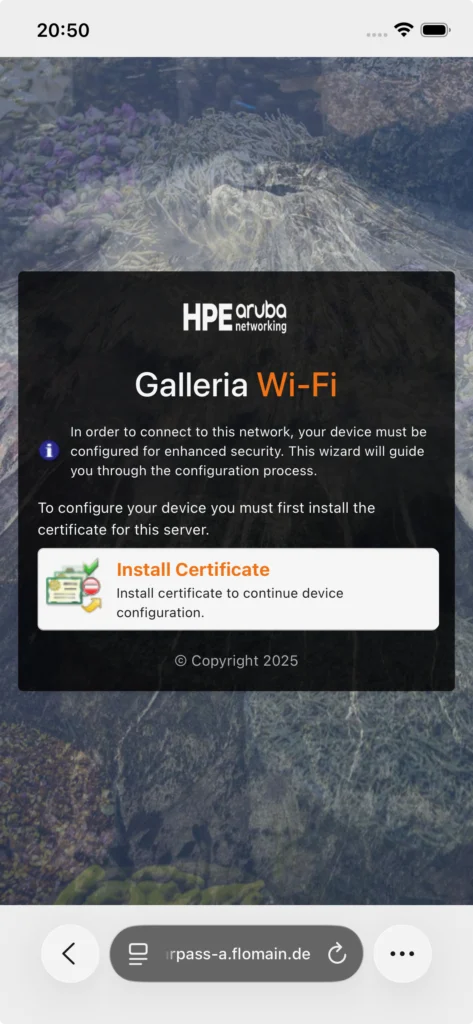
First, the user needs to install the CA Certificate, which is used to sign the network profile package. We selected this during the configuration of the Onboarding page. After the certificate is installed the next page offers to install the network profile:
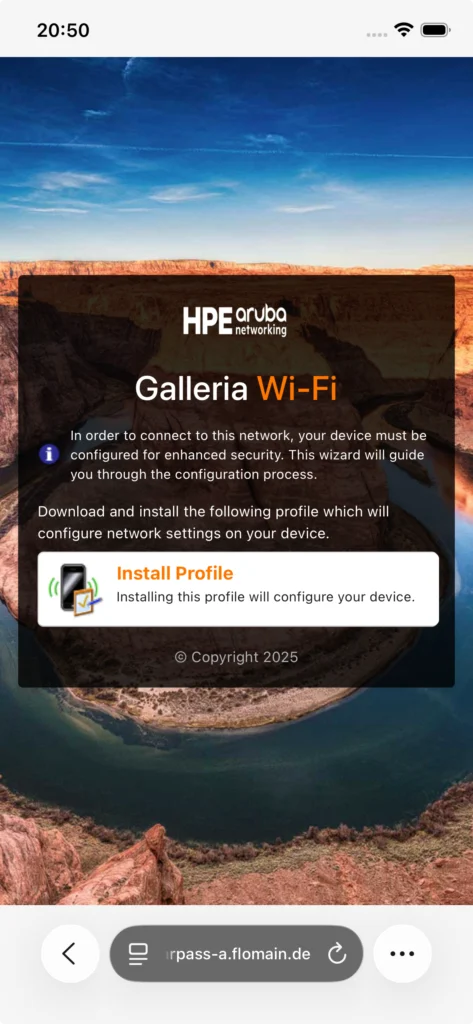
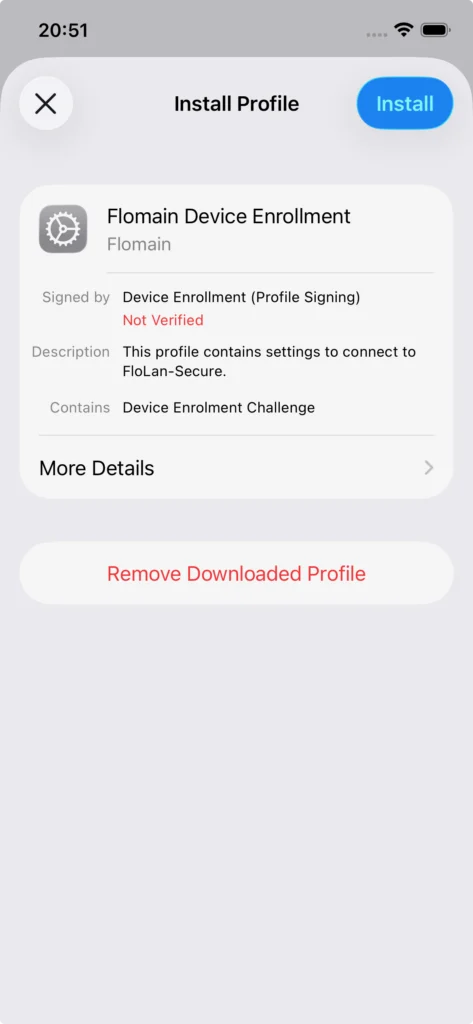
Download the profile and install the profile on the device. This is device specific, but for IOS it looks like this:
After the installation, return to the Onboarding page, which should look like this:
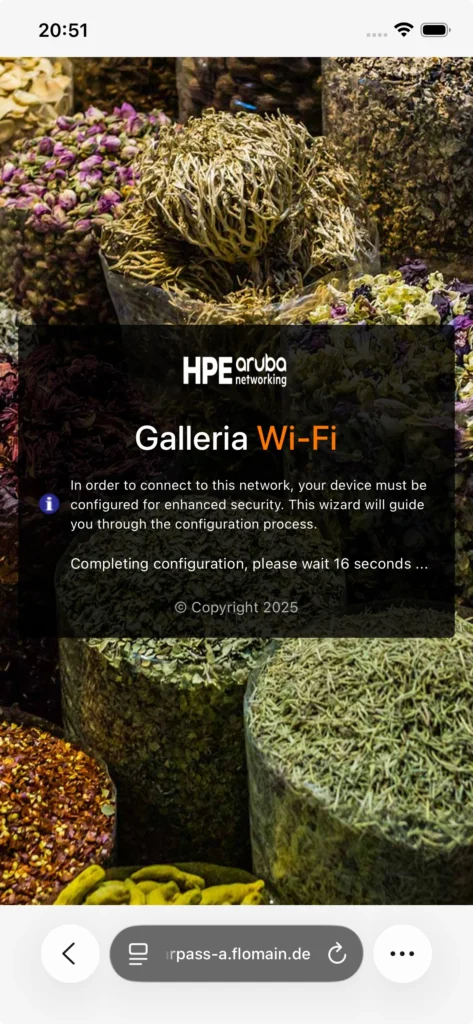
Your device should now connect automatically to the secure SSID. You successfully onboarded your first device.
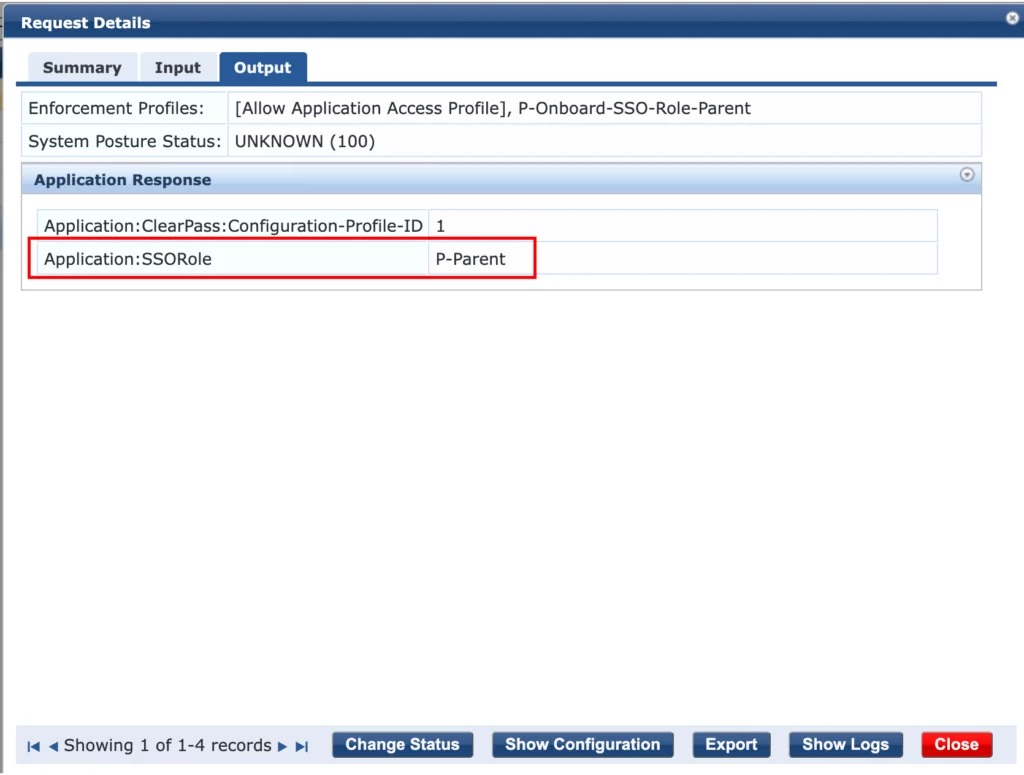
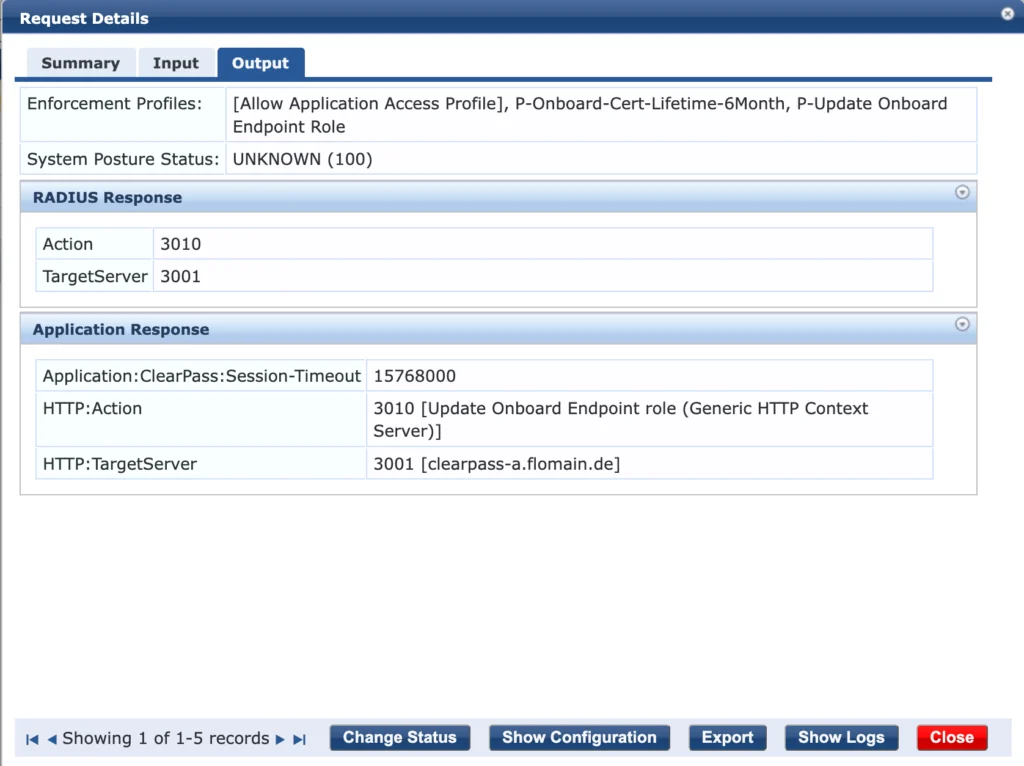
In the Access Tracker you will see the following entry, which was generated while the device was requesting the certificate. The service used, is the second one, we created earlier, which is the service auth service:
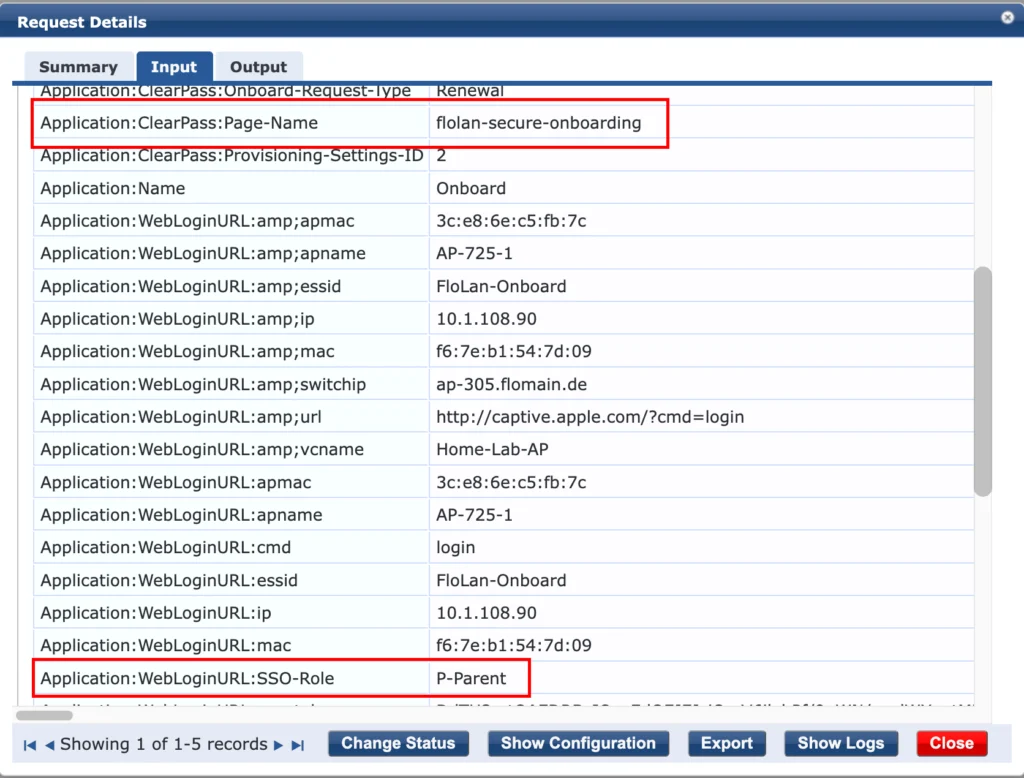
Here you get the role, which we send in the last authentication request and many additional information, even for the device itself.
Here is the output of that request:
In the Onboarding application you can now see the certificate, issued to the user:
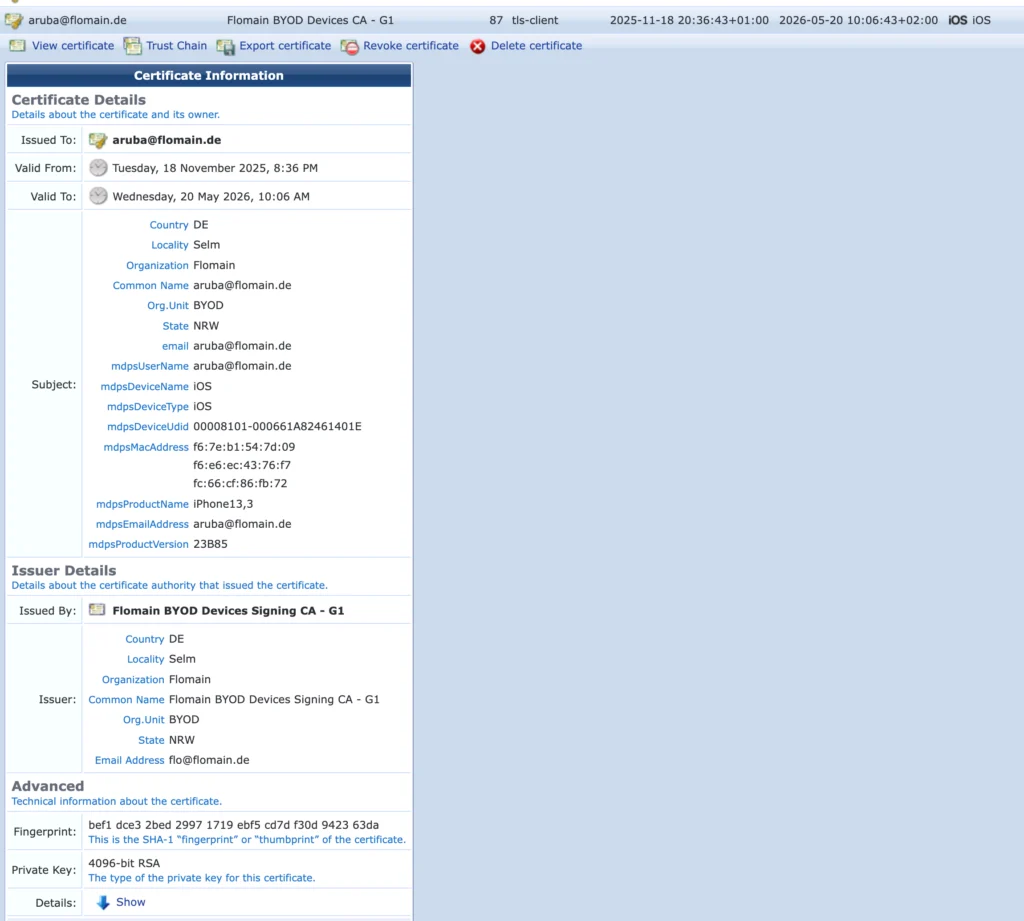
It has all the information we configured earlier.
Some additional Thoughts
The most important thing after the configuration is ready and tested, how to distribute the Onboarding URL to your users. Basically, there are two and a half options for that.
The first option is to use the same SSID. This will involve using less secure authentication methods like EAP-PEAP, to allow access before the user has a certificate. I would strongly recommend not to use this approach.
The much better option is to use a second SSID or a complete other way of connecting. The second SSID option is the recommended one. You can use the guest SSID, for example. Simply add a link to the captive portal which can be used by internal people to reach the onboarding URL. Guests will not be able to use that link, as they will be required to pass SSO in order to get any further. After successful onboarding, the device will automatically join the secure SSID and will not use the guest SSID anymore. This is my preferred way of doing onboarding.
Instead of using the guest SSID, you can also use a special onboarding SSID. The process would be the same. Redirect your users, connecting to that SSID, to the onboarding URL and let them go through the process.
If you find this post useful, leave me a comment and share your feedback with me. You can also buy me Pizza, using the “Buy me a Pizza” button on the right, to support this blog and keep the IT gremlin happy.
If you would like to do me a favor, share this post with your friends and social media contacts. This would really help to make this blog more popular and help others to find the information above more easily using search engines.
Share on: