Most organizations are moving to a network where all ports are authenticated. This could lead to problems when we try to connect an AP to a network port as AP authentication is more than just an accept.
There are two types of AP that might be considered. First, the Campus AP, which needs to connect to a controller. But this is the easy part as all traffic is tunneled to the controller and we just see the AP on the port.
The more interesting part is the IAP, as the IAP will connect to the switch port and we will see all the connected clients to that IAP on the same port but in different VLANs. Let’s try to walk through the different scenarios beginning with the Campus AP and afterward continue with the IAP.
During the whole post, I assume that you do authentication on each port in your network and that a device only gets access after successful authentication. For the MAC Based part, I also assume, that you have a complete list of all MAC addresses accessing the network. If not, you can go with ClearPass profiling. This will be a topic for a later post.
Campus AP Authentication
The Campus AP (CAP) is the easy part. The reason is that you tunnel all the traffic to the Controller and that the switch only sees the CAP on the port. But this creates the baseline for the more sophisticated authentication for IAP’s.
MAC Based CAP Authentication
Let’s start with MAC-based authentication. This is very simple and honestly not really an authentication. But it is really good to separate your devices from each other and to simplify the access switch configuration as the port config (like VLANs) can be assigned dynamically.
Make sure, the switch is running the same time as the radius server. This is essential for authentication to work.
Afterward, let’s start with the switch configuration. Below are the config items, needed on the switch.
First, the radius server:
radius-server host 10.104.104.41 key "aruba123"
radius-server host 10.104.104.41 dyn-authorization
radius-server host 10.104.104.42 key "aruba123"
radius-server host 10.104.104.42 dyn-authorization
From those radius servers, create a server group:
aaa server-group radius "CPPM" host 10.104.104.41
aaa server-group radius "CPPM" host 10.104.104.42
And finally configure a port, in my case port 5, to use mac authentication:
aaa port-access mac-based 5
aaa port-access mac-based 5 server-group "CPPM"
That’s already everything we need on the switch. Now head over to ClearPass.
On ClearPass, add the switch to “Devices”. Go to “Configuration–>Network–>Devices” and add a new device:
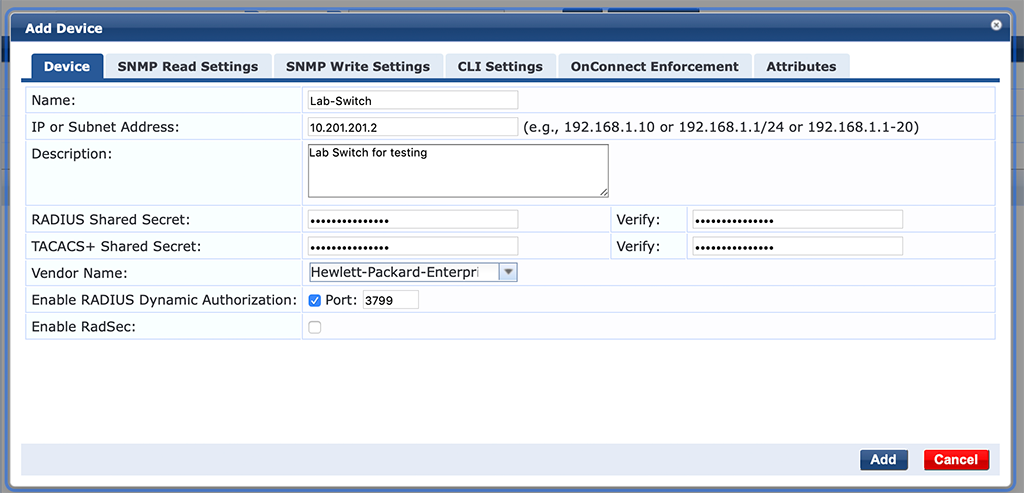
The Switch is an ArubaOS switch, running the latest OS, which is currently 16.10.0003. The important part here is the “Vendor Name”. Please insert here “Hewlett-Packard-Enterprise” The rest should be adopted to meet your requirements.
Now let’s start to create the service. First, we need to create a profile to return the CAP VLAN back to the switch. I use VLAN 202 (LAB_CAP_Management). You can use whatever VLAN you like. To create the profile go to “Configuration–>Enforcement–>Profiles” and create a new profile:
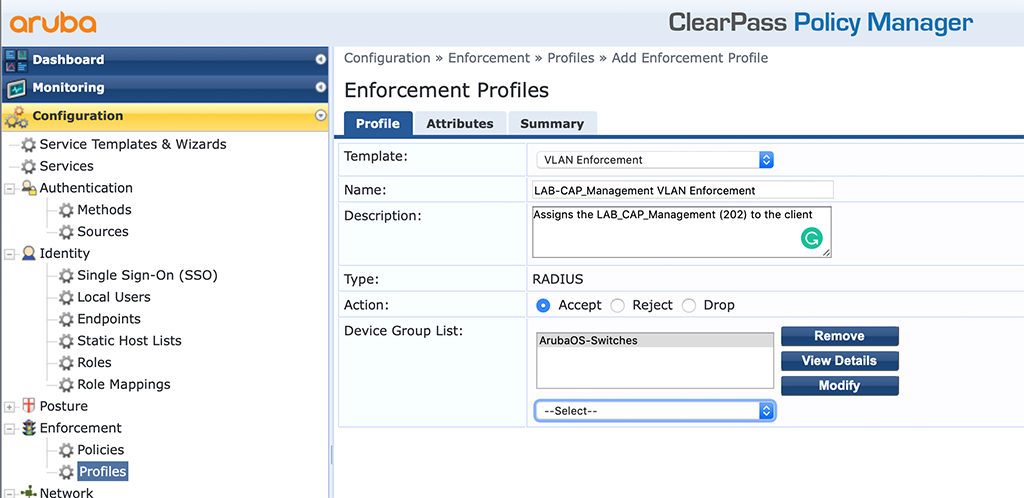
The important part here is the “Template”. Select “VLAN Enforcement” as the “Template”. I also use the “Device Group List” to send the profile only to supported devices. Now click “Next” to get to the “Attributes” tab:
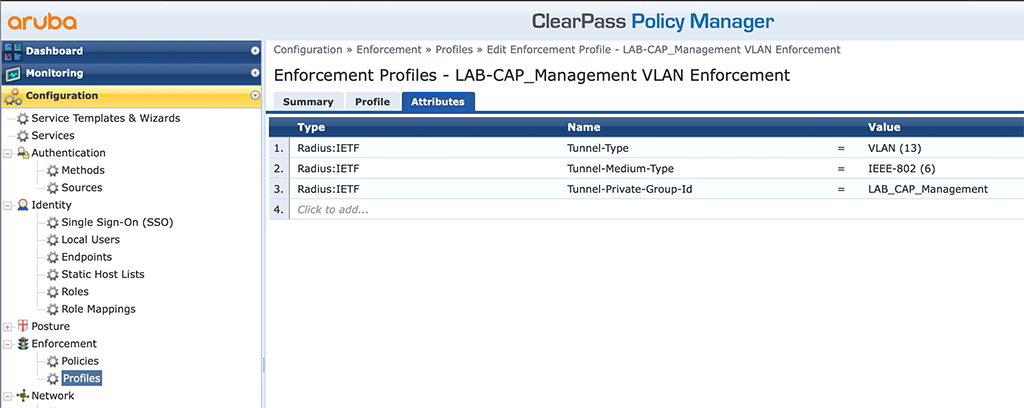
Because of the “VLAN Enforcement” “Template” there are already some attributes available. I reduced them to the ones above. For the last attribute, in line 3, you can either use the VLAN ID, would be 202 in my case or the VLAN name which is “LAB_CAP_Management” in my case. Using the VLAN name makes life easier when you support multiple sites or buildings with different VLANs but the same names. Save the new profile with a click on the “Save” button.
We also create a simple policy to assign the created profile. Go to “Configuration–>Enforcement–>Policies” and create a new policy:
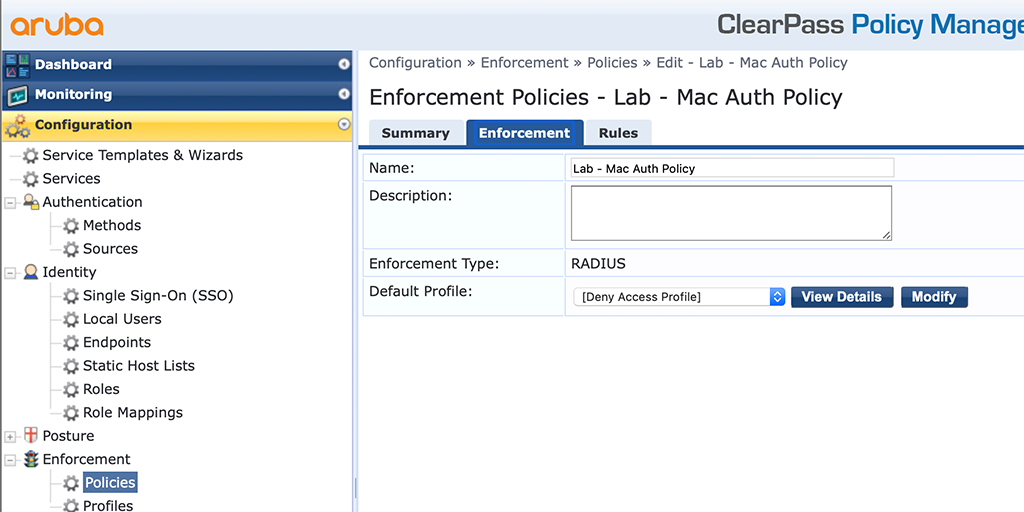
The first screen is a simple one. Just enter a “Name” and select the “Default Profile”. Normally this is the “[Deny Access Profile]”. Click the “Rules” tab to get to the important part:

I created a very simple policy that assigns the AP VLAN to all devices (MAC addresses) which belongs to the role “Aruba AP”. I derive the role from the endpoint database in ClearPass. In a real production environment, this should come from some kind of asset database. If you don’t have such a database, you can use the endpoint database as well, together with device profiling.
The final step in ClearPass is to create a service. Just go to “Configuration–>Services” and add a new service:
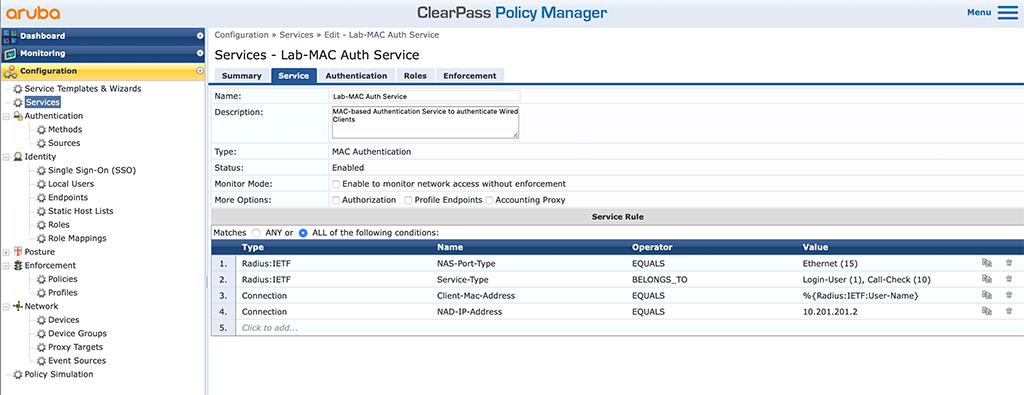
The new service should be a “MAC Authentication” “Type”. “Authorization” is not needed at the moment. Make sure, the “Service Rules” will cover all possible request types, belonging to this service. The last “Service Rule” is just for my lab, to make sure it will not interfere with other services I have.
On the “Authentication” tab select only “[MAC-AUTH]” as the “Authentication Method” and add your “Authentication Source”. In my case, this is the “Endpoints Repository”.
If you do role mappings, select your “Role Mappings Policy” on the “Roles” tab.
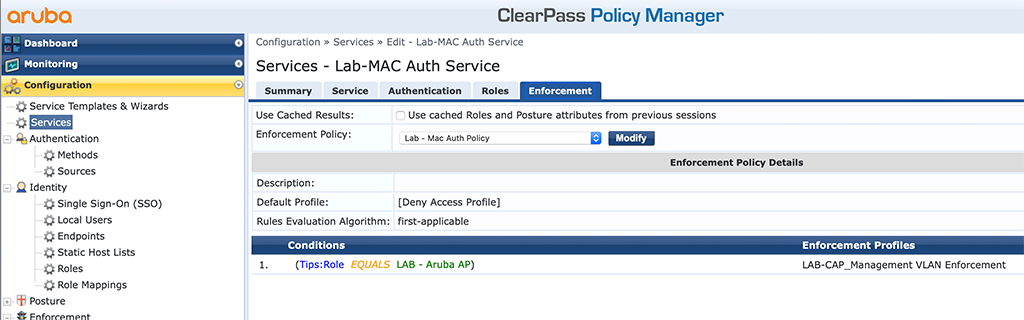
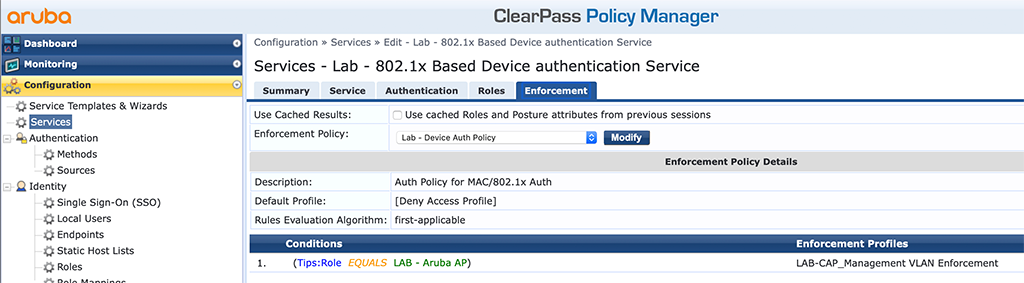
On the “Enforcement” tab select the created “Enforcement Policy”:
Save the service and test with a CAP. From the switch I can see, that it has worked:
LAB-Switch(config)# show port-access clients

 Port Access Client Status

  Port  Client Name   MAC Address   IP Address      User Role         Type  VLAN
  ----- ------------- ------------- --------------- ----------------- ----- -------------------------------------------------------
  5     b0b867ca8364  b0b867-ca8364 n/a                               MAC   202
EAP-PEAP Based CAP Authentication
Let’s go to the more secure authentication methods. The AP’s also support 802.1x based authentication with EAP methods. First, we look at PEAP and afterward also EAP-TLS.
To configure the AP to use EAP-PEAP, the AP needs to be connected to the controller and provisioned to use EAP-PEAP. To provision a CAP login to the Controller or Mobility Master and go to “Configuration–>Access Points–>Campus APs” and select the desired AP:
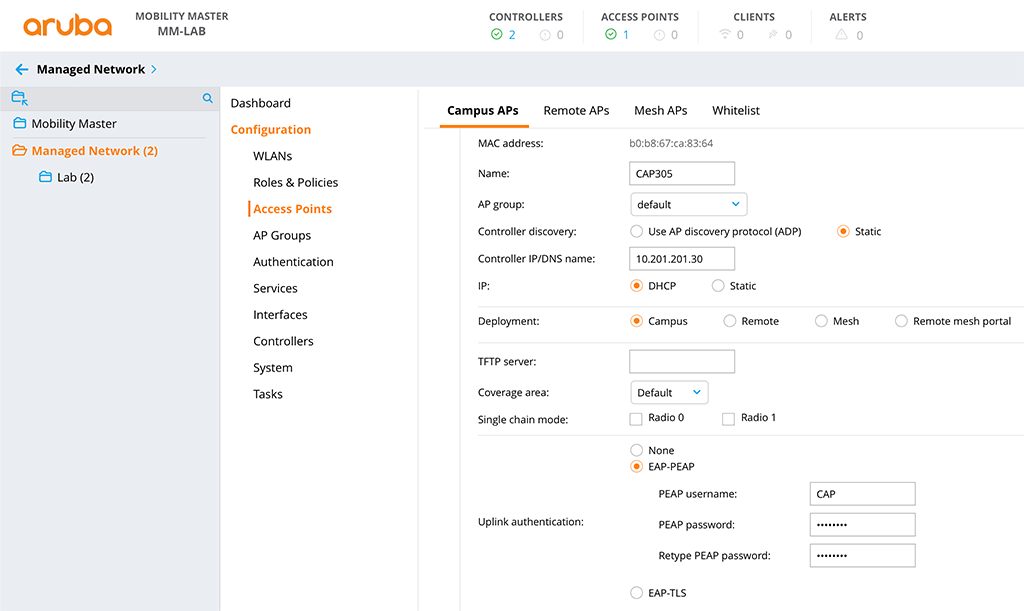
On the bottom of the page, there is a “Show advanced options” link. Click this one to get the options for “Uplink authentication”. Here you simply select “EAP-PEAP” and enter the “PEAP username” and “PEAP password”. After clicking the “Submit” button, the AP will reboot and try to connect with the configured settings to the switch.
On the switch, I use the following settings, in addition to the one from above. First, tell the switch to use the server group for EAP authentication:
aaa authentication port-access eap-radius server-group "CPPM"Then, enable EAP on the switch:
aaa port-access authenticator activeFinally, enable EAP on the port. For EAP authentication I will use port 7:
aaa port-access authenticator 7Now all EAP requests on the switch are processed and send to the radius server.
On ClearPass we need to define a new service that should handle the new requests. Simply go to “Configuration–>Services” and add a new service:
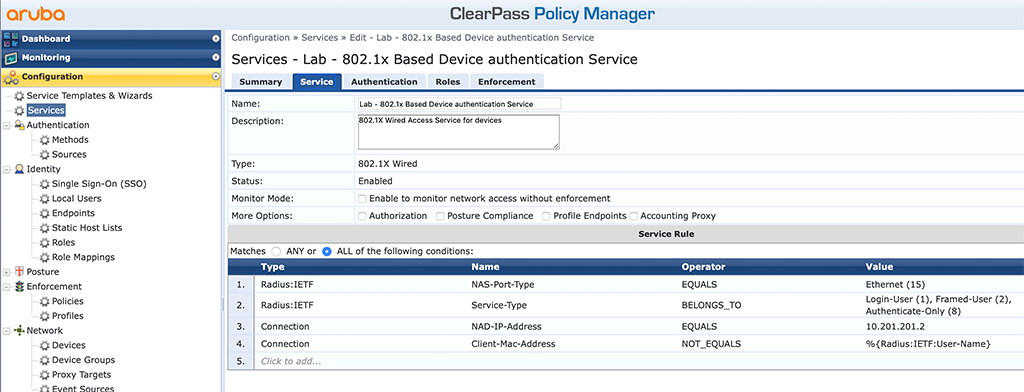
Select “802.1X WIRED” for “Type” and use the “Service Rules” from above. You can skip rule number 3. This is just for my lab to work correctly.
On the “Authentication” tab select just “[EAP PEAP]” for the “Authentication Methods” and add your “Authentication Sources”.
If you do role mappings, select your “Role Mappings” on the “Roles” tab.
Finally, I use the “Enforcement Policy” from above for the “Enforcement” I just renamed the enforcement policy to reflect the fact, that is is used for the MAC authentication and DOT1x authentication service:
Again, a very simple policy. You can make more complex if you like. Save the created service and start testing.
If all works fine the switch should show something like this:
LAB-Switch(config)# show port-access clients

 Port Access Client Status

  Port  Client Name   MAC Address   IP Address      User Role         Type  VLAN
  ----- ------------- ------------- --------------- ----------------- ----- -------------------------------------------------------
  7     CAP           b0b867-ca8364 n/a                               8021X 202
EAP-TLS Based CAP Authentication
Now we are getting to nerdy stuff. EAP-TLS would be the best implementation from a security point of view. To use this kind of security just go back to the Controller or Mobility Master and provision an AP to use EAP-TLS. Go to “Configuration–>Access Points–>Campus AP’s” and select the desired AP:
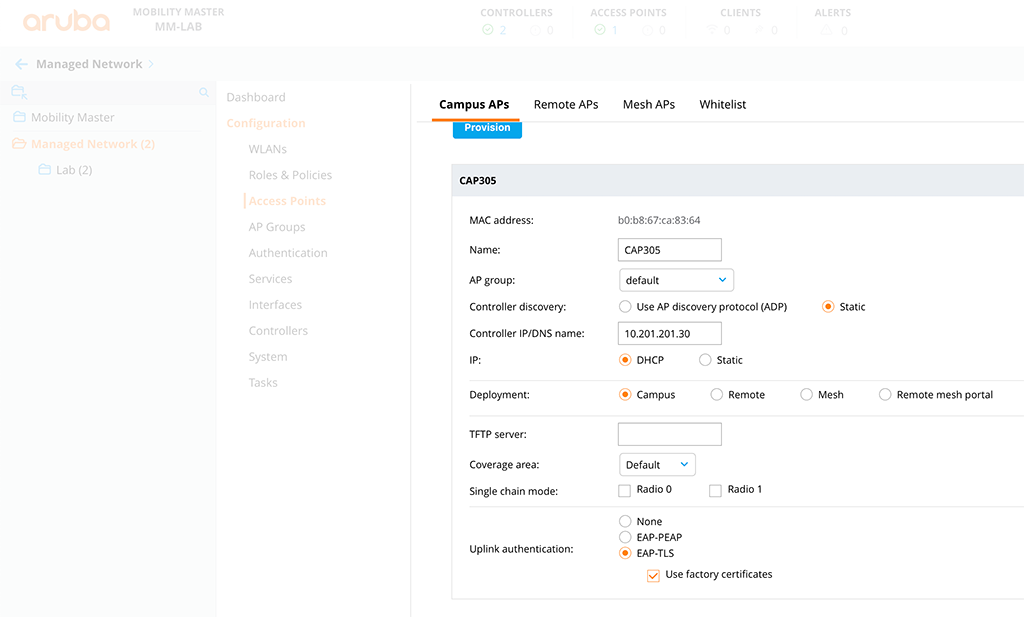
Look for the “Show advanced options” link in the “Uplink authentication” section and select “EAP-TLS”. I would also recommend using the build-in certificates of each AP. They are stored within a TPM. To do so, check the “Use factory certificates” checkbox. Submit the changes and the AP will reboot.
The good news, If you followed the part above (EAP-PEAP) you do not need to make any changes on the Switch part. So we can directly head over to ClearPass.
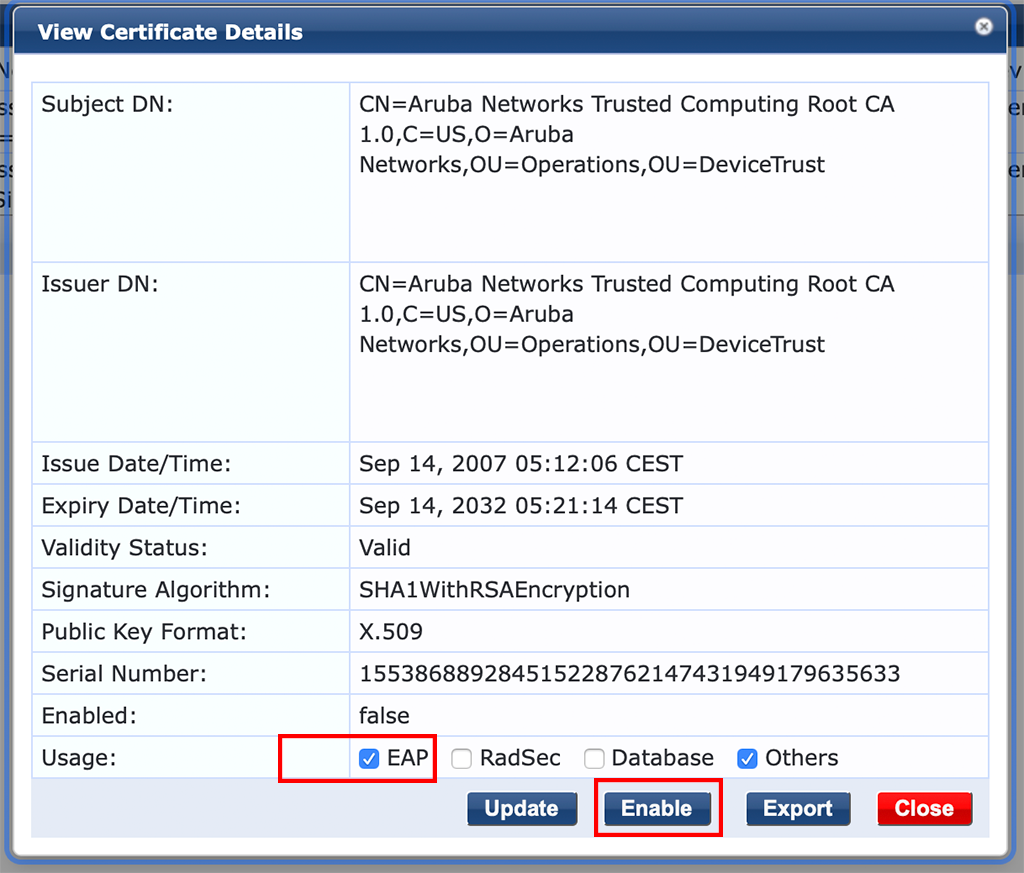
Only some simple additions in ClearPass are needed. First, we need to enable the usage of the Aruba Root Certificate within ClearPass. This is the root CA for the certificates within the TPM chip. To enable this certificate go to “Administration–>Certificates–>Trust List” and search for “Aruba”. This should give you a list of certificates including this one:
CN=Aruba Networks Trusted Computing Root CA 1.0,C=US,O=Aruba Networks,OU=Operations,OU=DeviceTrustSelect this one and enable EAP and the certificate itself:
The next step is to create a new TLS authentication method in ClearPass which is not using authorization. Go to “Configuration–>Authentication–>Methods” and select the predefined “[EAP TLS]” method and do a copy of this one. Now select the copy and modify it like this:
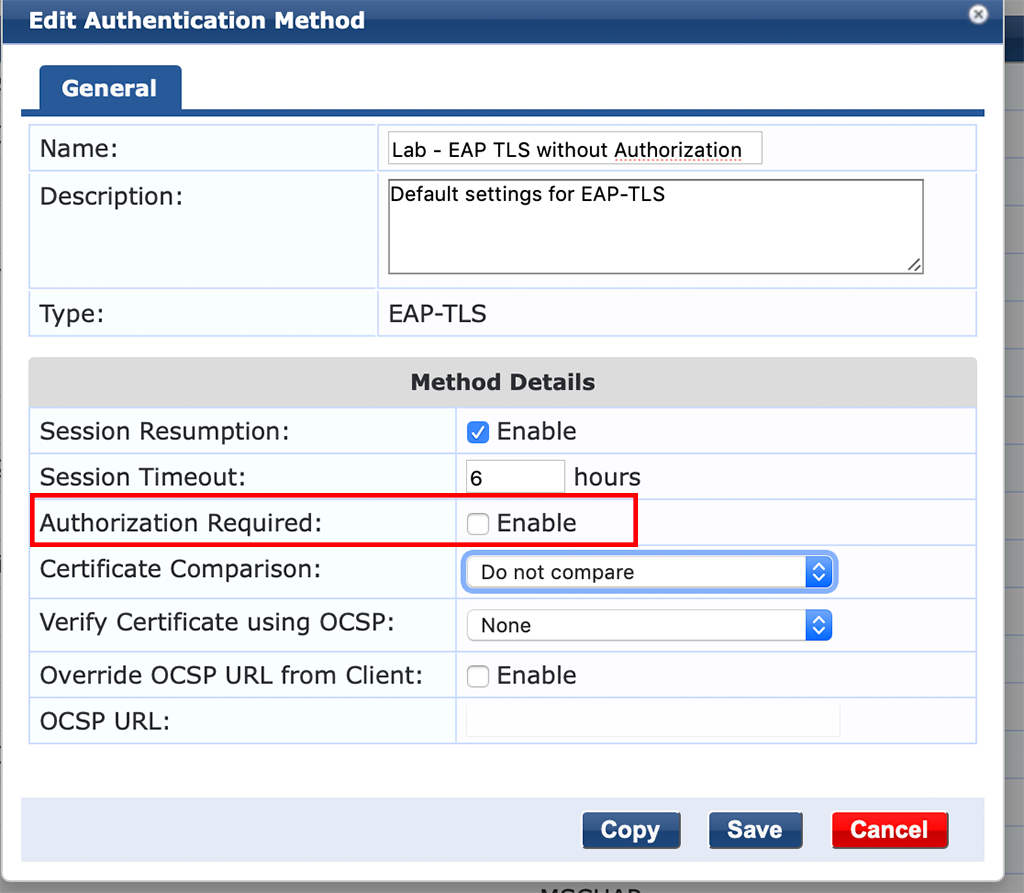
It would be a great idea to change the “Name” and you need to remove the checkmark for “Authorization Required”.
The last step is to modify the already created 802.1x service to work with the new authentication method. Go to “Configuration–>Services” and select the services created above in the EAP-PEAP section:

I change only some parts in the “Authentication” tab. I replaced the “Authentication Methods” with the TLS method created above and I use the “Endpoints Repository” for the “Authentication Sources”. Afterward, the AP can authenticate using EAP-TLS against the radius server:
LAB-Switch(config)# show port-access clients

 Port Access Client Status

  Port  Client Name   MAC Address   IP Address      User Role         Type  VLAN
  ----- ------------- ------------- --------------- ----------------- ----- -------------------------------------------------------
  7     CAP305        b0b867-ca8364 n/a                               8021X 202
Role-Based CAP Authentication
Let’s go even further. Instead of just us normal 802.1x, we can also use roles for authentication. One thing to note here, roles and normal 802.1x are mutually exclusive.
I will show the role-based access for the CAP with the EAP-TLS authentication. But it will work with all the above-mentioned scenarios.
First we need to enable role-based authentication on the switch:
aaa authorization user-role enableAnd we also need to create a simple role:
aaa authorization user-role name "CAP"
   vlan-name "LAB_CAP_Management"
   exit
This one will only set the VLAN. But you can also include much more stuff like ACL’s for example.
Now we also need to change something within ClearPass. Instead of returning the VLAN as before, we need to return the role.
Go to “Configuration–>Enforcement–>Profiles” and create a new one:
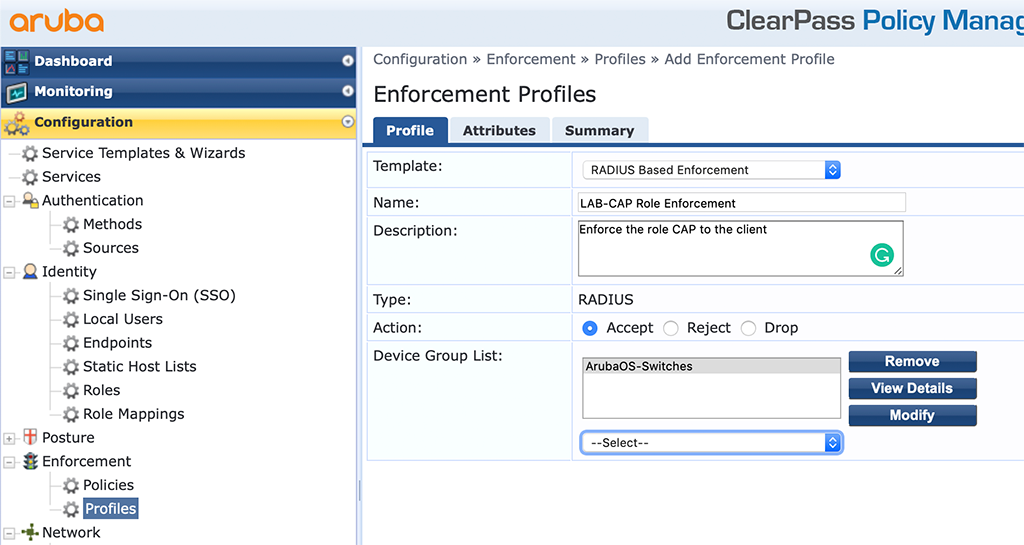
Enter a “Name” and select the “Radius Based Enforcement” as the “Template”. Click “Next” to get to the “Attributes” screen:
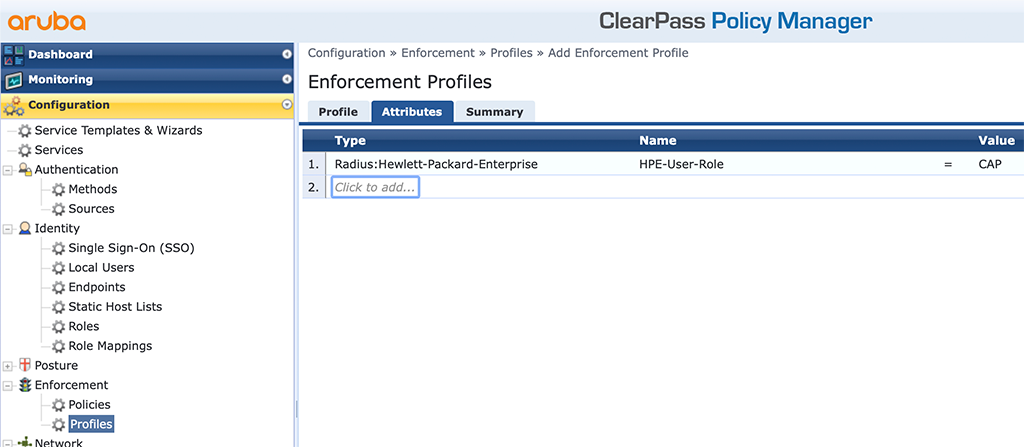
Just return the attribute above to the switch. The value should be the name of the role, configured on the switch.
The last step is to replace the VLAN enforcement profile with the role enforcement profile in the policy. Go to “Configuration–>Enforcement–>Policies” and select the policy we create initially with the MAC authentication:
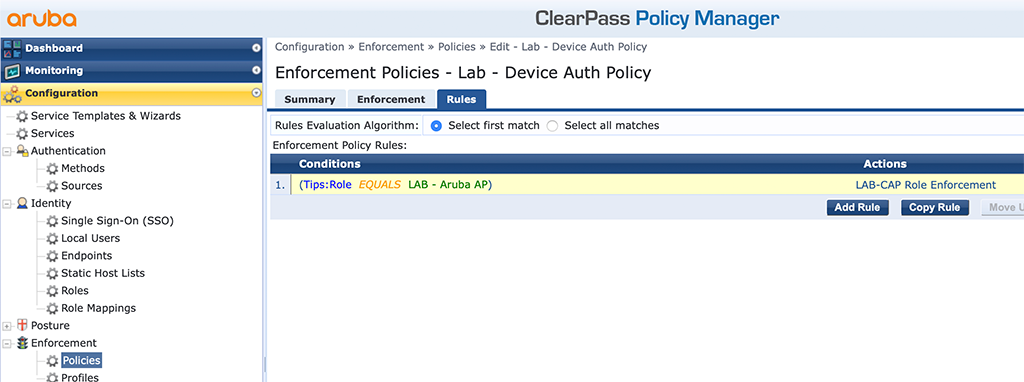
Just replace the enforcement profile creates initially with the one above. Now, the switch should get the role info and should place the AP into the correct role:
LAB-Switch(user-role)# show port-access clients

 Port Access Client Status

  Port  Client Name   MAC Address   IP Address      User Role         Type  VLAN
  ----- ------------- ------------- --------------- ----------------- ----- -------------------------------------------------------
  7     CAP305        b0b867-ca8364 n/a             CAP               8021X 202
Instant AP Authentication
With Instant AP (IAP) it gets a little bit more complicated. The main reason is not the config itself but the situation, that the switch will not just see the IAP on the port but also all clients connected to that IAP. Therefore we need to send an additional radius attributed with the authentication in order to open the port for the IAP and all other clients on the IAP without reauthenticate the clients. But we will see during the next paragraphs.
MAC-Based IAP Authentication
We will start with the MAC-based authentication as well. Here, we do not need to change anything on the IAP itself. The Switch config is the same, as for the CAP:
radius-server host 10.104.104.41 key "aruba123"
radius-server host 10.104.104.41 dyn-authorization
radius-server host 10.104.104.42 key "aruba123"
radius-server host 10.104.104.42 dyn-authorization

aaa server-group radius "CPPM" host 10.104.104.41
aaa server-group radius "CPPM" host 10.104.104.42

aaa port-access mac-based 5
aaa port-access mac-based 5 server-group "CPPM"
If you followed the part about the campus AP, I have removed the roles based authentication from the switch:
no aaa authorization user-role enableWe will enable this feature again at the end of this part.
Now we will head over to ClearPass.
First I will create new enforcement profiles for the IAP. Go to “Configuration–>Enforcement–>Profiles”. First the one for the IAP management VLAN, the one which will be untagged on the port:
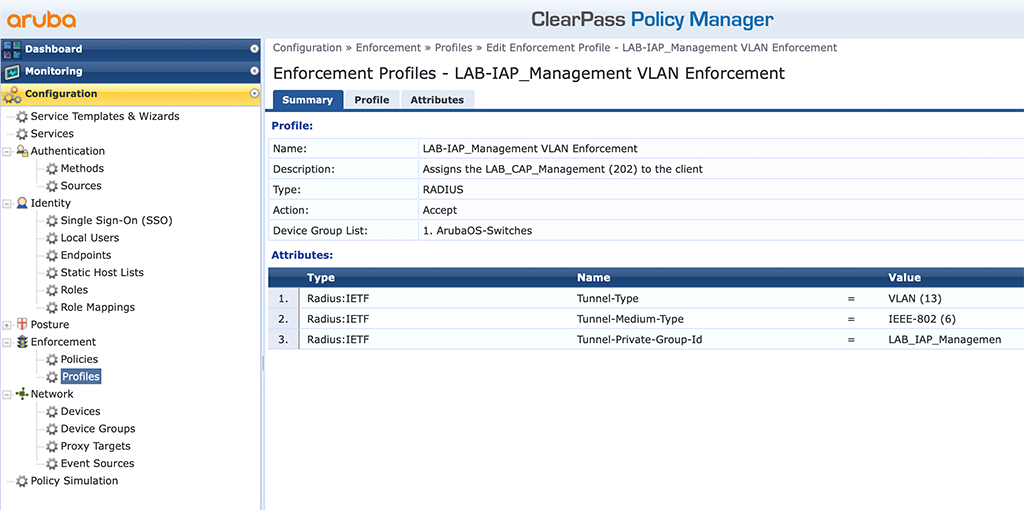
This one is easy, as it is the same as with the CAP above. I use VLAN 203 (LAB_IAP_Management”. Now we get to the tagged VLAN’s for the Clients, connected to the IAP:
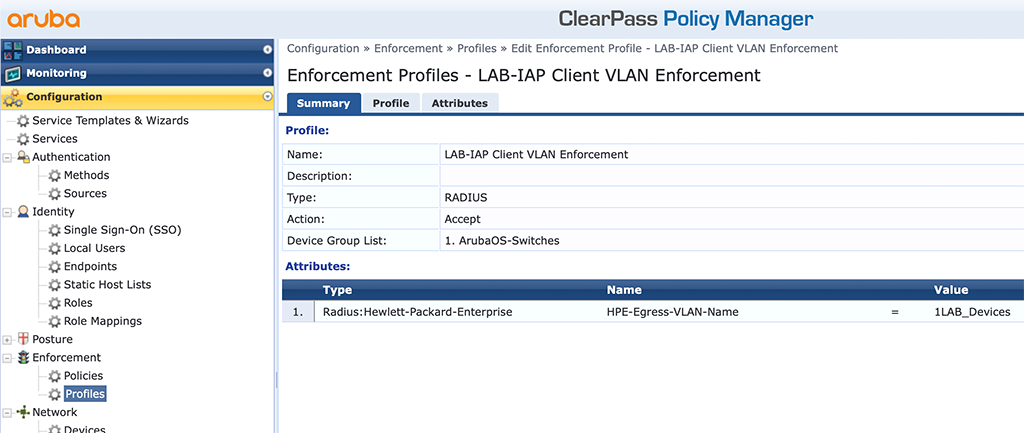
You need to use the “HPE-Egress-VLAN-Name” attribute to pass additional VLANs to the switch. There is one thing to know, using this kind of method. With this attribute, you can send tagged and untagged VLANs to the switch. If you like to have them tagged, you need to write a “1” in front of the VLAN name, as in the picture above. If you like to have them untagged use a “2”. If you like to have multiple VLANs, just use this attribute multiple times.
We also need to change the port mode from user-based to port-based. This will authenticate the IAP and will allow all other clients on the port without any further authentication. Just create another profile like this:
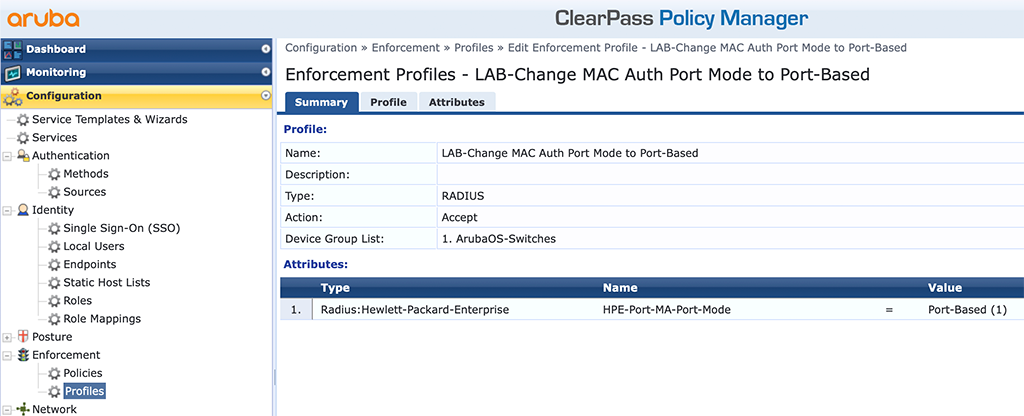
To change the port mode during MAC authentication just use the “HPE-Port-MA-Port-Mode” attribute. This is a custom radius attribute as well and will change the port mode from user-based to port-based.
This was the hard work. Now, we need to put everything together in an enforcement policy. I just reuse the one from above (for CAP authentication) and added a new “Condition”:
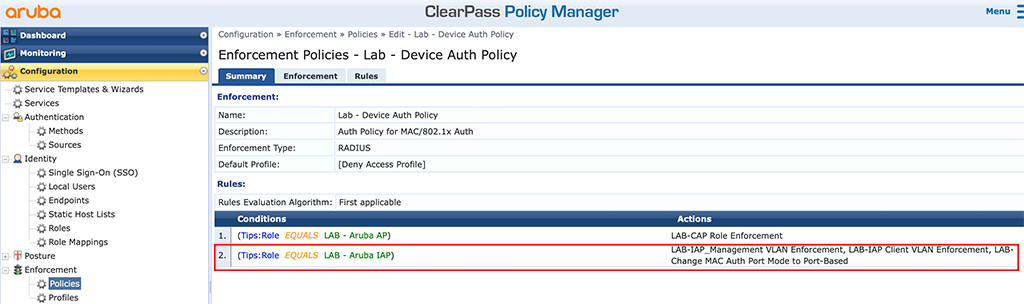
The above enforcement policy sends the created profiles to every device which get’s the role “Aruba IAP”. So very simple, as in the CAP example above. The role is derived again from the endpoint database.
As you read carefully, I also used the same policy as with the CAP above, so actually, I’m done at the moment. Below is the mac authentication service from above (the example with the CAP), now with the updated enforcement policy:
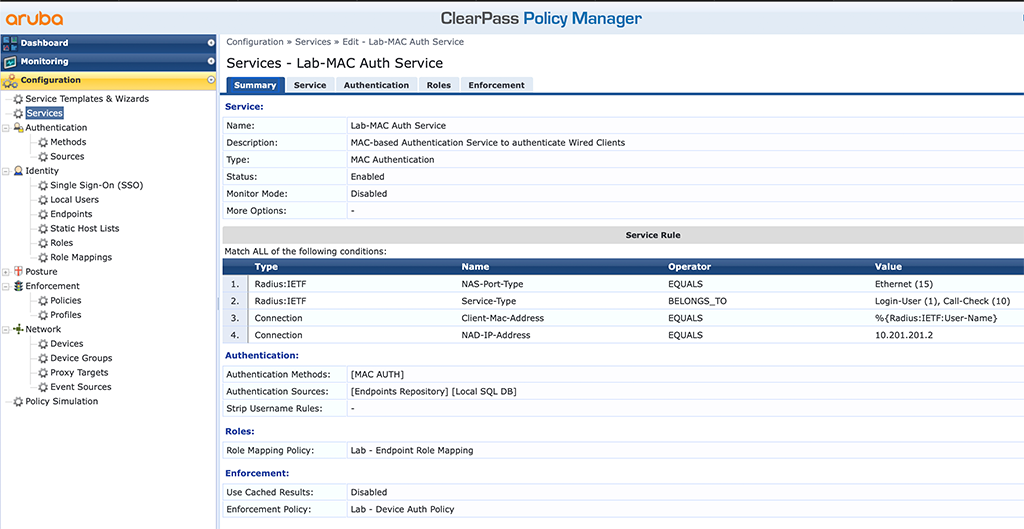
After connecting the IAP you should see a successful authentication in the access tracker and multiple VLANs on the switch, for the port with the IAP:
LAB-Switch(config)# show port-access clients

 Port Access Client Status

  Port  Client Name   MAC Address   IP Address      User Role         Type  VLAN
  ----- ------------- ------------- --------------- ----------------- ----- -------------------------------------------------------
  5     b0b867ca8364  b0b867-ca8364 n/a                               MAC   204, 203

LAB-Switch(config)# show vlan 203

 Status and Counters - VLAN Information - VLAN 203

  VLAN ID : 203
  Name : LAB_IAP_Management
  Status : Port-based
  Voice : No
  Jumbo : No

  Port Information Mode     Unknown VLAN Status
  ---------------- -------- ------------ ----------
  1                Tagged   Learn        Up
  3                Untagged Learn        Down
  5                MACAUTH  Learn        Up

  Overridden Port VLAN configuration

  Port  Mode
  ----- ------------
  5     No


LAB-Switch(config)# show vlan 204

 Status and Counters - VLAN Information - VLAN 204

  VLAN ID : 204
  Name : LAB_Devices
  Status : Port-based
  Voice : No
  Jumbo : No

  Port Information Mode     Unknown VLAN Status
  ---------------- -------- ------------ ----------
  1                Tagged   Learn        Up
  5                MACAUTH  Learn        Up

  Overridden Port VLAN configuration

  Port  Mode
  ----- ------------
  5     MACAUTH
For port 5, both VLANs are learned via “MACAUTH”.
You can also see, that the port is now in port-based mode:
LAB-Switch(config)# show port-access summary

 Port Access Status Summary

  Port-access authenticator activated [No] : Yes
  Allow RADIUS-assigned dynamic (GVRP) VLANs [No] : No
  Use LLDP data to authenticate [No] : No
  Dot1X EAP Identifier Compliance [Disabled] : Disabled
  Allow incremental EAP identifier only [Disabled] : Disabled

  Note: * indicates values dynamically overridden by RADIUS.

       |   Authenticator    |   Web Auth   |      MAC Auth      |  Local MAC
  Port  | Enable Mode  Limit | Enable Limit | Enable Mode  Limit | Enable Limit
  ----- - ------ ----- ----- - ------ ----- - ------ ----- ----- - ------ -----
  1     | No     Port  0     | No     1     | No     User  1     | No     1
  2     | No     Port  0     | No     1     | No     User  1     | No     1
  3     | No     Port  0     | No     1     | No     User  1     | No     1
  4     | No     Port  0     | No     1     | No     User  1     | No     1
  5     | No     Port  0     | No     1     | Yes    Port* 1     | No     1
This means, that clients on the port will not need to authenticate.
EAP-PEAP Based Instant AP Authentication
Now let’s go to PEAP based authentication. This is possible with Instant as well. The switch is still configured for dot1x as before and I use port 7 for this example:
radius-server host 10.104.104.41 key "aruba123"
radius-server host 10.104.104.41 dyn-authorization
radius-server host 10.104.104.42 key "aruba123"
radius-server host 10.104.104.42 dyn-authorization
aaa server-group radius "CPPM" host 10.104.104.41
aaa server-group radius "CPPM" host 10.104.104.42
aaa authentication port-access eap-radius server-group "CPPM"
aaa port-access authenticator 7
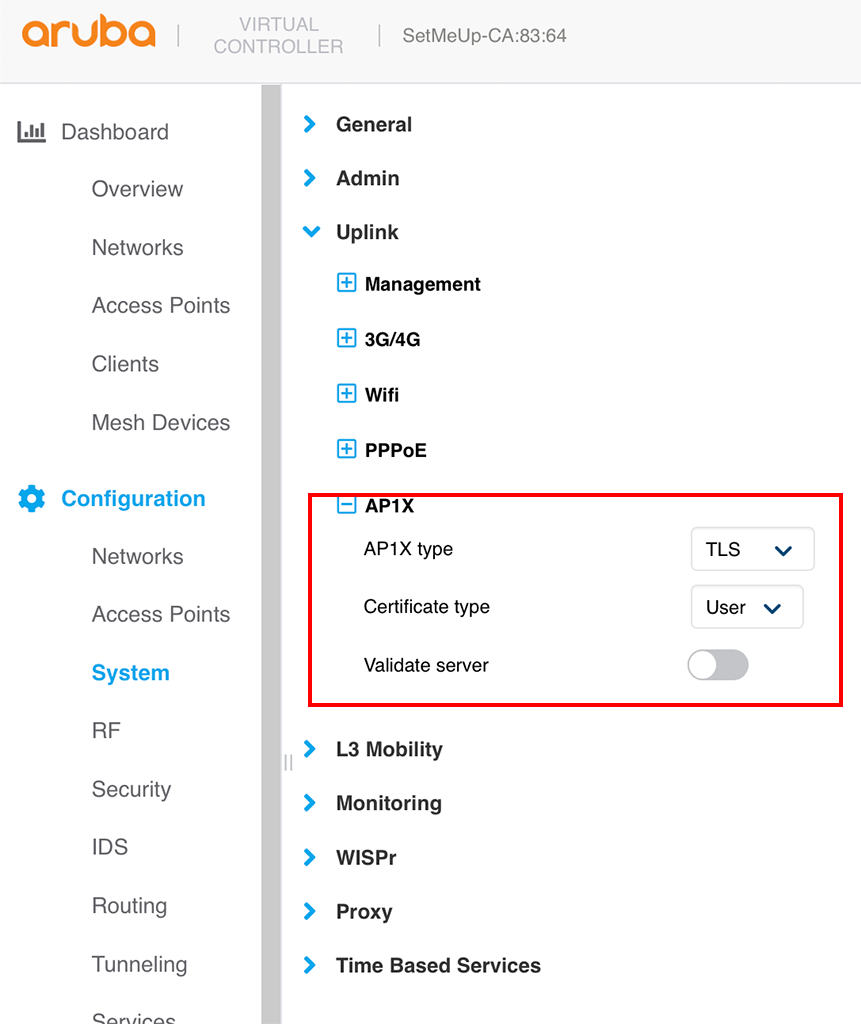
aaa port-access authenticator activeNext, we need to configure the IAP to use dot1x with EAP-PEAP. Just log in to the IAP and go to “Configuration–>System” and look for “Show advanced options”. Afterward, open the “Uplink” section:
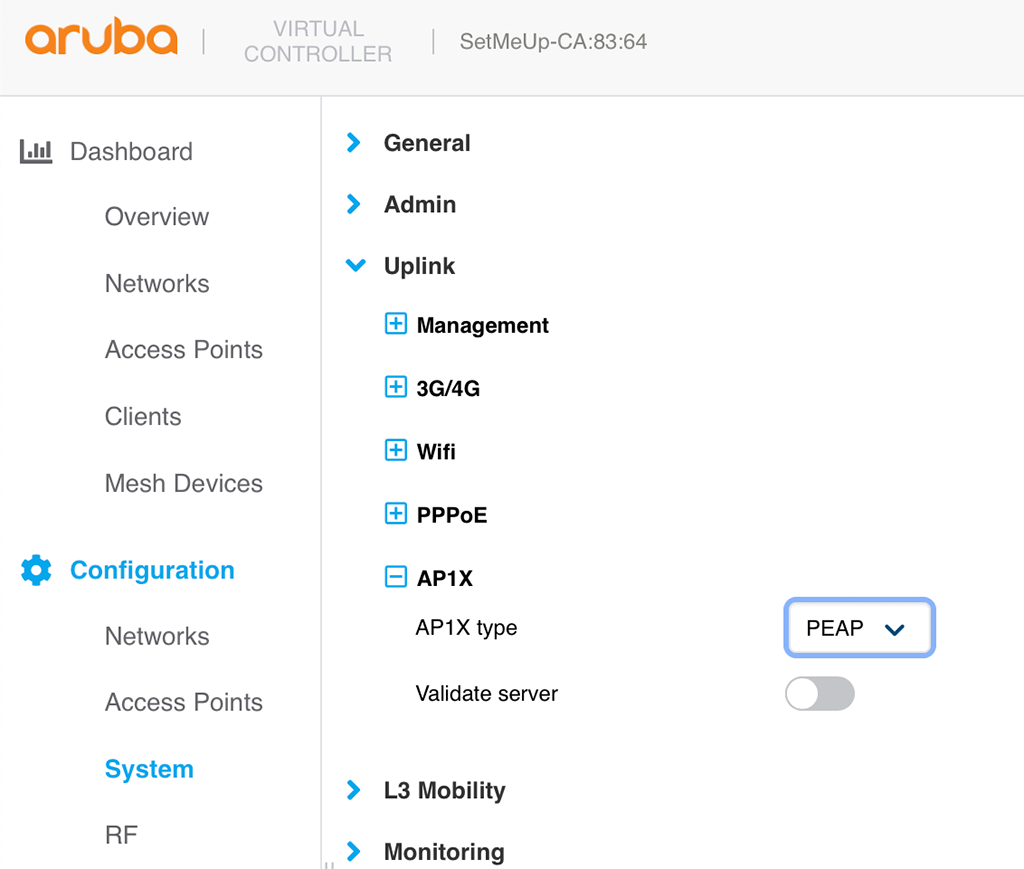
In the “AP1X type” field select “PEAP”. This will configure PEAP for all IAP’s on the uplink. In the CLI it looks like this:
ap1x peapThe credentials are configured for each IAP individually. Go to “Configuration–>Access Points” and select one IAP. Modify this IAP and go to the “Uplink” section:
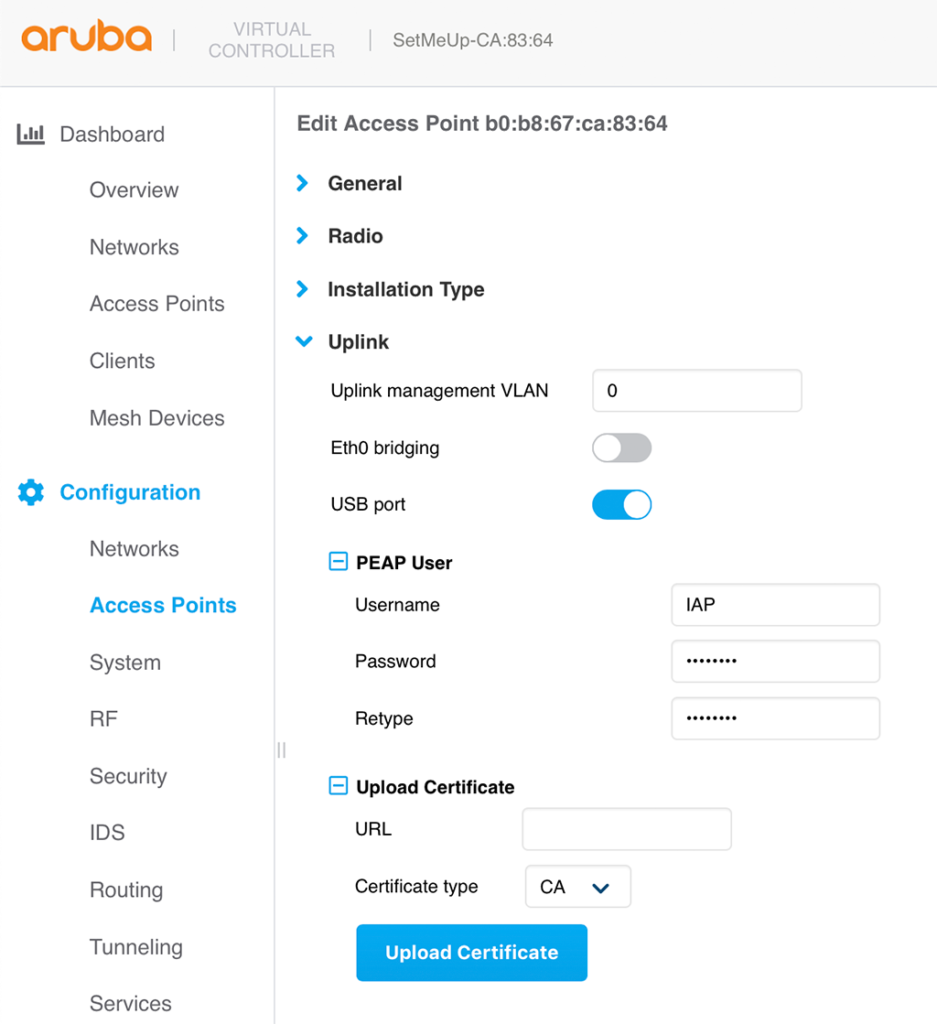
In the “PEAP User” section enter the “Username” and “Password”. These are the PEAP credentials, used during authentication. Afterward, reboot the IAP. This needs to be done for all IAP’s in the cluster individually. But this also allows for individual PEAP credentials for each IAP. If you cannot use the GUI, you can also use the CLI like this:
ap1x-peap-user IAP aruba123After reboot, the IAP will use the PEAP credentials to authenticate against the switch. Now let’s go to ClearPass and create (alter) the service.
First, we create a new enforcement profile. Go to “Configuration–>Enforcement–>Profiles” and create a new one like this:
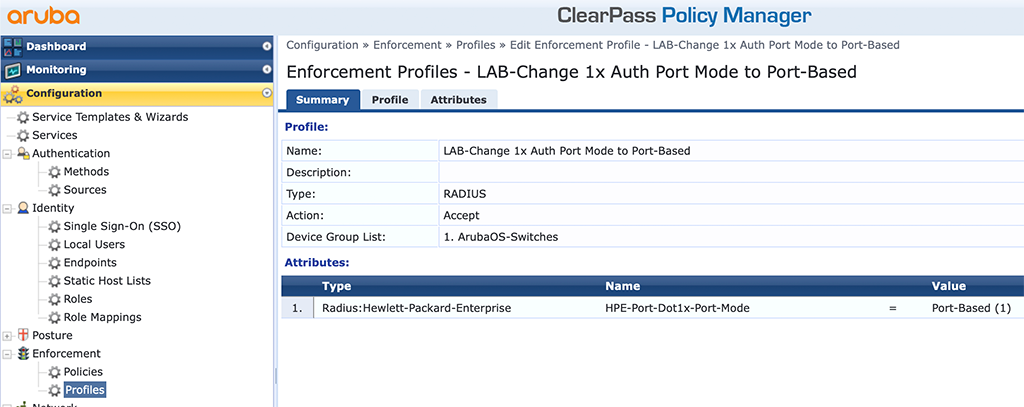
This is another HPE attribute (VSA), but this time, it changes the port mode for DOT1x authentication. But it works the same as the VSA we used during MAC authentication to change the port mode.
We also need to alter the policy to use this VSA. Therefor go to “Configuration–>Enforcement–>Policies” and create a new one or alter the one from above like this:
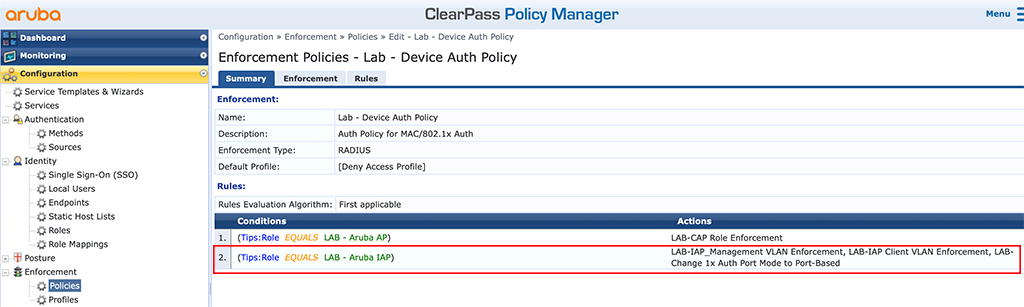
I just replaced the port mode enforcement with the one created above for MAC authentication.
The service, created during the CAP authentication for EAP-PEAP should do the job. Just to check, here is the service:

After you connect the IAP to the switch port you should see a successful authentication. The switch should show this:
LAB-Switch(config)# show port-access clients

 Port Access Client Status

  Port  Client Name   MAC Address   IP Address      User Role         Type  VLAN
  ----- ------------- ------------- --------------- ----------------- ----- -------------------------------------------------------
  7     IAP           b0b867-ca8364 n/a                               8021X 204, 203

LAB-Switch(config)# show port-access summary

 Port Access Status Summary

  Port-access authenticator activated [No] : Yes
  Allow RADIUS-assigned dynamic (GVRP) VLANs [No] : No
  Use LLDP data to authenticate [No] : No
  Dot1X EAP Identifier Compliance [Disabled] : Disabled
  Allow incremental EAP identifier only [Disabled] : Disabled

  Note: * indicates values dynamically overridden by RADIUS.

       |   Authenticator    |   Web Auth   |      MAC Auth      |  Local MAC
  Port  | Enable Mode  Limit | Enable Limit | Enable Mode  Limit | Enable Limit
  ----- - ------ ----- ----- - ------ ----- - ------ ----- ----- - ------ -----
  1     | No     Port  0     | No     1     | No     User  1     | No     1
  2     | No     Port  0     | No     1     | No     User  1     | No     1
  3     | No     Port  0     | No     1     | No     User  1     | No     1
  4     | No     Port  0     | No     1     | No     User  1     | No     1
  5     | No     Port  0     | No     1     | Yes    User  1     | No     1
  6     | No     Port  0     | No     1     | No     User  1     | No     1
  7     | Yes    Port* 0     | No     1     | No     User  1     | No     1
EAP-TLS Based Instant AP Authentication
Now, let’s move to EAP-TLS. We do not need to change anything on the switch. But for the IAP we need to create a client certificate. I will not show how to do this. So I assume you have a valid client certificate for your IAP’s. You need the private key and public key in different files.
Go to the IAP and go to “Configuration–>Access Points” and select the access point you need. Go to the “Uplink” section to upload the certificate:
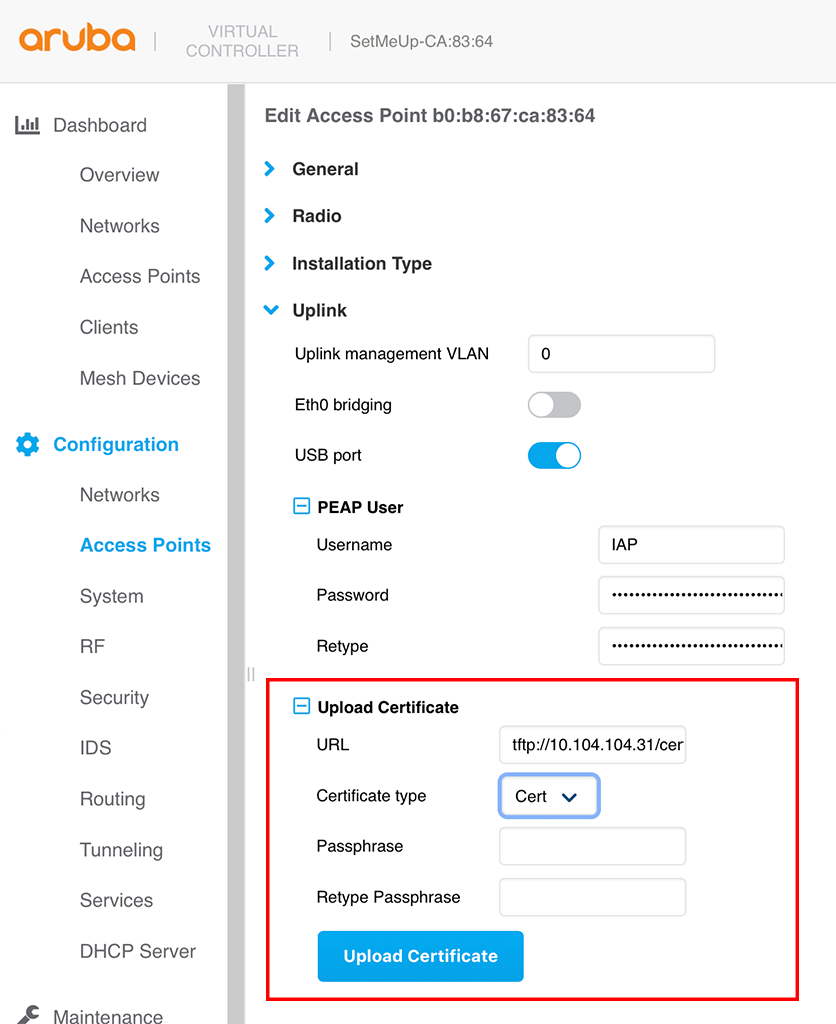
The certificate needs to be in the pem format and can be stored on tftp,http or ftp server. You need to upload the public key and private key in different files and make the private key password protected. After you press the “Upload Certificate” button you can check the result with the following command:
b0:b8:67:ca:83:64# show ap1xcert

Current ap1x Certificate:
Version       :2
Serial Number :09
Issuer        :/C=US/ST=California/L=Sunnyvale/O=Aruba Networks/CN=ClearPass Onboard Local Certificate Authority (Signing)/[email protected]
Subject       :/C=DE/ST=NRW/L=Selm/O=Flomain/OU=IAP Access to Network/CN=IAP-305/[email protected]
Issued On     :Mar  6 11:50:13 2020 GMT
Expires On    :Mar  6 12:20:13 2021 GMT
RSA Key size  :2048 bits
Signed Using  :RSA-SHA512
Now, we just need to configure the IAP to do EAP-TLS instead of PEAP (configured just before). Go to “Configuration–>System” and look for “Show advanced options” and go to the “Uplink” section:
Afterward, you need to reboot the IAP to make the config active.
On ClearPass, you just need to change the DOT1x service (from the example above with PEAP) to include the TLS method without authorization. We created this during the configuration of the EAP-TLS based campus AP authentication:
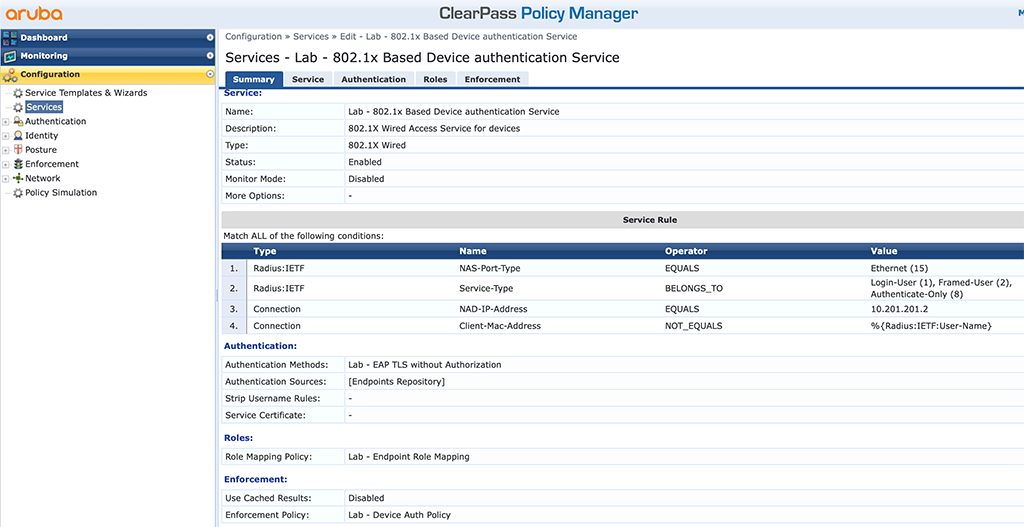
The above service worked already for EAP-PEAP and with the change from the PEAP authentication method to the “Lab – EAP TLS without Authentication” method it also works for the TLS based authentication. To verify the configuration just connect the IAP to a DOT1x enabled port and check the switch afterward:
LAB-Switch# show port-access clients

 Port Access Client Status

  Port  Client Name   MAC Address   IP Address      User Role         Type  VLAN
  ----- ------------- ------------- --------------- ----------------- ----- -------------------------------------------------------
  7     IAP           b0b867-ca8364 n/a                               8021X 204, 203

LAB-Switch# show port-access summary

 Port Access Status Summary

  Port-access authenticator activated [No] : Yes
  Allow RADIUS-assigned dynamic (GVRP) VLANs [No] : No
  Use LLDP data to authenticate [No] : No
  Dot1X EAP Identifier Compliance [Disabled] : Disabled
  Allow incremental EAP identifier only [Disabled] : Disabled

  Note: * indicates values dynamically overridden by RADIUS.

       |   Authenticator    |   Web Auth   |      MAC Auth      |  Local MAC
  Port  | Enable Mode  Limit | Enable Limit | Enable Mode  Limit | Enable Limit
  ----- - ------ ----- ----- - ------ ----- - ------ ----- ----- - ------ -----
  1     | No     Port  0     | No     1     | No     User  1     | No     1
  2     | No     Port  0     | No     1     | No     User  1     | No     1
  3     | No     Port  0     | No     1     | No     User  1     | No     1
  4     | No     Port  0     | No     1     | No     User  1     | No     1
  5     | No     Port  0     | No     1     | Yes    User  1     | No     1
  6     | No     Port  0     | No     1     | No     User  1     | No     1
  7     | Yes    Port* 0     | No     1     | No     User  1     | No     1
  8     | No     Port  0     | No     1     | No     User  1     | No     1
  9     | No     Port  0     | No     1     | No     User  1     | No     1
  10    | No     Port  0     | No     1     | No     User  1     | No     1
  11    | No     Port  0     | No     1     | No     User  1     | No     1
  12    | No     Port  0     | No     1     | No     User  1     | No     1
  13    | No     Port  0     | No     1     | No     User  1     | No     1
  14    | No     Port  0     | No     1     | No     User  1     | No     1
  15    | No     Port  0     | No     1     | No     User  1     | No     1
  16    | No     Port  0     | No     1     | No     User  1     | No     1
  17    | No     Port  0     | No     1     | No     User  1     | No     1
  18    | No     Port  0     | No     1     | No     User  1     | No     1
  19    | No     Port  0     | No     1     | No     User  1     | No     1
  20    | No     Port  0     | No     1     | No     User  1     | No     1
  21    | No     Port  0     | No     1     | No     User  1     | No     1
  22    | No     Port  0     | No     1     | No     User  1     | No     1
  23    | No     Port  0     | No     1     | No     User  1     | No     1
  24    | No     Port  0     | No     1     | No     User  1     | No     1
  25    | No     Port  0     | No     1     | No     User  1     | No     1
  26    | No     Port  0     | No     1     | No     User  1     | No     1
  27    | No     Port  0     | No     1     | No     User  1     | No     1
  28    | No     Port  0     | No     1     | No     User  1     | No     1
Role-Based Instant AP Authentication
We will now switch to role-based authentication. As with the CAP example above, this makes things much easier on ClearPass. First, we need to set the switch to role-based authentication:
aaa authorization user-role enableand configure the user-role:
aaa authorization user-role name "IAP"
   vlan-name "LAB_IAP_Management"
   vlan-name-tagged "LAB_Devices"
   device
      port-mode
   exit
The last two lines will set the port to port authentication and will allow all IAP connected clients to get through without authentication:
device
   port-mode
This is only available on 2930 switches and further. the 25xx switches do not support this feature. So for the 25xx switches, this method is not useable.
That’s it for the switch. Now, we need to adapt ClearPass to respond with the correct role name. First, you need to create an enforcement profile to send the role to the switch. Go to “Configuration–>Enforcement–>Profiles” and create a new profile like this:

Simply replace the “Value” with your role name on the switch. The last step is to replace all the profiles in the enforcement policy with the role enforcement profile create before. Just go to “Configuration–>Enforcement–>Policies” and search for the policy created for the DOT1x authentication:
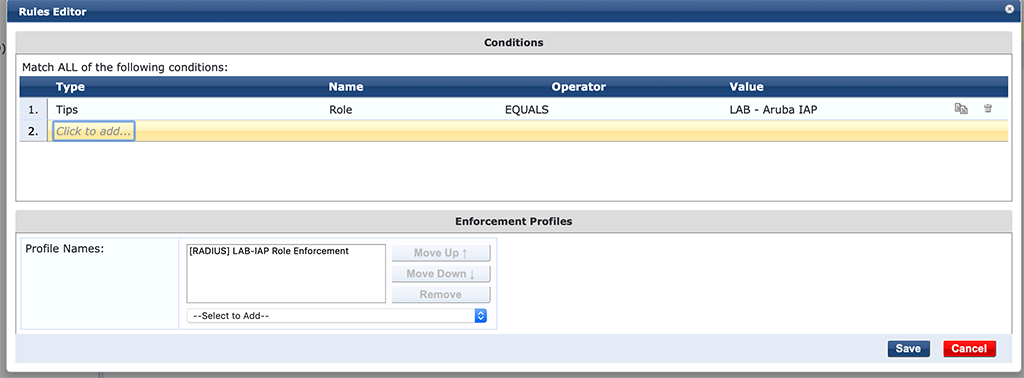
This will enforce the IAP role enforcement profile to all devices which have the IAP role on ClearPass.
After that, you can connect the IAP to the switch. And you should see the role applied to the IAP:
LAB-Switch(config)# show port-access clients

 Port Access Client Status

  Port  Client Name   MAC Address   IP Address      User Role         Type  VLAN
  ----- ------------- ------------- --------------- ----------------- ----- -------------------------------------------------------
  7     IAP           b0b867-ca8364 n/a             IAP               8021X 204, 203
Provisioning the AP’s
As you saw in the post above, the authentication of CAPs or IAPs is not that complicated. But one thing I did not mention, you need to provision the AP’s before you can use the authentication. So the CAPs need to connect to the controller to get the DOT1x config and the same applies to the IAPs, which need to connect to Central or AirWave or to get manual configured before they can use DOT1x. So you need to define a process to provision the APs. You might use a mixture of MAC authentication and DOT1x. That way the AP’s could first connect to the switch and get authenticated using MAC authentication and afterward provisioning the APs to connect using DOT1x.
If you find this post useful, leave me a comment and share your feedback with me. You can also buy me Pizza, using the “Buy me a Pizza” button on the right, to support this blog and keep the IT gremlin happy.
If you would like to do me a favor, share this post with your friends and social media contacts. This would really help to make this blog more popular and help others to find the information above more easily using search engines.
Share on:
Thank you Florian! This is extremely useful and relevant to a project I’m working on currently. I was initially going to go for MAC auth for CAPs, but your post has shown me doing EAP-TLS is very feasible indeed. Also, thanks to your article, I now know how to switch ports to per-port rather than per-user – something I’ve not seen before.
Do you know if it is possible to tell from the device authentication request whether or not it’s in CAP or IAP mode? That is what I’m going to be experimenting with next in my drive to keep simplifying and generalising my ClearPass rules.
Hi Jannie,
thanks for the feedback.
From the authentication itself, you cannot see a difference between CAP and IAP. BUT, for both devices, you need to do some kind of provisioning. For the CAP you need to do provisioning on the controller and for the IAP you need to have some config in AirWave or Central before the IAP can use TLS. For the IAP, you have to use a custom cert, TPM is currently not supported, so here you can have something within the cert, which will identify the IAP as an IAP.
The CAP’s can use the TPM cert, which will make them unique compared to the IAP.
And as I already said, you need to somehow provision the AP’s before they can use TLS. During this provisioning, ClearPass can profile the AP’s (DHCP based profiling is enough) and classify the AP as an IAP or CAP and you can then use the Endpoint Database as well to classify the AP as an IAP or CAP.
Hope this is understandable.
BR
Florian
Hey Florian,
went through this a few weeks ago, and I would have been happy if I had already known your instructions… Thanks for the again detailed and complete information!
One thing I would like to add: after provisioning the APs with EAP-TLS they didn‘t connect on switch ports without authentication activated.
Kind regards,
Uli
Hi Uli,
thanks for the feedback. Really appreciated.
Are you talking about IAP or CAP mode? Just to make sure I test with the correct mode.
BR
Florian
Sorry, I missed the C… CAPs running 8.6.0.2
Florian,
Thank you for the quality write-ups.
Why use this over having the switch do device profiling and automatically placing the AP on one or more relevant VLANs? According to what I’ve read this detection and placement happens before authentication. Or how could this fit into the initial provisioning of access points?
Hi Matt,
thanks for your comment. Really appreciated.
If you are talking about device profiles on the switches, this is true, if you just need to assign VLAN’s to the device. But if you also need security (802.1x and not MAC authentication) the switch will not get any data from the AP to profile, as the port is blocked and only a successful authentication can change this. So profiling can not happen.
Hope this answers your question.
BR
Florian
Thank you sir,
just in time for my project 🙂
EAP TLS works like a charm!
Tomas
Great post. Do you know how this authentication would change with port-channeled CAP/IAP uplink ports? I have an IAP cluster with LACP enabled and don’t believe 802.1X is possible, but maybe you have an idea?
Hi Ryan,
you are correct, with LACP enabled, 802.1x is not possible. I’m not aware of any switch who will allow 802.1x on a link aggregation. So it would not work on the AP site and not on the switch site.
what is the goal, you would like to achive? Is it security or manageability?
BR
Florian
Great article and looking forward to testing EAP-TLS with my campus APs. One question, what version of ClearPass are you using? When I got to the part about enabling the Aruba certificate I noticed that mine didn’t have an option for EAP to enable. Could this option only be available on 6.8 and above? I’m running 6.7.
Hi Jose,
Thanks for your feedback, really appreciated.
I was using the latest and greatest version, which was 6.9 at that point. I think in earlier versions, there was only an enable button. This would enable the ca for all services in ClearPass. In later versions, there is a more granular option to only enable the certificate for specific services.
BR
Florian
Dear Florian,
indeed a great article, and not only this one but all of them so far, therefore | thumbs up |.
Regarding this particular one, in order to Auth. IAP using CPPM via TLS is it mandatory that every IAP has it’s own Cert.? .
We use as Central as management platform is there a way to manage the cert. rollout centrally?
Thank you in advance for your reply.
Hi Adrian,
Thanks for the feedback. Really appreciated.
Regarding your question. It is not needed that every IAP has it’s own certificate, but by using one for all, you will not be able to separate them from an authentication point of view. If this is not a problem, you can use the same for all.
To my knowledge, it is not possible to enrol certificates from central for this use case. At least today.
BR
Florian
Great article! One question when using the same 802.1x service as the existing devices use (with EAP TLS) when adding the EAP TLS without Authorization an error is presented as it is a duplicate. How do you suggest adding that with an existing service already using EAP TLS. Would you have to build separate Services? Suggestions? I mean we can do PEAP but EAP TLS seems like a better idea. 🙂
TIA!
Hi Christopher,
Thanks for the feedback.
I would use a separate service for this and would not mix it with my client authentication.
EAP TLS is for sure the better idea.
Hope this helps.
BR
Florian
Thanks for the quick reply. How do you feel is best in the service to separate client authentication from devices when the service rules might be similar?
I feel this may also be a good way to do EAP TLS with our IP Phones as well instead of PEAP as they also have a similar certificate preinstalled.
Thanks,
Chris
Hi Christopher,
well, that could be a challenging one. You could use the “Radius:IETF:User-Name” attribute, which is for my IAP’s always “IAP” to select the correct service.
Hope this helps,
BR
Florian
Hi Christopher,
e.g. Alcatel Phones always use ALCIP as Username so you can use that as attribute in the service rule. As Florian mentioned I use a separate service for unauthorized device types.
Regards,
Uli
Hi Uli,
this is great to know. would make things easier.
BR
Florian
Hello Florian,
Thank you as always for the Great article!, question about the Aruba Controller what is the Configure for the SSID ?
and if work will the Client connect to there Department Vlan ?
Thank you
Hi Mohammad,
If you follow the article above you can configure your SSID’s as always. There is no need to do something differently.
If you are using Aruba Campus AP’s the user will be tunneled to the controller and the VLAN will be enforced there.
If you are using Aruba Instant AP’s make sure to change the port mode, as described above. And you also need to add your Department VLAN tagged to the port, where the AP is connected to. How to do this with radius, depends on the switch you are using.
I hope this helps.
BR
Florian
Hello Florian,
First I’m new to Aruba Wi-Fi controller 🙂
about the SSID you mean i can configure my SSID’s as tunnel mode ?
if all the traffic go to the controller i think will be heavy traffic because we have more than 20 Vlan for each Department
about the port in controller side is there any configure or not ?
Thank you
Hi Mohammad,
If you run an Aruba Wifi Controller you will always tunnel the traffic to the controller. Depending on your controller, traffic should not be an issue, even with many VLANs. If you need locally bridged SSID you should go with Aruba IAPs instead of controller-based APs. I do not know your network and the goals you like to achieve. I would recommend getting in touch with a local Aruba Partner or SE from Aruba to get those questions sorted out.
BR
Florian
Hello Florian,
I figure most the configure.
Thank you for your help
Hi Mohammad,
great to hear that you get it working.
BR
Florian
good work florian team cheers…
Hi Vilas,
thanks for the feedback 🙂
BR
Florian
Hi Florian, thank you for this very comprehensive article. Have you got any idea where I could obtain the “Aruba Networks Trusted Computing Root CA 1.0” public certificate? We are evaluating an open source RADIUS server and we would like to add that cert to our trusted clients root CA’s.
Hi Lieven,
I do not know any page from where you can download the CA. But if you send me a mail, I can export the cert from my ClearPass and send it to you. Or you can open a Support Case with Aruba and ask Tac to provide the cert.
BR
Florian
Thanks. I have opened a support case with our supplier for obtaining the CA certificate(s).
Hello Florian ,
Thanks for all of your effort
Can you please share a guide the correct way to create client cert on iaps
Hi Ognyan,
thanks for your comment.
What kind of guide do you think of? The certificate can be a simple certificate, which supports TLS Client Authentication. It could be the same as you use for 802.1x clients.
Many thanks,
Florian
Hi,
Thank you for this great post.
I have been trying to secure an IAP with TLS and 802.1x on the uplink for a few days.
No matter which certificate I try, it always fails because of the private key.
I have an AP505 with 8.11.1.
We have already secured some network devices (printers, phones, etc.) with 802.,1x, but the AP just doesn’t want to.
Any ideas?
Hi Patrick,
do you get any error message? What do you mean with “because of the private key”?
BR
Florian
Good Morning!
I have found the error.
The privat key must be in PKCS#8 format and all certs in one file.
Now i can upload the cert and i can see the result with “sh ap1x config”.
Regards
Patrick
Hi Patrick,
thanks for the update and thanks for sharing your solution. This will help others as well.
BR
Florian
Maybe this helps someone who is trying to get the same running for Alcatel IP Phones
ClearPass Alcatel Phones
1. Enable and assign Usage “EAP” on this two certificates
– CN=Wired Phones,OU=PKI Authority,O=Alcatel-Lucent,C=FR
– CN=Alcatel Enterprise Solutions,OU=PKI Authority,O=Alcatel,C=FR
2. Create Local User “ALCICT” in ClearPass (Default User used on Alcatel Phones with Factory Settings)
a. User: ALCICT
b. PW: password
3. You need to add “Local User Repository” in the used Service.
Hi Jannes,
thanks for sharing this. Much appreciated.
BR
Florian
Hi,
Can we use Private CA / Enterprise CA instead of factory certificates ? If possible, how can we put the certificate on the AP?
hello,
Can we use Private CA / Enterprise CA instead of factory certificates? If possible, how can we put the certificate on the AP?
hello,
Can we use Private CA / Enterprise CA instead of factory certificate? If possible, how can we put the certificate on the AP?
Hi ReFeel,
thanks for the question. Yes it is possible to have your own certificate, instead of the factory default one. On how to get the cert on the AP depends on the management system you are using. For Central, you can upload the CA and the client certificate to Central and then configure this certificate on group basis for all AP’s in this group. If you which to have a dedicated cert for each AP, you can use EST to enroll a certificate for every AP individually.
Hope this helps on highlevel answer.
BR
Florian
I saw that EST Profile can only be applied on a global level for all APs, cannot be applied for per APs or AP Groups, right?
Hi ReFeel,
The EST profile is configured on a per Group basis, or per AP basis. At least in Central.
BR
Florian
Hi Florian,
R u providing troubleshooting trainning, if so let me know I am looking for trainning for Aruba.
I Florian are u providing training for Aruba products..
Hi digevilas,
No, I do not provide training. I’m working for HPE Aruba Networking and use this blog to document stuff which I find interesting. This greatly helps myself to learn new stuff and I hope it will help other to do the same.
If you are looking for a training, write me a mail and I can check how I can help you with finding the right training for you.
BR
Florian
Hi Florian, appreciate all the work you put into posting this information – it has been extremely helpful. We are working on implementing the above but I am struggling with CAP units that have two network connections. Is the above possible with this type of setup? I have it doing the above MAC authentication using the EAP-TLS, but it is an issue with them not getting this policy, falling down to our existing wired MAC authentication, which I have set as allow for the interim and then once the port cycles based on the profiler request it looks to get picked up correctly. I feel like I am 90% there, but might be missing a few tweaks – can you shed any light on on this?
Thanks so much
Hi D.A,
Thanks for the feedback. Much appreciated. To my undertanding, authentication on link aggragations does not work. So, I do not think you will get this to work. You can only use one of the connections of the CAP. If you would like to use both, authentication will not work, or you will see weired stuff happening.
BR
Florian
Hi Florian,
we are running an issue with the EAP-TLS authentication on Clearpass.
On the AP side we are receiving :
802.1X: EAP-TLS using TPM certs authentication fail
802.1X: EAP-TLS using TPM certs authentication fail
802.1X: EAP-TLS using TPM certs authentication fail
802.1X: EAP-TLS using TPM certs authentication fail
This started after updating to 8.12.0.
How i can check the default certificate on the AP? If it’s correct or not i mean!
Hi FLorian,
After upgrading the MC to 8.12.0 the AP started throwing :
802.1X: EAP-TLS using TPM certs authentication fail
Clearpass on the other hand :
Client did not complete EAP transaction
Is there something that i could check from the AP console and identify the source of the issue?
Hi,
this kind of error normally indicates a trust issue. But normally the TPM cert should not change.
I would try to capture the radius traffic on the clearpass and check if you could see anything.
I doubt that there are any logs available which will dig deeper.
Any other change than the upgrade to 8.12?
BR
Florian
Hi FLorian,
After upgrading the MC to 8.12.0 the AP started throwing :
802.1X: EAP-TLS using TPM certs authentication fail
Clearpass on the other hand :
Client did not complete EAP transaction
Is there something that i could check from the AP console and identify the source of the issue?