After some time of absence, I’m back now, with a new lab in a new home. So I can build new cool stuff to test different and new setups. One part of the new LAB is SD-Branch and as I use my Synology Diskstation to backup this blog I need to create a rule to allow access from the internet to my disk station. So I need to set up port forwarding with the SD-Branch gateway running my internet connection at home.
Before that, I used my Comware based router for my internet connection and had all the port forwarding there. With SD-Branch this function is now in my 7005, acting as the Branch Gateway (BGW). Even if the configuration, compared to the Comware based router, is different it is easy and comprehensible.
The Default WAN Protect ACL
On each BGW there is a default ACL, protecting the WAN side of the BGW and is applied to all ports which are marked as WAN port. Below is the content of this ACL:
ip access-list session wan-uplink-protect-acl
    any any sys-svc-dhcp permit
    ipv6 any any sys-svc-v6-dhcp permit
    any any sys-svc-esp permit
    any any sys-svc-natt permit
    any any sys-svc-ike permit
    any any sys-svc-icmp permit
    ipv6 any any sys-svc-icmp6 permit
!
If you talk to security people they would make this ACL even tighter and it is absolutely up to you to change this ACL to your needs. For my needs, the default ACL is enough. At least at the moment. So, but why do I’m talking about this ACL. I will use this ACL to allow access to internal resources, like my DiskStation to allow the backup.
The ACL above is applied to every incoming packet on the WAN port, except those which already have outgoing connections. So if my webspace tries to do the backup via FTP this ACL does not allow FTP access and the packets are dropped. So first of all, make a copy of this ACL, as I will never encourage you to make changes to those default settings. We will always work with our own created stuff. So the first step would be, to create a new ACL with the same content as the one above. To create the new ACL login to Aruba Central and head over to the group or gateway you would like to configure. I create that kind of settings on the group level and if not generally valid for the whole group apply them on the device level. To create the new ACL switch from “Basic Mode” into the “Advanced Mode” and go to “Security–>Policies” and create the new ACL with a click on the plus sign:
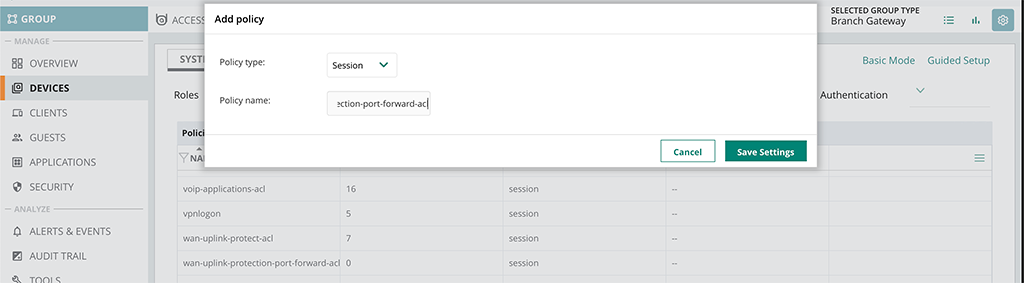
Just leave the “Policy type” with “Session” and set the “Policy Name”. Afterward, you can click the “Save Settings” button and you have created the new ACL. Now you can start creating rules for that ACL by selecting the ACL in the list. A new table will open and you can start adding rules by clicking the plus sign:
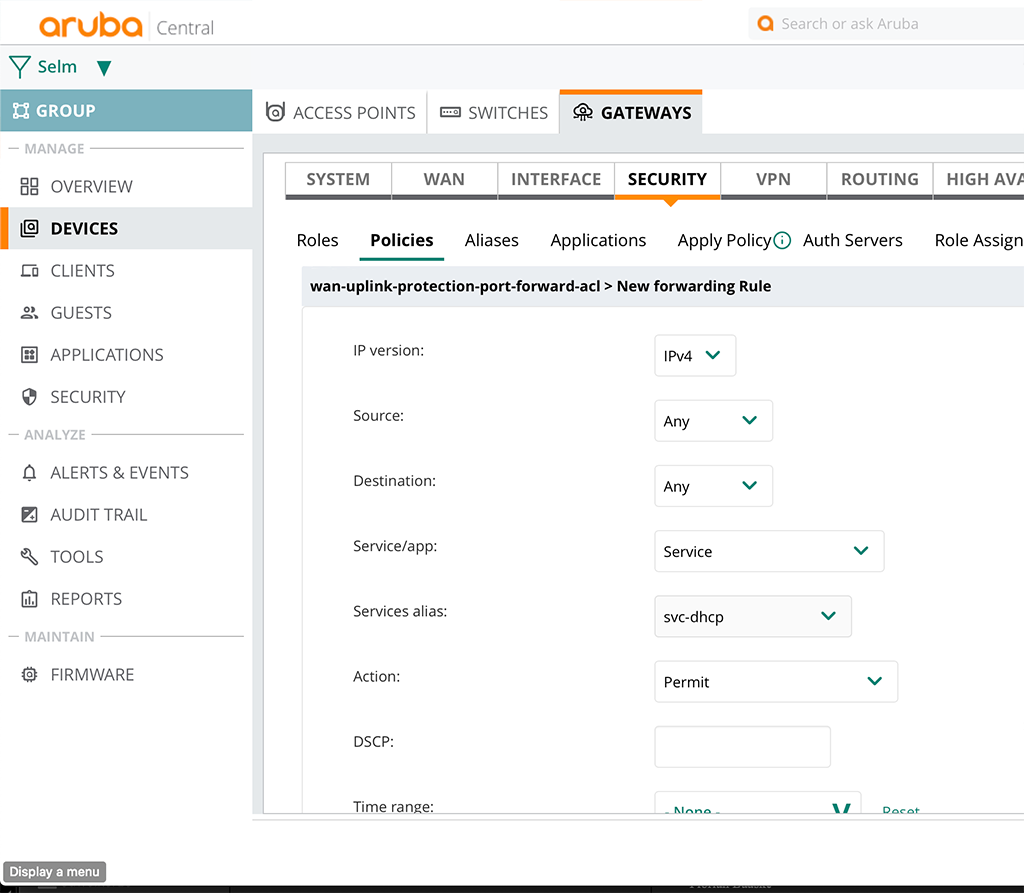
The above is an example to allow DHCPv4. At the end of the ACL there is an implicit deny all. So only allow what you are really want to have. Proceed with as many rules as you need.
The Port Forwarding Rules
After you created all the rules needed, you can start creating the port forwarding rules. Ahh, not that fast. There are some useful config items available, which will make your life easier in the future. As I will forward FTP traffic from a specific static IP I will create a “Network Aliases” for this IP. I can use this alias in the rule and I can change that alias without ever touching the ruleset again if my web host might change in the future.
To create the alias (in the controller world this is known as netdestination) go to “Security–>Aliases” and click the plus sign in the table “Network Aliases” to create a new alias:
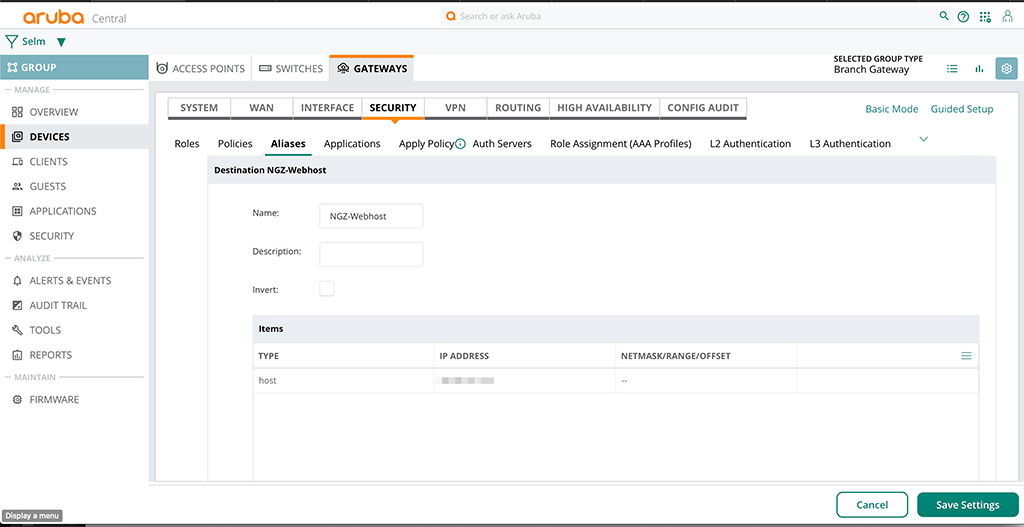
In the “Items” table just create as many items as needed and afterward click the “Save Settings” button.
You can do the same with services. If you need to forward specific ports, which normally correspond to apps or services you can define those on the same page under “Service Aliases”.
Now it is time to create the forwarding rules. Go back to the created policy and add another rule. This time we use the created aliases to create a destination nat rule like this:
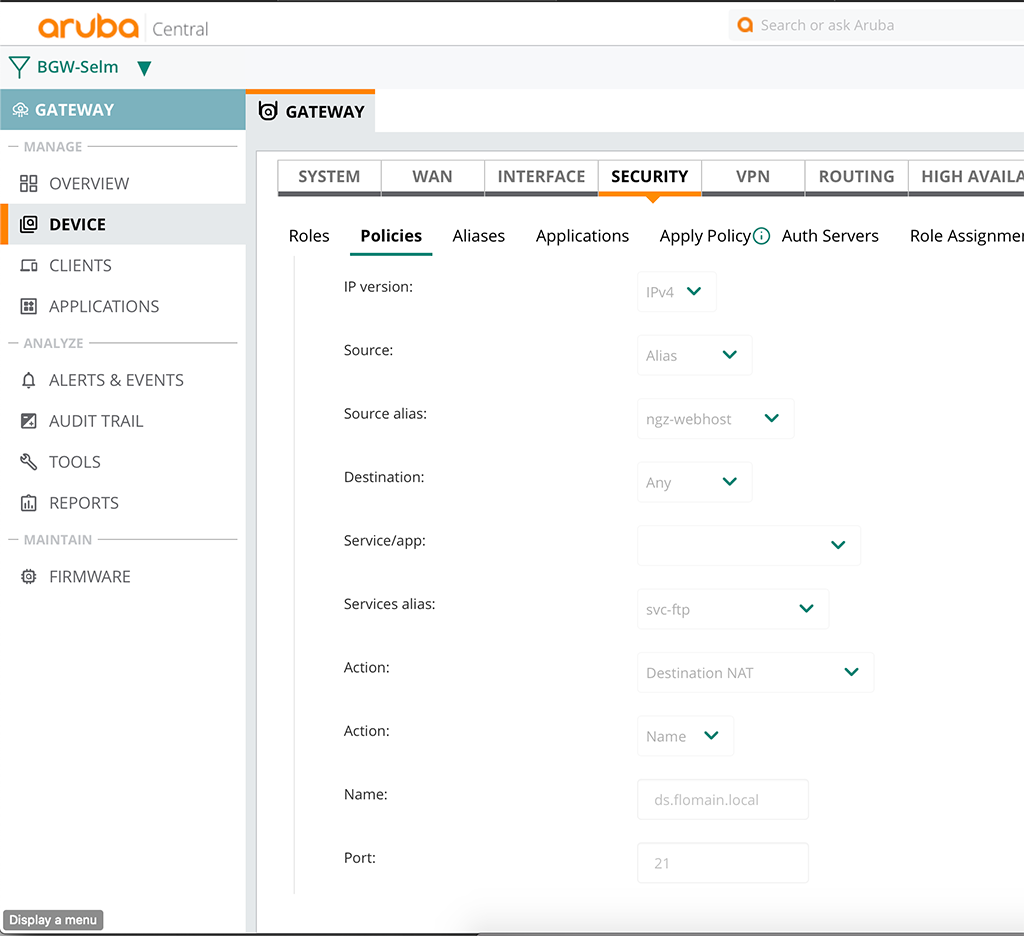
The “Source” is “Alias” and the “Source alias” is the created one, just before. For the “Service alias”, I used the predefined “svc-ftp” alias, as I do not need to create a new one.
The interesting part comes with the “Action”. Here you enter “Destination NAT”. You now select whether to use a “Name” or “IP” and enter the internal destination for the forwarding, including the port.
Afterward, simply save the policy.
Apply the Policy to the Port
The last and final step is to apply the policy as a per session ACL to the WAN port. Just go to “Interface–>Ports” and select the WAN port. The config of the port might look like this:

The important part is the “Policy” config. The rest might differ, depending on your requirements. After saving the new policy to the WAN port you might need to reset the port. At least I had to.
Additional Steps for non-default Ports
If you use non-default ports for the forwarding, something above 1024 you might also need to allow those ports to be received and processed by the controller. This is needed, as the controller itself is the destination of the packet and the controller needs to forward the packet. It sounds complicated but is very simple.
Just head over to “Security–>Advanced” and select the “Acl White List” section. This table includes all traffic types, which are allowed to be received and processed by the controller. Traffic, which is purely forwarded by the controller, like the client to client or client to server traffic is not affected by this list. Only traffic destined for the controller itself is affected.
If you use ports that are non-default and which are not in this list, the traffic for those ports will not be forwarded. So you simply need a new rule to allow those ports. As I was using FTP in the example above, I do not need to add anything to this list, as FTP traffic is already allowed by this list. But I need to forward another port, which is TCP port 5001. And this port is not allowed by the ACL Whitelist. So I need to add this port to the list.
Just hit the plus sign at the bottom of the list and enter the details like this:
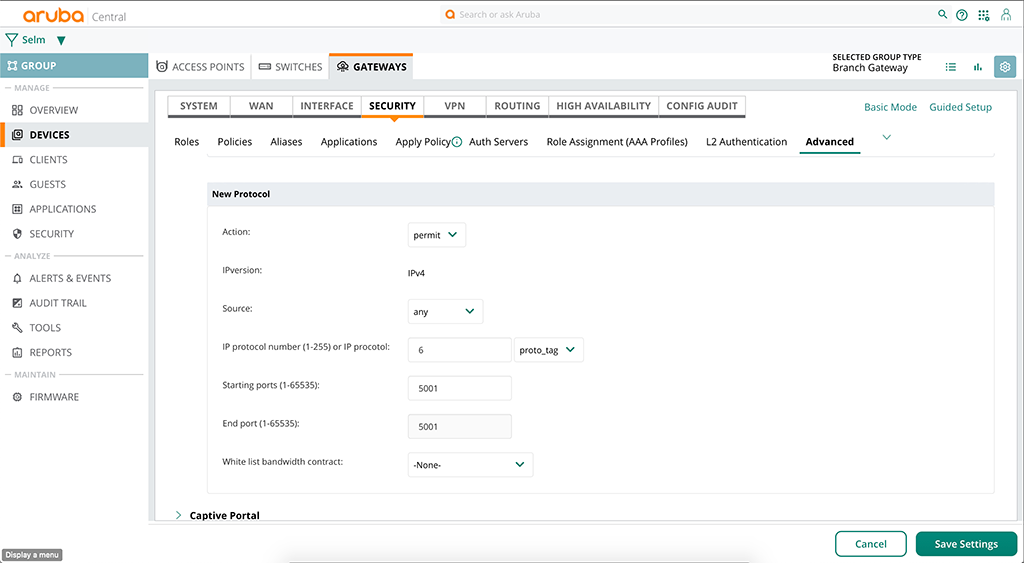
First, you select “permit” for the “Action” and “any” for the “Source”, except there is a specific source for that type of traffic. The important part is “IP protocol number”, here you have to enter 6 for TCP or 17 for UDP, just for example. Depending on your type of traffic you can enter different values, but those might be the obvious ones. Afterward, enter the port range and save the new rule.
This will allow the controller to process traffic, coming in on port 5001 in my example and if you have the destination NAT rule in place, will forward this traffic to the internal device.
If you find this post useful, leave me a comment and share your feedback with me. You can also buy me Pizza, using the “Buy me a Pizza” button on the right, to support this blog and keep the IT gremlin happy.
If you would like to do me a favor, share this post with your friends and social media contacts. This would really help to make this blog more popular and help others to find the information above more easily using search engines.
Share on:
As usual great stuff, Florian!
Hi Peter,
thanks for the feedback. Really appreciated the time you spend on my blog.
BR
Florian
Hello, I would like to allow outgoing connections coming from the LAN to the outside world on port 22 (SSH). It seems it’s blocked right now with the default config. How can I achieve that? Thank you.
Hi Claude,
If you configure the Gateway to NAT all internal networks to the internet everything should be allowed and nothing is blocked, except you block something in the user role.
Do you want to connect to a host on the internet running SSH on port 22 or will your source port 22? both should work.
BTW: If coming from the internal network, port forwarding is nothing you should look into.
BR
Florian
You mentioned you needed to reset the WAN port to get the new ACL to apply. Care to share those commands? I’ve followed all the steps and it’s not working.
Hi Alex,
I just set the port down/up, either by doing it physically or rebooting the device, or shutting the port. But with newer versions, this was not needed anymore.Not sure if this was a bug with the version I used for this test or if it was a problem with my setup.
What is the problem you see?
BR
Florian
Hi Florian,
This article and your entire blog is extraordinary. It has helped immensely as we learn our way around Aruba SD-WAN.
Have you ever been tasked with transmitting VOIP through a 9004? On our old Sonicwall we were able to do this with simple port forwarding, however when trying to implement on Aruba we are getting a one-way audio which seems to be a NAT problem.
Thank you.
Hi Anne,
Thanks for the great feedback. This is what keeps me writing 🙂
Normally, as I understand SIP, there is no need to forward something, assuming that it is the SIP client, which is behind the 9004. Normally, the SIP client should use STUN to avoid the SIP-NAT issue.
If you only have one SIP client and this one is using a pre-defined port range for the RTP stream, you might do a simple port forwarding (UDP), but I haven’t done this before as normally, you would use STUN together with SIP.
BR
Florian
Wow great article. My dnats seem to work okay except for 443. When I try to dnat 443 the branch gateway redirects it to 4343. Any known work around for this?
Hi Christopher,
I just checked with my gateways (already running AOS10, but the SD-WAN code should be the same) and I could redirect (destination nat) to an internal peer without issues. I do not see the redirect to 4343.
BTW: 4343 is the internal management port for the getaway. Are you sure, you did your redirect correctly? For me, it looks like you do the redirect to a gateway or controller and this one is doing the redirect to 4343.
Can you check your sessions on the gateway, it should have a session with the “N” flag, which is destination nat.
BR
Florian
I’m actually running into an issue that is a bit different. I will give an example:
– I have my sdwan connected to an ISP gateway on an ip range x.x.x.x/29
– the ISP gateway is x.x.x.1/29
– the sdwan is x.x.x.2/29 on vlan 4086
– i have an AOVPN server which i need to use on x.x.x.3/29 on vlan 4086, because i need to forward the same ports as the controller (e.g HTTPS, IKE, NATT )
– this sdwan is a branch and i share the connected routes to other branches through the overlay
– with IP NAT 1:1, it works, when i do DNAT, but the problem is that whenever i try to reach any other branches through the overlay, from the AOVPN, it is overwritten by the IP NAT 1:1 rule ( works as intended )
I checked and NAT outside takes precedence over NAT inside and ACL takes precedence over NAT. I’m trying to build the DNAT for the AOVPN server in the WAN ACL, but it doesn’t work, because x.x.x.3/29 on vlan 4086 no longer exists after i remove the 1:1 rule. I could not find any documentation on how to achieve this goal.
Basically i want to have my AOVPN server on x.x.x.3/29 and be able to do DNAT ( forward ports from the internet > to AOVPN x.x.x.3/29 and then the sdwan would then translate to the corresponding AOVPN private IP ). Any ideas? i’m kinda stuck
Hi Christian,
It took me a while to think about your setup. It really sounds interesting.
If you put the VPN Server into a role and if you add a route ACL to that role, which will forward all internal traffic through the WAN Overlay. and only local or internet traffic is routed normally. This should (not tested) the 1:1 nat rule.
It would take some time to create that setup and check.
If you like, send me a mail and we can have a converstion overthere.
BR
Florian
Hi Florian,
Feel free to contact me on my private email, i cannot see your email. Unfortunately, i cannot a lot of tests on our production environment, since the setup was created. It’s functional the way it is, but not optimal. That woud be the goal, to improve it.
Br
Cristian
Hi,
First, Thank you for this post.. It is great.
There is just one think that didn’t work for me. The public ip address is unreachable. Is there anything I can do ?
Hi Miotanb,
thanks for your feedback.
Why is your public IP not reachable? If you provider does not give you a real public IP, there is not that much, you can do from a GW point of view.
BR
Florian
How can i access the branch gateway using ssh from my pc ? Do i need to setup port forwarding natting concept ? If yes whats a typical sample config would be ?
Hi Adi,
Thanks for you comment.
This higly depends on the location you are coming from.
First of all, the gatewa is listen to SSH on every interface with an IP. So if you can access one of the internal interfaces (not the WAN internface) either from internally or through the SD-WAN Overlay you should be fine.
If you are coming from the internet and you can only reach the WAN internface from externally you only have to allow SSH on the wan uplink acl. Eitehr allow it from all locations, or, if possible, you can also acceot SSH only from specific IP’s to make it more secure. There is not need to do any natting, as you can connect to the WAN interface, if the ACL will allow it.
BR
Florian