I often get the question, how to connect our devices to central, as we do not allow direct access to the internet. Here is the answer, we can send the dynamic proxy settings via DHCP to our IAP’s, running at least firmware version 8.4.
DHCP Part for Dynamic Proxy Settings
First, you need to prepare your DHCP server to send the proxy information to the IAP’s. You can use option 60 to only send this information to IAP’s if you have not only IAP’s in the network.
The IAP expect two options in the DHCP ACK packet:
- Option 60
- Text field with “ArubaInstantAP”
- Option 148
- Text field with the value: “server=[proxy_ip],port=[proxy_port]”
If those two fields are present in the DHCP ACK packet, the IAP use this information to contact the proxy server.
Below is an example of the two options:
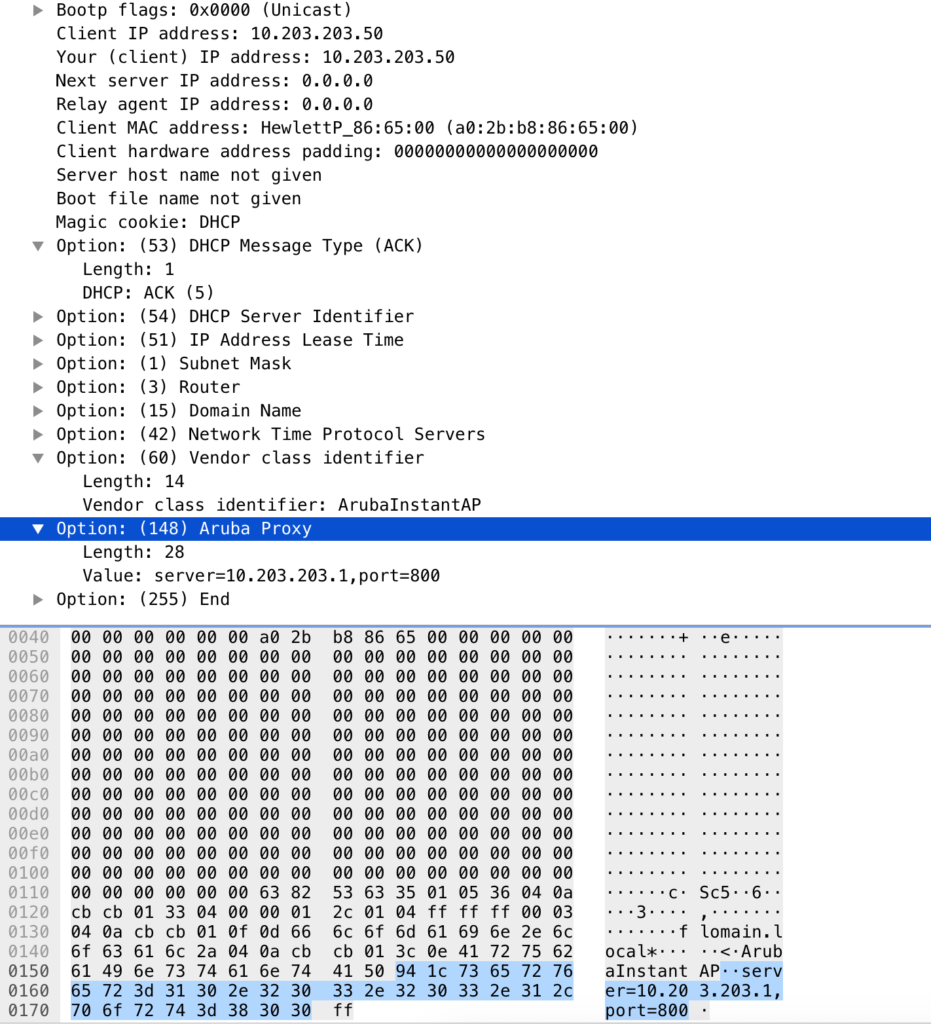
In my example, the proxy server is at 10.203.203.1 and is listening on port 800.
Dynamic Proxy Settings on the IAP
The IAP will just use the information from above to connect to the proxy. The only thing you will see is a log entry like this:
Wed Apr  3 10:30:45 2019  DHCP Option             In progress  DHCP lease of 10.203.203.50 obtained, lease time 300 seconds
Wed Apr  3 10:30:45 2019  DHCP Option             Debug        Proxy Server Option parsed, Proxy Server: 10.203.203.1, Port: 800
The IAP will now use the proxy server to connect to activate and central:

Shortly after the connection to Activate, you can check the settings here:
a0:2b:b8:86:65:00# show activate status

IAP MAC Address          :a0:2b:b8:86:65:00
IAP Serial Number        :CN44GRY02N
Cloud Activation Key     :HPH4S0UL
Activate Server          :device.arubanetworks.com
Activate Status          :fail-prov-no-rule
Provision interval       :2 minutes
The cool thing is, that the IAP not even need a DNS server, as the proxy server is doing the DNS lookup for the IAP. This makes this solution very convenient for very small sites with no onsite IT equipment.
This will also work to connect your IAP’s to an AirWave server, as the communication is using HTTPS as well.
If you find this post useful, leave me a comment and share it with your friends. If you don’t like the post, leave me a comment and tell me what you don’t like. But whatever you do, leave me a comment.
Very useful, Florian.
I have been looking for a solution like that.
Keep up the good work.
Thanks for your feedback. Really appreciated.