On a regular basis, I get the question on how to configure a wireless captive portal without the PEFNG license on the controller. This post is to address this and to show how you can use a wireless captive portal without PEFNG license. Notice, I always recommend using PEFNG license. Not to use PEFNG should only be an exception.
Captive Portal without PEFNG: What is the PEFNG License
Before we start with the technical part, some words on the PEFNG license. I always recommend getting this license as well. It includes very useful features like the following:
- Fully Stateful Layer 4-7 Firewall
- Fully user and application-aware
- Integration with external RADIUS servers
- and more…
For a full list of features visit www.arubanetworks.com and search for the PEFNG license. Or just use this link to the datasheet:
http://www.arubanetworks.com/assets/ds/DS_PEF.pdf
The main reason I recommend PEFNG is the firewall feature, together with the ability to create individual roles for the users. Without PEFNG you can only use the default roles. But roles are critical and a very important part of security.
Captive portal on ArubaOS depends on roles as well. You use a role to define the URL of the captive portal. This is the reason because a captive portal without PEFNG is tricky. Read further to get it done, even without PEFNG.
Captive Portal without PEFNG: Configuration of a new SSID
I assume you have a VMM (Virtual Mobility Master) and one or multiple MD’s (Managed Devices). I also use the internal captive portal here. But ClearPass should work as well.
To start, log in to the VMM and create a new WLAN. Select the hierarchy level and go to “Configuration–>WLAN” and click the “+” sign:
As you see, I’m in the “Managed Network” hierarchy level. All controllers get the configuration of this new WLAN, due to the hierarchy level. This is just my lab environment, so I expect your production environment to look different. You should have more hierarchy levels.
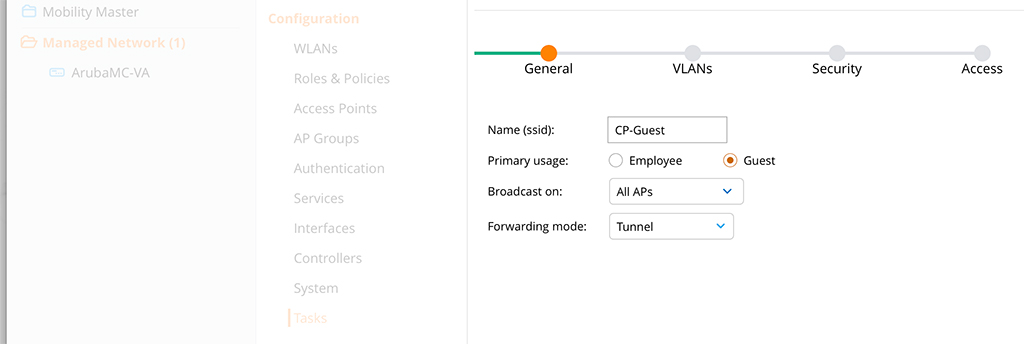
The configuration of the new WLAN is easy. On the first page of the wizard, you specify the “Name (ssid)” and the “Primary usage”. For the name, you use a meaningful name. This is the name of the SSID as well. The “Primary usage” is “Guest”. Click the “Next” button at the bottom.
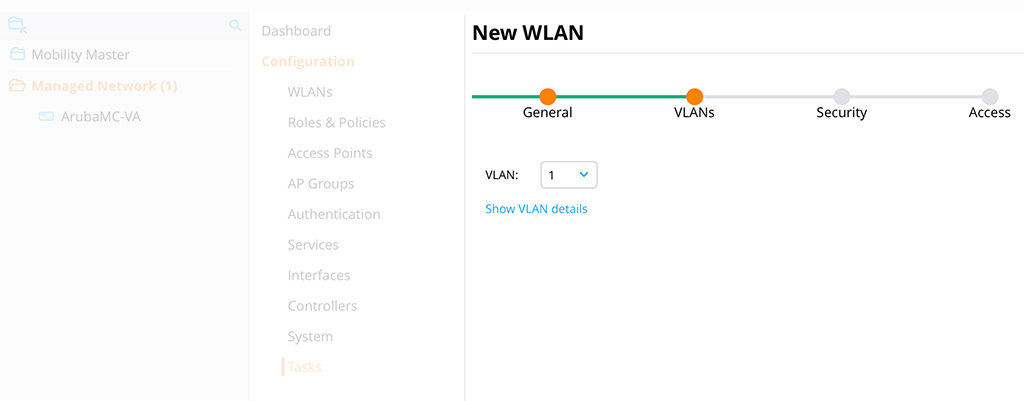
Choose the VLAN for the guest clients. A good practice is to not use VLAN 1. I use VLAN 1 for simplicity in my LAB environment. Click the “Next” button.
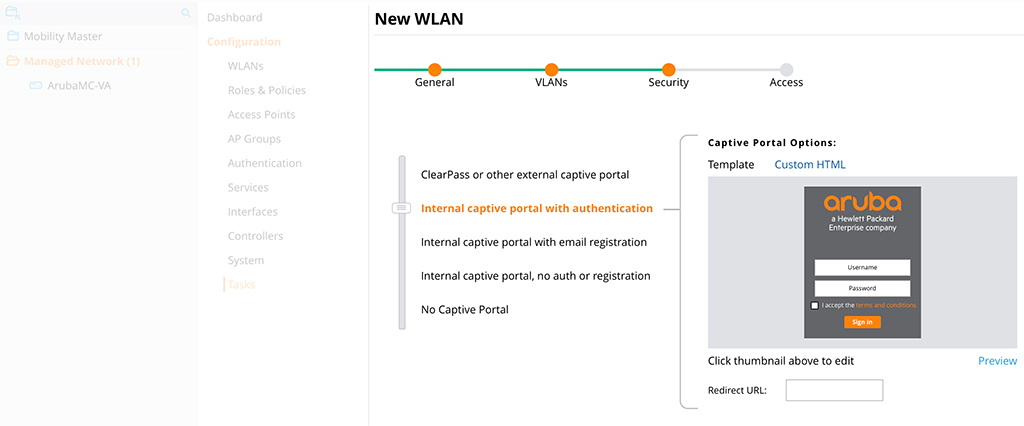
Select the captive portal you prefer. I use the one with authentication. All the other options should work as well, including ClearPass. you can also customize the captive portal. But this is out of the scope of this post. Click “Next”.
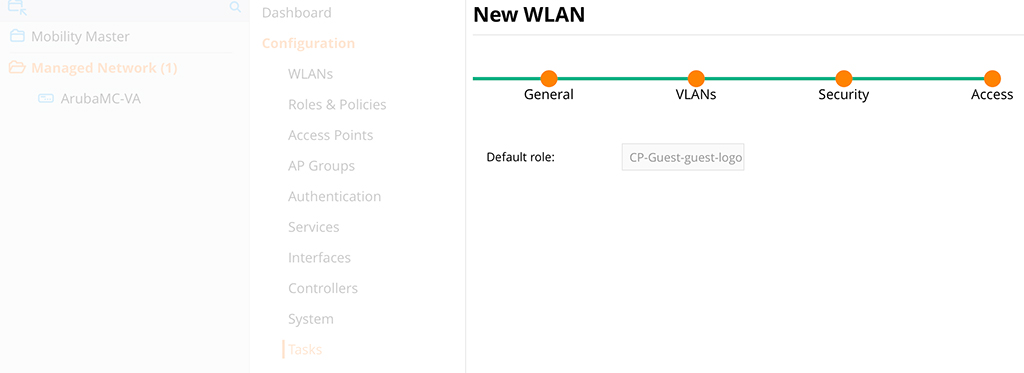
Up to this point, everything is normal. Now, the controller should create a new role. This is the “Default role” on the screen above. remember the name, before clicking “Finish”.
“Submit” the changes and wait for the SSID becoming available.
Captive Portal without PEFNG: Check the Roles
In the meantime, let’s check the role. I use the CLI for this. The CLI give more information. Connect to the MD, not the VMM. The VMM is not aware of the role.
This is the list of all roles on the MD:
(ArubaMC-VA) #show rights

RoleTable
---------
Name                   ACL  Bandwidth                  ACL List                                 Type
----                   ---  ---------                  --------                                 ----
ap-role                9    Up: No Limit,Dn: No Limit                                           System
CP-Guest               34   Up: No Limit,Dn: No Limit  CP-Guest/                                User
cpbase                 26   Up: No Limit,Dn: No Limit  cpbase/                                  User
default-iap-user-role  13   Up: No Limit,Dn: No Limit                                           User
denyall                24   Up: No Limit,Dn: No Limit  denyall/                                 User
Gast                   30   Up: No Limit,Dn: No Limit  Gast/                                    User
gast_cppm_sg           32   Up: No Limit,Dn: No Limit  gast_cppm_sg/                            User
guest                  7    Up: No Limit,Dn: No Limit  global-sacl/,apprf-guest-sacl/           User
guest-logon            12   Up: No Limit,Dn: No Limit                                           User
logon                  2    Up: No Limit,Dn: No Limit                                           User
stateful-dot1x         10   Up: No Limit,Dn: No Limit  global-sacl/,apprf-stateful-dot1x-sacl/  System
switch-logon           16   Up: No Limit,Dn: No Limit  switch-logon-acl/                        System
sys-ap-role            14   Up: No Limit,Dn: No Limit  sys-control/,sys-ap-acl/                 System
sys-switch-role        15   Up: No Limit,Dn: No Limit  sys-control/,sys-switch-acl/             System

Total Roles:14
(ArubaMC-VA) #
The one from the screen above is not there. But, there is a role with the same name as the SSID. In my case, this is the “CP-Guest” role. Let’s check this role in detail:
(ArubaMC-VA) #show rights CP-Guest

Valid = 'Yes'
CleanedUp = 'No'
Derived Role = 'CP-Guest'
 Up BW:No Limit   Down BW:No Limit
 L2TP Pool = default-l2tp-pool
 PPTP Pool = default-pptp-pool
 Number of users referencing it = 0
 Periodic reauthentication: Disabled
 DPI Classification: Enabled
 Youtube education: Disabled
 Web Content Classification: Enabled
 IP-Classification Enforcement: Enabled
 ACL Number = 34/0
 Openflow: Enabled
 Max Sessions = 65535

 Check CP Profile for Accounting = TRUE
 Captive Portal profile = CP-Guest

Application Exception List
--------------------------
Name  Type
----  ----

Application BW-Contract List
----------------------------
Name  Type  BW Contract  Id  Direction
----  ----  -----------  --  ---------

access-list List
----------------
Position  Name      Type     Location
--------  ----      ----     --------
1         CP-Guest  session

CP-Guest
--------
Priority  Source  Destination  Service      Application  Action        TimeRange  Log  Expired  Queue  TOS  8021P  Blacklist  Mirror  DisScan  IPv4/6  Contract
--------  ------  -----------  -------      -----------  ------        ---------  ---  -------  -----  ---  -----  ---------  ------  -------  ------  --------
1         user    controller6  svc-https                 captive                                Low                                            6
2         user    controller   svc-https                 dst-nat 8081                           Low                                            4
3         user    any          svc-https                 captive                                Low                                            6
4         user    any          svc-http                  captive                                Low                                            6
5         any     any          svc-v6-icmp               permit                                 Low                                            6
6         any     any          svc-v6-dns                permit                                 Low                                            6
7         any     any          svc-v6-dhcp               permit                                 Low                                            6
8         user    any          svc-http                  dst-nat 8080                           Low                                            4
9         user    any          svc-https                 dst-nat 8081                           Low                                            4
10        any     any          svc-dns                   permit                                 Low                                            4
11        any     any          svc-dhcp                  permit                                 Low                                            4

Expired Policies (due to time constraints) = 0
(ArubaMC-VA) #
Much information. The important stuff is the last table. Here are all the rules to redirect the client to a captive portal. You also see the information about the captive portal profile. In the middle, just before the tables starting you find this:
Captive Portal profile = CP-GuestLet’s check the captive profile as well:
(ArubaMC-VA) #show aaa profile CP-Guest

AAA Profile "CP-Guest"
----------------------
Parameter                           Value
---------                           -----
Initial role                        cp-guest-guest-logon
MAC Authentication Profile          N/A
MAC Authentication Server Group     default
802.1X Authentication Profile       N/A
802.1X Authentication Server Group  N/A
Download Role from CPPM             Disabled
Set username from dhcp option 12    Disabled
L2 Authentication Fail Through      Disabled
Multiple Server Accounting          Disabled
User idle timeout                   N/A
Max IPv4 for wireless user          2
RADIUS Accounting Server Group      N/A
RADIUS Roaming Accounting           Disabled
RADIUS Interim Accounting           Disabled
RFC 3576 server                     N/A
User derivation rules               N/A
Wired to Wireless Roaming           Enabled
Device Type Classification          Enabled
Enforce DHCP                        Disabled
PAN Firewall Integration            Disabled
Open SSID radius accounting         Disabled
(ArubaMC-VA) #
Here you can define all the parameters you need to adjust the captive portal. The only thing, which is not correct, the “Initial role”. Adjust this to reflect the correct role. You have to use the one from above, “CP-Guest” (wait and read further before changing the role).
Captive Portal without PEFNG: Create the Correct Role
But here comes the problem. The VMM is not aware of this role. The VMM use the “cp-guest-guest-login” role. If you look into the Web GUI, you will not find any hint of the “CP-Guest” role. You will always see the “cp-guest-guest-login” role. To change this, we create the “CP-Guest” role on the VMM. So, back to the GUI, stay in the same hierarchy level as before. Go to “Configuration–>Roles & Policies” and click the “+” sign:
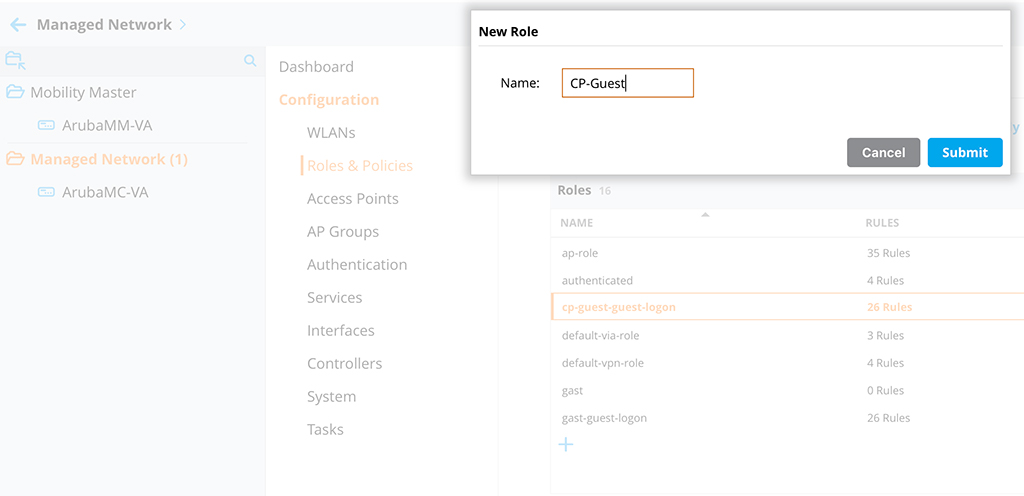
Create the role with the same name as from the show command in the CLI. Now, the VMM is aware of the role. The last step is to change the initial role for the SSID to the one above. Go to “Configuration–>System–>Profiles” and select the “Wireless LAN–>Virtual AP” profile and look for your “Virtual AP” profile (SSID). Inside your profile search for “AAA”:
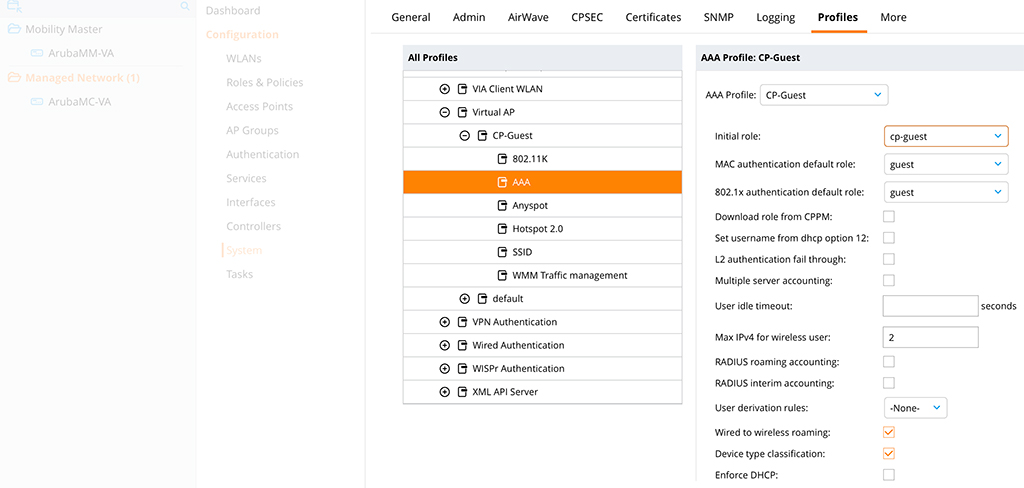
Change the “Initial role” to the one from above. “Submit” the changes. Afterwards, connect to the SSID and check for captive portal.
The last part of the above post sounds weird. But it is the only way, I got it working.
To avoid this, just get the PEFNG license as well. It brings much cool stuff and your security colleagues will love it.
Do you always buy the PEFNG license as well? Or you don’t? Tell me why and leave a comment below. If you find this post interesting, leave me a comment and share it with your friends. If you don’t like the post, leave me a comment and share it with your enemy. But whatever you do, leave me a comment, now.
Thank you for your article!
Nice article, thank you very much. To make things more complicated, is it possible to configure a Clearpass Captive Portal with ArubaOS8 without PEF licenses?
Hi Jon,
theoretically, this should be possible. but you will not be able to modify any roles on the controller. So I would not recommend it.
BR
Florian
As per article it is possible, but I haven´t been able
Does it work on a standalone mobility controller as well?
Hi Ajin,
just to make one thing clear, you should use a PEFNG license when working with Aruba Controllers. If for some reason this is not possible you can get this running without a PEFNG license as well. But this should always be the plan of last resort.
To my knowledge, this should also work with a standalone controller.
BR
Florian
Hi Florian,
Yes, it worked on the standalone controller and it was just a straightforward process as there is no need to edit the role name or anything.
Thanks,
Ajin.