This post is all about operator login with ClearPass. I show the implementation of authenticating a network operator to Aruba Switches, Comware based switches, Aruba Controller and AirWave. For some devices, I will show the process with TACACS+. For those, which do not support TACACS+, I use radius authentication, which I describe in a later post.
Operator Login: ClearPass Configuration for TACACS+
ClearPass has built-in TACACS+ support for various devices. In the first part, I create a ClearPass configuration for general purposes. Afterward, I append rules to serve certain devices.
I assume, ClearPass is installed and you know how to configure the basics. If you struggle with this, leave me a comment and can cover this as well in a future post.
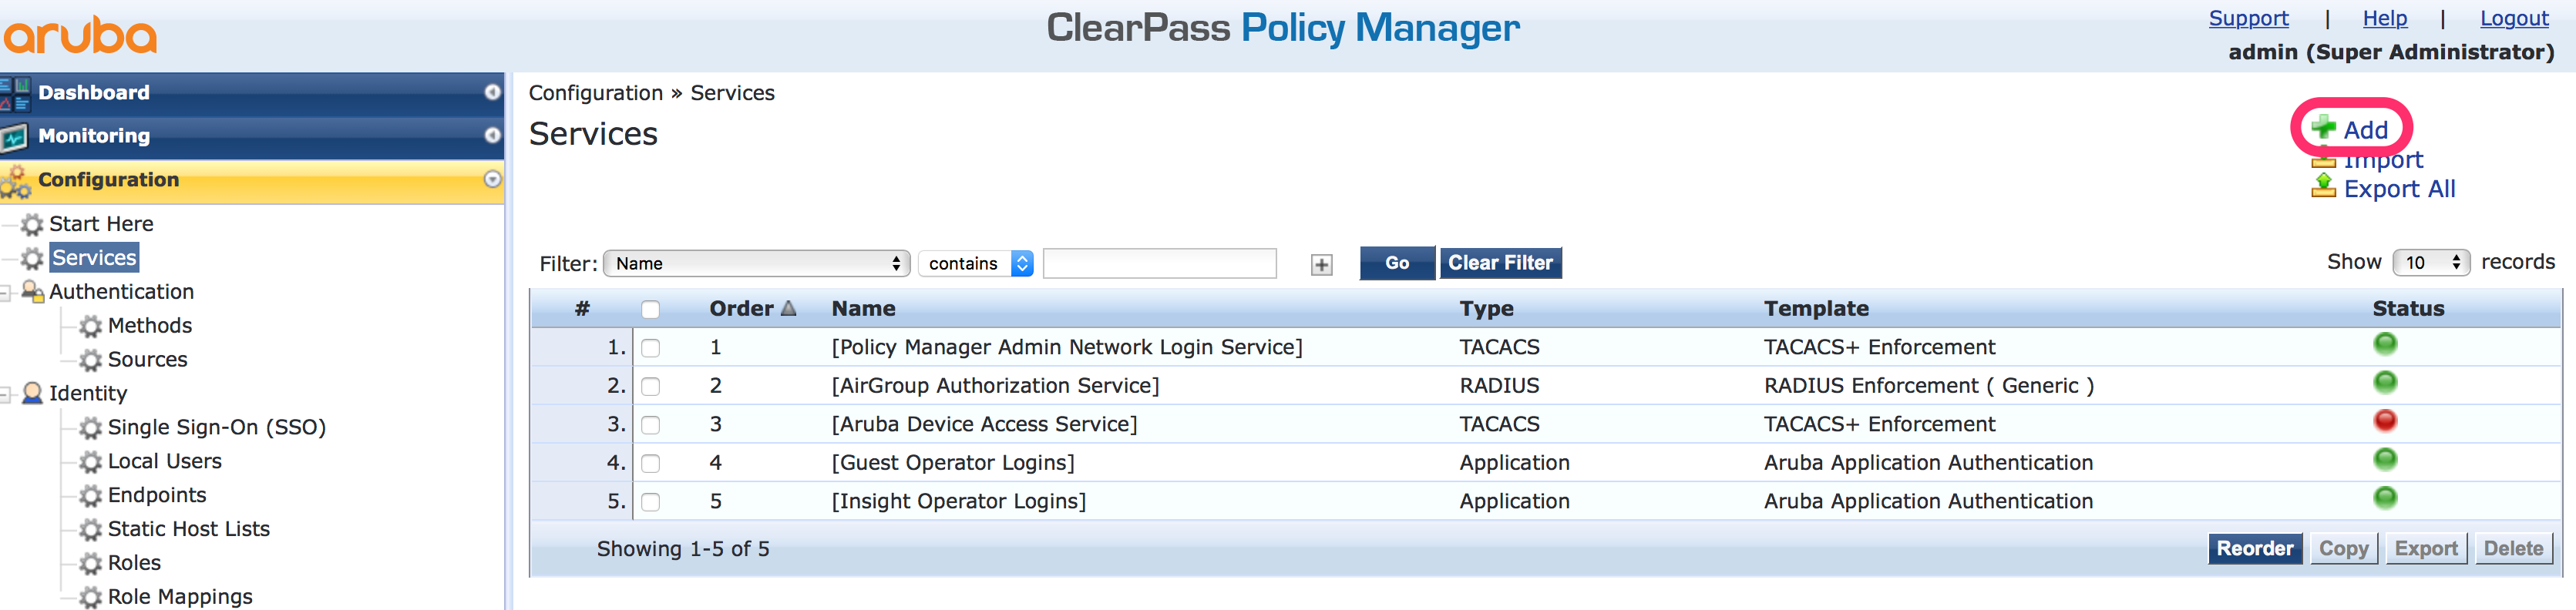
The first step is to create a new authentication service within ClearPass. I use this one for all of my operator logins. It is also possible to create different services for different devices. To create the service go to “Configuration–>Services” and click on “Add”:
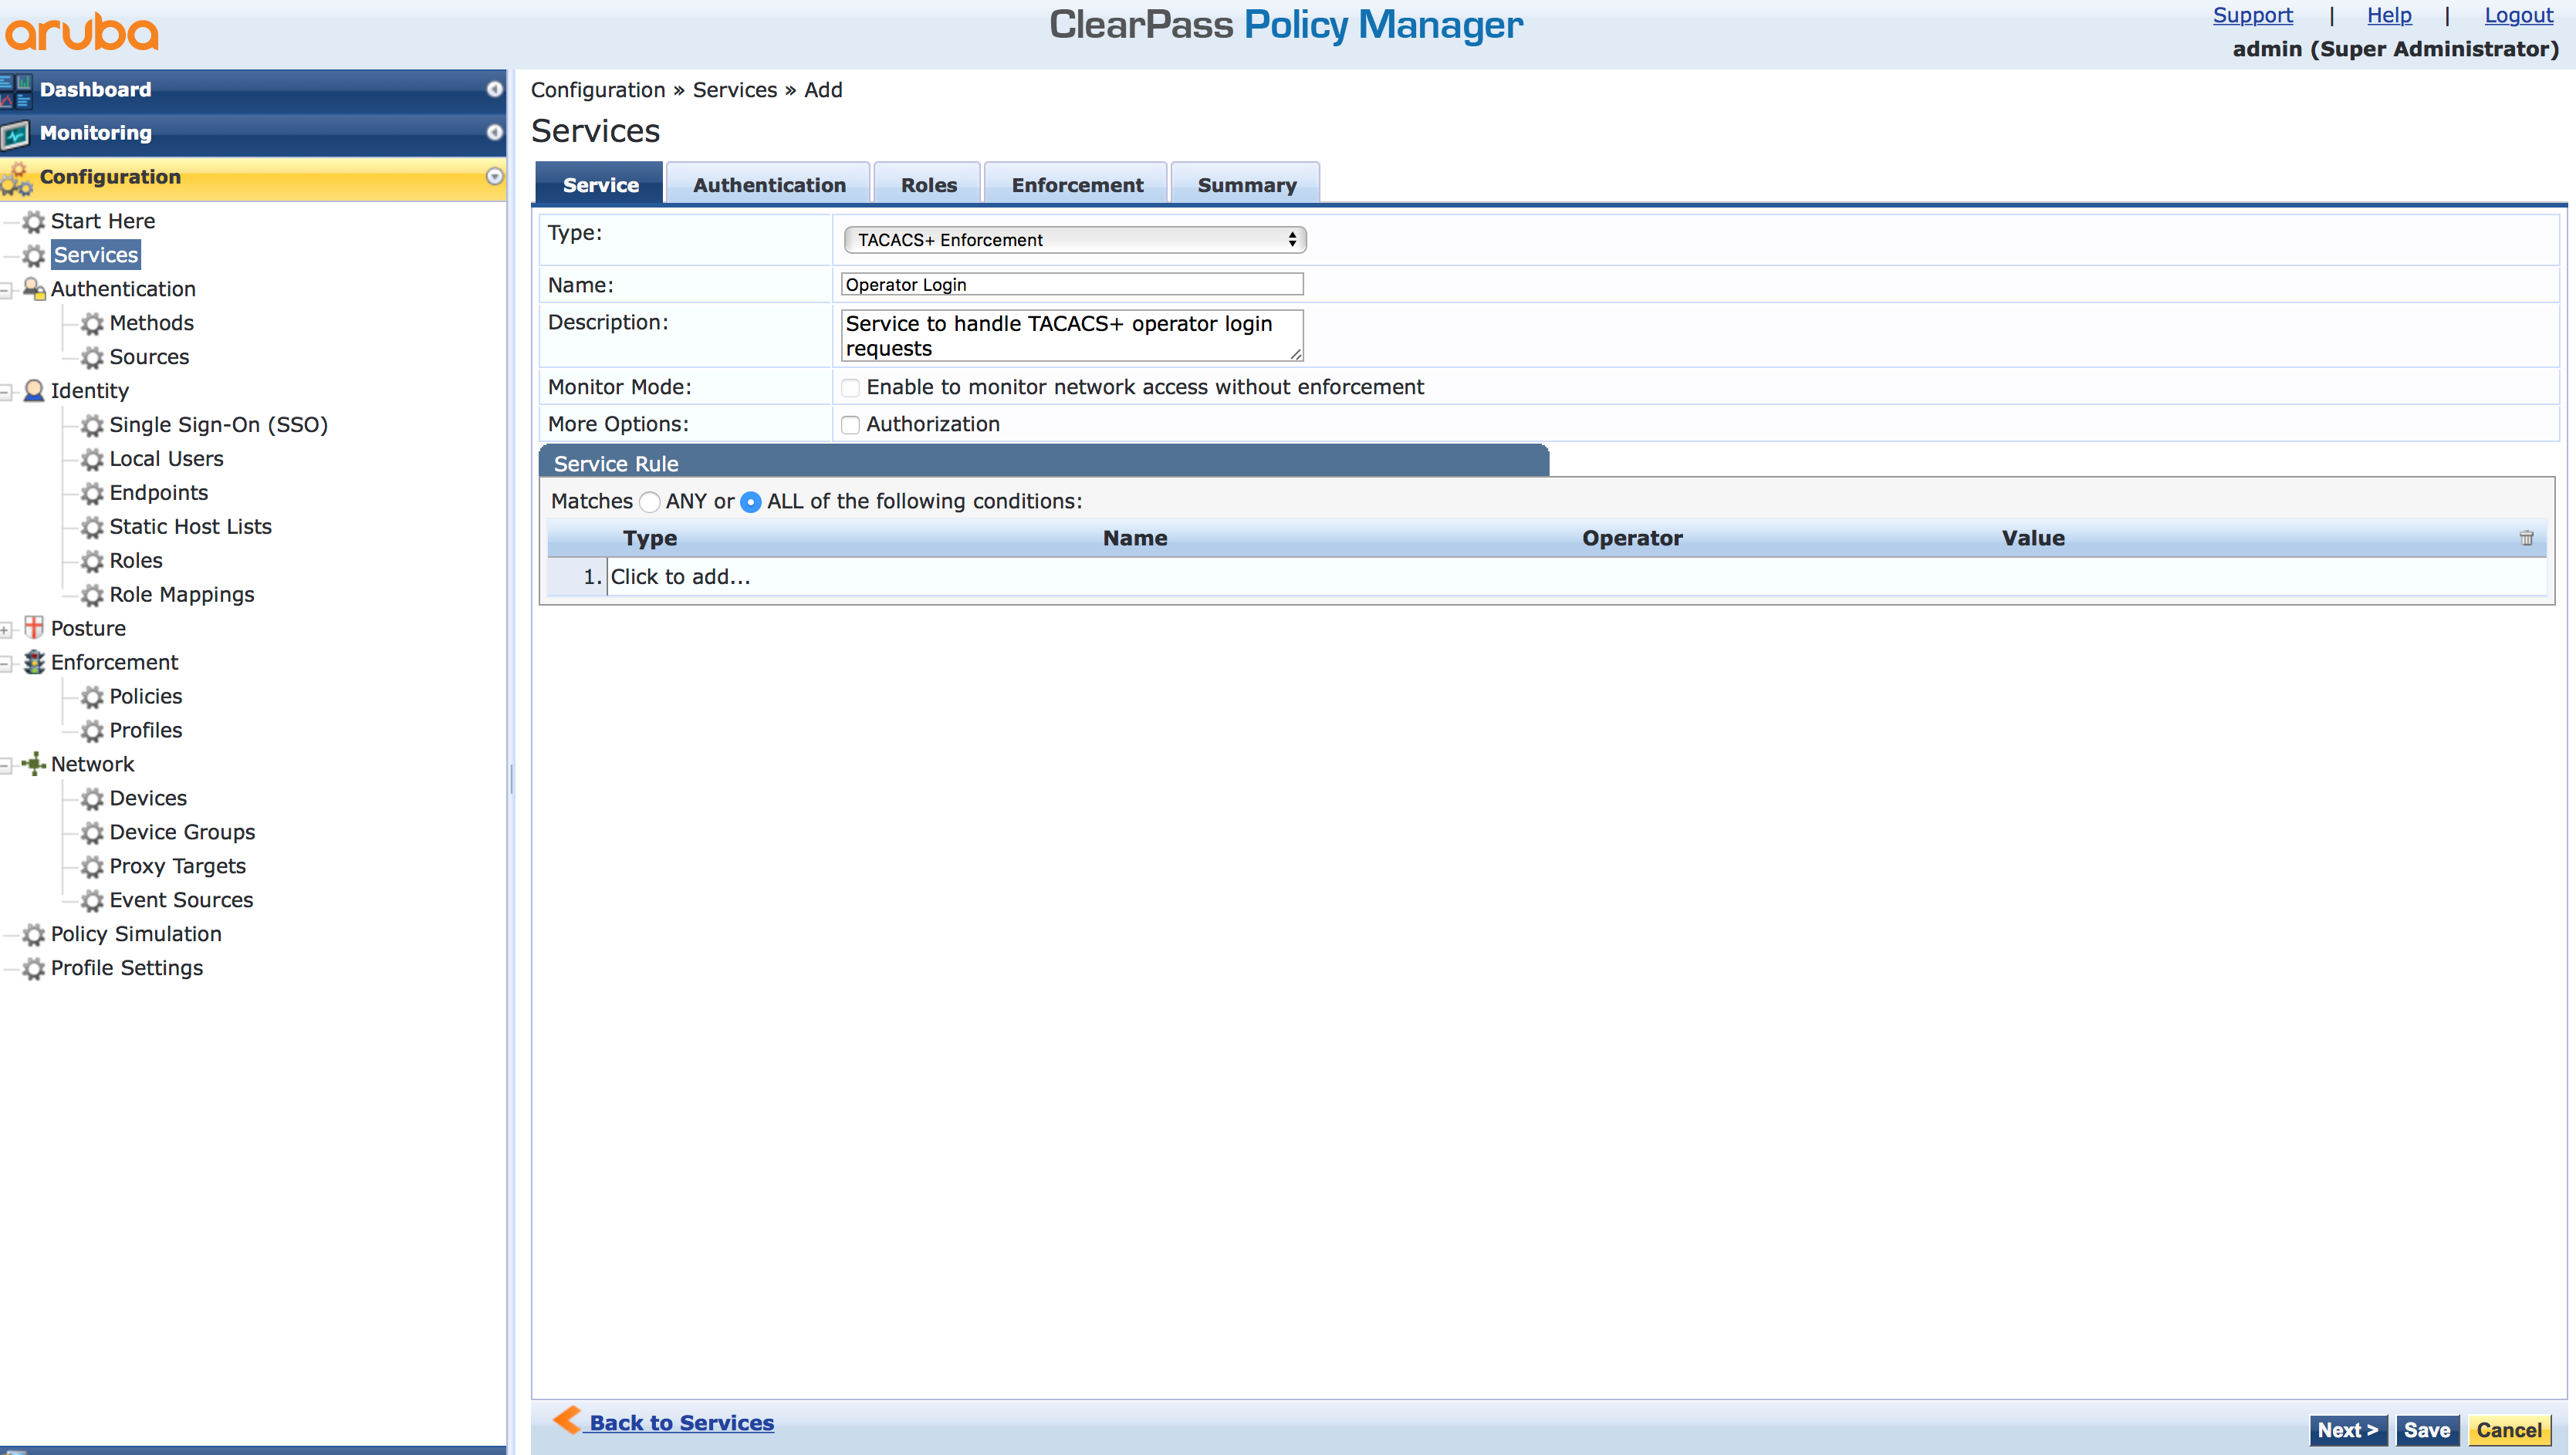
A new screen appears and allows you to configure the type of the service, the name, and a description. Select the “TACACS+ Enforcement” for the type. Feel free with the name and the description. But make it clear what the service is doing. I do not create service rules at this stage, as I can add them later if needed:
Click “Next” to get the next screen. Here you select the authentication source. This can every authentication source from ClearPass. For my testing purpose, I use the internal user database. I place all my test users in this DB:
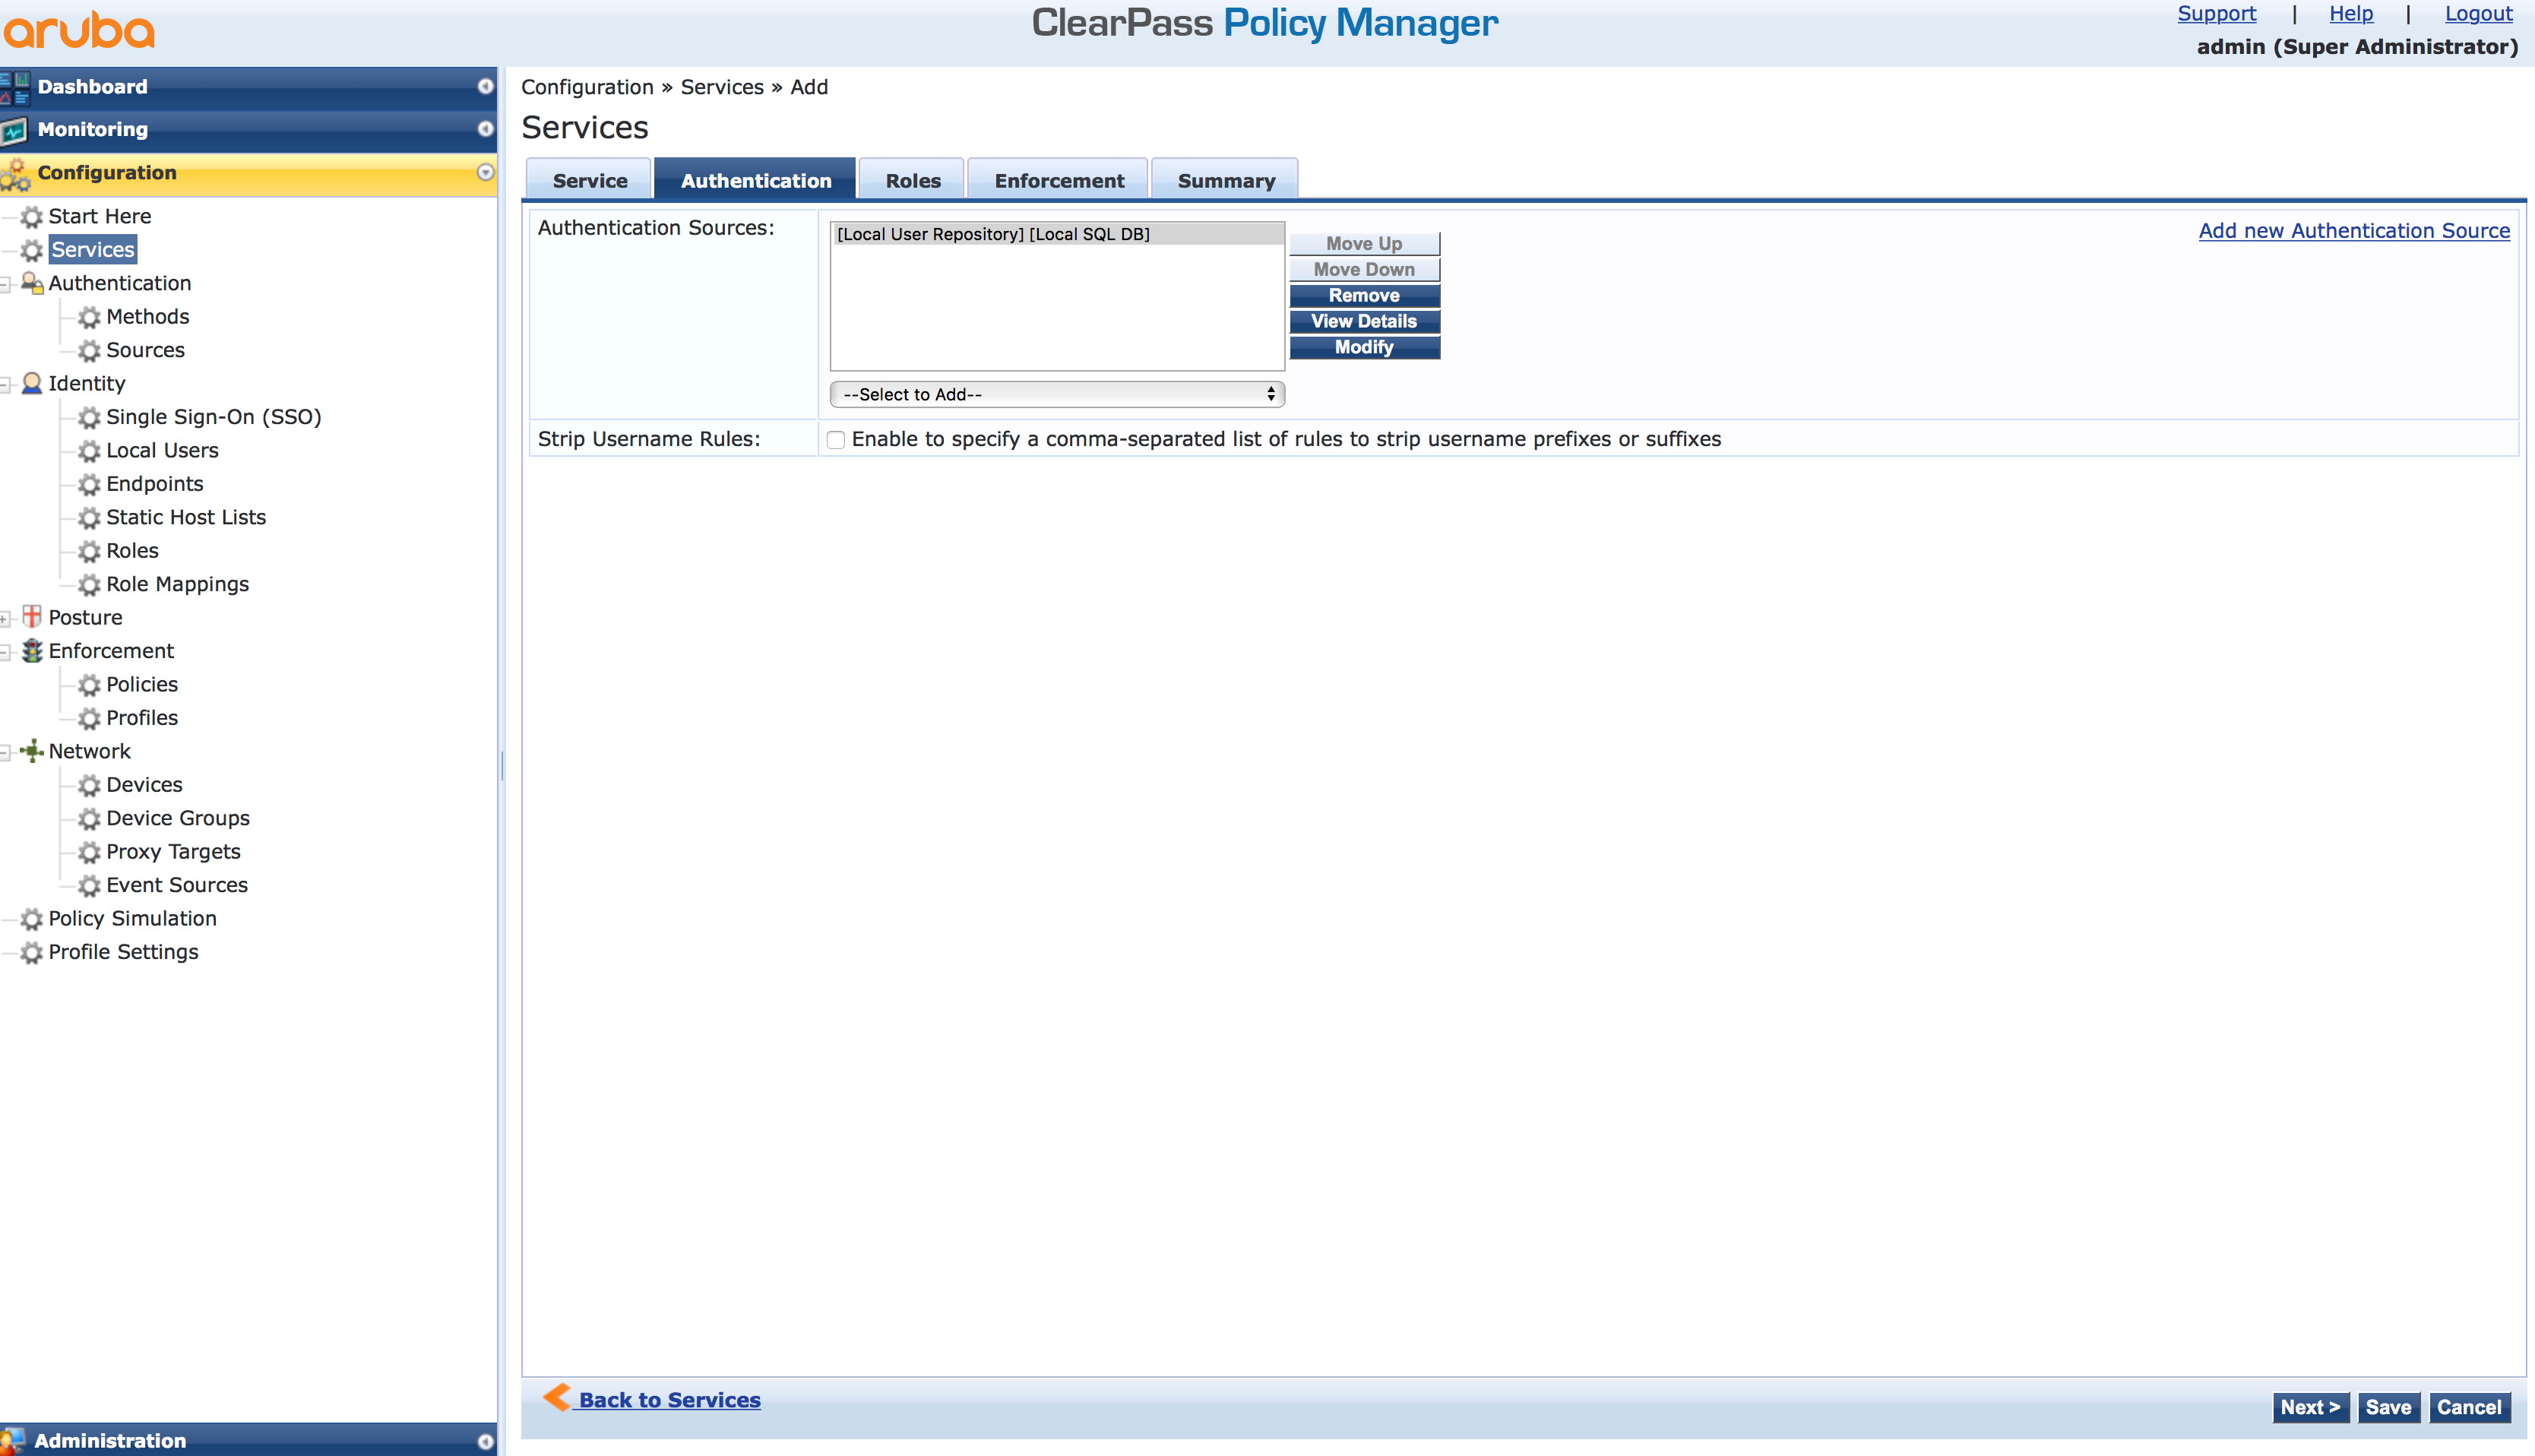
Afterward, click three times “Next” and save the new service. All other screens are
Operator Login with Comware Based Devices
To authenticate all network operators on Comware devices with TACACS+ and ClearPass follow this paragraph. The first step is to prepare the Comware device to use ClearPass for TACACS+ authentication. On Comware based devices TACACS+ is called HWTACACS.
Log in to the device and make sure, that you did not configure your current connection type for TACACS+. If connected with SSH do not configure TACACS+ for SSH, as you could possibly log out yourself from the device.
Create the HWTACACS scheme on the device:
hwtacacs scheme cppm-tacacs
primary authentication 192.168.111.55
primary authorization 192.168.111.55
primary accounting 192.168.111.55
key authentication simple comcomcom
key authorization simple comcomcom
key accounting simple comcomcom
user-name-format without-domain
This scheme is configured with the TACACS+ server 192.168.111.55 and the key “comcomcom” for authentication, authorization, and accounting. This scheme does not send the domain with the request, as the domain is not configured on ClearPass.
The next step is to configure the domain on the device:
domain cppm
 authentication login hwtacacs-scheme cppm-tacacs
 authorization login hwtacacs-scheme cppm-tacacs
 accounting login hwtacacs-scheme cppm-tacacs
Every user, which uses this domain “cppm”, is authenticated with the ClearPass server.
To enable this kind of authentication for all incoming connections except the console, configure the following:
line vty 0 63
 authentication-mode scheme
 user-role network-operator
That’s all you need to configure on the device. Now, prepare some specifics for the authentication on ClearPass. So, head over to ClearPass.
Operator Login with Comware Based Devices Basic ClearPass Settings
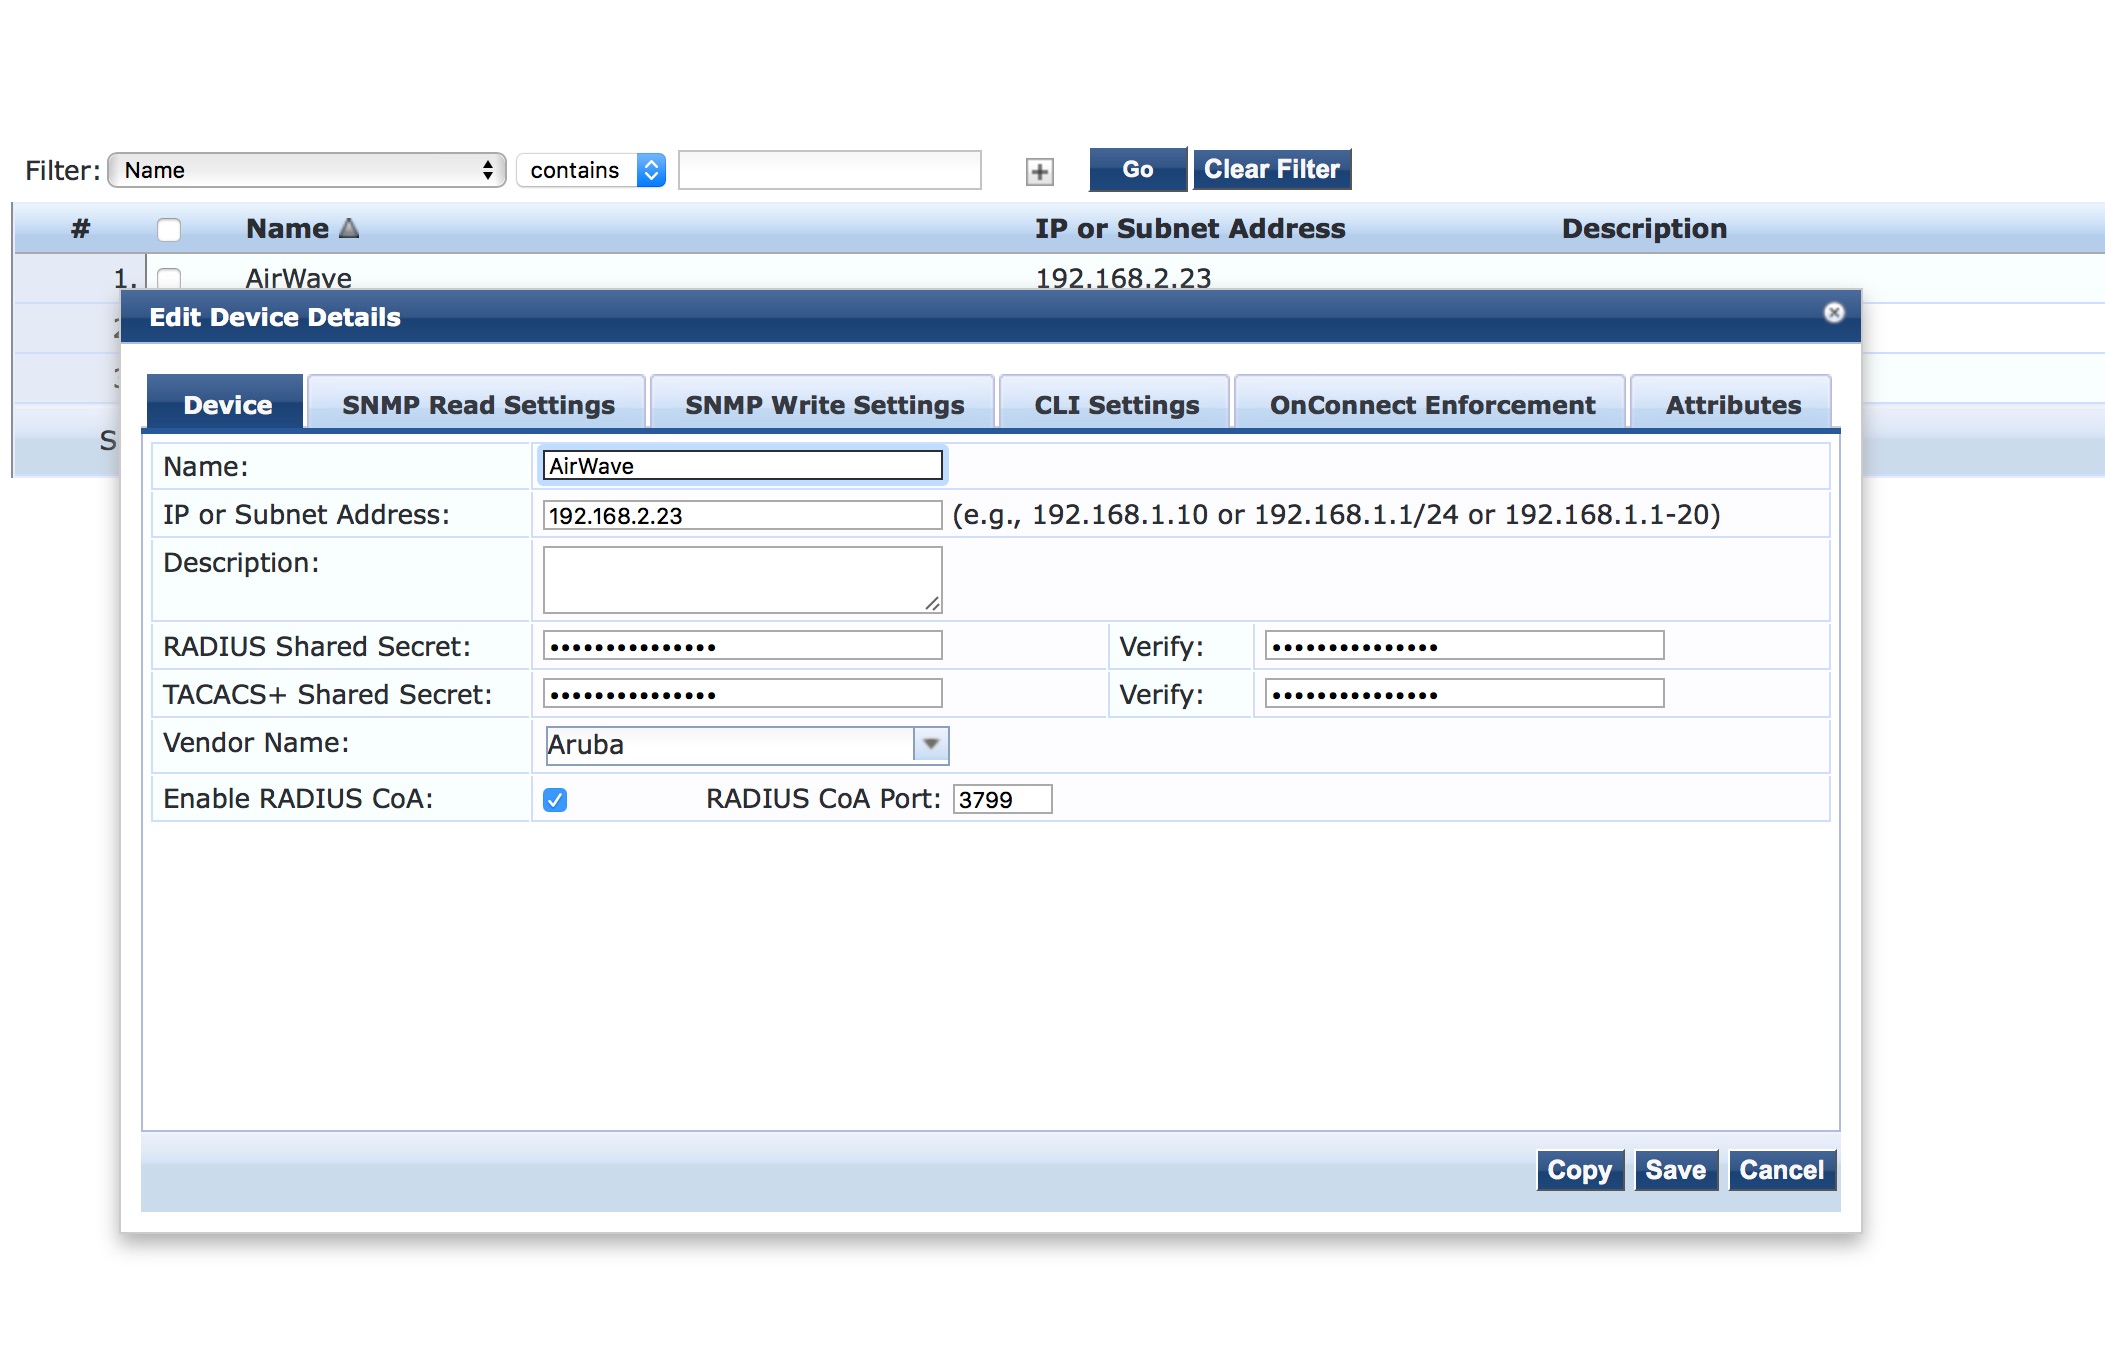
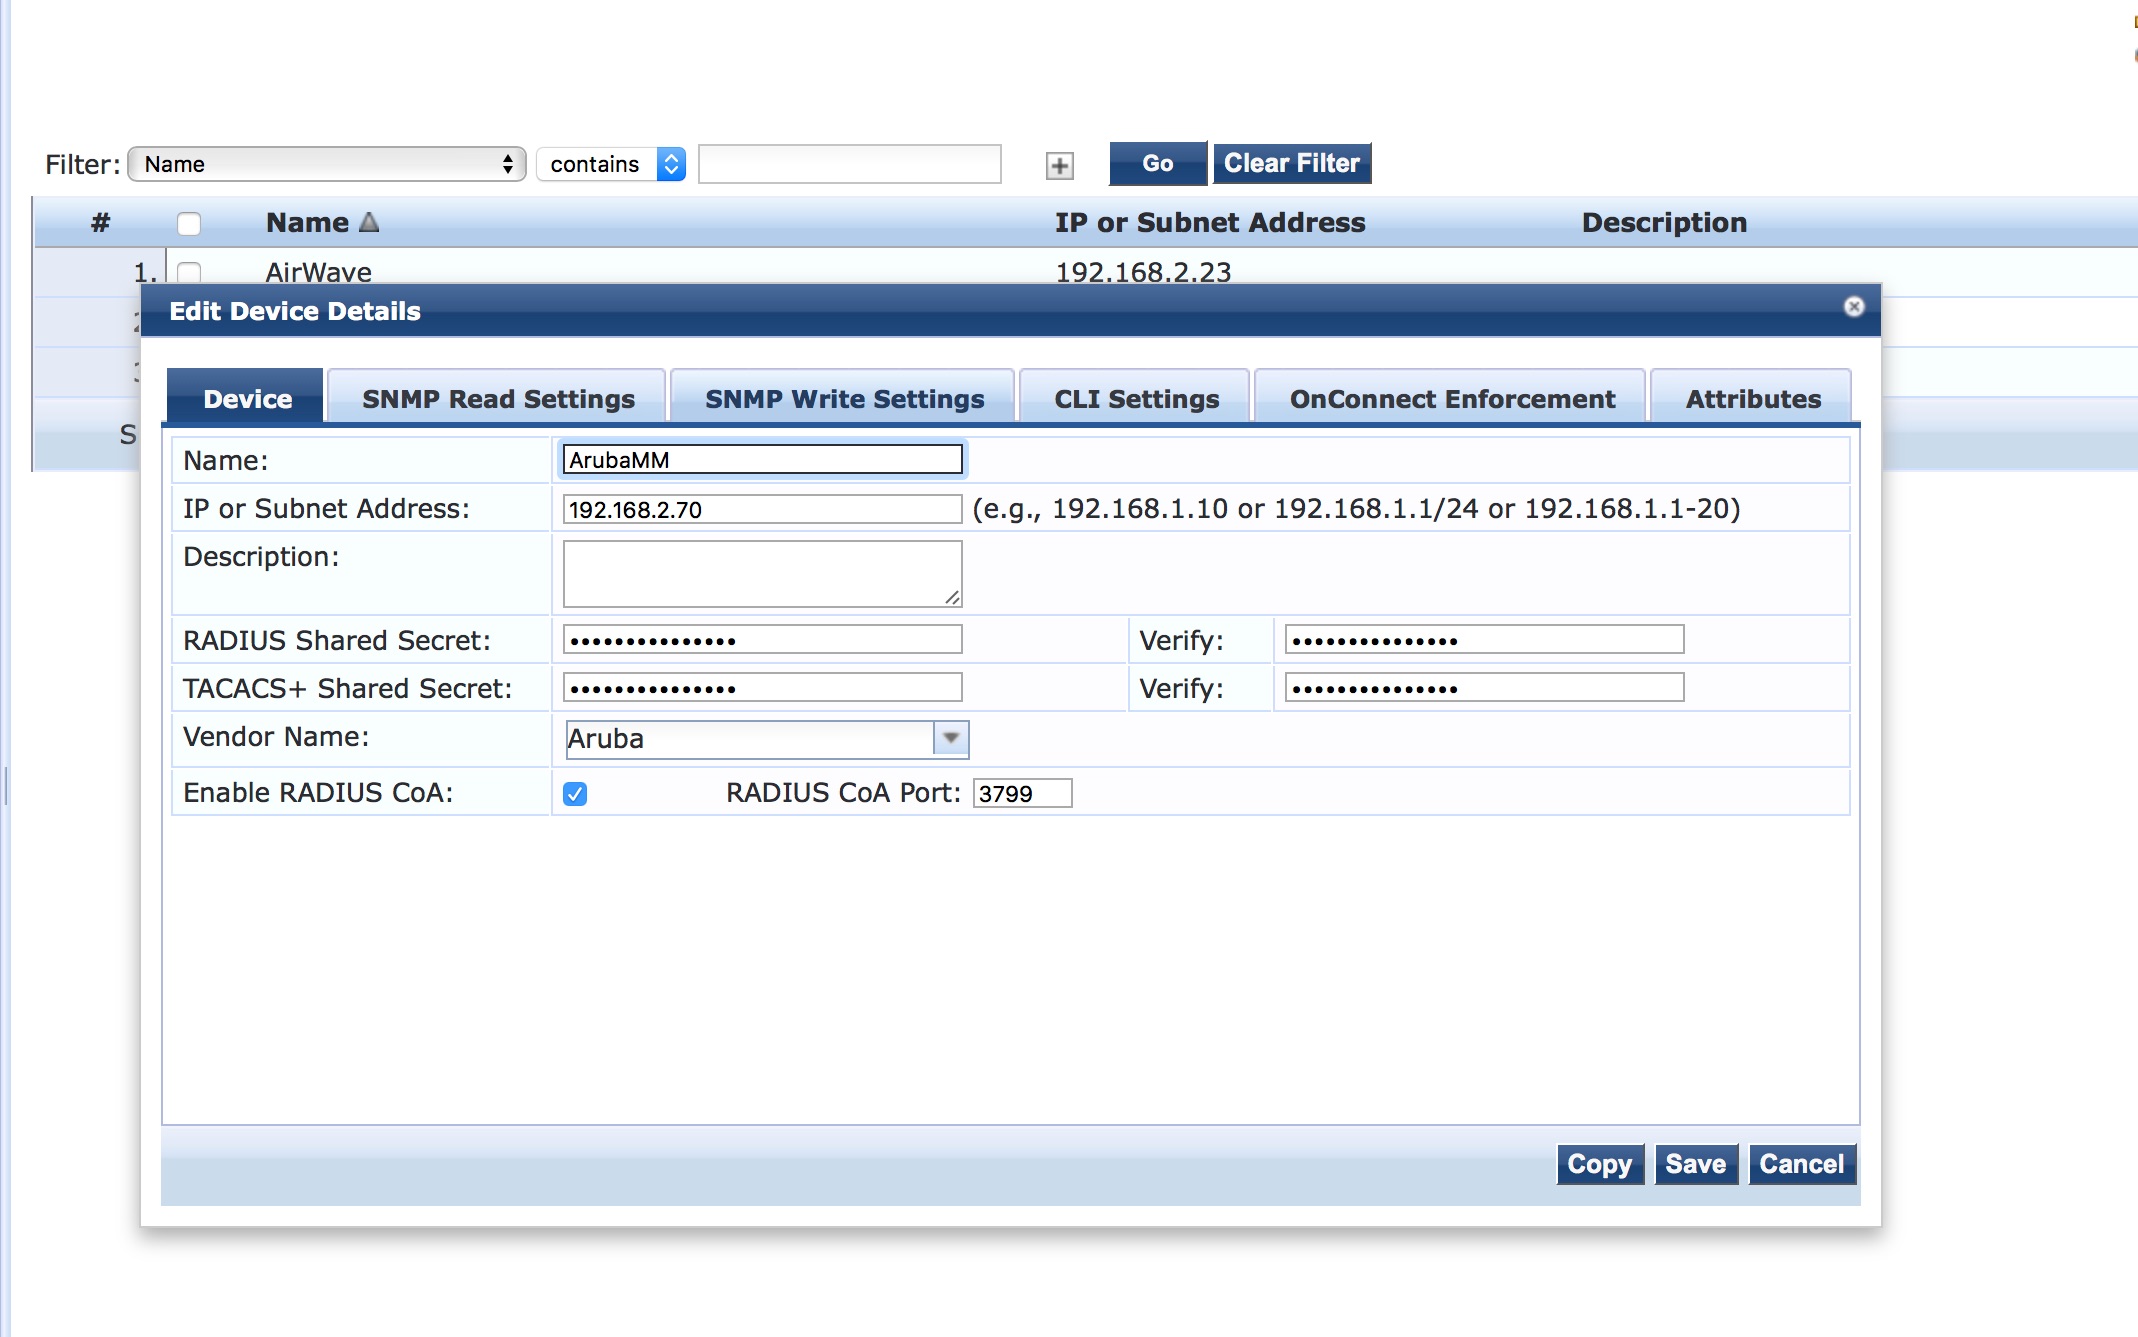
The first step is to create the device within ClearPass. Go to “Configuration–>Network–>Devices” and click the “Add” button to add a new device to ClearPass:
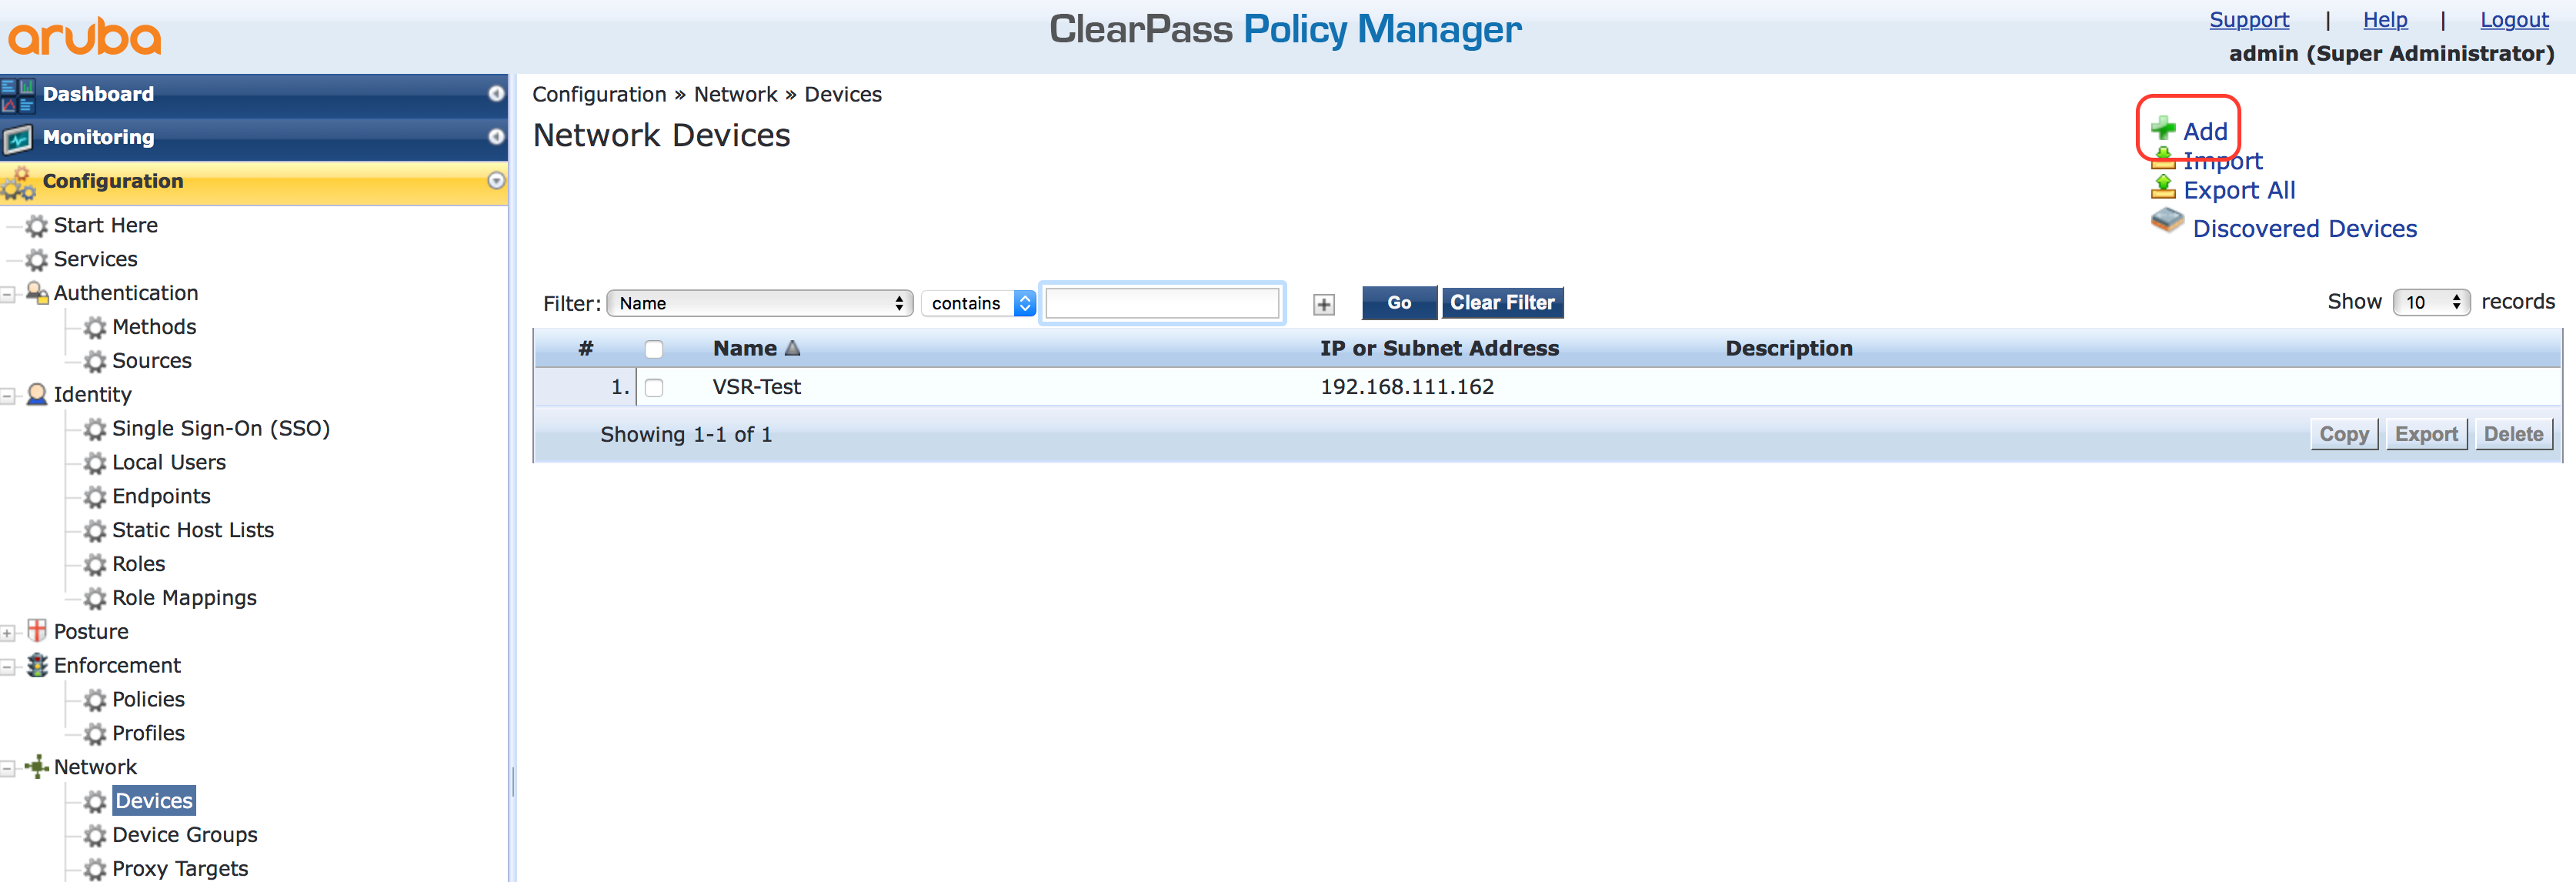
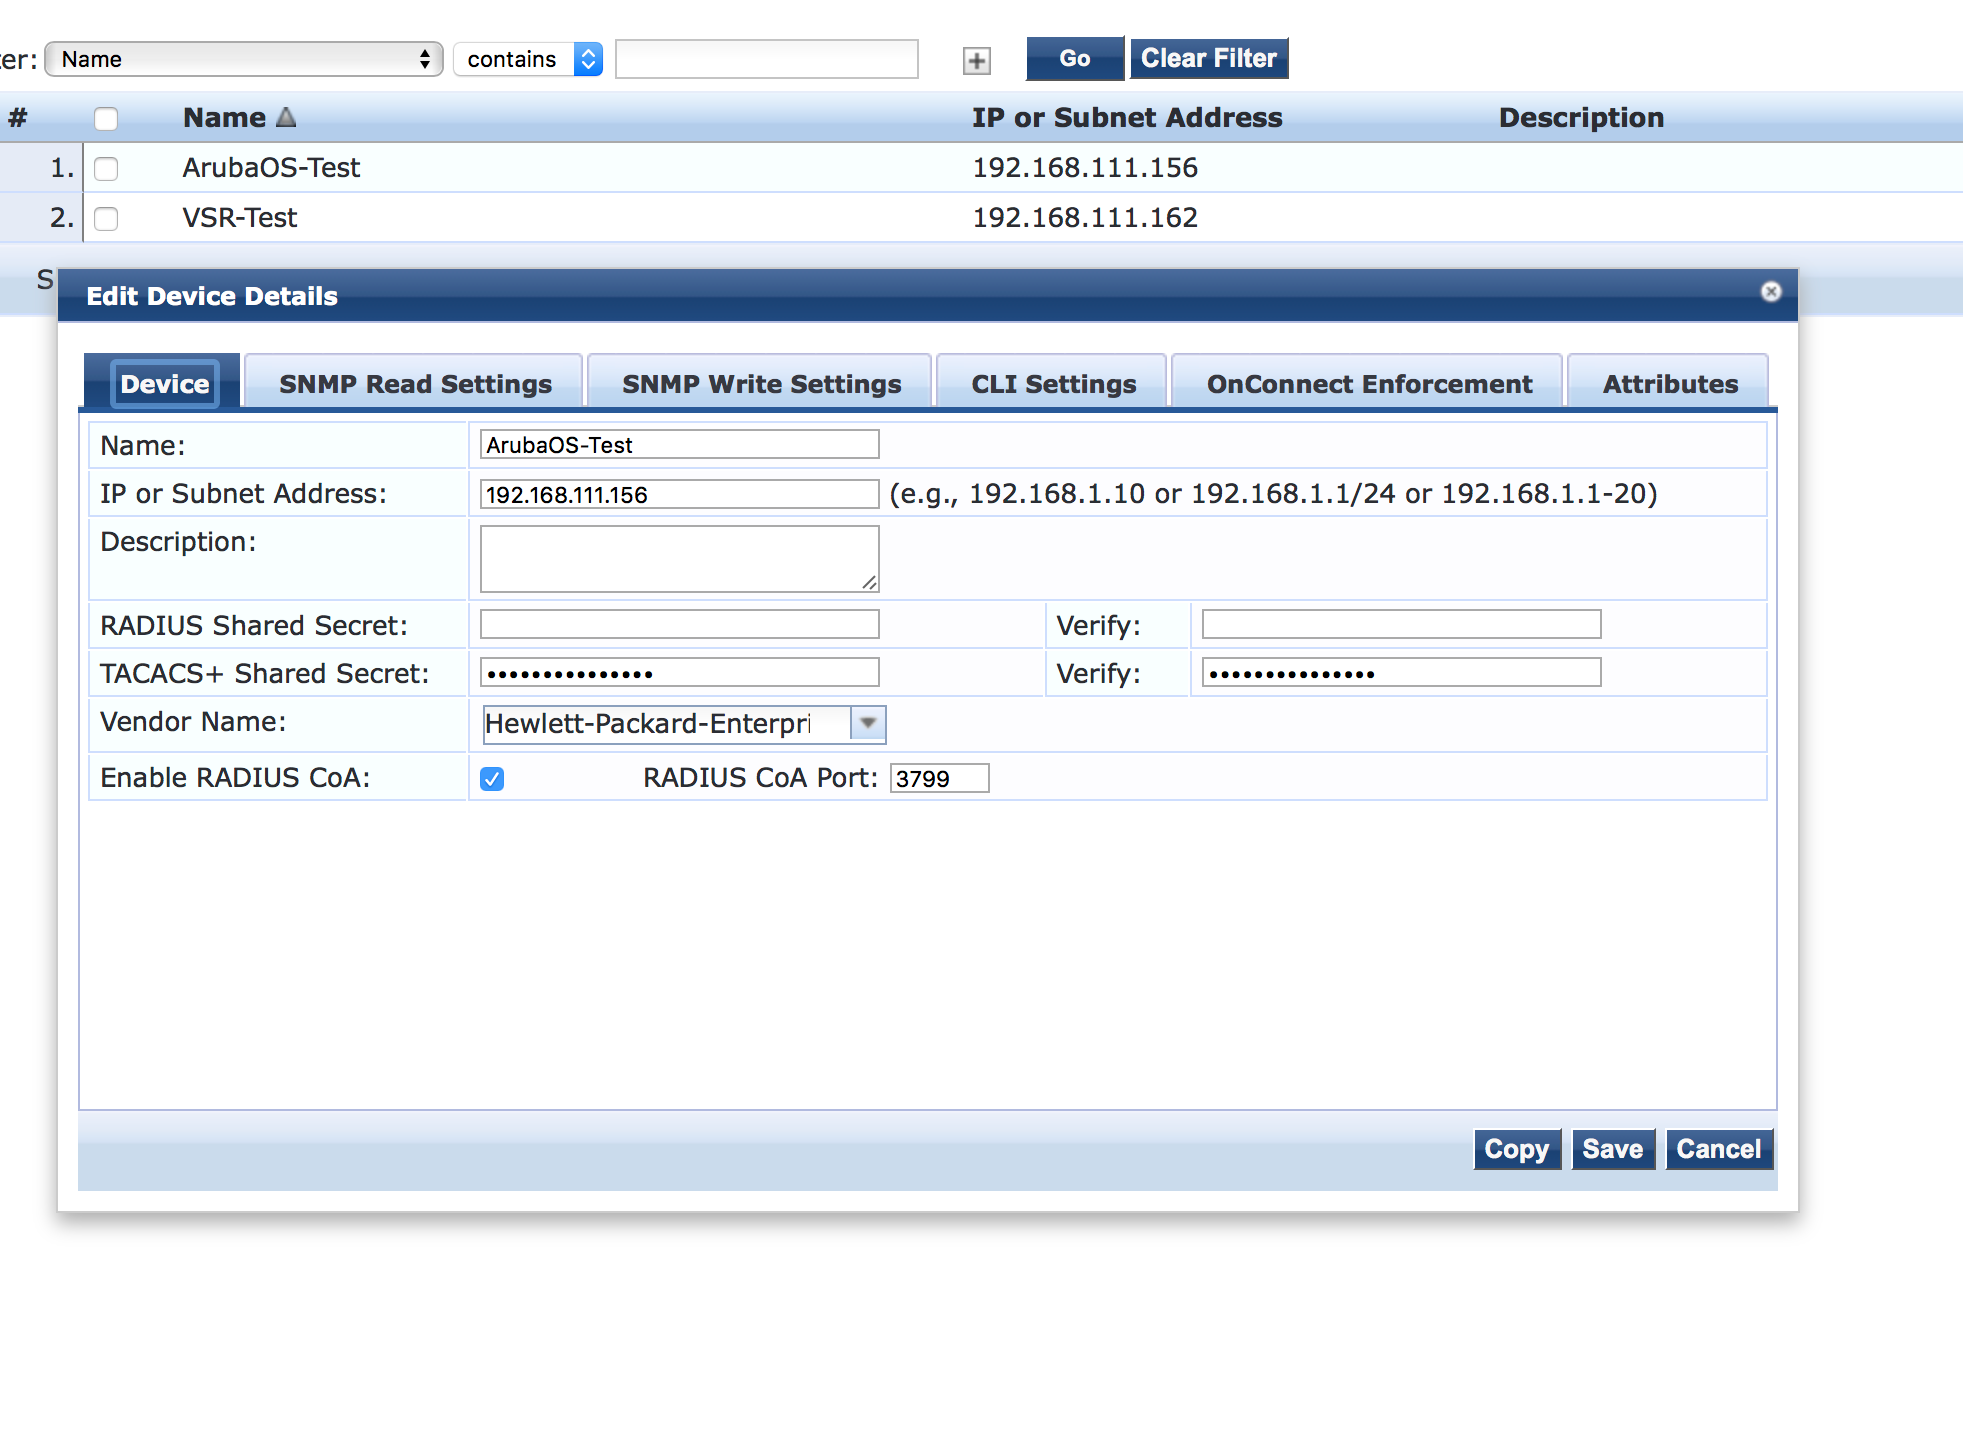
You see the following screen:
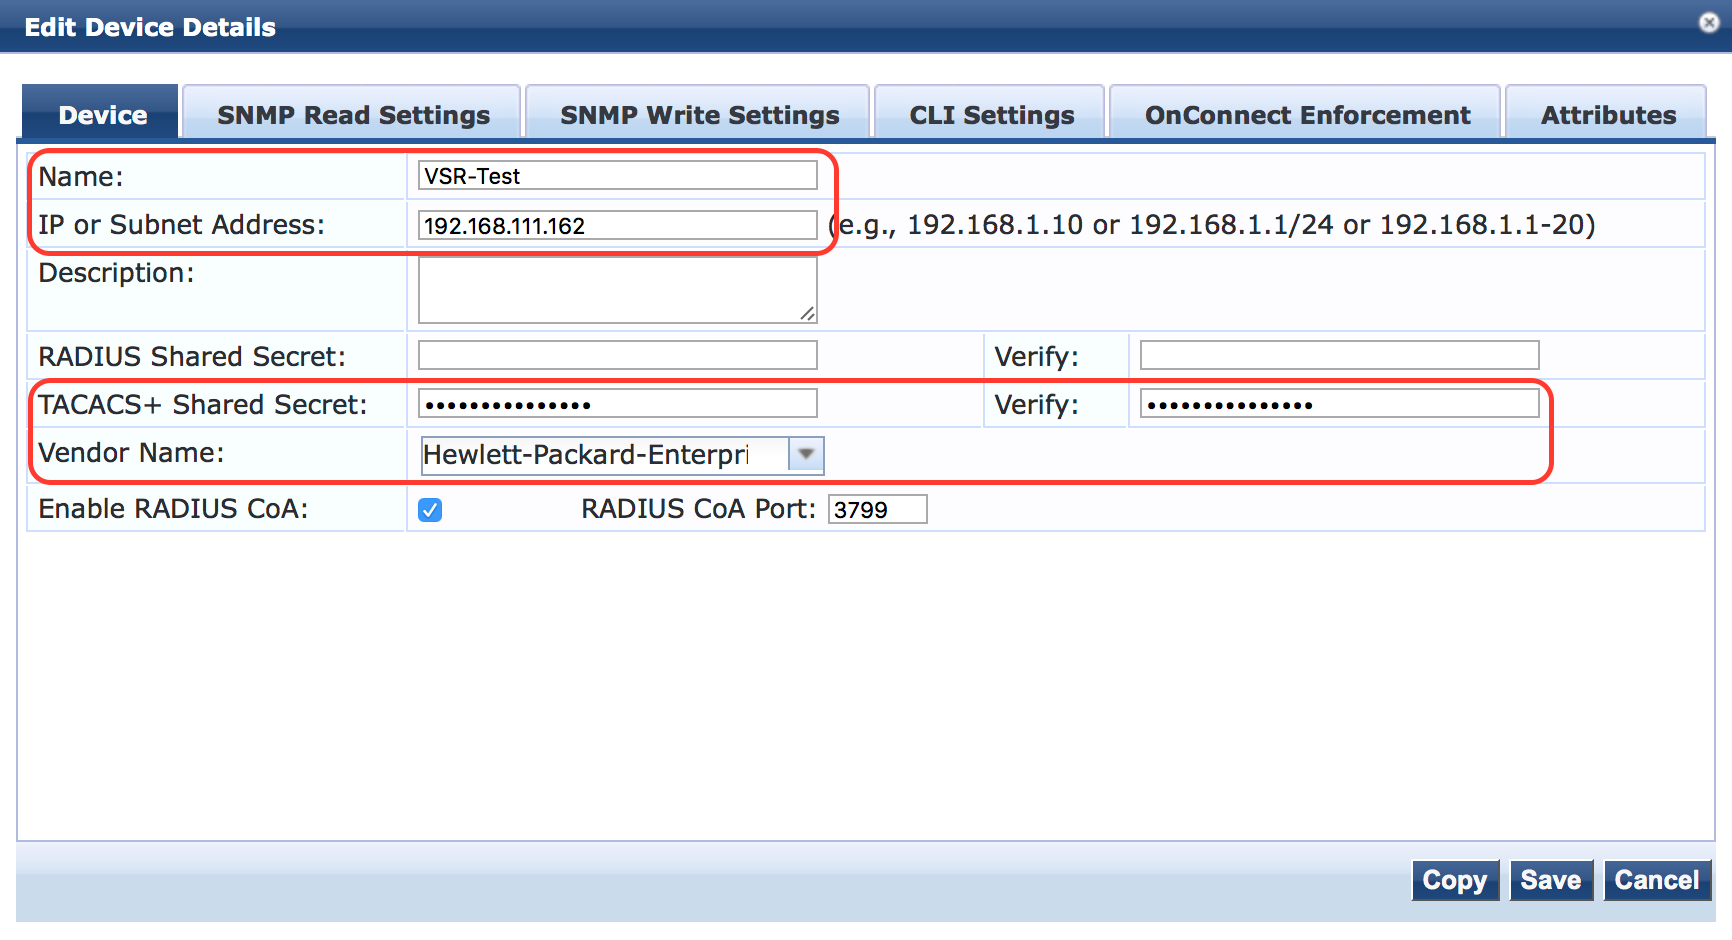
You have to configure the Name and the IP address. If you have a subnet with IP address, you can configure them as well. Configure the same shared secret as the key on the device. If those do not match, the communication between the device and the ClearPass will fail.
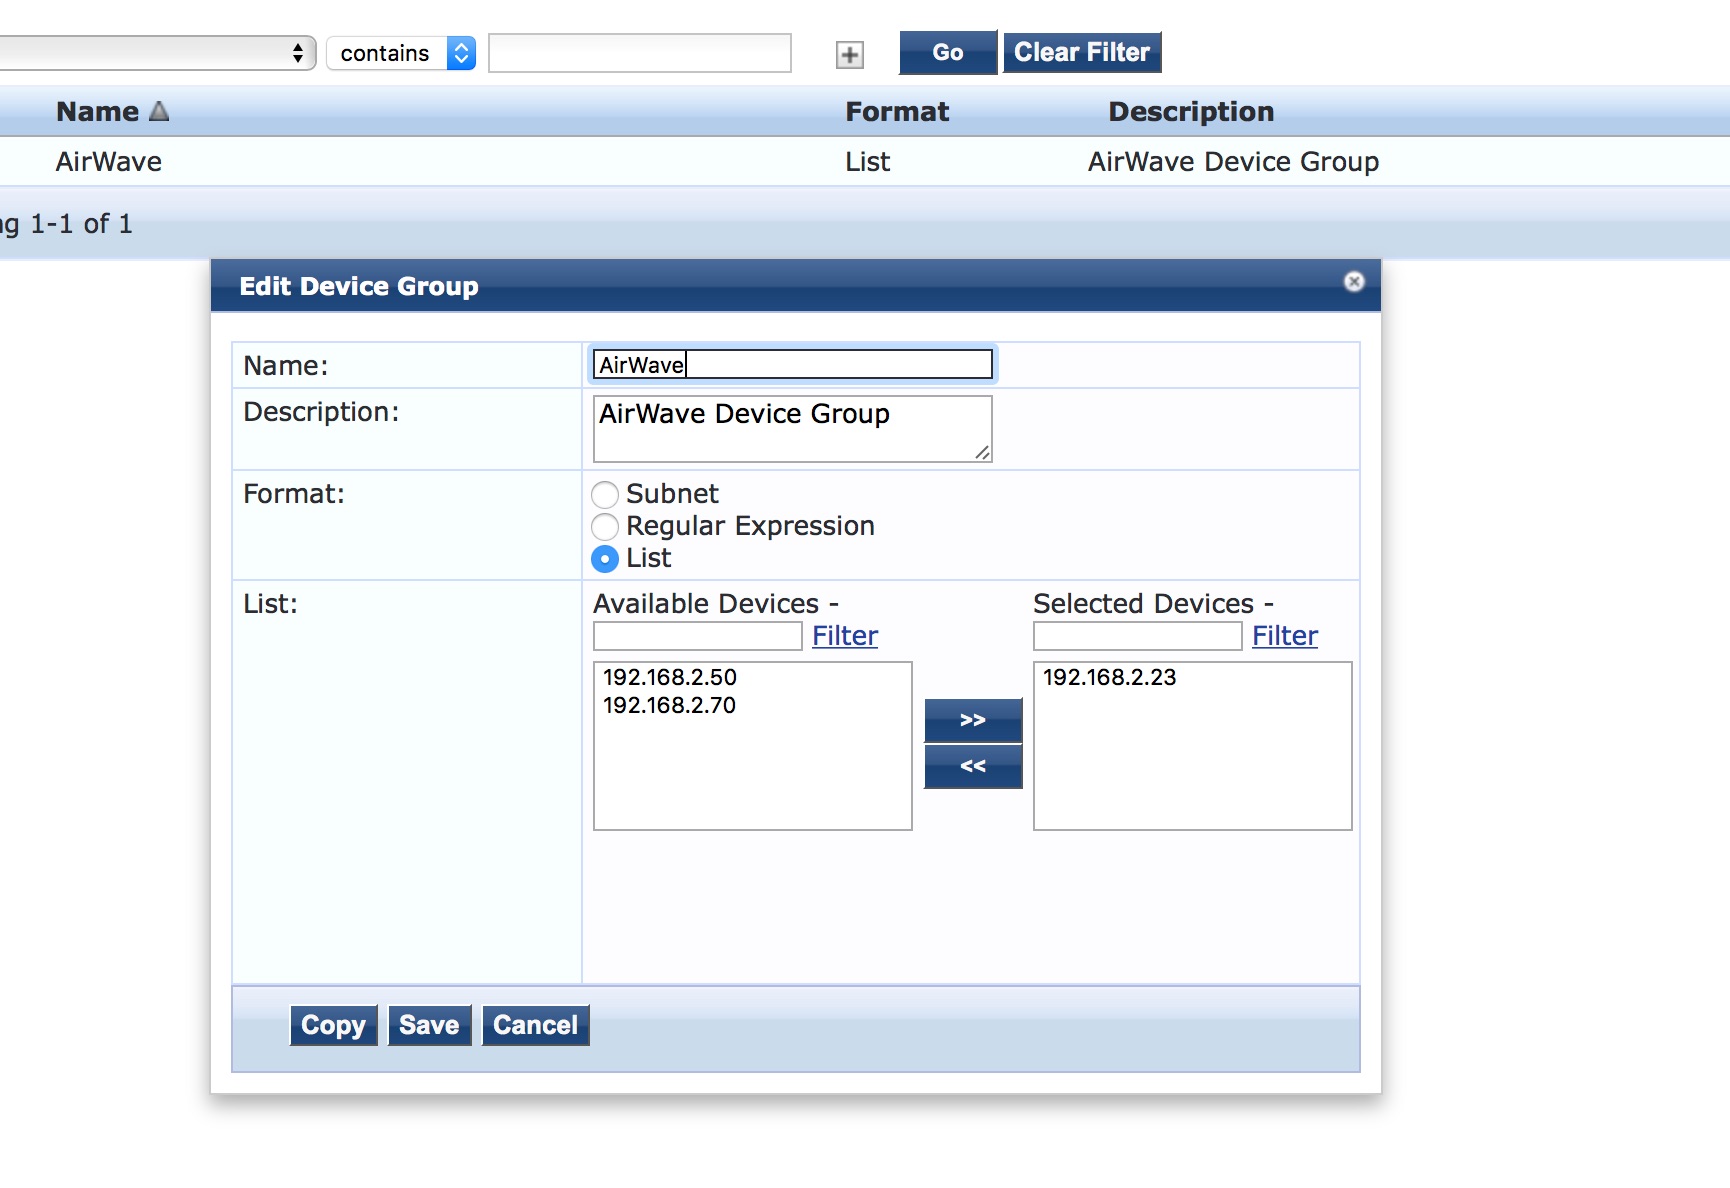
If you have many devices of the same type, it makes sense to create device groups. I use these device groups to send different TACACS+ responses to the different type of devices, like Comware, Aruba OS Switch, and ArubaOS WLAN controller.
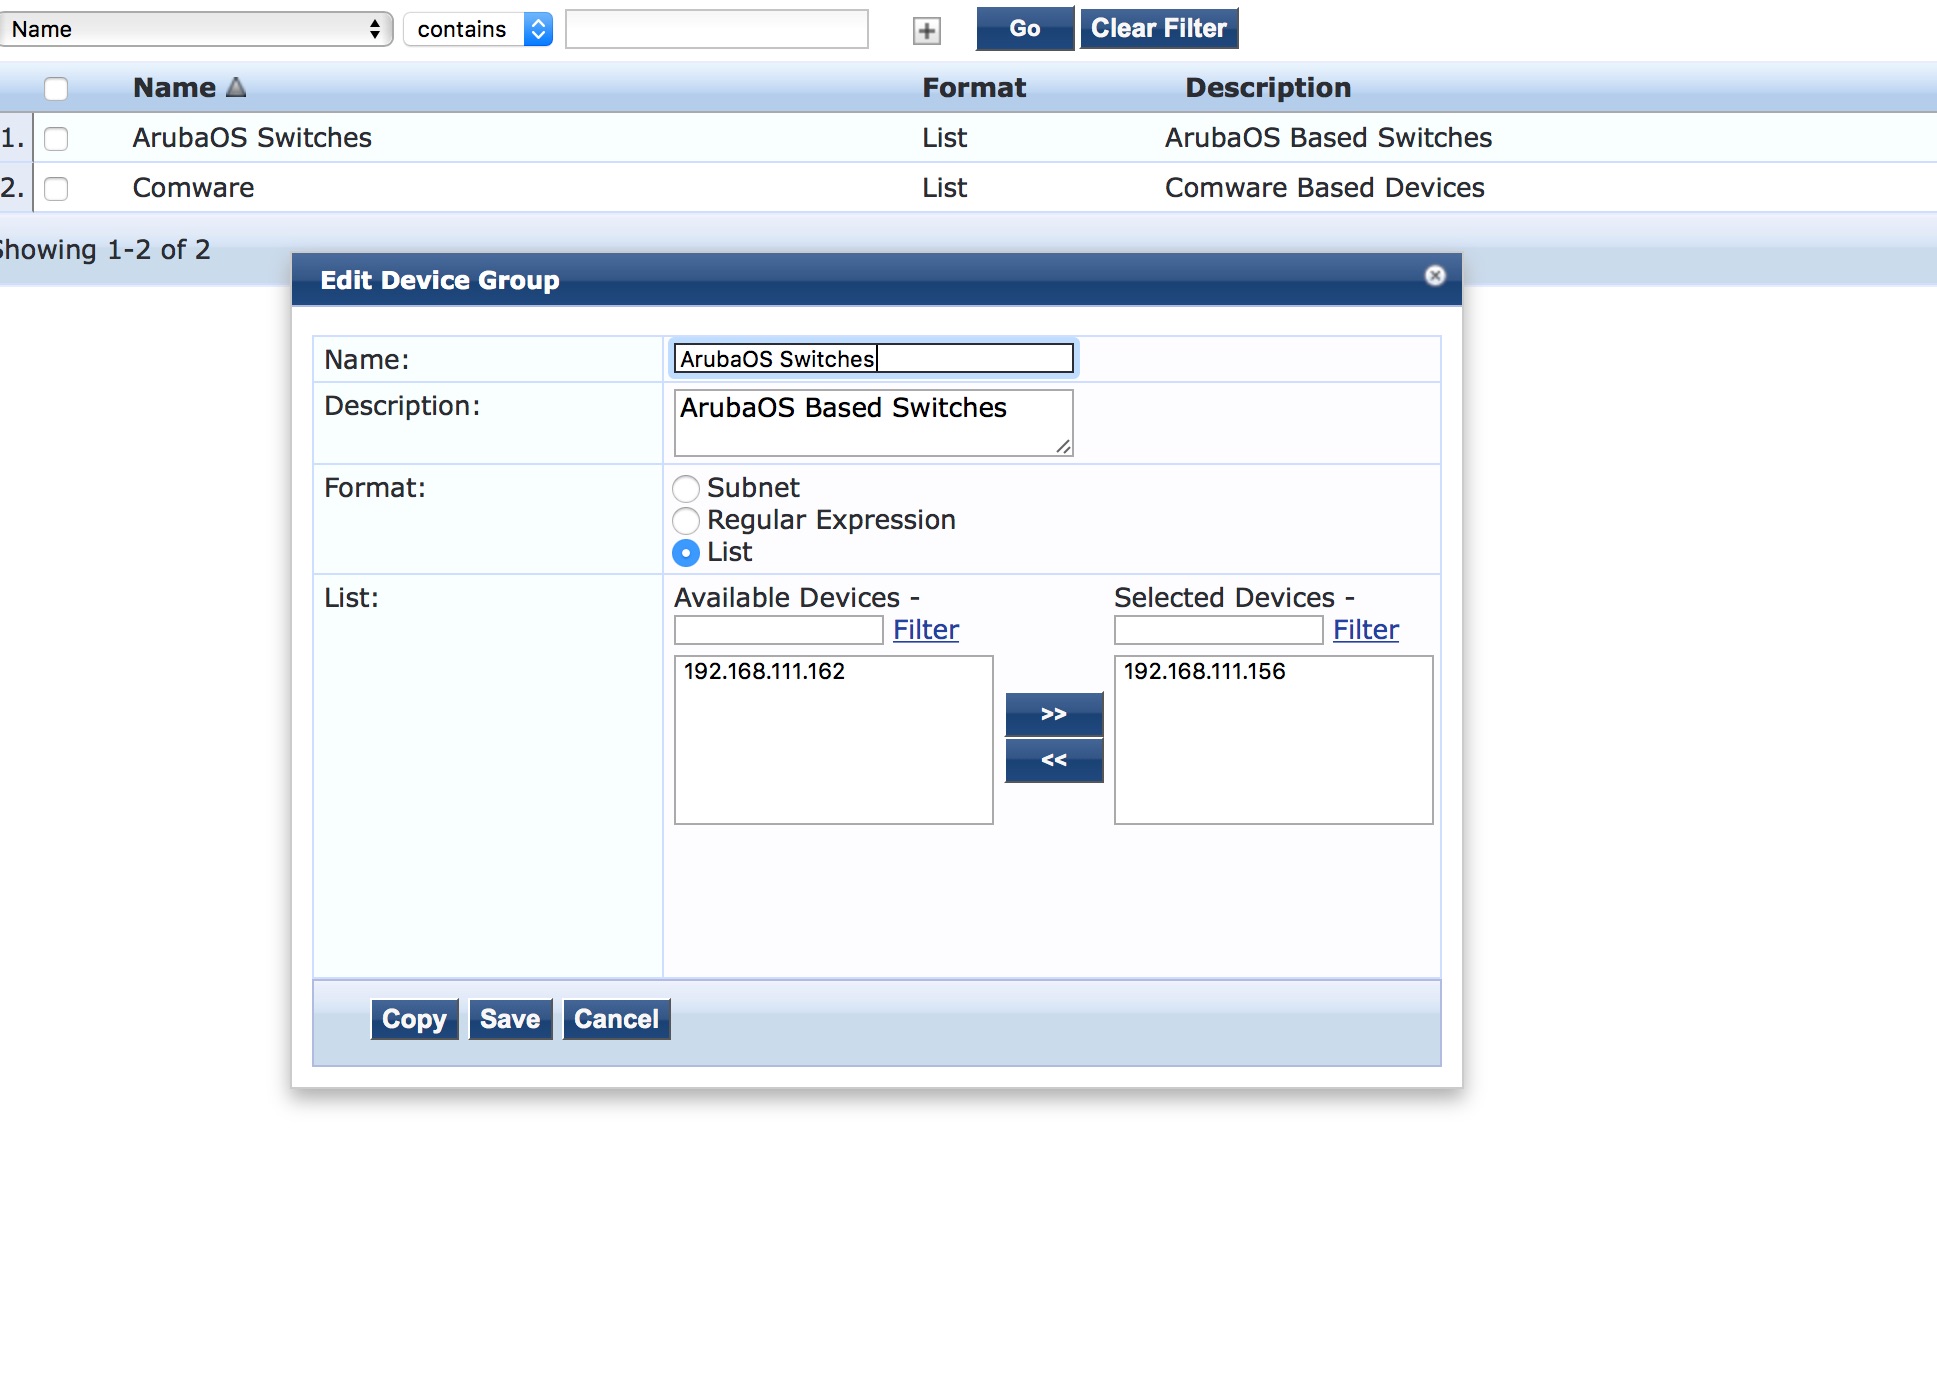
To create a device group go to “Configuration–>Network–>Device Groups” and click the “Add” button. This allows you to create the group. For Comware I created this group:

To select the devices, belonging to this group, I choose the “List” format, as this allows the selection of the device from the list of configured devices. you can also choose the “Subnet” format, which allows the definition of a subnet. Makes sense, if all devices of the same type are within the same management subnet. I’ve never used the “Regular Expression” option, but this will gives you the most flexibility.
Operator Login with Comware Based Devices Service Definition
All prerequisites are done and we can start with the service definition. The first step is the creation of the “Enforcement Profile”. Go to “Configuration–>Enforcement–>Profiles” and click the “Add” button on the top of the page.
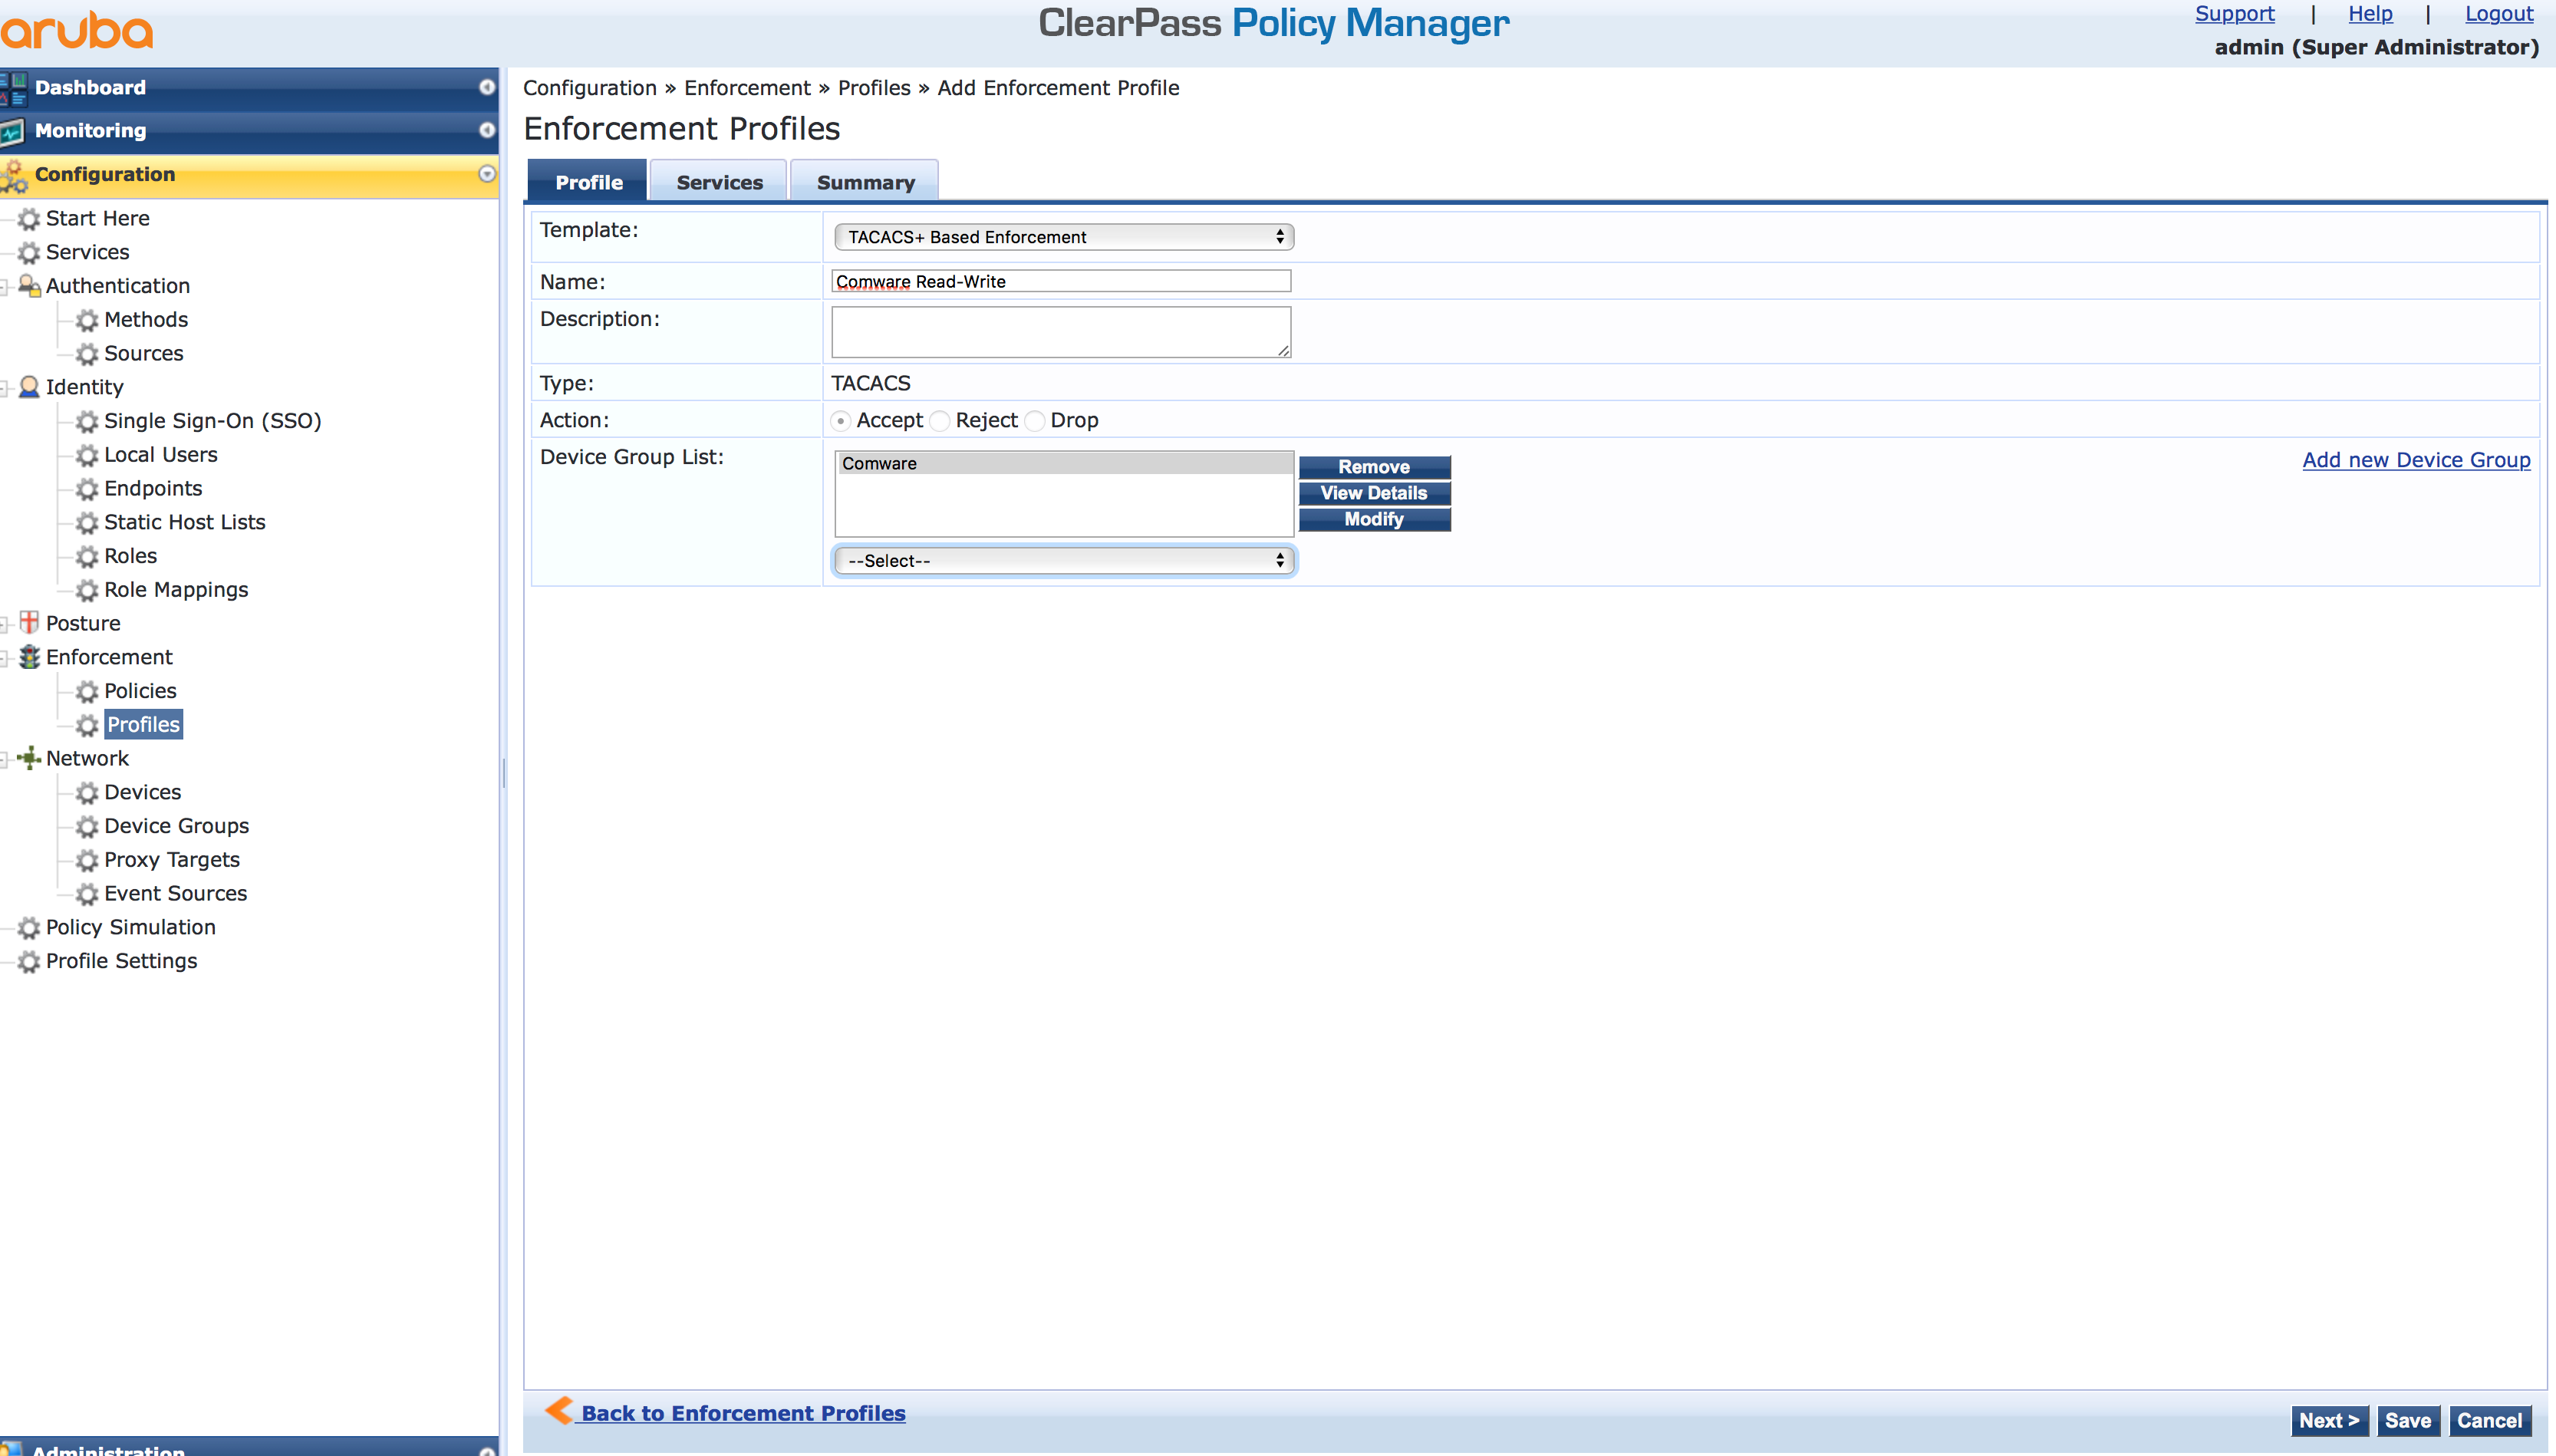
Select the “TACACS+ Based Enforcement” as the “Template”. As I create a profile for root access, a name it accordingly. The tricky part is at the bottom. Select the created device group in the “Device Group List”. This ensures, that this profile is only used for devices which are in this group. This makes life easier later on. Click “Next” to get to the next screen.
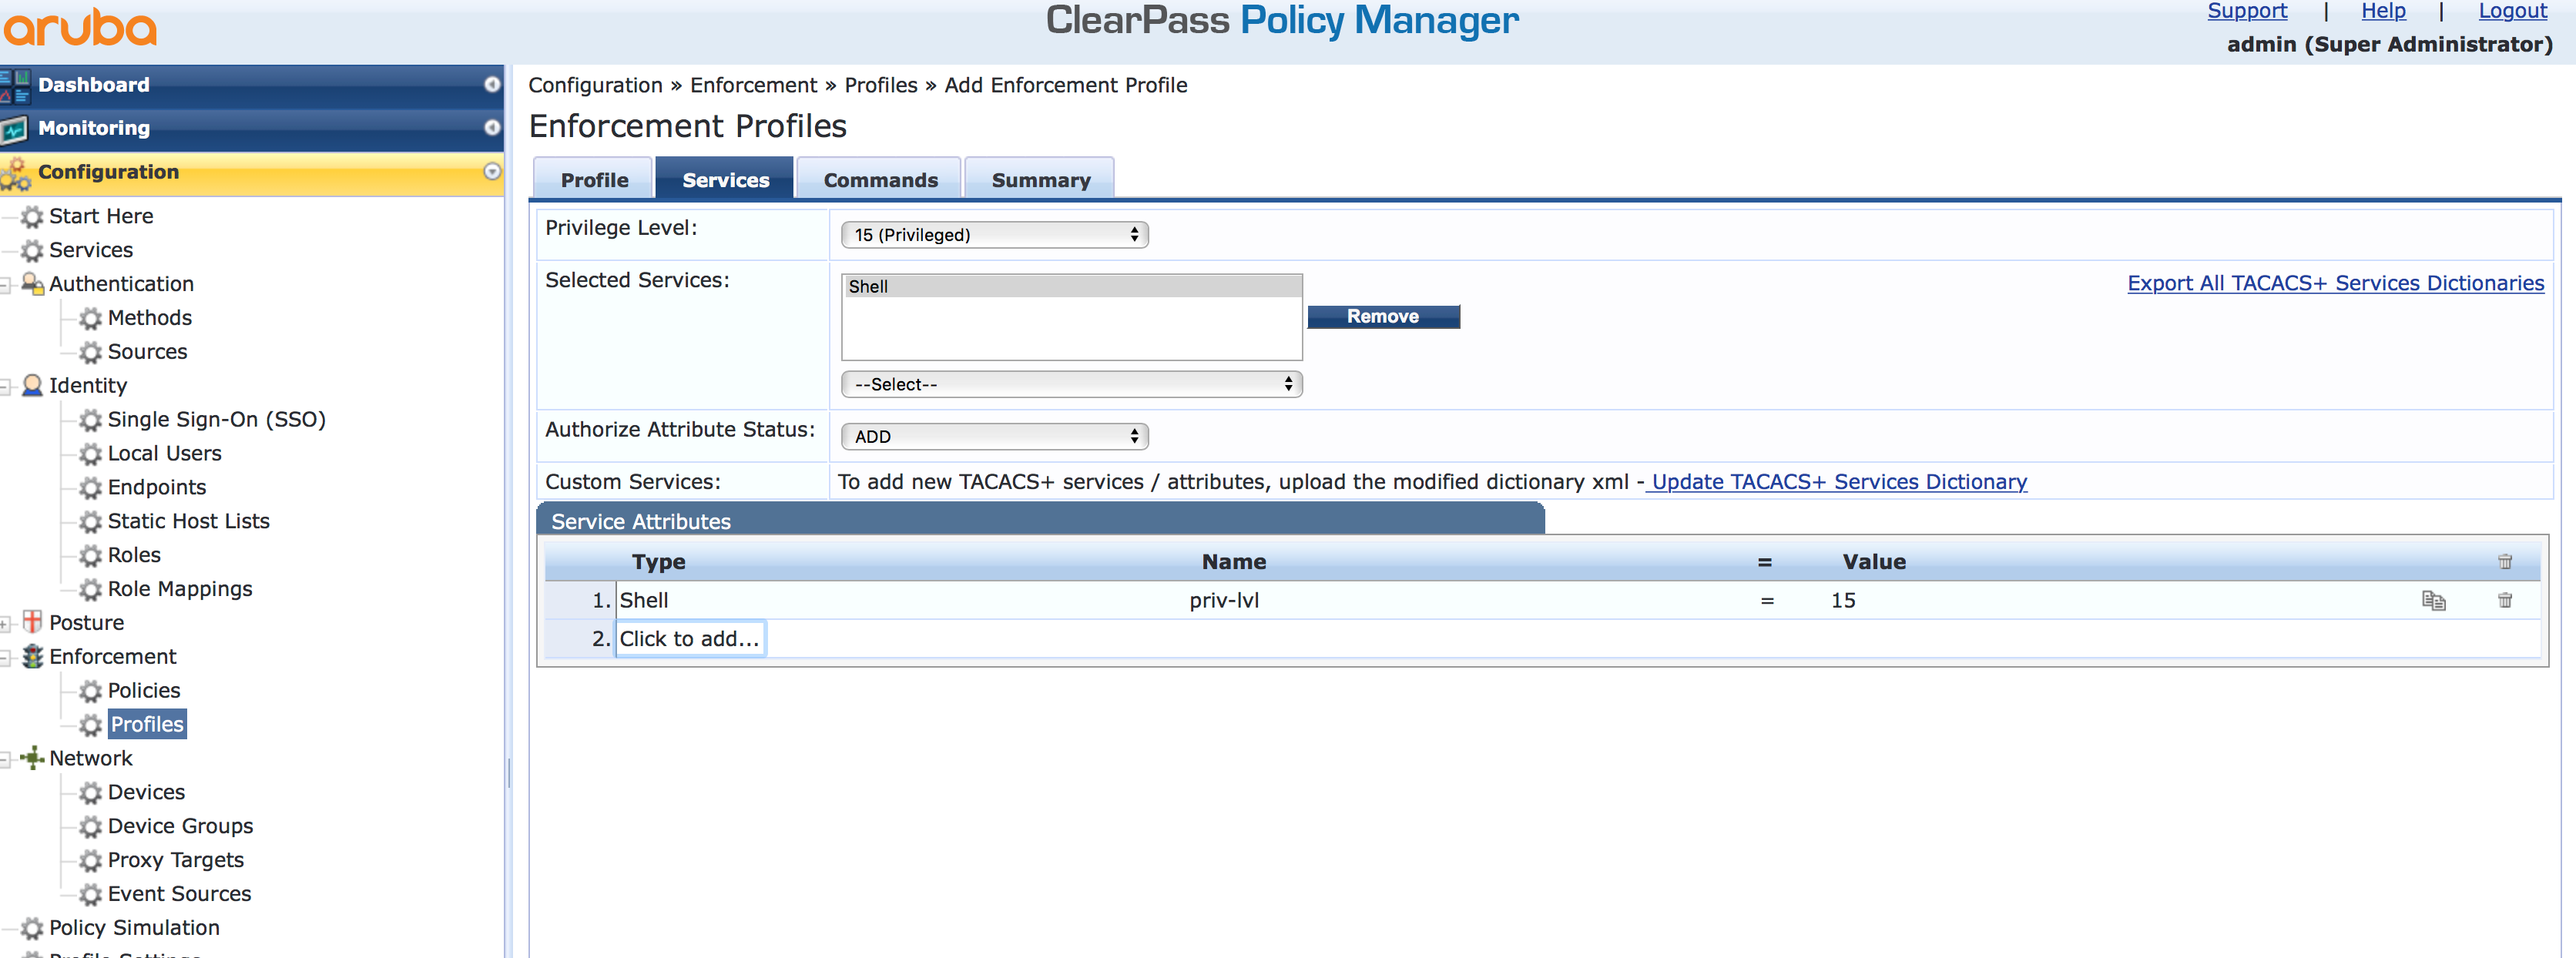
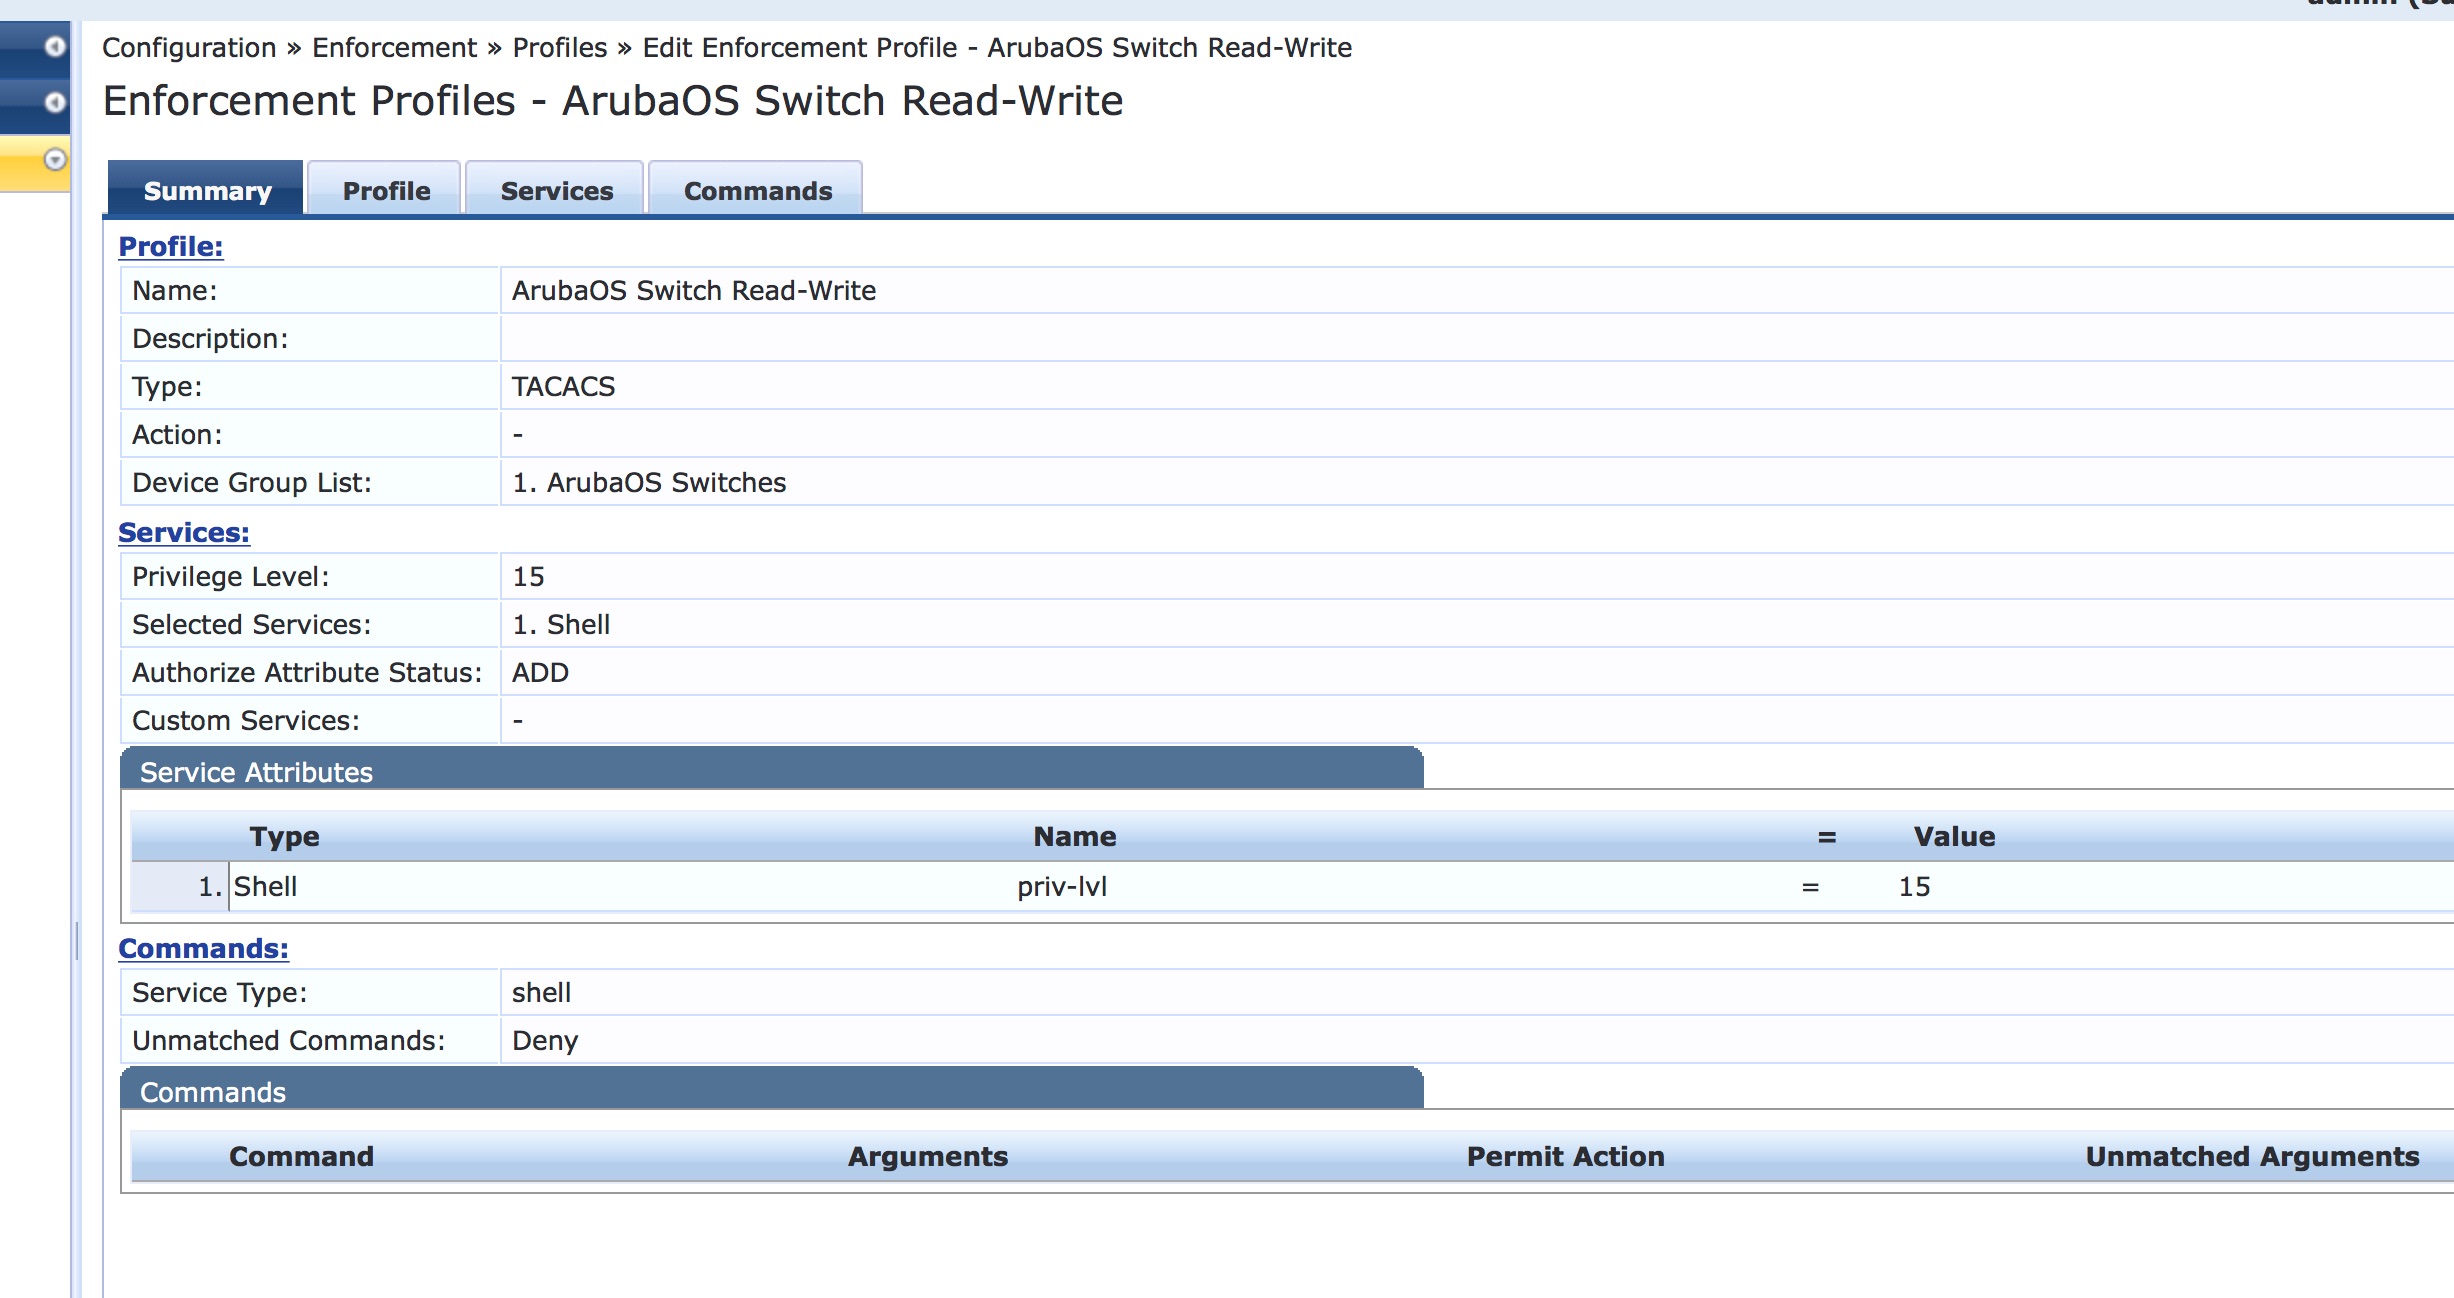
Select the “Privilege Level” for the user. In my case, it is 15 for read-write with full access. Also select “Shell” for the “Selected Services”. In the “Service Attribute” section you can specify different options for each selected service. I set the privilege level to 15 again. Click “Next”, to get to the next screen.
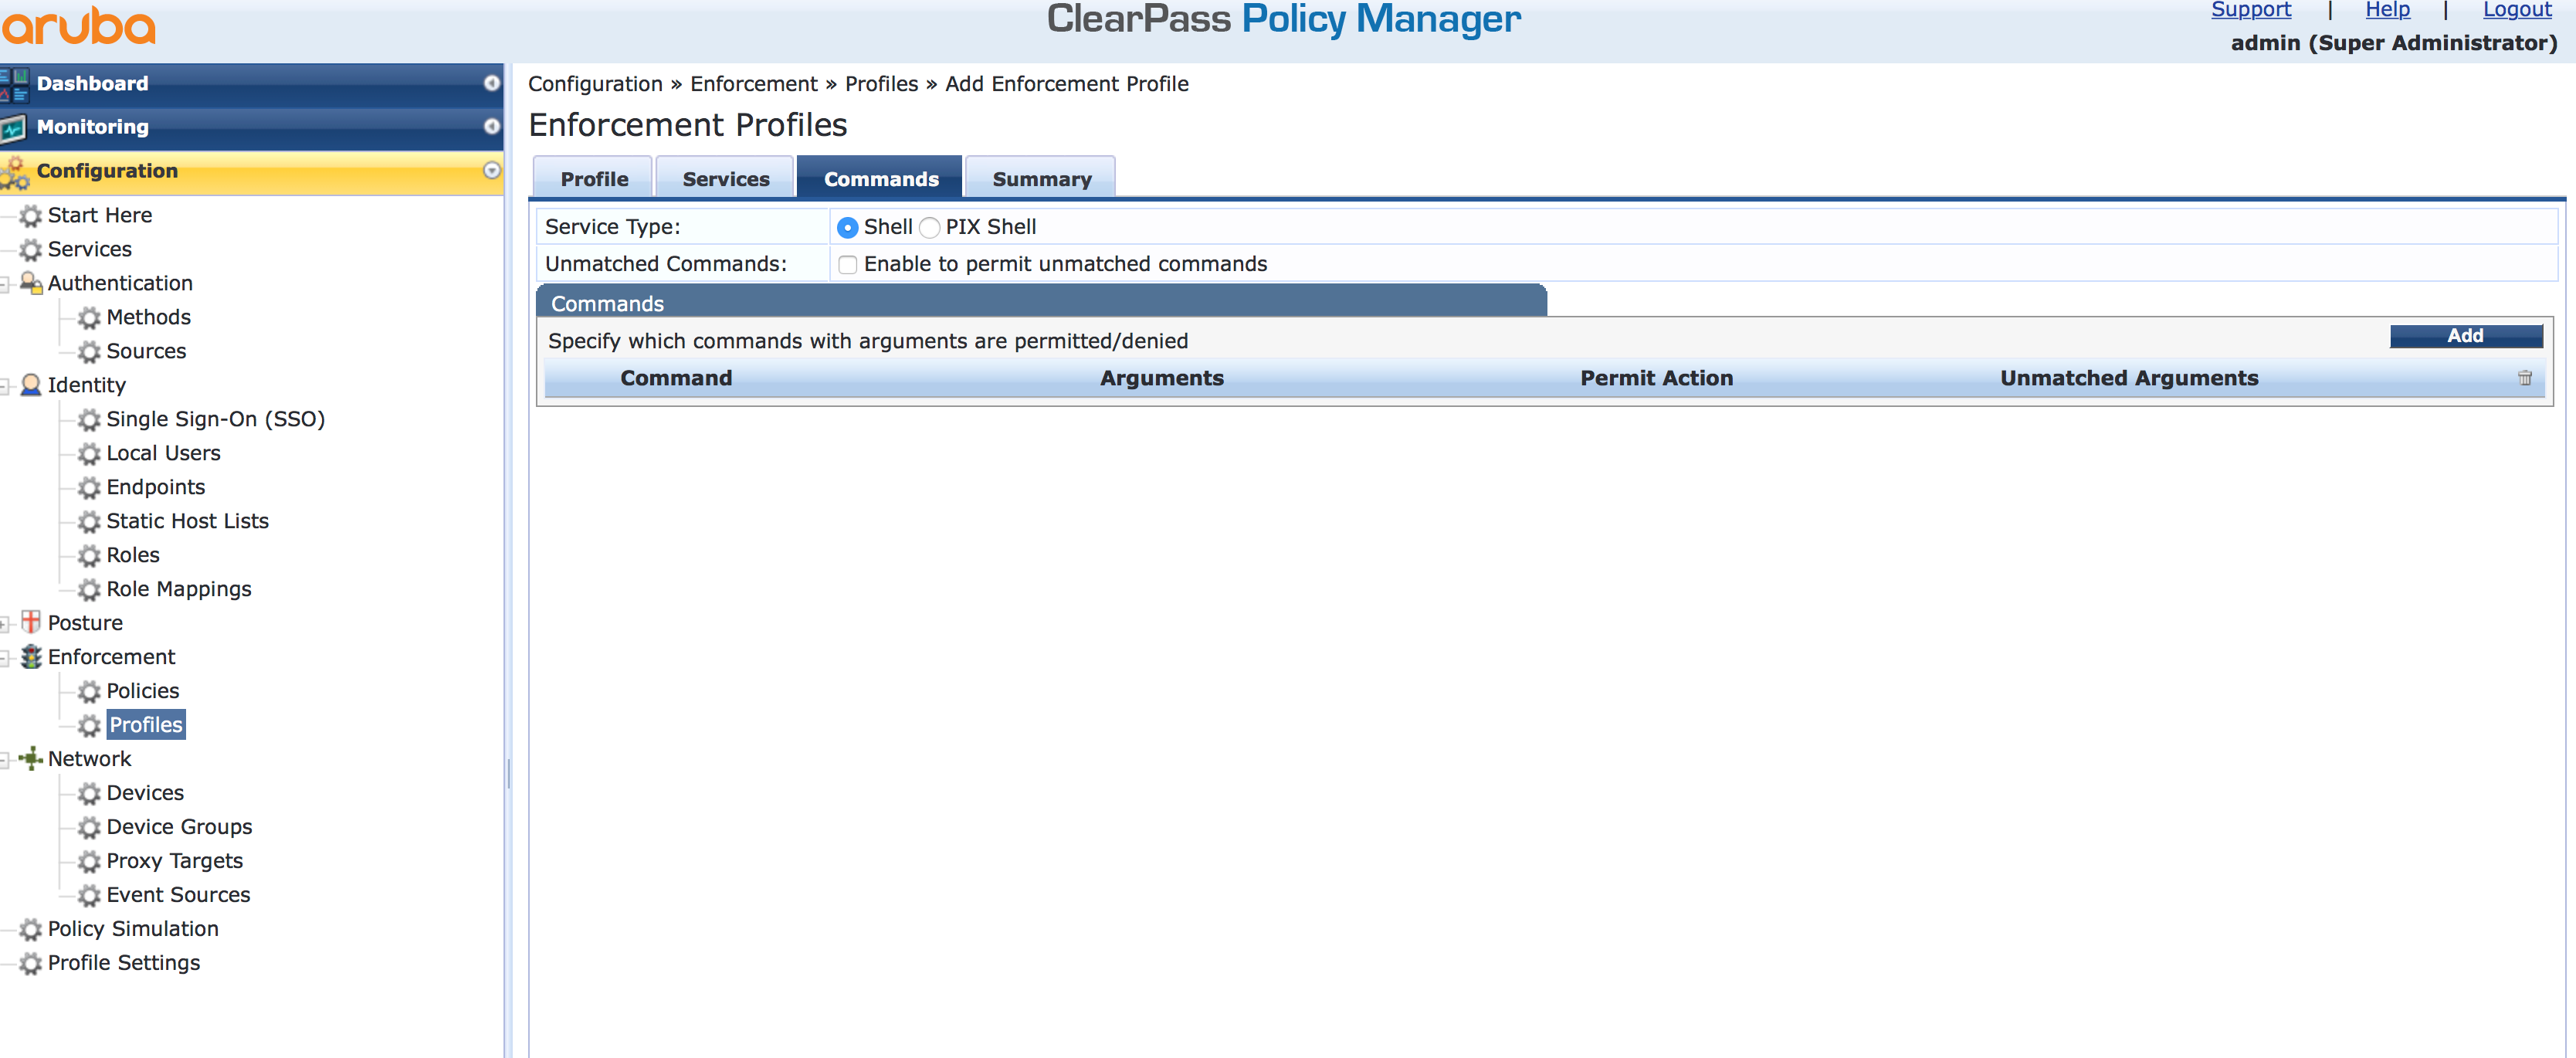
On this page, you can specify which commands are allowed for the user with this profile. In my case, I do not restrict the commands for this profile. I will cover this in a later post, as this is part of command authorization, which is a different topic.
Click “Next” to get to the summary screen and save the configuration. You should repeat those steps for every profile you need. Normally, at least one time to create the read-only profile.
The next step is to create the policy, which will assign the profile. The profile is assigned, based on user roles. In my example, I have a local user configured which has the network administrator role assigned. Based on this role, the “Comware Read-Write” profile is assigned.
To create the policy, go to “Configuration–>Enformcement–>Policies” and click the “Add” button:
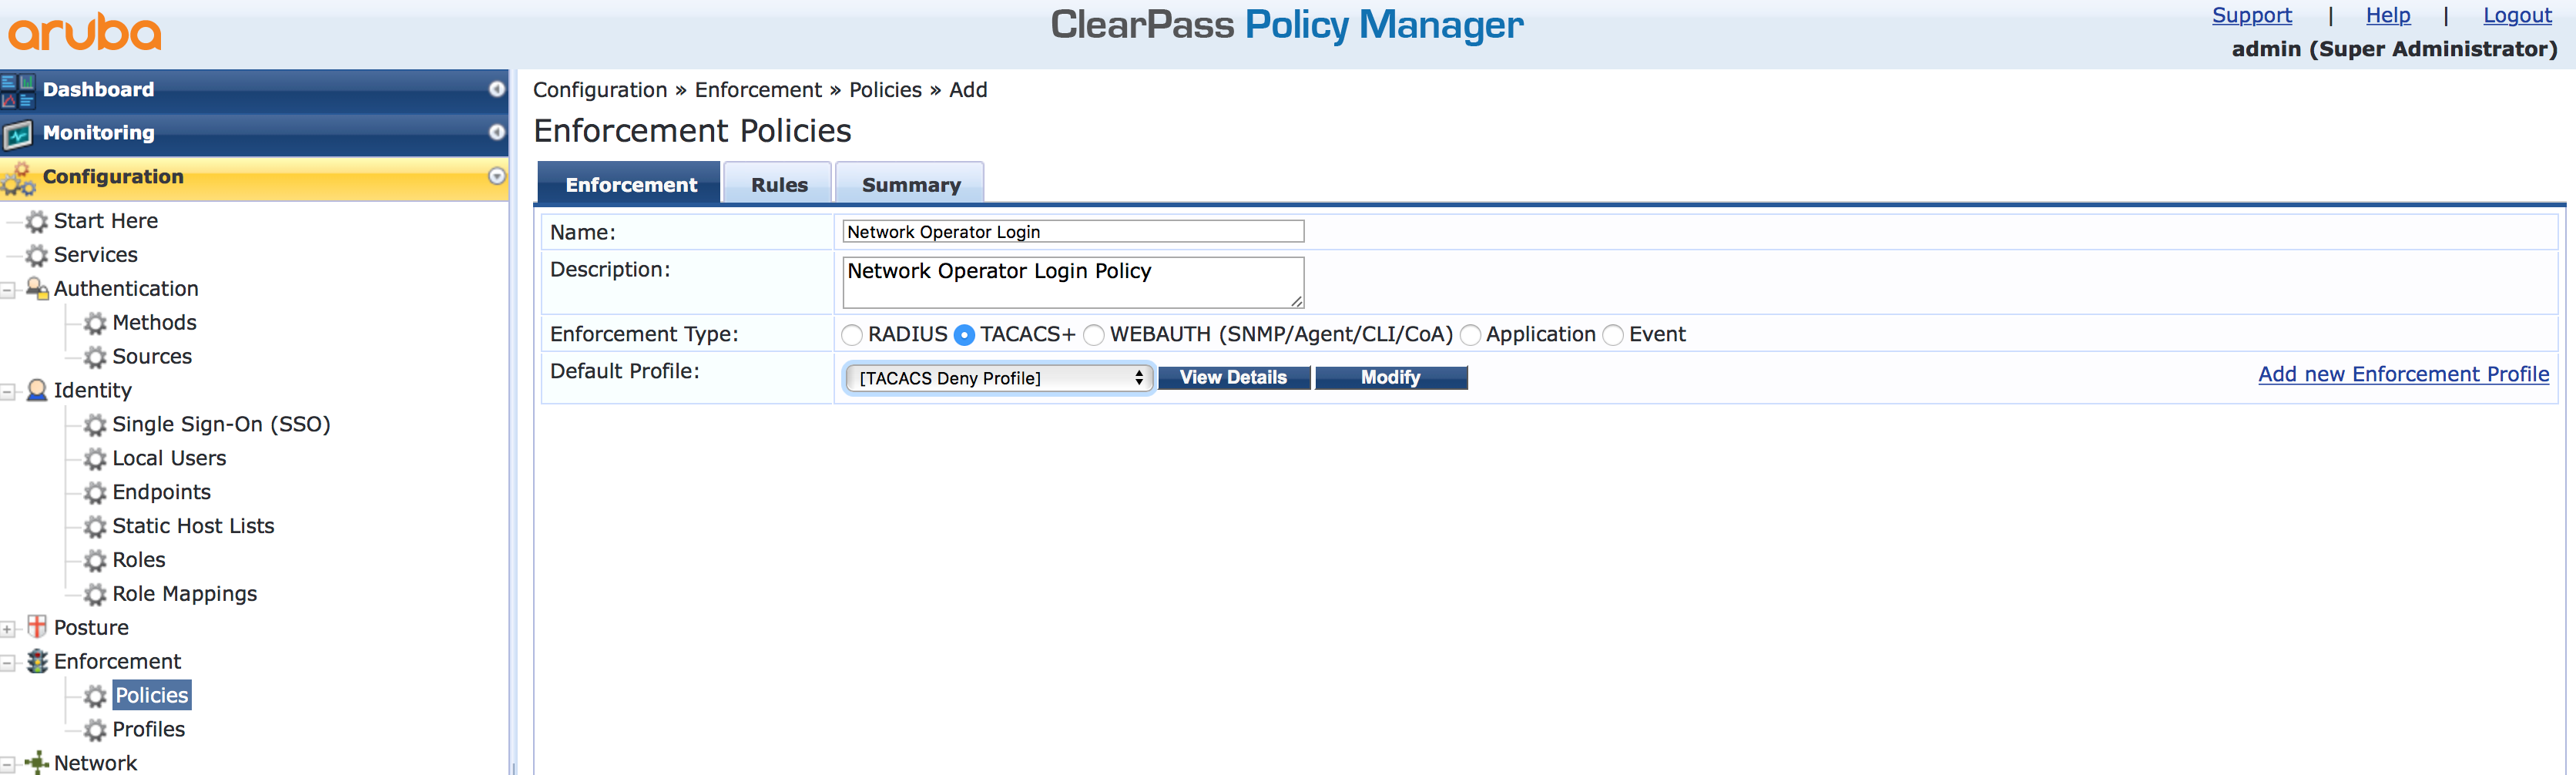
Chose a name that makes this policy unique and everyone knows what it is for, by reading the name. Select “TACACS+” for the “Enforcement Type” and select the “Default Profile”. This one is used when no rule matches the request. E.g. the user is not in the user directory. Click “Next” to get to the rules page and click the “Add” button there:
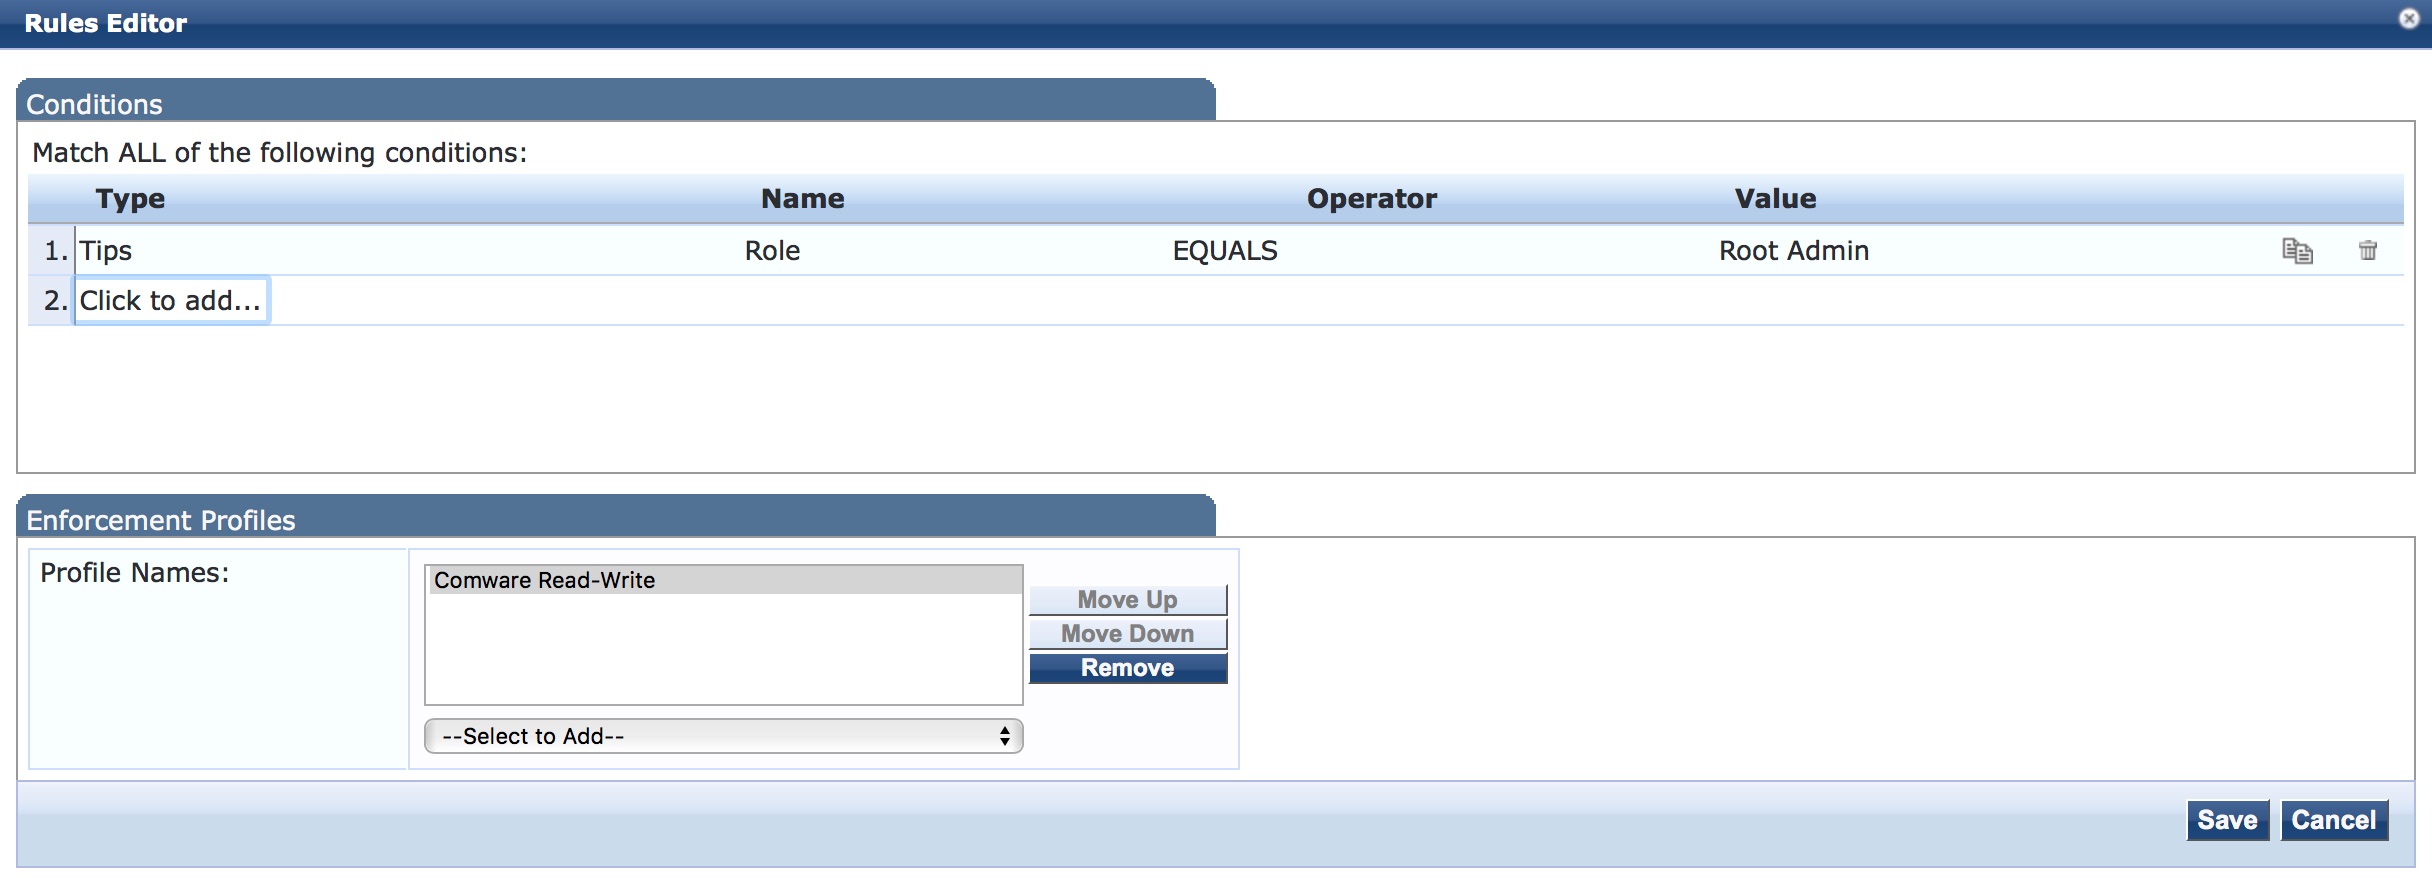
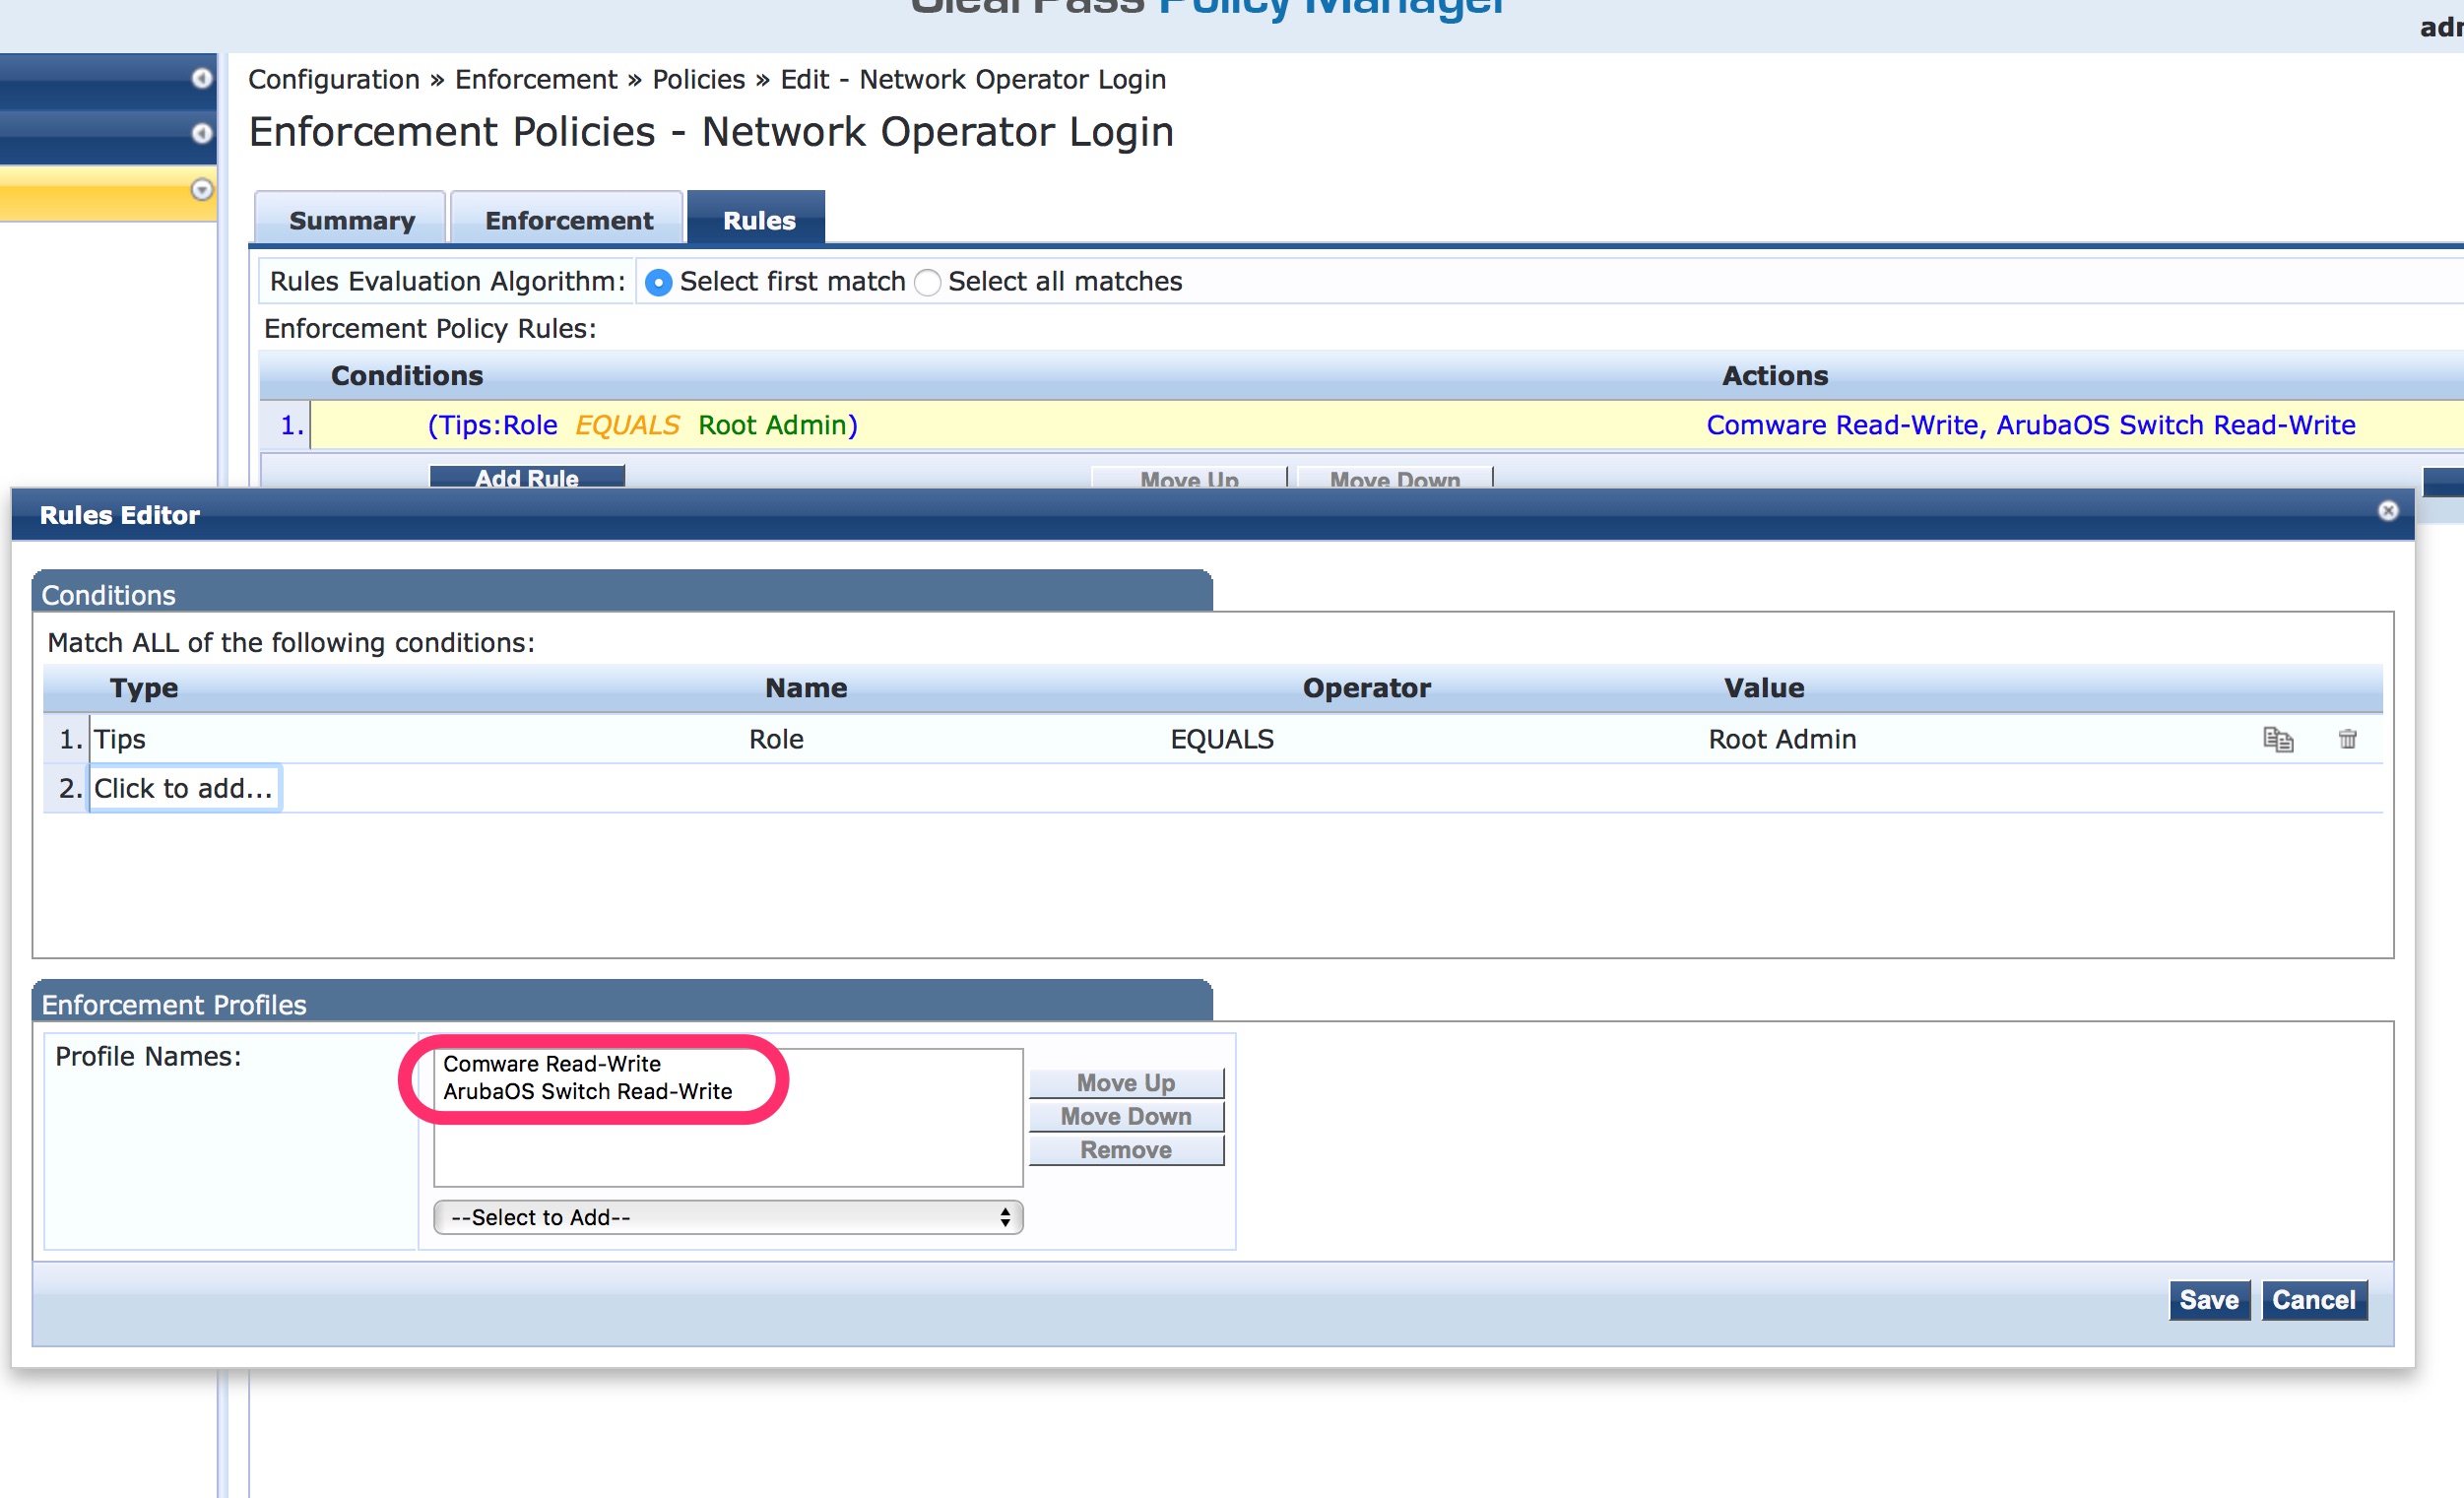
You can add more rules if needed. If all rules match, the “Enforcement Profile” on the bottom is used to send the reply to the device. If you add more devices which need different profiles, you can simply add them to this list. As with the grouping function, only profiles which match the group, the device is part of, are used to send the answer. This makes it very easy to manage those rules. Click “Save” to save the rules. Add more rules, e.g for the read-only roles and accounts. Afterward, click the “Next” button and check the configuration on the “Summary” page. Then save the policy.
The last step is to add the policy, to the created services. Open the service, from the first paragraph, again and head to the “Enforcement” tab:
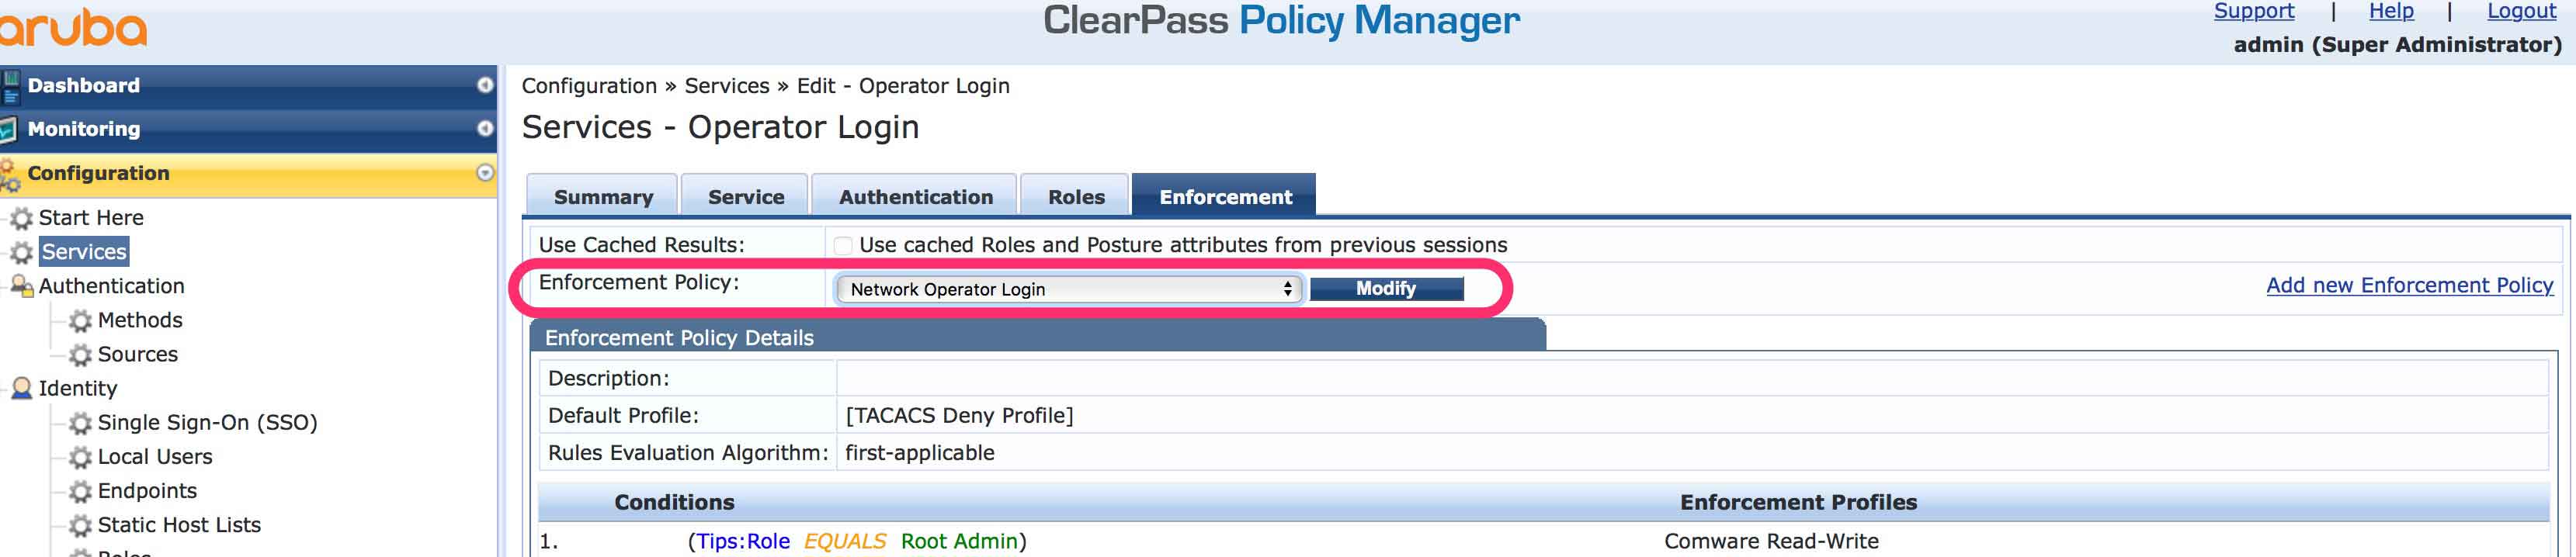
Select the created policy for the “Enforcement Policy” setting and save the service. Afterward, the authentication request from the networking device is handled by ClearPass using the created service and the profile:

Operator Login with ArubaOS (Switches) based Devices
The following paragraph describes the configuration of the ArubaOS switch to support TACACS+ on ArubaOS based Switches and the additional configuration tasks for ClearPass.
On the Switch, you need to enable TACACS+ authentication for SSH, or any other service you would like to use, with the following command:
ArubaOS-Test(config)# aaa authentication ssh login tacacs localAfter the successful login, the user needs to authenticate to access the enable context as well with the following command:
ArubaOS-Test(config)# aaa authentication ssh enable tacacs localThe end of both commands defines the authentication method. It is best practice to define local as the second authentication option, in case the TACACS+ server is not available. This ensures that access to the device is always possible.
To avoid the need to double authenticate and access the enable mode with the first login, use this command:
ArubaOS-Test(config)# aaa authentication login privilege-modeThe last step is to configure the TACACS+ server on the Switch:
ArubaOS-Test(config)# tacacs-server host 192.168.111.55 key comcomcomRepeat this command for every TACACS+ server you have.
The next step is to add the switch to ClearPass. It should look like this:
Afterward, create the device group for ArubaOS switches:
You also have to create the profiles for the ArubaOS switches. This is the summary screen for one the profiles:
The last step is to add the profile to the policy. The policy can be the same as before, which is used for Comware devices:
Afterward, the authentication for ArubaOS switches should work.
Operator Login with AirWave
AirWave also has the ability ao authenticate against a TACACS+ server. To use TACACS+ for authentication go to “AMP Setup–>Authentication” on the AirWave server:
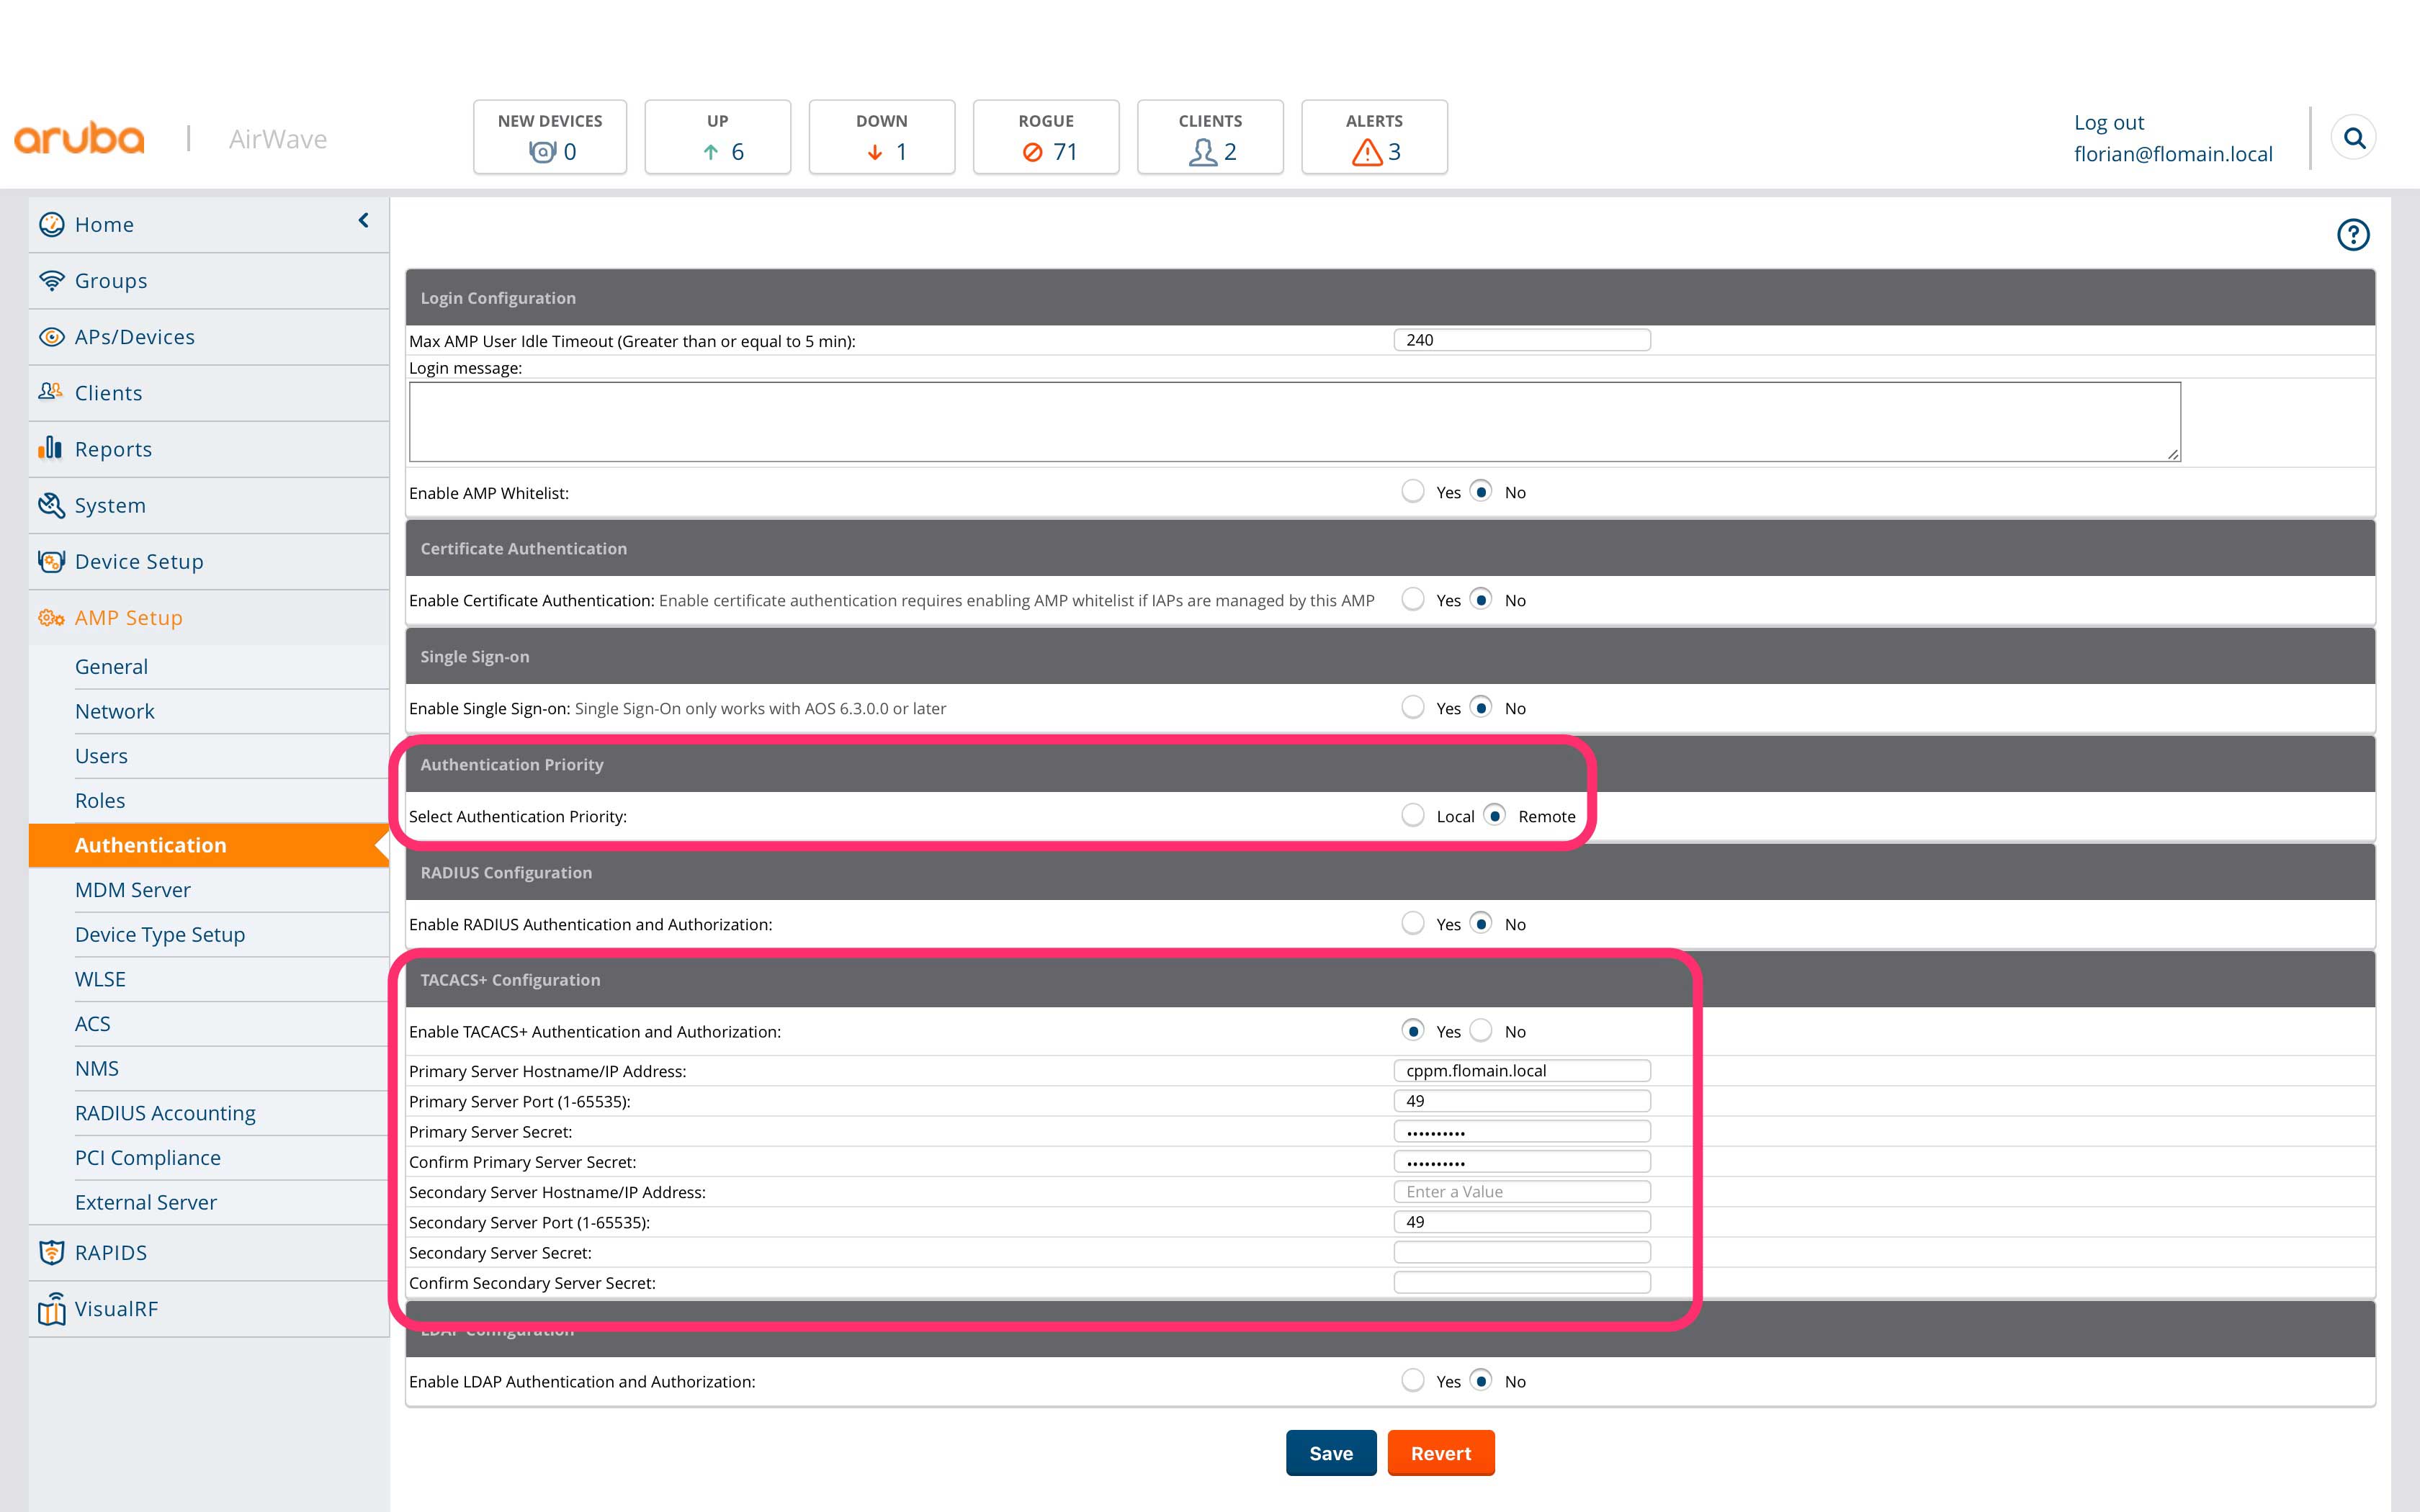
Select “Remote” for “Authentication Priority”. The local account will always be accessible. This makes sure, that you can log in, even when the TACACS+ server is not available. Also, configure the details for the TACACS+ server. Afterward, click save to apply the settings. That’s all on the AirWave part.
Now, head over to the ClearPass part. First, create the device, in this case, the AirWave server:
Afterward create the device group for AirWave:
Next step is to create the profile for AirWave:
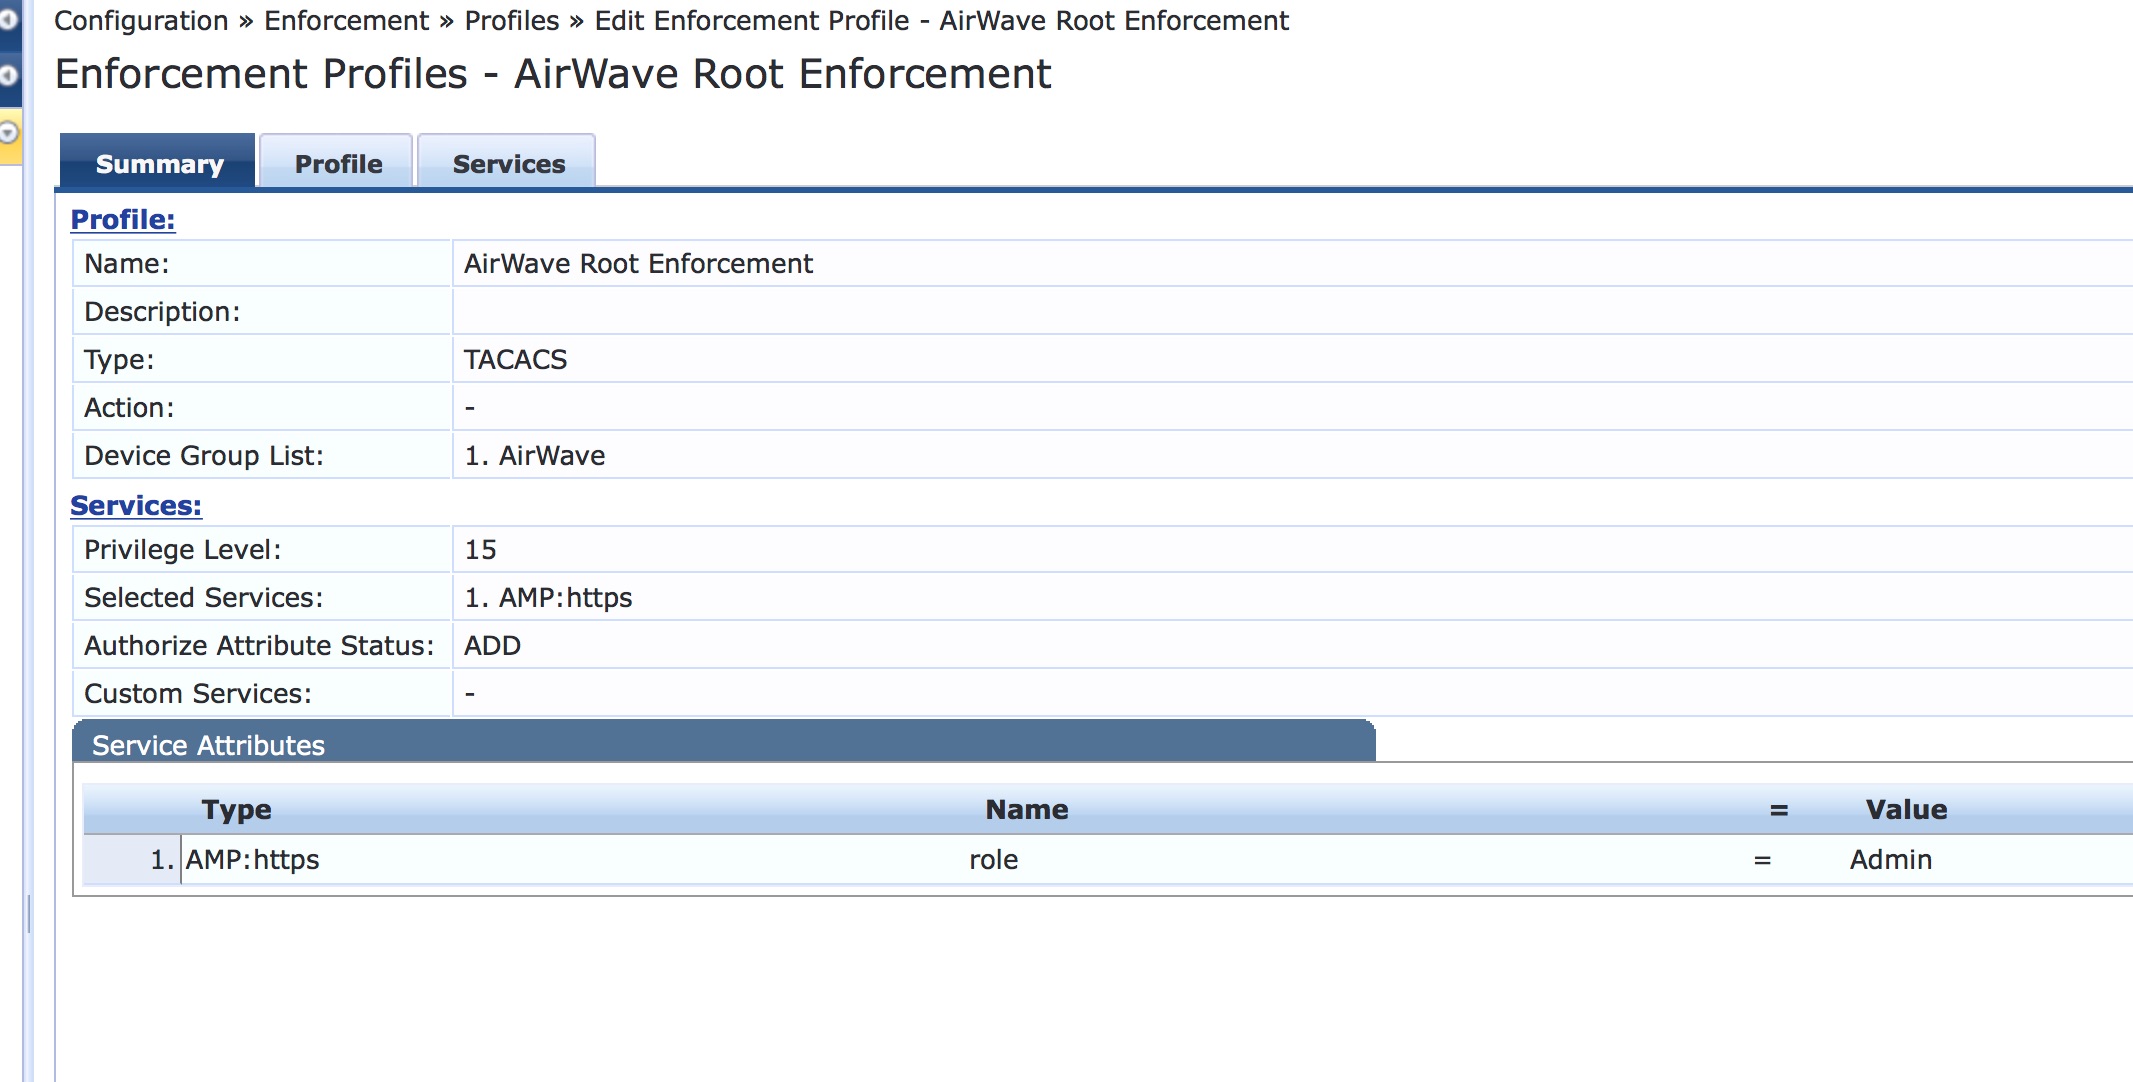
As the service, select “AMP:https” for this profile. For full access select the predefined “Admin” role. You can also use any other role name, previously defined in AirWave.
Add the profile to the previously used policy and you can use TACACS+ for authentication on your AirWave server.
Operator Login with ArubaOS Controller
ArubaOS for WLAN controller supports TACACS+ as well. For this test, I use the brand new ArubaOS 8 version.
To configure ArubaOS for TACACS+ authentication, the first step is to create the Authentication Server Group. I demonstrate the configuration for the managed devices, but the same applies to the virtual mobility master. Go to “Managed Network–>Configuration–>Authentication–>Auth Servers” and press the “+” button, to add a new server group:
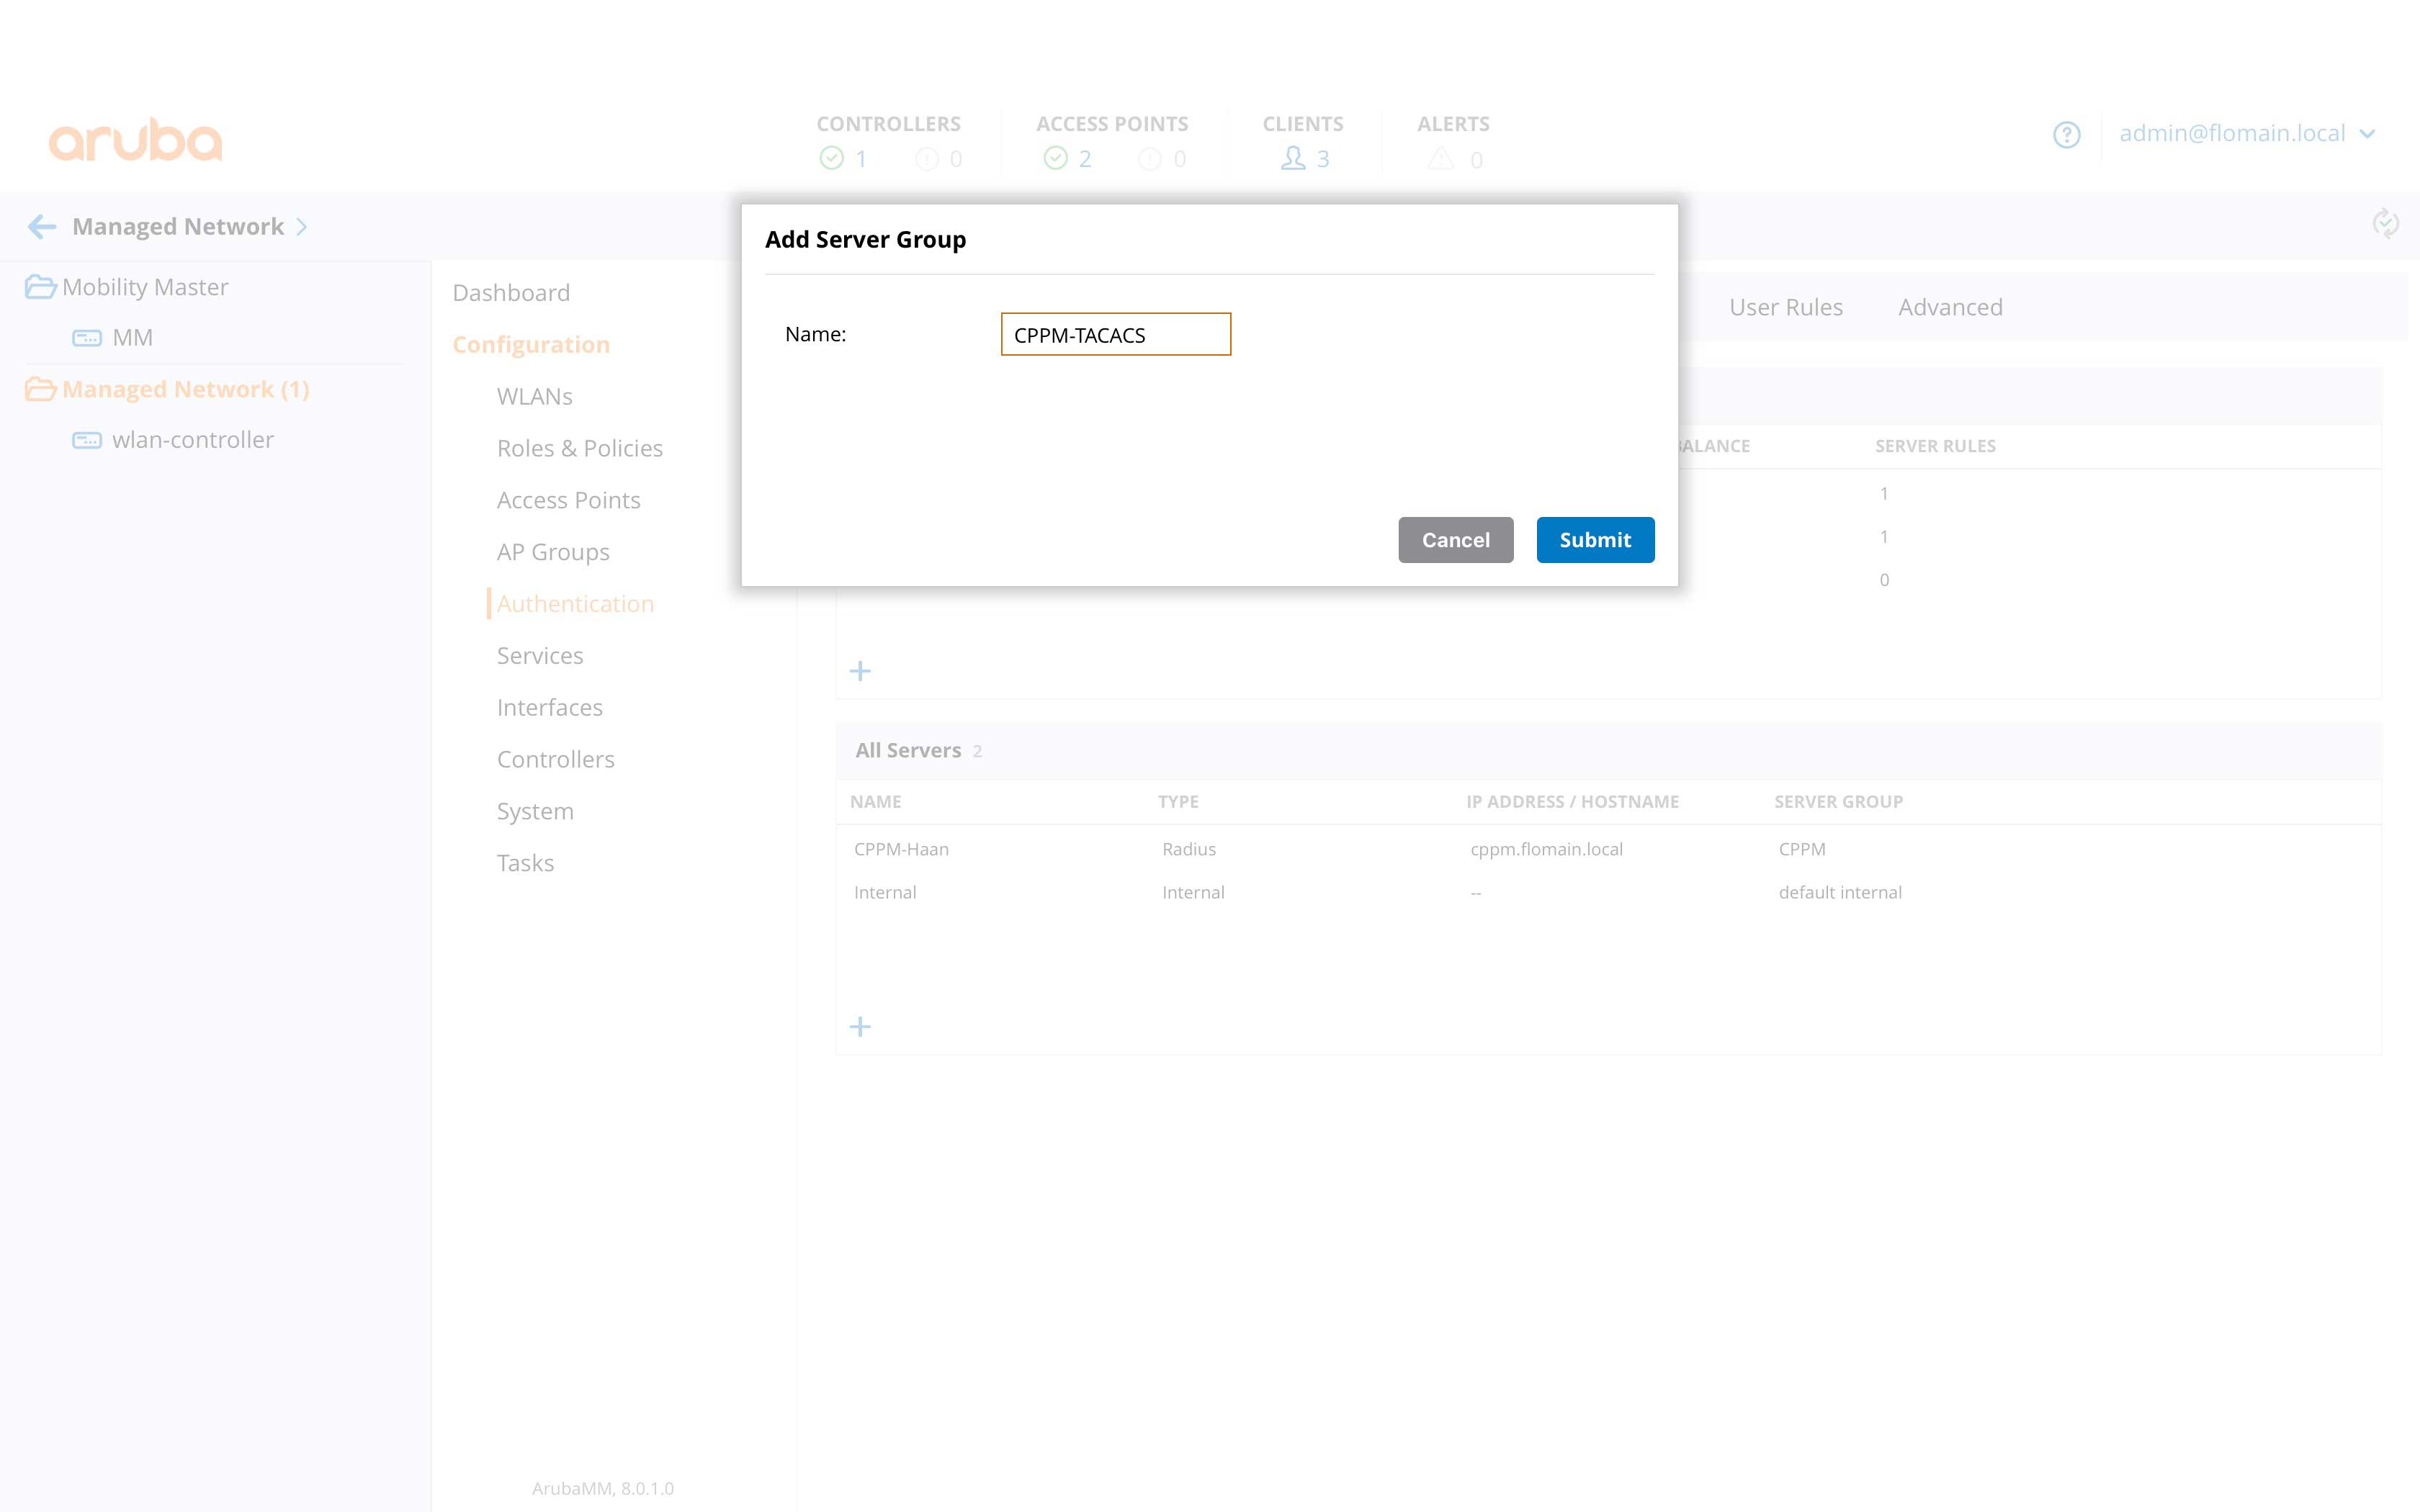
Press the submit button, to save the new group. Afterward, select the new group and press “+” button in the lower box to add a new server to this group:
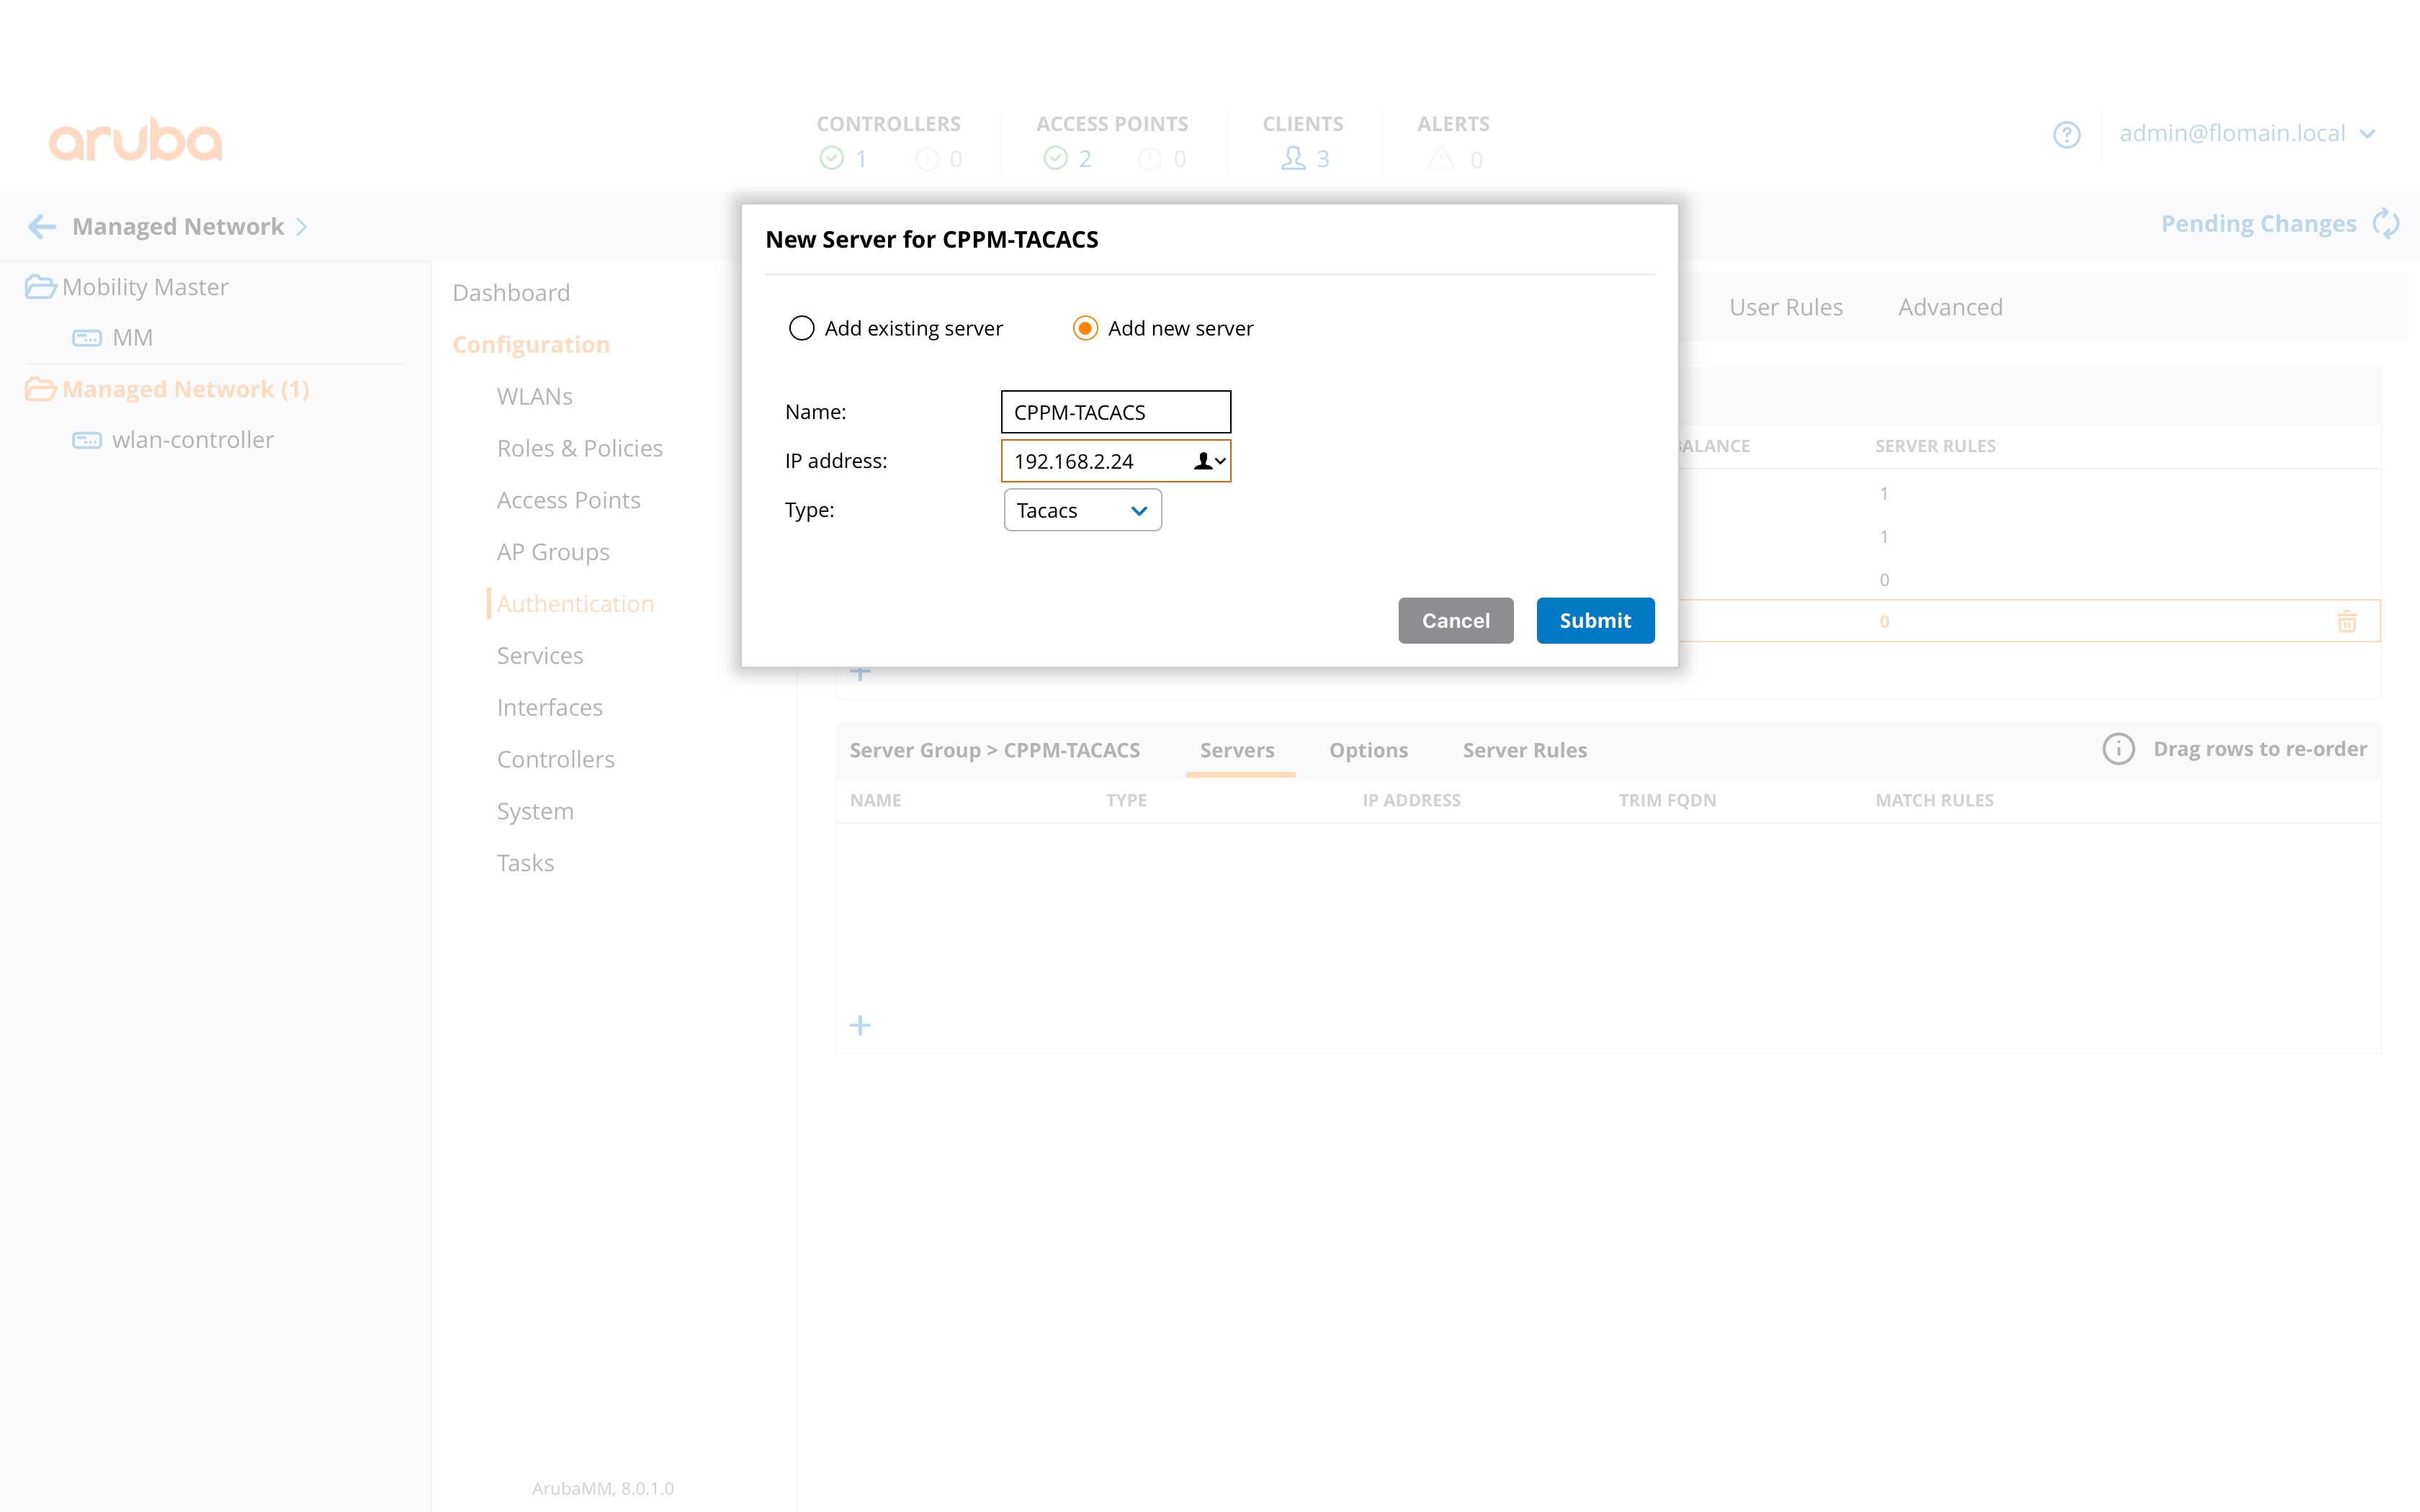
Press the “Submit” button to save the new server. Now, select the server in the lower box and configure the secret key for the connection:
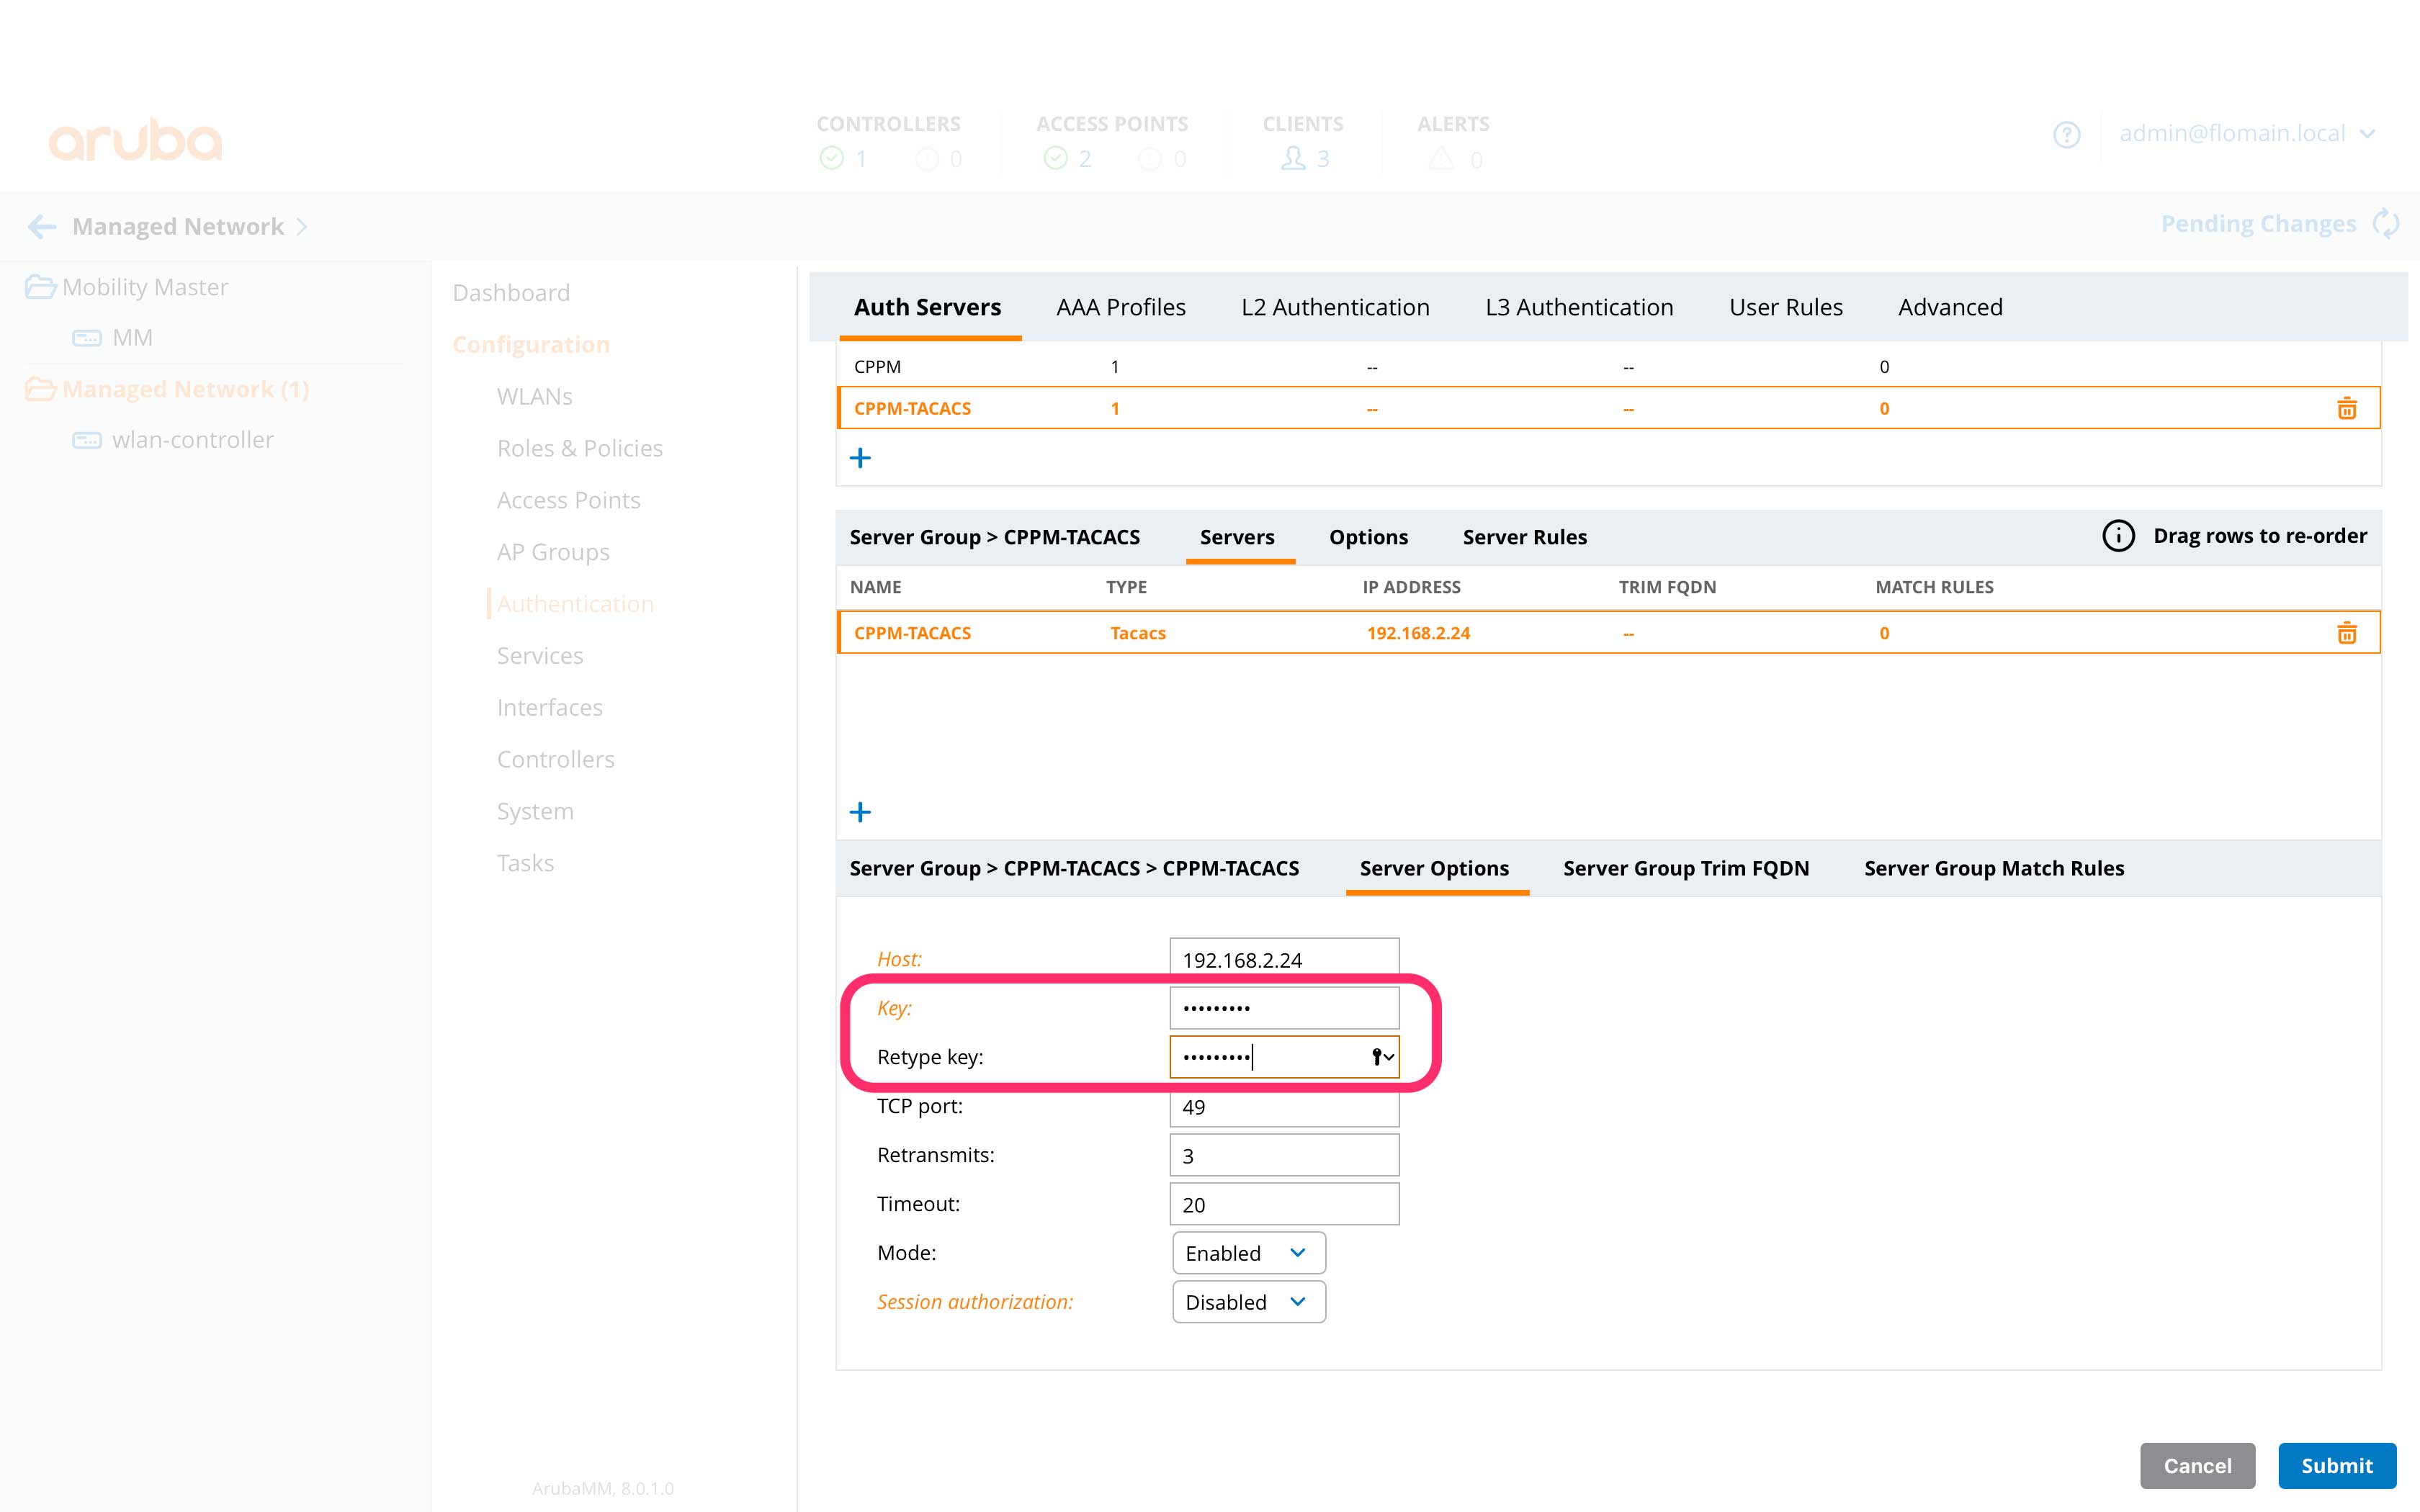
****UPDATE****
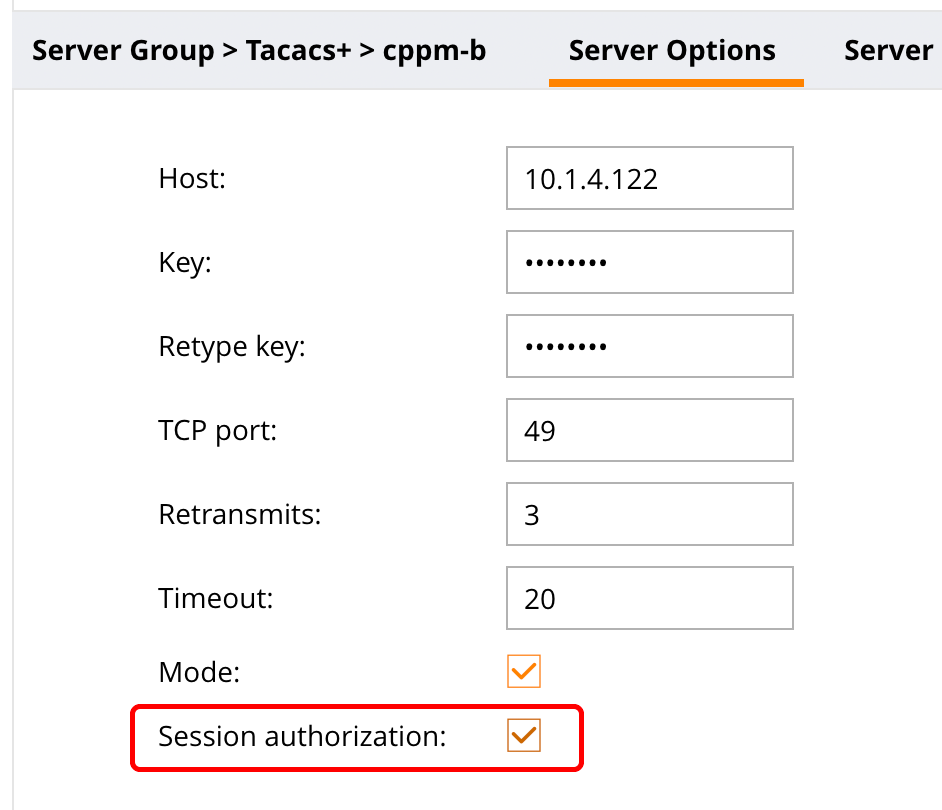
thanks to the comment from Udo I noticed an errror in the post. To make it work you also need to enable “Session authorization”:
The screenshot above is from a newer version. In older versions there is a select box instead of the checkbox.
****End of UPDATE****
Submit the changes and deploy the changes to all nodes.
The last step on the controller is to apply the authentication server group for management authentication. Head over to “Managed Networks–>Configuration–>System–>Admin–>Admin Authentication Options”. This brings up the following page:

The important options are those within the red square. The default rule is used for authentication request where no rule is returned. Do not use MSCHAPv2 with TACACS+, as this will not work. The rest is self-explaining. Submit the changes and synchronize them to all nodes.
The last step is to configure ClearPass to support the authentication of ArubaOS based controller. First, create the device within ClearPass:
Afterward, create the device group:
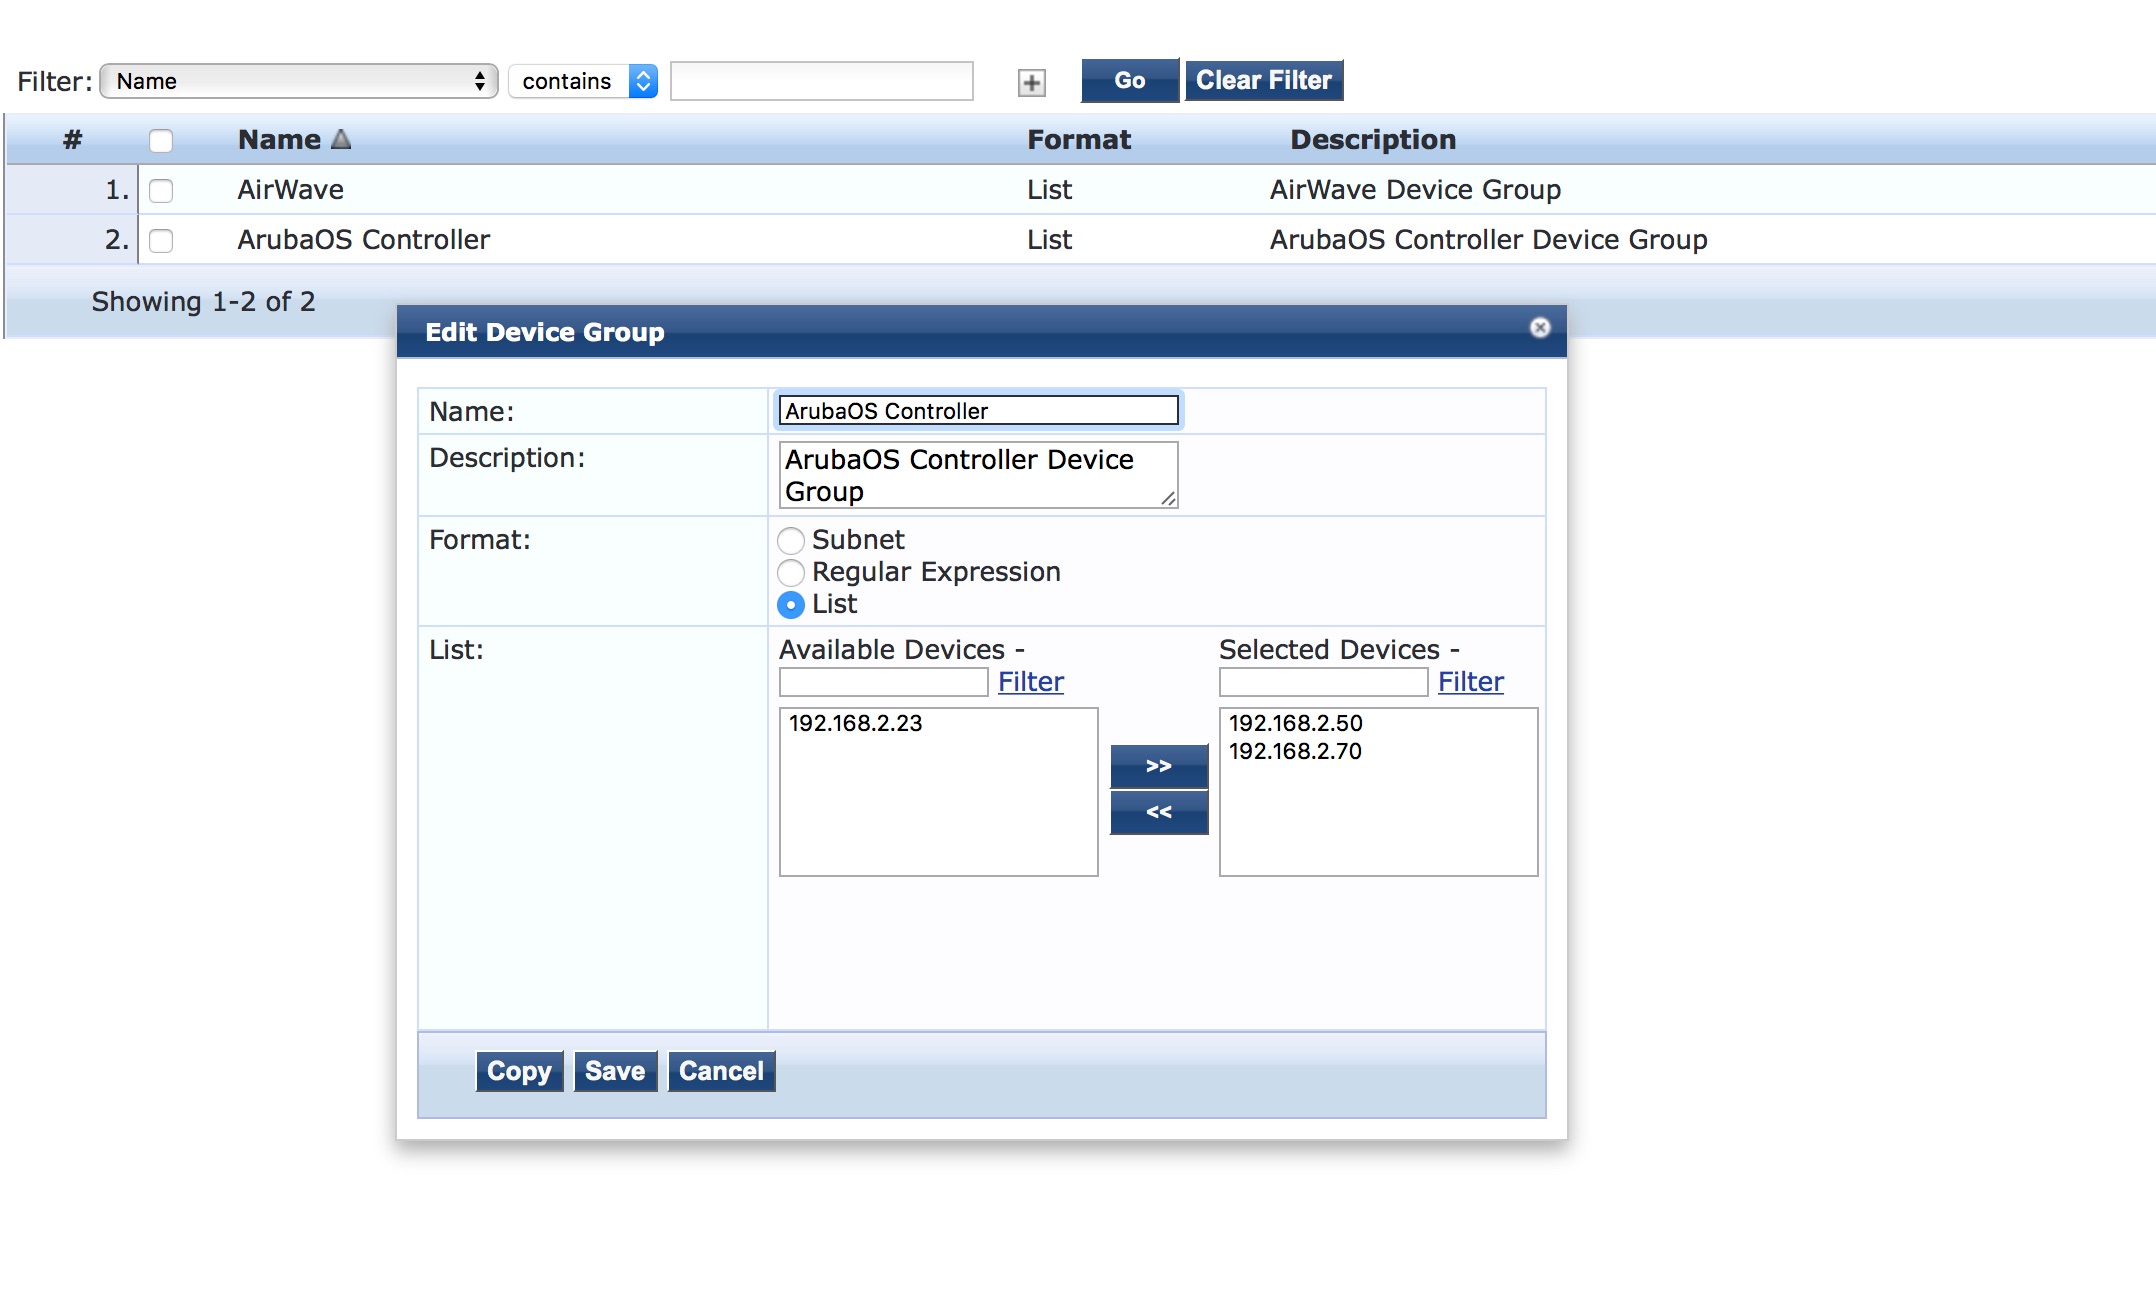
Then, create the profile for the ArubaOS controller:

And finally, add the profile to the policy:
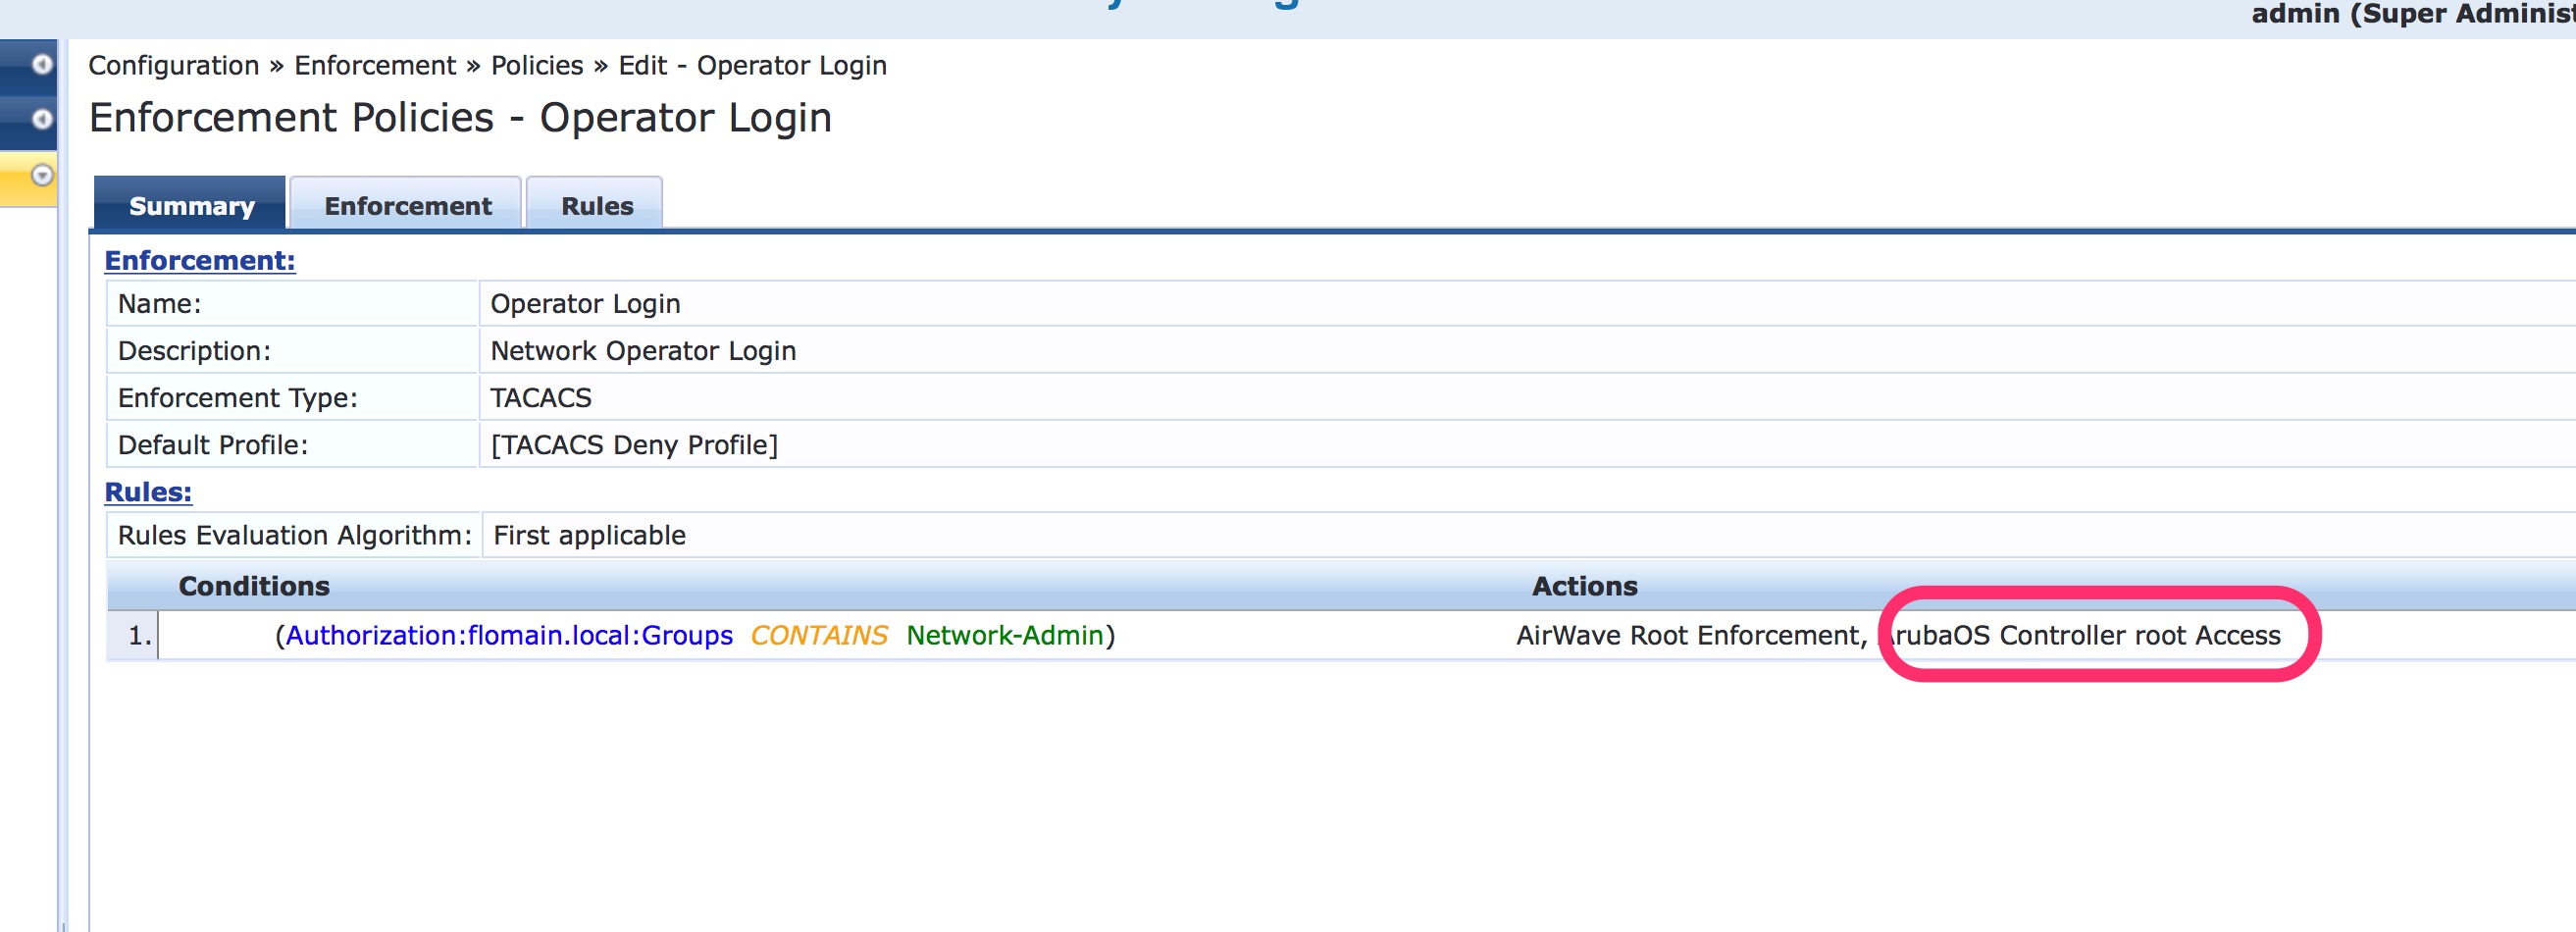
That’s the configuration and afterward, log on using TACACS+ should work.
That post includes a lot of examples on how to use TACACS+ for operator login. In the next post, I will concentrate on authorization after the login.
Feel free to write me your opinion below as a comment. I appreciate any discussion about the topic.
Another awesome write up
Thanks Robert for the feedback. Really appreciated.
I know this has been out here for a while, but this was a helpful writeup. Thank you!
Thanks, Doug U. really appreciated it.
Hello,
I done configure with the Operator Login with ArubaOS Controller and work fine with root Profiles but i want create another Profiles with readonly but can’t make it work ? can you help me ?
Hi Mohammad,
thanks for asking. Actually, it should be quite easy to use different profiles than root. I changed the profiles from above to the following, to return the read-only profile:
	Type	Name	=	Value

1.	Aruba:Common	Aruba-Admin-Role	=	read-only
After login to the CLI I have the read-only role assigned:
show loginsessionsSession Table
-------------
ID User Name User Role Connection From Idle Time Session Time Path
-- --------- --------- --------------- --------- ------------ ----
1 [email protected] read-only 10.1.109.53 00:00:03 00:00:04 /
Hope this helps 🙂
BR
Florian
Hi Florian,
if I change in ClearPass but not working, if i change that in the ArubaOS controller the root profiles will not work correct ?
Hi Mohammad,
The profile name in the ArubaOS controller needs to match the content of the “Aruba:Common Aruba-Admin-Role” VSA from my comment above. If this is the case it should work.
BR
Florian
HI Florian,
I see profile under Configuration –>System but I think this for the access point not for admin user.
Hi Mohammad,
you can see the profiles using the command below:
*#show mgmt-roleManagement User Roles
---------------------
ROLE DESCRIPTION
---- -----------
root Super user role
read-only Read only commands
location-api-mgmt location-api-mgmt
standard Standard role
nbapi-mgmt nbapi-mgmt
ap-provisioning ap-provisioning
network-operations network-operations
guest-provisioning guest-provisioning
I’m not aware of an option to see those within the GUI.
BR
Florian
HI Florian,
first sorry for late replay to long i know :),
the read-only work with me after i enable Session authorization in:
https://www.flomain.de/wp-content/uploads/2017/02/Operator_Login_-_Add_Auth_Server_Key_to_ArubaOS.jpg
Thank you again
Hi Mohammad,
thanks for sharing this information. This will help others, looking for the same.
BR
Florian
Hello Florian,
first of all thank you for this great documentation.
The root access works fine, but when I am adding a read only profile it fails, means the users in this group also have root access.
In Access tracker it uses the correct enforment profile TACACS-Aruba-WLC-RO
The configuration in the enforment is like you wrote:
Priv-level: 15
Type: Aruba:Common
Name: Aruba-Admin-Role
Value: read-only
But when I login into controller and use #show loginsessions, I see my admin session Nr. 1 and in session 2, my Testuser is also assigned the root role
Session Table
————-
ID User Name User Role Connection From Idle Time Session Time Path
— ——— ——— ————— ——— ———— —-
1 adm_kinscheu root 10.79.26.83 00:00:05 00:22:28 /
2 proxyusr root 10.79.26.83 00:00:39 00:13:14 /
do you have an Idea?
Thanks a lot
µdo
Hi µdo,
from what you wrote it looks correct for me. Could compare your profile with the default one “[ArubaOS Wireless – TACACS+ Read-Only Access]”. Or maybe you can us this default profile, to check if this changes something.
BR
Florian
HI Florian,
thank you for your reply. I checked with the [ArubaOS Wireless – TACACS+ Read-Only Access] profile, same result.
Can I check somewhere what is sent to the controller?
Hi,
It took some time to build a test lab 🙂
I also found the issue with the setup. You need to enable “Session authorization” within the tacacs server configuration:

Using this made it work for me. Can you please check as well?
BR
Florian
Hi Florian,
sorry for causing you so much trouble and THANK YOU for doing it.
It works perfect, thank you for supporting me.
Nice regards Udo
Hi Udo,
No, I need to say thank you, as you helped me to find an error in the post.
BR
Florian
Hi Florian,
I have another issue based on this documentation.
I have connected multible clusters on the MM and any cluster belongs to different location. For any location (Cluster) there is a different access group for managing the controller.
Is there a way that they can access only their controller based on their group membership ?
MM
-country one
— cluster one
– country 2
— cluster two
— cluster three
Hi Udo,
To my knowledge, this is not possible at the moment.
BR
Florian