This time I would like to show, how to secure the connection between postfix and the client with the help of a certificate by using postfix with TLS support. You can use your own certificate authority for that or a public one. I will use StartSSL to create my certificate and use postfix with TLS.
If you use Debian, as I did, postfix with TLS support is already installed when you install postfix from the standard repository and you just need to enable it. But before we start with the postfix configuration we need to get a certificate. I use StartSSL for my certificates, because it is completely free and the chance is very high, that most of your clients will automatically trust those certificates by default.
Get a Certificate from StartSSL
Head over to StartSSL.com and create an account. You will get a certificate for authentication. My experience is, that it will only work without issues if you use MS internet explorer. BTW, normally Chrome is my browser of choice.
If you have an account with StartSSL you can create a certificate, but you need to validate an email address and a domain, before you can start. If you already validated the domain and the mail address, start from your control panel, select the “Certificate Wizard” and select “Web Server SSL/TLS Certificate”:

Click continue, to go to the next screen:

Select whether you need a 2048 or a 4096 key size and create a password. We will remove this password later on, as this is not supported with postfix. click continue to get to the next screen:
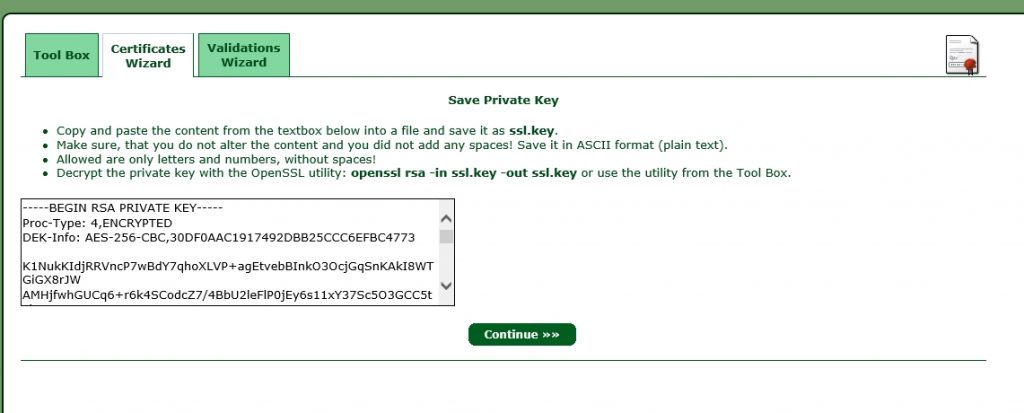
Save the text from the text-box to a file with a “.key” ending. I always use a name, which correspond to the domain name used with this certificate. In this case it is “www-flomain-de.key”. click continue to go to the next screen:

Now, select the top-level domain (the domain needs to be validated) and click continue:
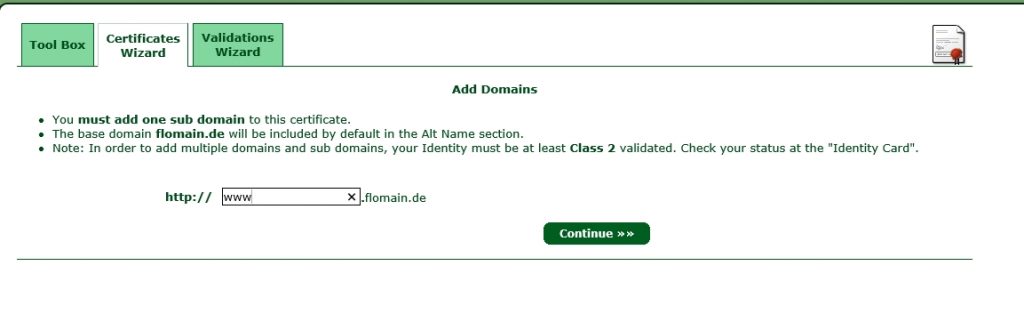
Write down the sub domain which will be used with the certificate and click continue to get a summary of the certificate. click again continue and you are done. You have to wait for StartSSL to sign your certificate. You will get an email when the process is completed. Afterwards, you can click on Tool Box and Retrieve Certificate and select your created certificate:
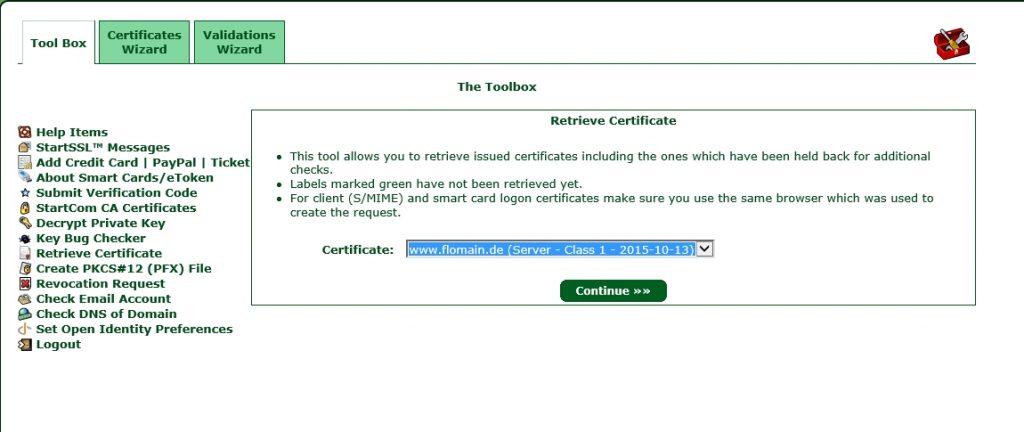
Click Continue and save the certificate to a file, I prefer the my-domain-tld.cert. In this case it would be “www-flomain-de.cert”.
Now, we can head over to your server and do the rest there.
Deploy the Certificate on the Server
You should have installed OpenSSL on the server in order get it running successfully. Before I start uploading the configuration, I create the directory, where all my certificates should be stored:
mkdir /etc/ssl/privatecp www-flomain-de.key www-flomain-de.key.backThis will create a backup of you key and you can start to remove the password protection by using this command:
openssl rsa -in www-flomain-de.key.back -out www-flomain-de.keyYou need to download the StartSSL ca package and make it a trusted ca. Simply download the file:
wget --no-check-certificate https://www.startssl.com/certs/ca-bundle.pem -O startssl-ca-bundle.pemand copy this file into this directory:
cp startssl-ca-bundle.pem /usr/local/share/ca-certificates/startssl-ca-bundle.pemNow, you have to run
dpkg-reconfigure ca-certificatesSelect “Ask” and then make sure the StartSSL ca is checked. Afterwards, the StartSSL ca is added to your trusted ca’s. Thats it. You now have to configure postfix.
Configure Postfix with TLS
To use postfix with TLS, you now have to enable TLS within postfix, which is quite easy. Just add those lines to your main.cf:
#TLS Configuration
smtpd_use_tls = yes
smtp_use_tls = yes
smtpd_tls_auth_only = no
smtp_tls_note_starttls_offer = yes
smtpd_tls_key_file = /etc/ssl/private/www-flomain-de.key
smtpd_tls_cert_file = /etc/ssl/private/www-flomain-de.cert
smtpd_tls_CAfile = /etc/ssl/certs/ca-certificates.crt
smtp_tls_CAfile = $smtpd_tls_CAfile
smtpd_tls_security_level = may
smtpd_tls_received_header = yes
smtpd_tls_session_cache_timeout = 3600s
tls_random_source = dev:/dev/urandom
# SSL-Certificate - Generate logfile entries
#
smtpd_tls_received_header = yes
smtp_tls_loglevel = 1
This will configure postfix with TLS and use the created certificate for authentication. The last two lines, will enable logging of TLS events. This is helpful to figure out, if the connection to another mail server is secured with TLS or not.
Just restart postfix and the new configuration of postfix with TLS support is live. You should now be able to use STARTTLS to encrypt your connection to the mail server.
If you have any questions or feedback, it is very appreciated to leave a comment.