This post describes how to set up a self-registration guest login page with sponsor approval. I use this ClearPass sponsored guest login at home for all my guests. Actually, my wife had the idea to use this kind of setup.
The solution will be very easy but you will get a good overview of how to configure this kind of guest page.
The workflow is easy. A guest needs to connect to an existing guest SSID and will be redirected to a self-registration page on ClearPass. Afterward, the guest account needs to be approved by a sponsor, who can also select how long the guest gets access to the network. Based on this setup, the workflow can be further enhanced. But it suits my current needs.
Create the Self-Registration Page
To create such a self-registration page with ClearPass, ClearPass has a wizard, which will guide you through the most important points. During the initial wizard, I will only configure some basic settings. I will change others afterward.
To create a new “Self-Registration” page within ClearPass login to ClearPass Guest and go to “Configuration–>Pages–>Self-Registrations” and click the “Create new self-registration page” link in the upper right of the screen:
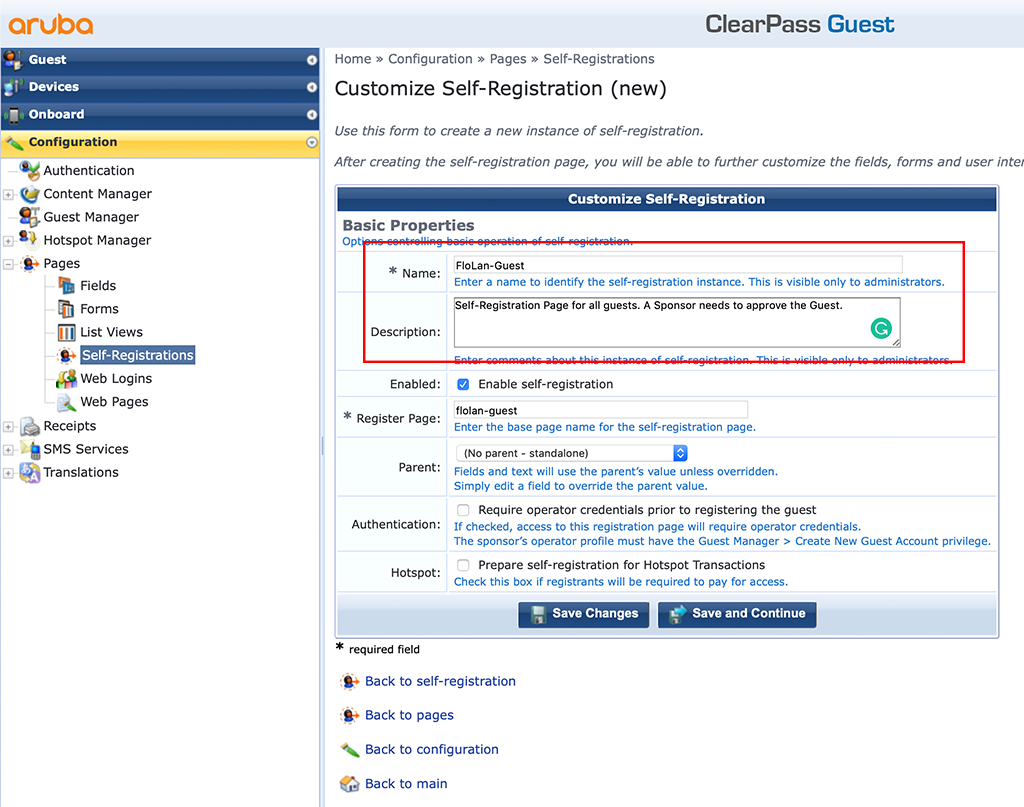
I just filled the “Name” and the “Description”. Click “Save and Continue” to proceed to the next screen.
On the next screen, I just changed the “Skin” to “Galleria Skin 3”. Again, click “Save and Continue”.
On this screen, you can change the self-registration page, presented to the user. I leave everything as it is. Click “Save and Continue” to proceed to the next screen.
The next screen is the page, presented to the guests after they have registered. I leave the defaults. Click “Save and Continue” to proceed to the next screen.
Now, you see the screen for configuring the delivery of receipts. No changes to this page as well. Click “Save and Continue” to proceed to the next screen.
This page is about sponsorship. And even, if the title says, sponsor, I keep the setting disabled, at least for the moment. Click “Save and Continue” to proceed to the next screen.
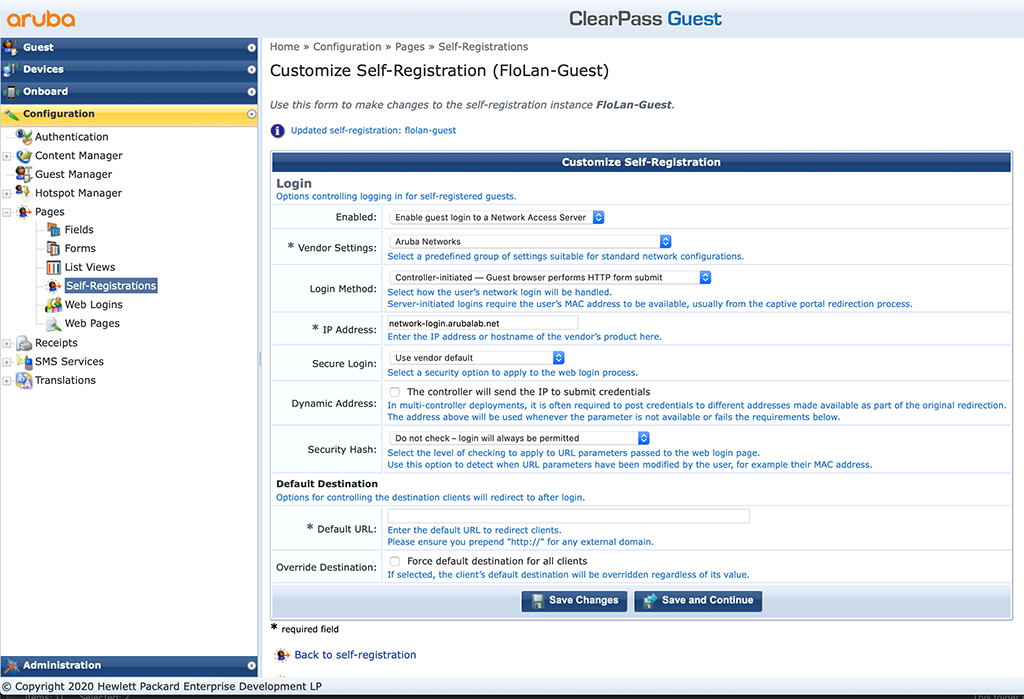
I make some changes to this screen. You need to adapt to your environment. If you use Aruba network products let the “Vendor Settings” with “Aruba Networks”. Also, modify the “IP Address” to the IP or hostname of your product. For Aruba Products this needs to be the CN of the Captive Portal certificate. Click “Save and Continue” to proceed to the next screen.
We will make changes to the next page later during the configuration. For now, click “Save and Continue” to proceed to the next screen.
If you allow your guests access to the self-service portal, leave all as it is and click “Save Changes”. This will bring you to the main configuration screen for the self-registration page. Keep this in mind, as I will refer to this page as the main configuration screen during the next paragraphs.
The basic setup is done. Let’s start to enhance the workflow.
Enable Sponsor Approval
As I would like to keep control of the guests, each account needs to be approved by a sponsor. To enable sponsor approval, click the “Sponsor Confirmation” link on the main configuration screen for the self-registration page, mentioned above:
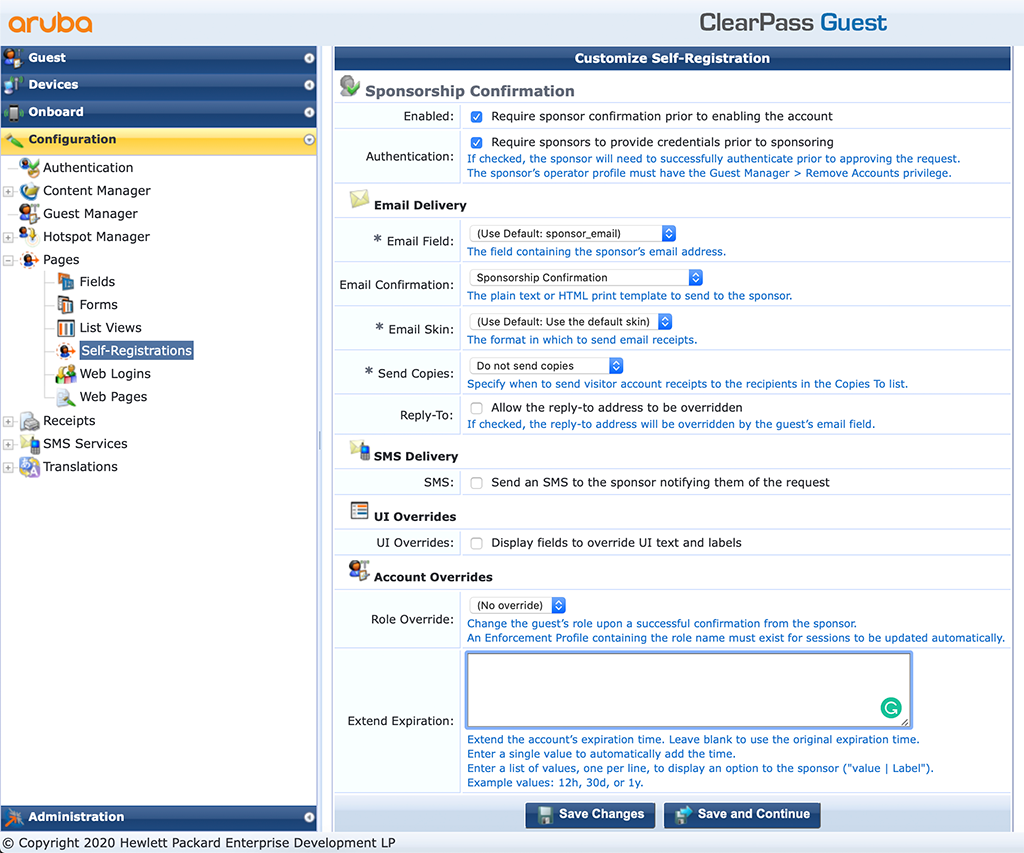
Just check the “Enabled” field at the top of the form. This will enable sponsor approval for all guests.
I will also let the sponsor select the validity period for the guests. To configure this, use the “Extend Expiration” text box. For me it looks like this:
1d|Visitor for one day.
7d|Visitor for one week.
1y|Visitor for one year.
You can replace those values with your own.
After setting the “Extend Expiration” values, a new setting appears, “Account State”. I set this to “Disabled – Account will remain disabled until confirmation”.
For now, click “Save Changes”.
In my setup, I will have a static mail to which the sponsor request is sent. To configure a static mail go the main configuration screen for the self-registration page and click on “Form” in the context of the “Register Page”. This will bring up a huge table. looks very complex and complicated. But it is very simple. Search for the “sponsor_email” field and click on “Edit:

This will bring up the following screen:
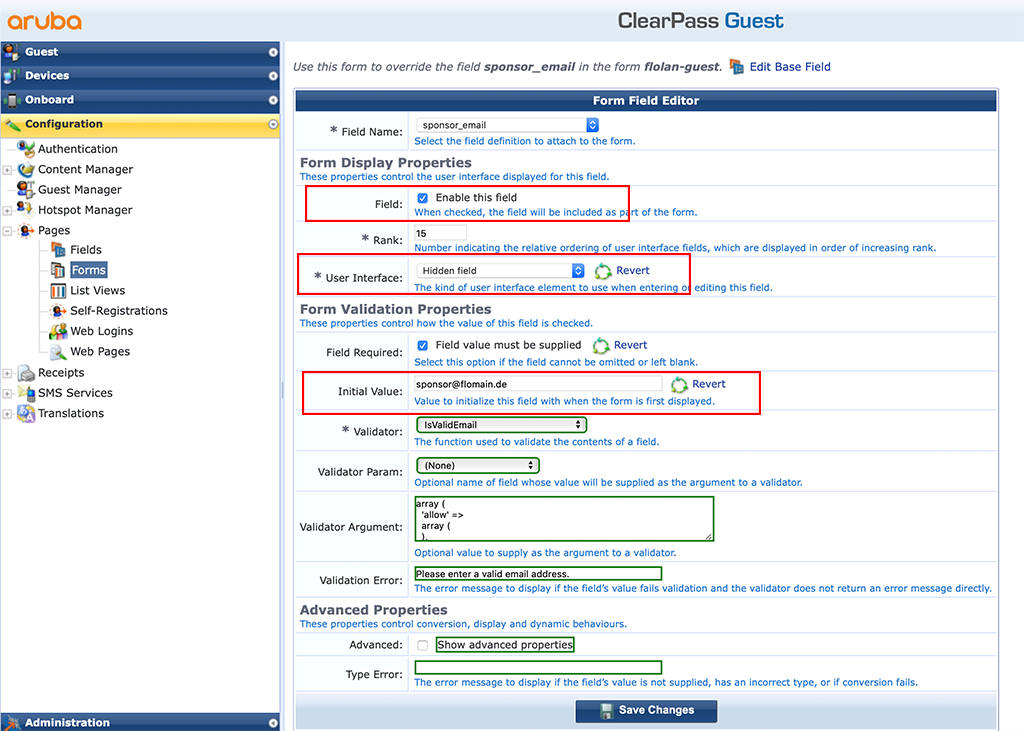
I changed the above three settings on this page. I enabled the “Field” and set the “User Interface” to “Hidden field”, so it is not visible to guests. And for sure, provided an “Initial Value” which is not changed by the guests, as he is not able to see the field. Click “Save Changes” to proceed.
Customize the Receipt for the Guest
To customize the receipt for the guest, go to “Configuration–>Guest Manager” and search for the “Receipt Options”:
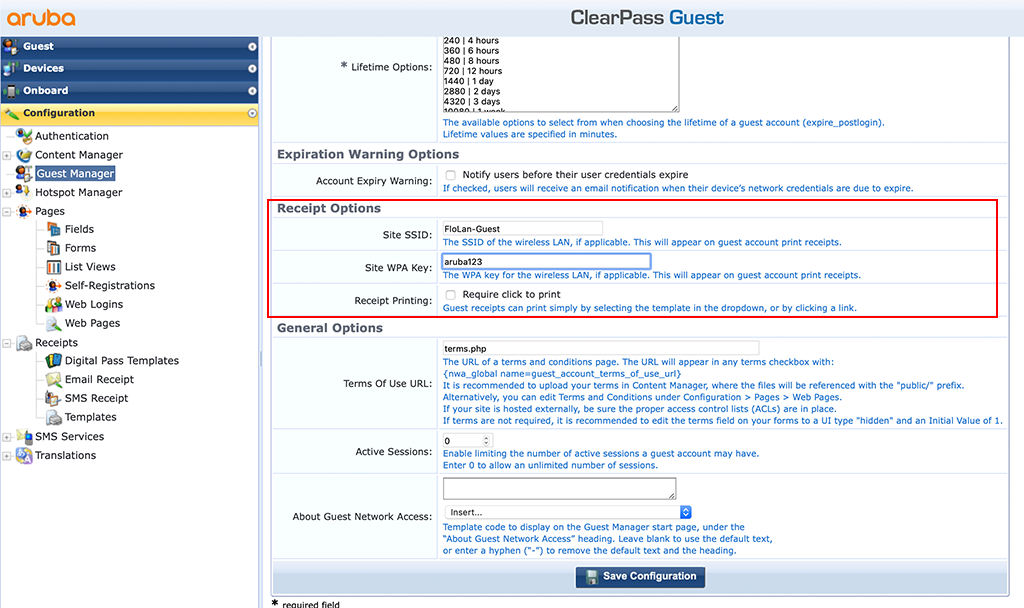
These settings are now the default settings for the SSID name and the WPA2 PSK. In my example, it is “FloLan-Guest” for the SSID and “aruba123” for the WPA2 PSK. If we send receipts to guests, those values are used.
Go back to the main configuration screen for the self-registration page and click the “Actions” link in the “Receipt Page” context:
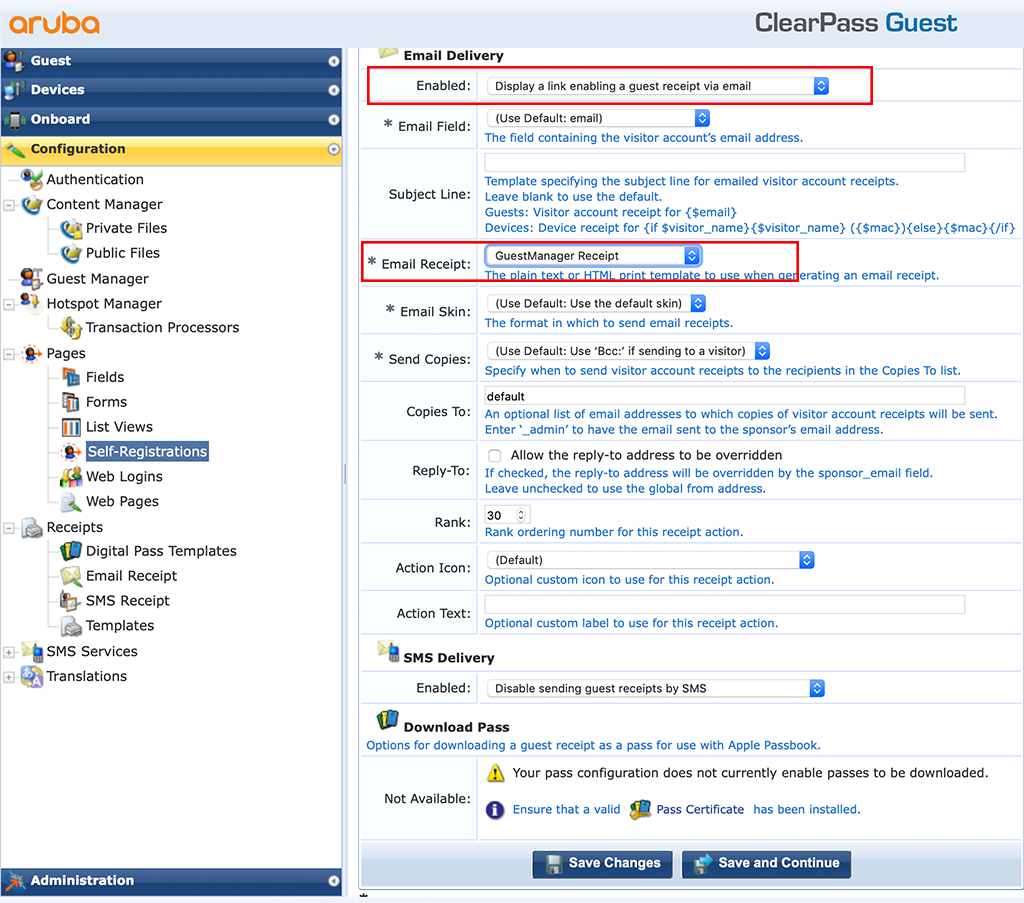
I enabled the “Email Delivery” with the option “Display a link enabling a guest receipt via email”. This is from my point of view, the most convenient option. The guest can decide whether to get a receipt or not.
I also changed the “Email Receipt” template to “GuestManager Receipt”. Do this in accordance to your needs.
The Policy Manager Part
Now we are coming to the authentication part. Up to now, we have a registration page but even if you enter something there, you will not be able to make it into the WLAN, as we did not have any authentication service.
There are multiple ways to create those services. You can use the wizard. Go to the policy manager and look for “Configuration–>Service Templates & Wizards”:
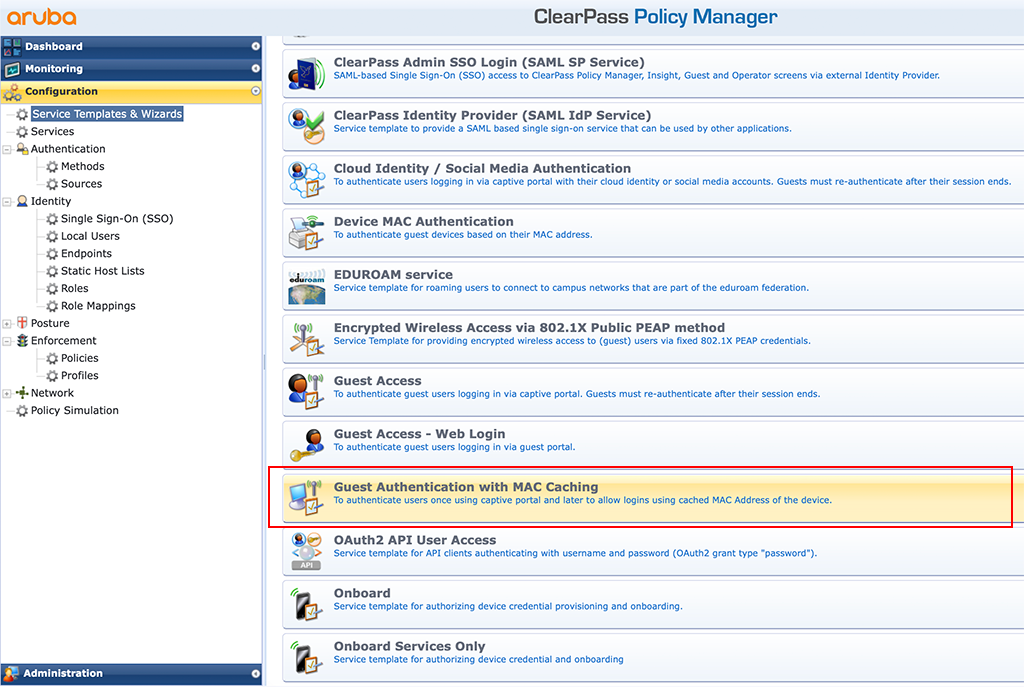
The “Guest Authentication with MAC Caching” wizard will be fine for most needs. Nevertheless, I will not use the wizard. The reason is, I want to have full control of all the things I do configure. So doing it manually without the wizard will bring this control. And secondly, you really learn how things work together. But if you already know all of this, just use the wizard.
I will create two services to serve the guest page. The first one is a mac authentication service. This will authenticate the devices. The second one is for the real guest user. Let’s see how things work out.
First, create the mac authentication service. Before we can do that, we need to create a new “Enforcement Profile”. This will set the username of the device to the guest’s email address. If you do not need this, you can skip this one. If you like to see the mail address, instead of the mac address, go to “Configuration–>Enforcement–>Profiles” and click the “Add” button to create the following profile:
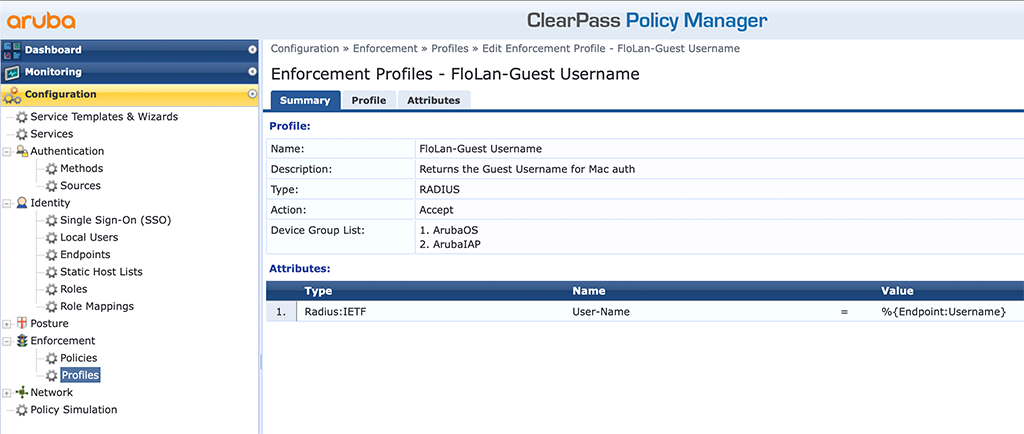
The important part is to set the “Radius:IETF” “User-Name” to “%{Endpoint:Username}”. This will send back the content of this attribute in the “Endpoints Repository”. We will fill this attribute with data in a later step.
Next, you need to create a new “Enforcement Policy”. Go to “Configuration–>Enforcement–>Policies” and click the “Add” button to create a new one:
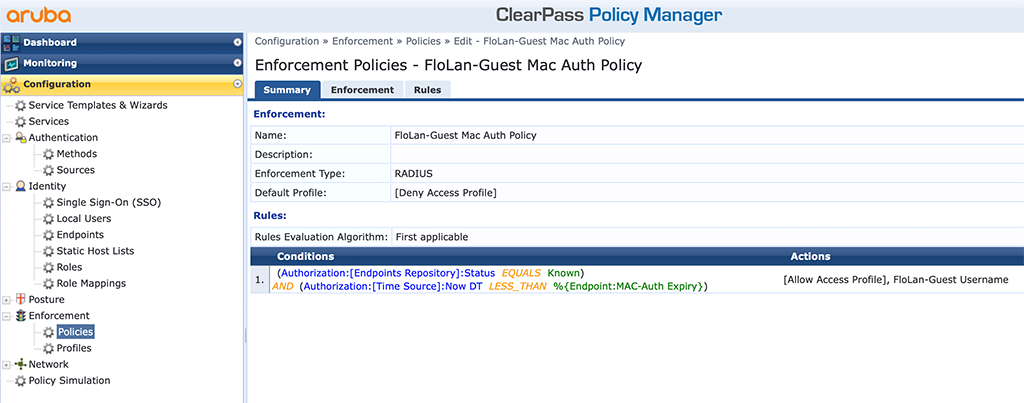
The “Enforcement Policy” is very easy. It simply returns a deny if the device is not “Know” or the “MAC-Auth-Expiry” is outdated. The mac is unknown if the device connects for the first time. So it should be redirected to the captive portal page. The second one checks if the device was already connected and a guest has successfully authenticated. If the “MAC-Auth Expiry” timestamp is already expired, this means, the user needs to reauthenticate at the portal or request a new account. If both conditions are true, the device is granted access by sending an accept and the username back to the network device, where the guest is connected.
Afterward, you can put everything together in a new service. Go to “Configuration–>Services” and create a new service like the one below:
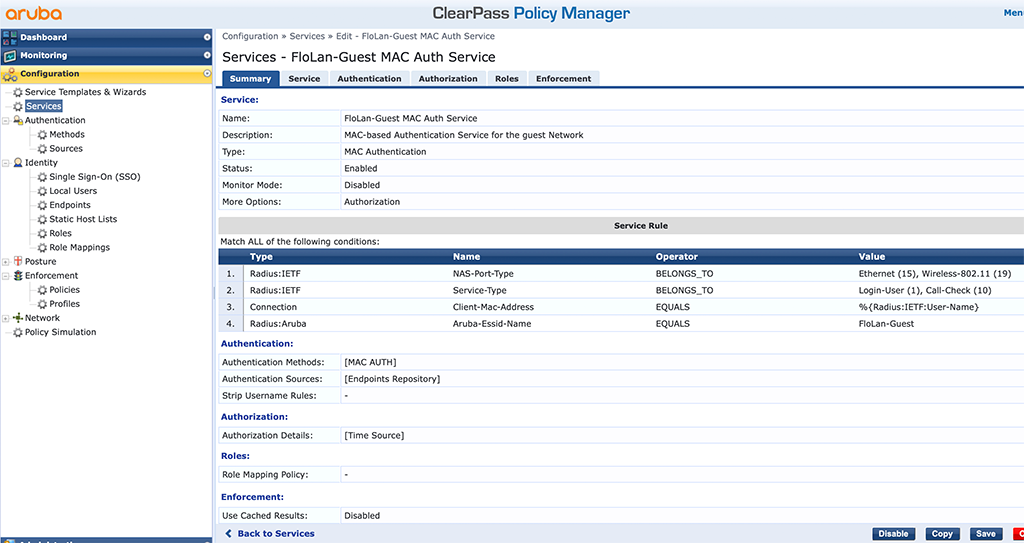
Make sure, you adapt the conditions to your environment. At least, you need to modify the SSID name. The rest is straight forward. The “Authentication Methods” is “[MAC AUTH]” and the source is the “[Endpoints Repository]”. Also, add the “[Time Source]” as a second authorization source and use the created “Enforcement Policy” as the “Enforcement Policy” for this service.
For the second service, we need to create two additional “Enforcement Profiles”. The first one will set the username field for the device. Go to “Configuration–>Enforcement–>Profiles” and create a new profile like this:
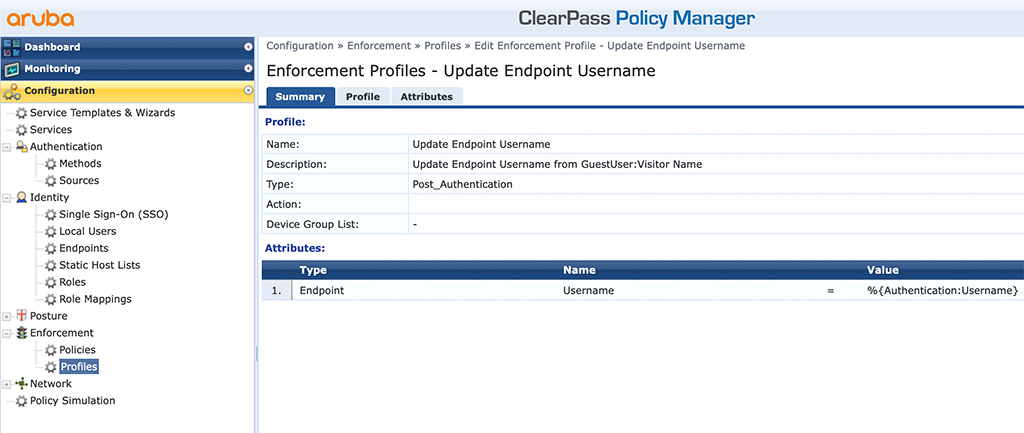
The profile is from “Type” “Post_Authentication” and will use the “%{Authentication:Username}” provided during the authentication by the guest and write this into the “Username” attribute for the endpoint. Therefore we can use this information later during mac authentication again.
You can set and create many more fields. One good example would be if you have multiple SSID’s and you need to know for which SSID the guest applied, you can also save the SSID in an attribute and check this one during mac authentication as well.
The second profile is to set the “MAC-Auth-Expiry” value. Just create another profile like this:
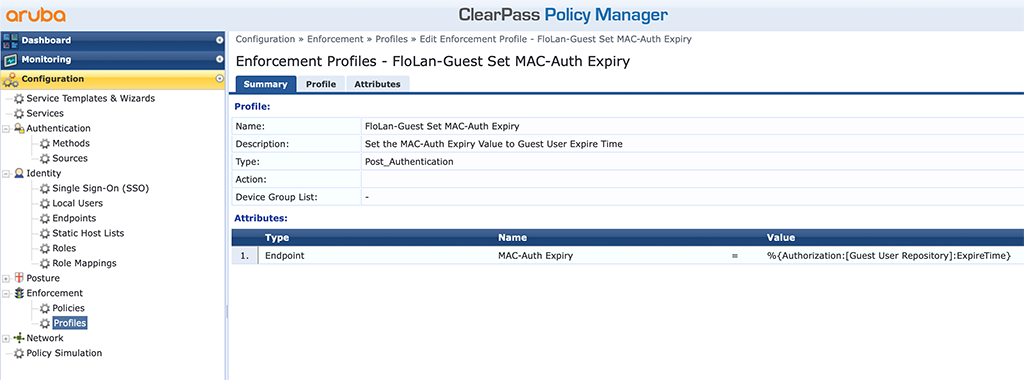
This one uses the “%{Authorization:[Guest User Repository]:ExpireTime}” value from the authentication to set the “MAC-Auth-Expiry” for the device.
Now bring the profiles together in an “Enforcement Policy”. Go to “Configuration–>Enforcement–>Policies” and create a new policy:

The policy is very easy, as it allows access on every day the whole week and simply checks if the guest has a specific role within ClearPass, “FloLan-Guest”. It then applies a lot of profiles to the request:
- [Update Endpoint Known] – Updates the “Status” field for the endpoint to “Known”
- FloLan-Guest Set MAC-Auth Expiry – Set the “MAC-Auth-Expiry” field for the endpoint
- [Allow Access Profile] – simply sends an accept back to the authenticator
- Update Endpoint Username – Set the “Username” field for the endpoint
If you use custom roles, as I do, you need to create those roles and add them to the “[Guest Roles]” role mapping. This will also make the role available in the guest part of ClearPass.
The last step is to create a service and put everything together. Go to “Configuration–>Services” and add a new service like this:
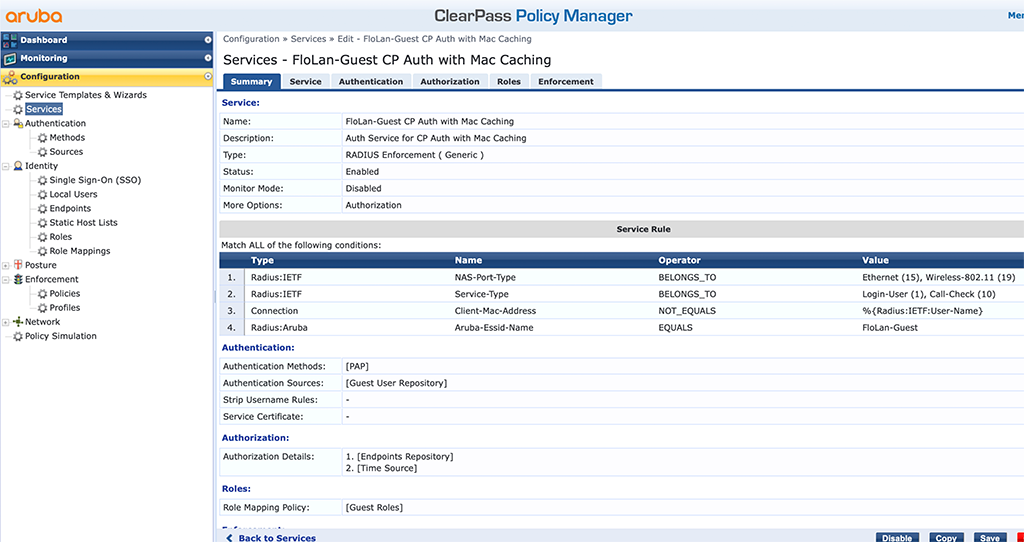
The type of the “Service” is “Radius Enforcement ( Generic )”. Use “[PAP]” for the authentication method and use the “[Guest Repository]” as the source. For authorization also add the “[Endpoints Repository]” and the “[Time Source]”. This time I use the “[Guest Roles]” role mapping and the “Enforcement Policy” we created above.
ClearPass Sponsored Guest Login Testing
The last step is to test the setup. Grab a device and connect to the network. In my case, I just created a simple SSID on my Instant AP’s. How to configure the network to use the Captive Portal will be the next post. So at this time, I assume you can connect to the network and get redirected to the captive portal.
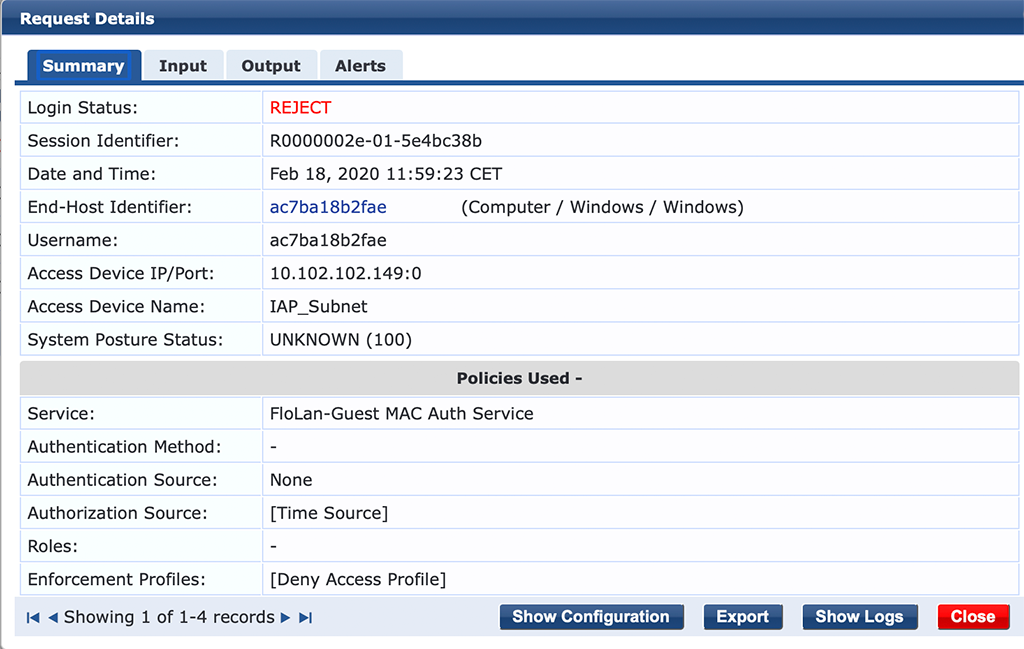
The client is connected to the WLAN the first time. The request is handled by the mac authentication service and as expected, it failed:
The user is now redirected to the captive portal page and can self-register. After the user enters all the information on the self-register page, an email is sent to the sponsor. The sponsor can now “Confirm” or “Reject” the request. Let’s assume the sponsor “Confirm”s the request.
Now, the guest is able to log in and to get the credentials via mail. Let’s assume the user press the “Log In” button.
This time, the radius request is handled by the captive portal service:
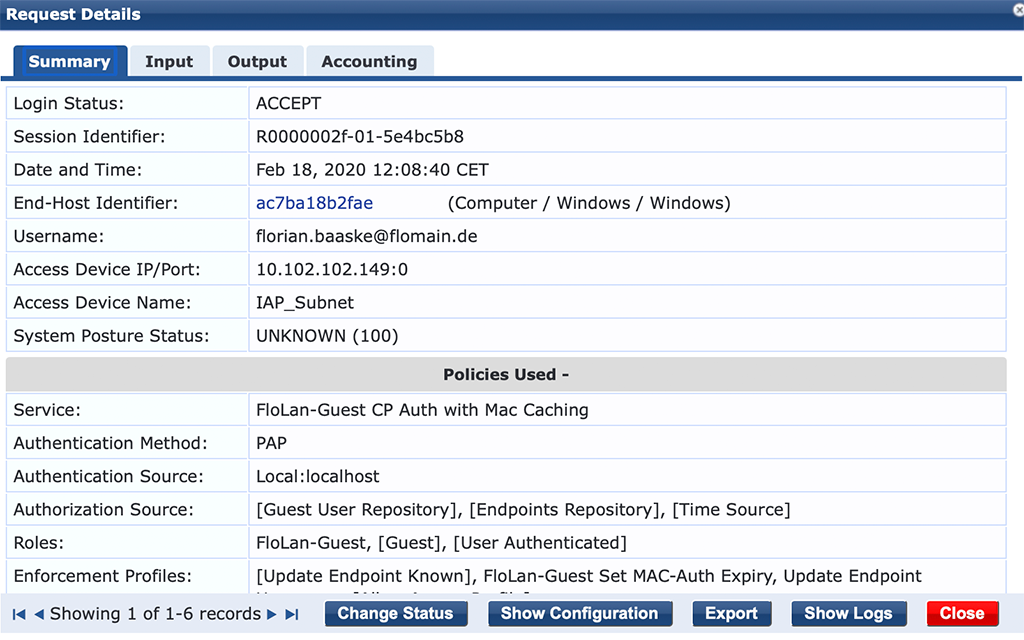
The user is authenticated and get’s access to the network. Let’s check the endpoint entry for the device. Just click on the “End-Host-Identifier”, which is the mac address.
Here we can check two things. First, the device is now a “Known Client”:

And secondly, on the “Attributes” tab, you see the attributes we created earlier, like “Username” and “MAC-Auth-Expiry”:
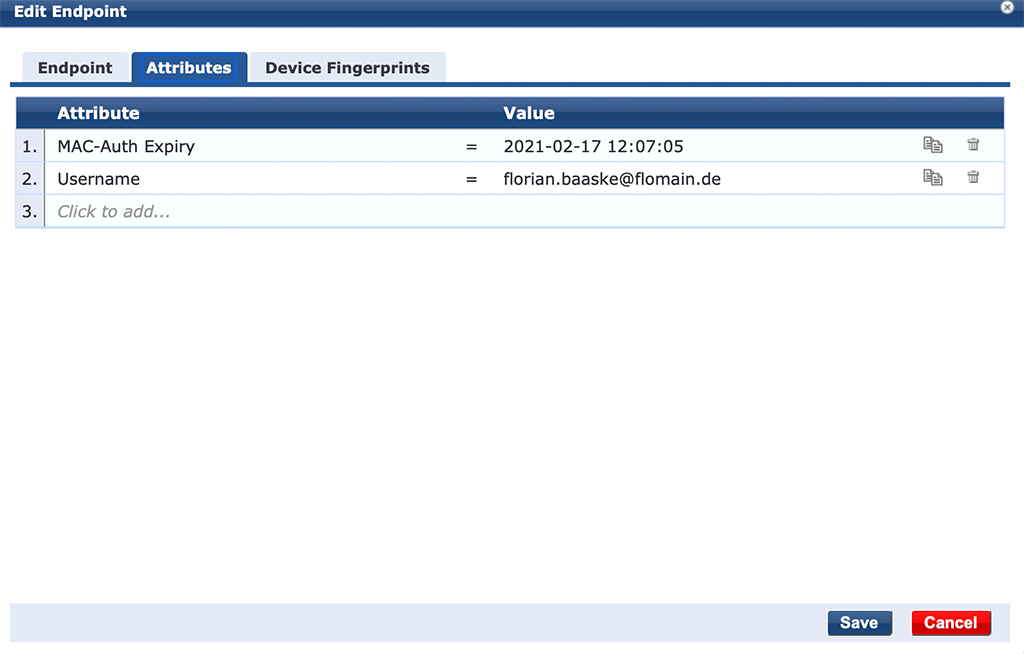
All the required attributes are there. To test if the mac caching is working just disconnect the client and reconnect to the network as before. The access tracker would show this output:
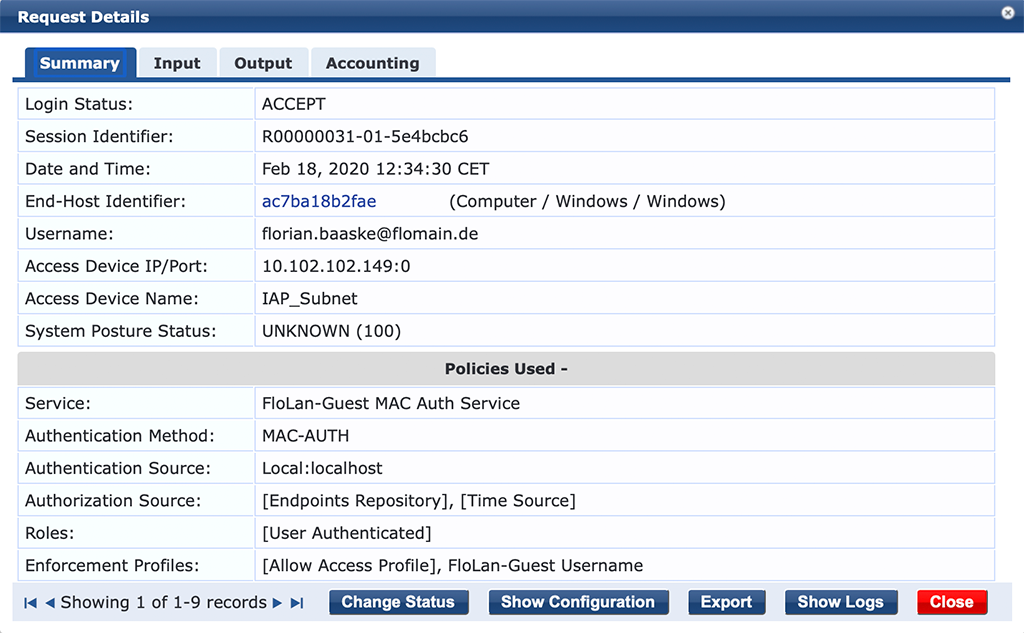
In contrast to the first mac authentication attempt, the “Username” is now the username from the guest, which was written into the “Username” attribute on the endpoint. The user can now use the network, without the need to re-authenticate against the captive portal again. And this behavior is called mac caching.
If you find this post useful, leave me a comment and share your feedback with me. You can also buy me Pizza, using the “Buy me a Pizza” button on the right, to support this blog and keep the IT gremlin happy.
If you would like to do me a favor, share this post with your friends and social media contacts. This would really help to make this blog more popular and help others to find the information above more easily using search engines.
Share on:
I’m having issues setting this up. I do not see a section that allows me to input the sponsors email.
Hai have you find a solution for the issue?
Hi Aniq,
do you have the same issue? Can you share some details?
Br
Florian
hi i have issue, after i accept the guest its rejected and no service is hitting
CPPM 6.12 with IAP
Hi Piggy,
thanks for your comment.
If you see the request, you can look into the Radius attributes, which are comming with the request and check them against those which are used in the service selection. If possible, post a screenshot of the access request and the configuration of the service.
BR
Florian