I was writing some new posts and realized that I missed one basic post for you. If you ever went through the process of provisioning many new AP’s to a controller, you may be looked for a simpler way to do the provisioning work. The solution is the whitelist. Every ArubaOS controller has an internal whitelist for campus AP’s and remote AP’s.
This whitelist has an entry for every AP (CAP, RAP and even IAP) and you can use the whitelist together with CPSec. I will not talk about CPSec in this post, but my recommendation is to enable CPSec in every deployment. It is best to enable it during initial configuration. But you can also enable it later, but be aware, that this can cause a service interruption during the migration phase to CPSec. Speak to your local partner or Aruba peers to plan the migration.
What is the Whitelist
The whitelist maintains a list of all trusted AP’s. You can also revoke the trust. This is great if AP’s get lost and you would like to deny access to those AP’s. But the whitelist ist even more. The whitelist contains the AP name and the group. And here is the main benefit from my point of view. You can define AP name and group before the AP joins your network. If the AP connects, the AP gets the name and group from the whitelist and the manual provision part is removed.
How to Fill the Whitelist Manually
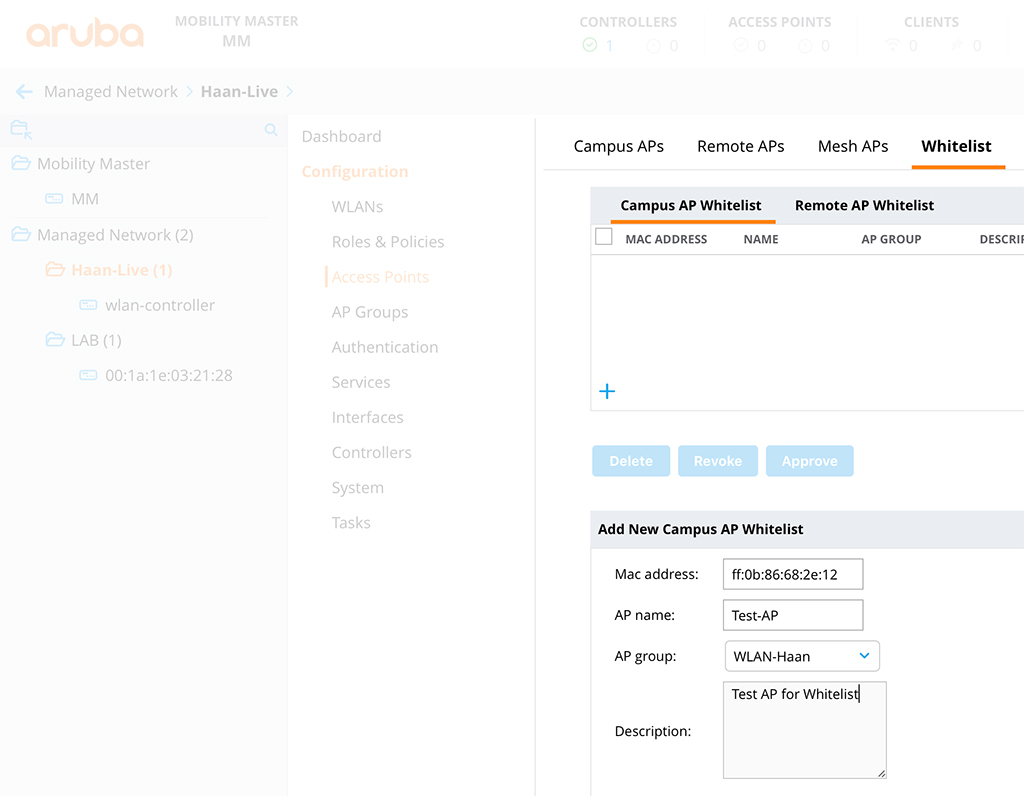
The whitelist is just a database on the controller. You can manually add, remove or modify entries. To add an entry, go to “Configuration–>Access Points–>Whitelist” and select either the “Campus AP Whitelist” or the “Remote AP Whitelist”. I think the names speak for themselves. IAP’s are part of the “Remote AP Whitelist”. To add a new entry, simply click the “+” sign at the bottom:
You can do the same on the CLI:
(MM) *[Haan-Live] (config) #whitelist-db cpsec add mac-address ff:0b:86:68:2e:12 ap-group WLAN-Haan ap-name Test-AP description "Test AP for Whitelist"This creates an entry in the whitelist. If the AP with the specified mac address connects to the controller, the AP is automatically provisioned with the AP name and AP group from the whitelist.
To change the AP name or the group, you simply modify the whitelist entry. In the GUI, simply click on the AP entry and change the parameters:
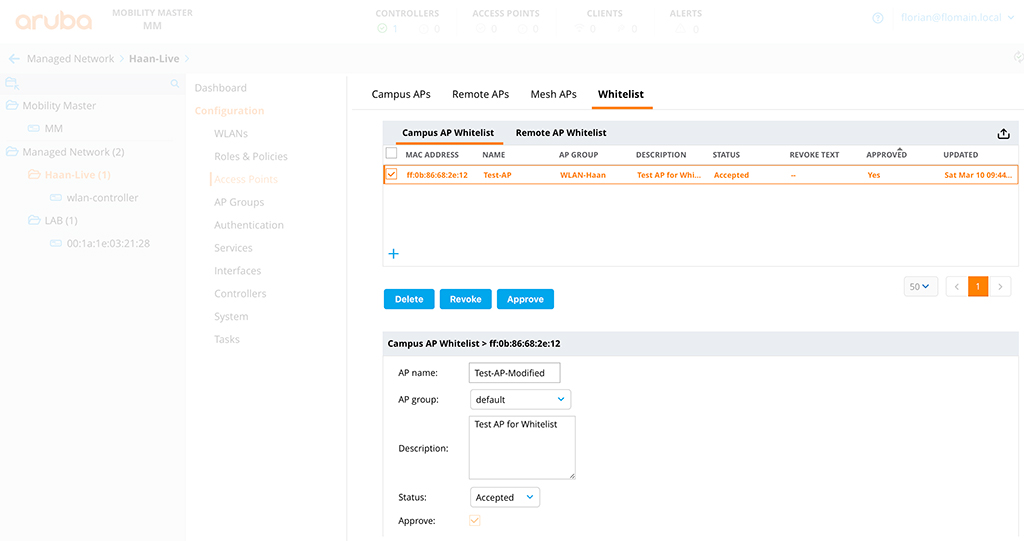
You can “Revoke” or “Delete” the AP from this screen as well. My recommendation is to revoke the AP, instead of deleting the AP, if you would like to deny access for this AP. This creates a defined state for the AP.
You can do the same in the CLI:
(MM) *[Haan-Live] (config) #whitelist-db cpsec modify mac-address ff:0b:86:68:2e:12 ap-group default ap-name Test-AP-Modified
     cert-type Certificate type
     description Description
     mode Revoke/Unrevoke entry
     revoke-text Revoke-text
     state Whitelist DB entry state
The benefit of the CLI, you can change even more options. I will not get into the details as most of the options are advanced options and you should not change them without consultation with your partner or Aruba peer.
The last option is to remove an AP.
To delete the AP from the whitelist, just click the delete button. This is not very special. The CLI command looks like this:
whitelist-db cpsec del mac-address ff:0b:86:68:2e:12This is the manual way to whitelist AP’s. There is a semi-automatically way as well.
How to Offload the Whitelist to ClearPass – Controller Part
You can also offload the whitelist to ClearPass. This is my preferred method. This workflow is very easy. The AP connects to the controller and the controller uses MAC authentication against a radius server. The radius server needs to know about the AP. Upon successful authentication, the AP can connect to the controller.
From my point of view, this is the best method, as you can change the parameters for the AP, like name and group on the radius server or in your database, where the AP information is saved.
My recommendation is to use some kind of asset database for this. For my lab, I use my Active Directory. So, all my AP’s are accounts in my AD database and I use ClearPass to query them. But let’s start at the beginning.
To offload the whitelist to ClearPass, you need to add ClearPass as an authentication server to the controller. Go to “Authentication–>Auth Servers” and click the “+” sign in the “All Servers” box:
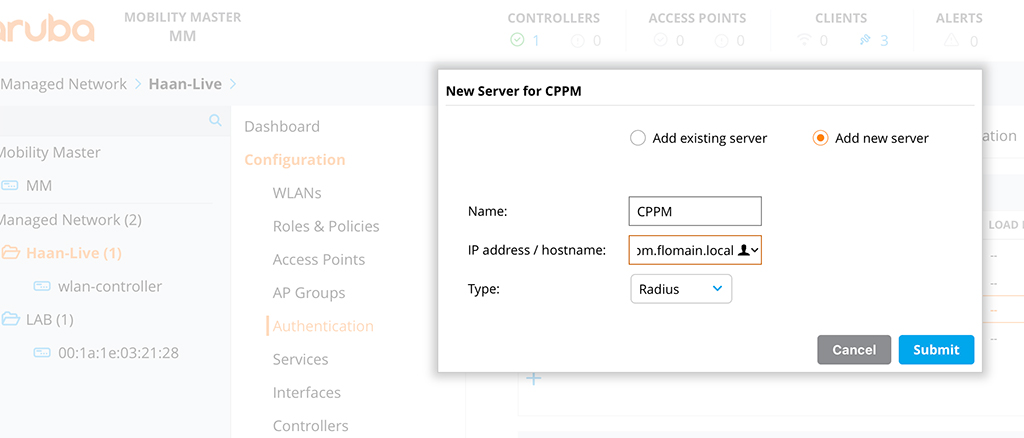
Select the “Add new server” radio button and specify a name. Choose either the hostname or the IP of your radius server. Leave the “Type” as “Radius” and click submit. The new server is now on the list of “All Servers”. Select the created server and configure the required details:
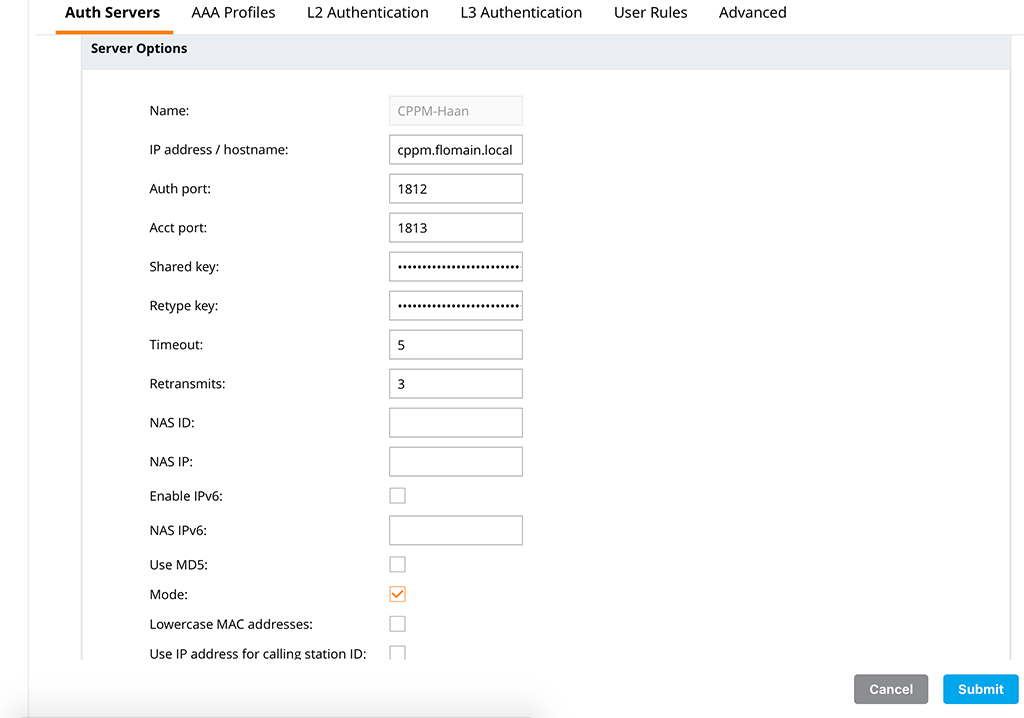
I have most of the options with the default value. The main important one is the “Shared key”. This key should be the same, on the controller and on ClearPass. Below is the CLI command, to create the server:
show configuration effective wlan-controller | begin authentication-server
aaa authentication-server radius "CPPM-Haan"
    host "cppm.flomain.local"
    key 536ad24d815828bd145043bebdf430451b756f43ef4cf619
    nas-identifier "10.100.100.50"
    nas-ip 10.100.100.50
This is a good example of the hierarchical configuration of ArubaOS 8. The screenshot above is from the group level and the CLI part is from the controller. In the GUI at the group level, you configure just the main parameters and you add controller specific settings like the “nas-ip” or the “nas-identifier” on the controller level. To get the output with the same content as the screenshot above, check the config in the group level from the CLI:
show configuration effective /md/haan-Live | begin authentication-server
aaa authentication-server radius "CPPM-Haan"
    host "cppm.flomain.local"
    key 453be891e6ff5de1798b950bed505b31f48b445f7f3b2dbc
This was just a side note, as this example shows very well how the hierarchical configuration model can work in ArubaOS 8.
The last step is to add the server to a radius group. Go to “Authentication–>Auth Servers” and click the “+” sign in the “Server Groups” box, if you have no server group. Just enter the name of the server group and click “Submit”. Afterward, select the server group and click the “+” sign in the “Server Group” box, to add an existing server to the group. Simply click “Submit” afterward. The configuration looks like this:
show configuration effective wlan-controller | begin "aaa server-group"
aaa server-group "CPPM"
 auth-server CPPM-Haan position 1
 auth-server CPPM-Haan trim-fqdn position 1
I remove the domain portion of the username as well with the last configuration line. This is not needed for the whitelist sync, but I use this radius server group for other authentication stuff as well.
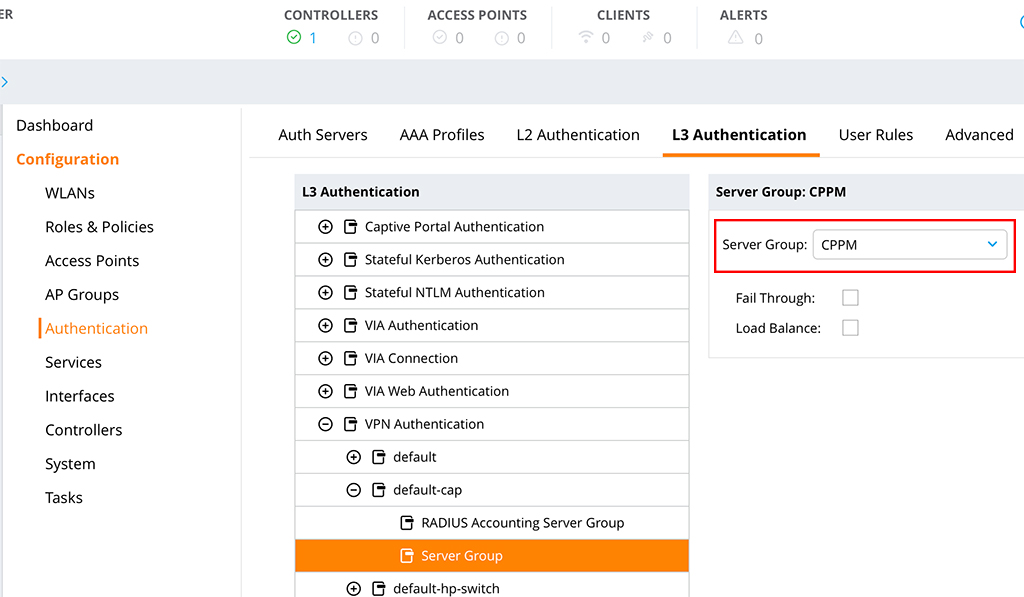
The last step is to tell the controller, to use ClearPass for any Campus AP authentication. Go to “Authentication–>L3 Authentication” and go through the L3 Authentication tree to “VPN Authentication–>default-cap–>Server Group” and change the “Server Group” to the one, you have created above:
From the CLI it looks like this:
show configuration effective /md/haan-Live | begin default-cap
aaa authentication vpn “default-cap”
default-role “sys-ap-role”
server-group “CPPM”
!
Afterward, the controller uses ClearPass to authenticate every AP, which is trying to connect to the controller. To get the same for RAP’s and IAP’s, just change the “Server Group” for the “default-rap” and “default-iap” profile as well.
How to Offload the Whitelist to ClearPass – ClearPass Part
This part is easy as well. But let’s start from the beginning. First, you create the “Enforcement Profile”. This includes the parameter for the AP name and group. Login to ClearPass and go to “Configuration–>Enforcement–>Profiles” and create a new profile of the type “Radius”:
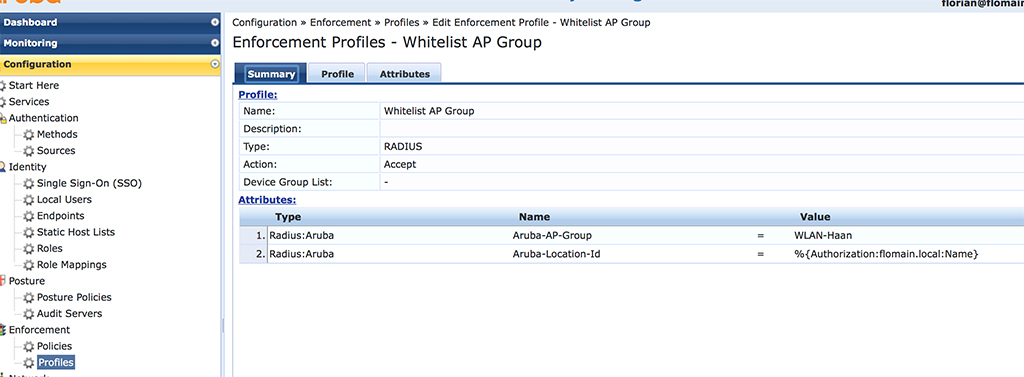
The most important part is in the “Attributes” section. I have two attributes, the “Aruba-AP-Group” and the “Aruba-Location-Id”. The first one is the AP group. Make sure, this one matches one of the AP groups on the controller. The second one is the AP name. Even if the name of the attribute is not emphasizing this.
The next step is to create the “Enforcement Policy”, but before you need to know my “Role-Mapping”:

The screenshot above shows my role mapping. I use different Active Directory groups to assign roles to different users and devices. This is not necessary, but I find it very convenient because you can use these roles in the “Enforcement Policy”. And that is the reason for the sides step to the role mapping. Without this screenshot, you would not understand my “Enforcement Policy”.
To create a new “Enforcement Policy”, go to “Configuration–>Enforcement–>Policies” and add a new “Enforcement Policy” with the click of the “+ Add” link in the right upper corner. Make sure, it is a “Radius” type policy. The summary of my policy looks like this:
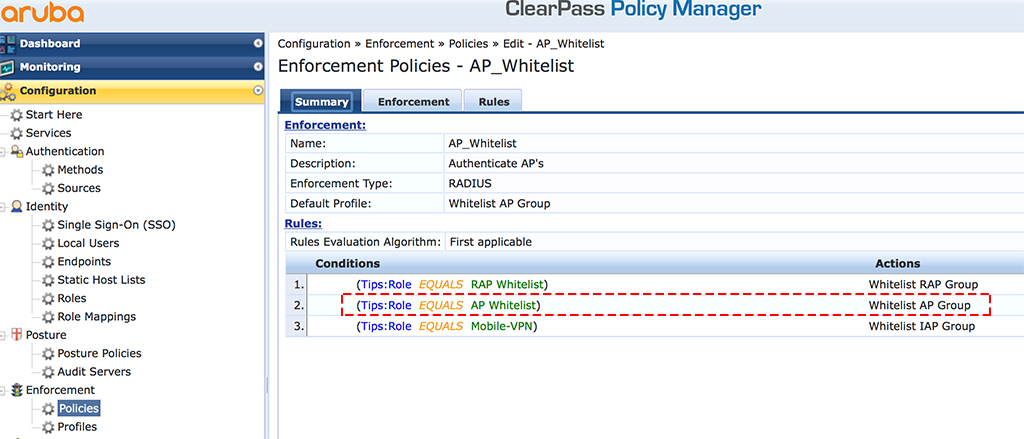
As you see, I use the roles from the mapping above to define the action. And the action is an “Enforcement Profile” In the case of condition 2, it is the profile from above. My lab environment is very simple, so no complicated conditions. Your conditions could look totally different, depending on your environment.
The last and final step is to create a service, which uses the role mapping and the “Enforcement Policy” to bring all together. To create a new service in ClearPass, go to “Configuration–>Services” and click the “+ Add” link. My service looks like this:
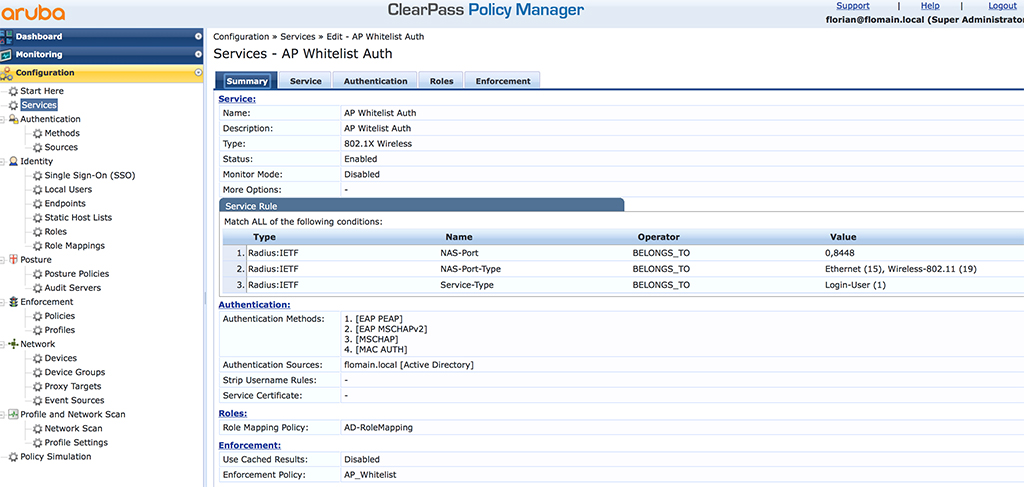
This is just the summary screen but is showing all important parameters. The “Service Rule”s are there to classify the request and route the request to this service. Make sure, it does not interfere with other services.
I have all the default “Authentication Methods” from the “802.1x Wireless” template, plus the “MAC_AUTH” method. This one is the only one, which is important. I use my AD as the “Authentication Source”. You also find my role mapping from above and the “Enforcement Profile”.
That was the ClearPass part and you can connect your AP’s.
Dynamically Adjust Whitelist with ClearPass
After all the above is configured, you can start to connect AP’s. I have connected one AP and this is the output from the controller after the AP is up and running:
(wlan-controller) #show ap database
AP Database
-----------
Name           Group      AP Type  IP Address     Status     Flags  Switch IP      Standby IP
----           -----      -------  ----------     ------     -----  ---------      ----------
AP-Wohnzimmer  WLAN-Haan  225      10.200.200.12  Up 31m:7s  2      10.100.100.50  0.0.0.0
The AP is in the group “WLAN-Haan” and has the name “AP-Wohnzimmer”. From ClearPass, it looks like this:
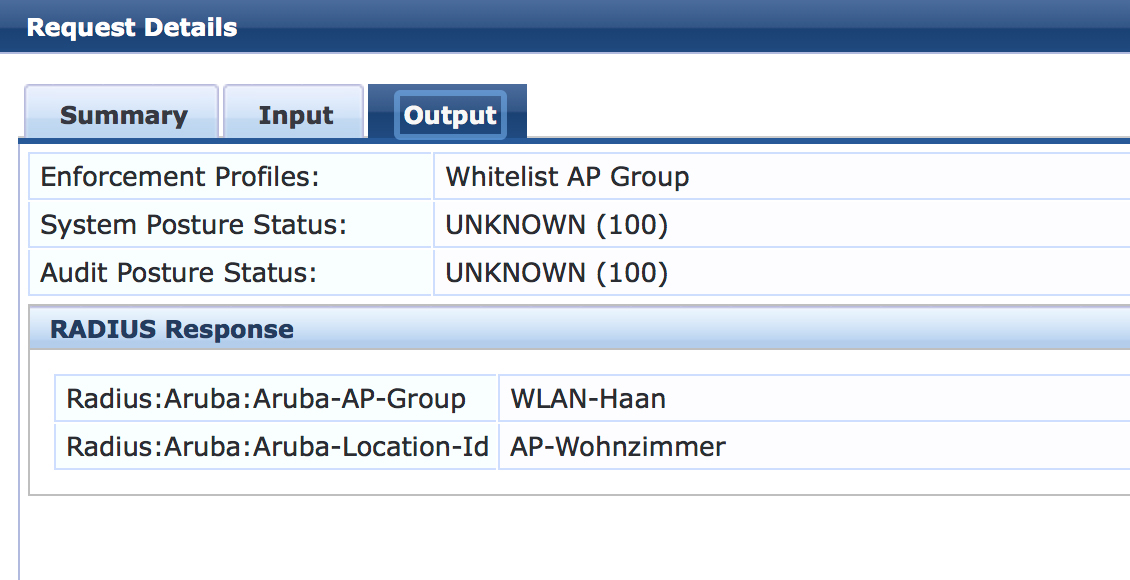
As you can see, the AP name and group from above matches the radius response in ClearPass. I will now change the name of the AP in my directory to “AP-Wohnzimmer-Test”. Let’s see what happens after I reboot the AP. First the output from ClearPass:
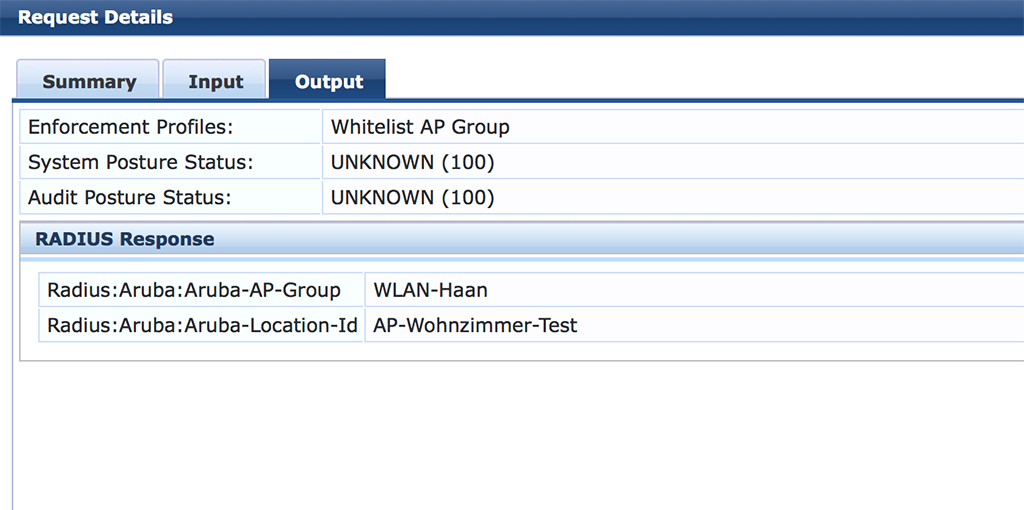
As you see, the name changed to “AP-Wohnzimmer-Test”. Now, let’s check if the controller has applied this as well:
(wlan-controller) #show ap database
AP Database
-----------
Name                Group      AP Type  IP Address     Status     Flags  Switch IP      Standby IP
----                -----      -------  ----------     ------     -----  ---------      ----------
AP-Wohnzimmer-Test  WLAN-Haan  225      10.200.200.12  Up 4m:43s  2      10.100.100.50  0.0.0.0
The AP name is changed on the controller. With the same steps, you can change the AP group as well. This makes it very easy to manage large lists of AP’s in a directory.
If you change the AP group, the AP reboots twice. The first one is initiated by the user to assign the new group and the second one is initiated by the AP to apply the new group configuration.
Offload the Whitelist to Aruba Activate
For RAP’s and IAP’s, you still need to convert them (for RAP’s) and point them to the controller. For this task, you can use Aruba Activate. This cloud tool can do this automatically for you. The RAP/IAP needs internet access, but this is the main requirement for all cloud-based tools.
If you have all the RAP’s/IAP’s already in Activate, it would make no sense to maintain them in a local database as well. And here comes the cool stuff. You can use Activate as well, to fill your whitelist. Make sure, the AP’s are in Activate and the rules are applied as well. I will not show this in this post, but if you need help with Activate, post your questions in the comment section below this article and I will help you.
On the mobility master, configure Activate in your hierarchy level of choice, to enable Activate sync on the managed devices. You only need to add Activate and your credentials to the configuration:
(MM) ^*[Haan-Live] (activate) #
add-only                Allow only addition of entries to whitelist DB
ca-cert                 Custom cert to upload to Activate
device-interval         Periodic interval for Device WhiteList Sync (in Hours)
device-whitelist-enable Enable or disable Activate Device Whitelist Service
interval                Periodic interval for AP WhiteList Sync (in days)
no                      Delete Command
password                Password Credential for Activate Login
provisionurl            Provision Activate URL
server-cert             Server cert to be used for IPSEC
url                     Activate URL
username                Username Credential for Activate Login
whitelist-enable        Enable or disable Activate AP Whitelist Service
The most important configuration steps are the following:
(MM) ^*[Haan-Live] (activate) #add-onlyI use this is one most of the time. This will only add devices from Activate. But if they disappear from Activate, they will stay in the whitelist.
(MM) ^*[Haan-Live] (activate) #password ***********This one is the Activate password and below is the command for the username:
(MM) ^*[Haan-Live] (activate) #username your_activate_account@your_compony.tldThe last and most important command is to enable the service:
(MM) ^*[Haan-Live] (activate) #whitelist-enableTo force the download you use this command on the managed device:
(wlan-controller) #activate whitelist downloadAfterward, you should have all RAP’s and IAP’s in the remote whitelist. This makes it very easy to manage the whitelist without to much work on your side. The controller contacts Activate on a regular basis to update the list.
How do you manage your whitelist during rollout and operations? Leave me a comment so that I get a better feeling what other people are doing.
If you find this post interesting, leave me a comment and share it with your friends. If you don’t like the post, leave me a comment and share it with your enemy. But whatever you do, leave me a comment, now.
Great Article …. However it should be noted the offloading to an “external” auth db (CPPM) using RAP w/cluster is NOT currently supported.
HI Florian,
Does it consume ACCESS LIC on CPPM ?
That’s a good question. Let me check.
So, were you able to check if it consumes ACCESS LIC?
Hi Alex,
I was not able to test by myself but talking to peers and they agree on that. As the authentication is a radius authentication it will consume an access license per AP.
BR
Florian
Thank you for the article! I have a question for you, if you enable CPPM whitelisting, can you still leverage the local db whitelist, or does the controller only allow one whitelist source?
Hi Sam,
To my knowledge, it allows only one whitelist. So it is “or” not “and”.
Many thanks,
Florian
Hello Florian,
we provisioned all APs to the correspondig AP-Group during the migration from 6.x to 8.x
What are the steps when moving or provisioning existing APs to another AP-Group? When doing this with Configuration > Access Points > Campus APs > Provision the AP is staying in the AP-Group given by the Whitelist.
Is it necessary to do this by whitelist-db cpsec modify?
And what happens to the Whitelist, when purging but having auto-cert-provisioning enabled?
Best regards,
Maurice
Hi Maurice,
If you set an AP group in the whitelist DB this will always rule out any other group setting (except if you use ClearPass for the whitelist). So provisioning the AP’s for a new group will not work, because when the AP reconnects to the controller the group from the whitelist will be used. So changing the group in the whitelist will solve this one.
Removing the group from the whitelist for that AP will also work. Then the provisioned group will be used.
If you purge the whitelist and an AP connects to the controller it already knows the AP group, as this is saved in the boot rom. So the group setting should survive a purge of the whitelist db.
auto-cert-provisioning will only allow the AP to reconnect without adding the AP to the whitelist manually.
hope this answers your questions.
Many thanks,
Florian