In my last post, I described a simple way, to use the an external captive portal with the Aruba Instant solution. This time, I will change the lab environment to support bridged clients. I will also cover the scenario with the internal dhcp server and the situation with an individual certificate.
External Captive Portal in Bridged Mode
For the first scenario, I create a bridged network. The client is send directly to the wired network and gets an IP address from there. The IAP sits in the middle and authenticate the client. I reuse my configuration from the last post. To get this working, I change the VLAN settings for the SSID to “Network Assigned” and “Static”. I can now enter a static VLAN id. In my case, I use VLAN 1. This sends the traffic untagged on the wire:
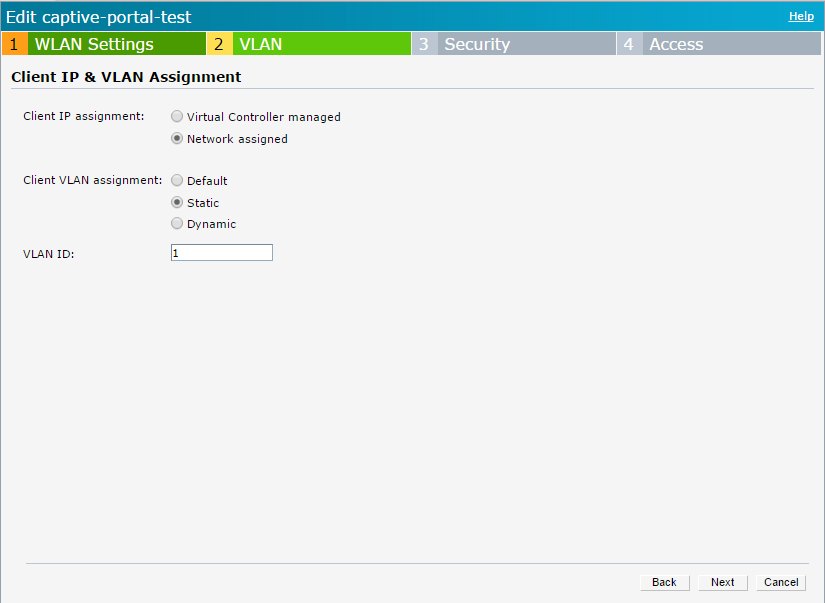
Every client is now sent to VLAN 1. The infrastructure in VLAN 1 assigns an IP address to the client. If the client now tries to reach something via HTTP or HTTPS, the client is redirected to the captive portal.
For the next test, I prepare a tagged VLAN, VLAN 10 The IAP has no l3 interface within this VLAN. I change the VLAN configuration for the SSID:

The difference to the first example is VLAN 10. In the Aruba Instant world, VLAN 1 is always untagged. You can change this, but that is the default. If you assign a user to VLAN 1, the traffic will be sent untagged to the wire. Every other VLAN, in my example VLAN 10 will automatically tagged.
For the explanation. The IAP intercepts the traffic again, even with no L3 interface the VLAN, as in the second example, redirects the client to the external captive portal server. I use the same HTML page as in my previous post:
<!doctype html>
<html lang="de">
 <head>
 <meta charset="utf-8">
 <meta name="viewport" content="width=device-width, initial-scale=1.0">
 <title>External Captive Portal with Username</title>
 </head>
 <body>
 <form method="POST" action="https://securelogin.arubanetworks.com/swarm.cgi">
 <input type="hidden" name="cmd" value="authenticate" />
 <input type="hidden" name="user" id="user" value="test" />
 <input type="hidden" name="password" id="password" value="test" />
 <input type="hidden" name="url" ip="url" value="https://www.flomain.de" />
 <input type="submit" value="Login"/>
 </form>
 </body>
</html>
The login URL is again:
"https://securelogin.arubanetworks.com/swarm.cgi"The IAP intercepts the connection to this URL and grabs the information sent, to authenticate the client.
External Captive Portal with NAT
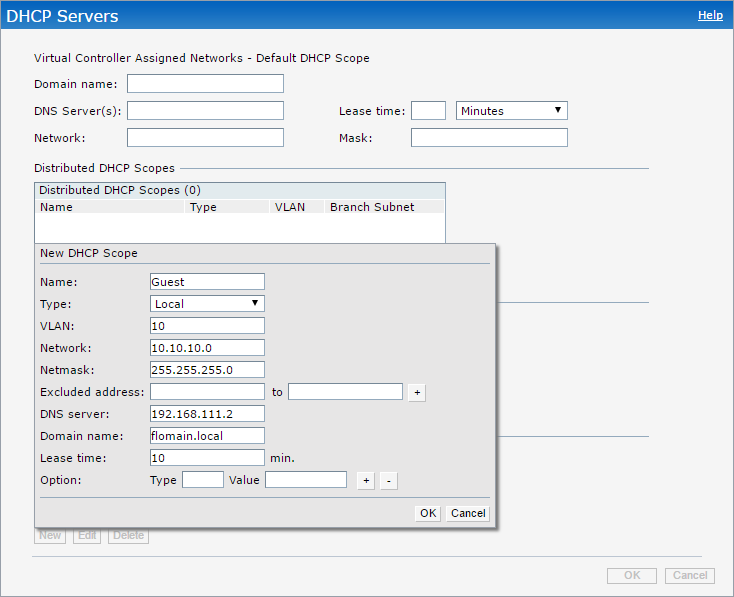
This time, the IAP is the DHCP server for all clients. To avoid routing, the IAP will also NAT the client to the wired network. The first step is to create the DHCP pool for the guest network. To create the DHCP pool on the IAP, go to “More–>DHCP Servers” and add a new “Local DHCP Scope”:
You have to assign the Local DHCP Scope to the SSID. Change the VLAN configuration for the SSID to use the created scope:
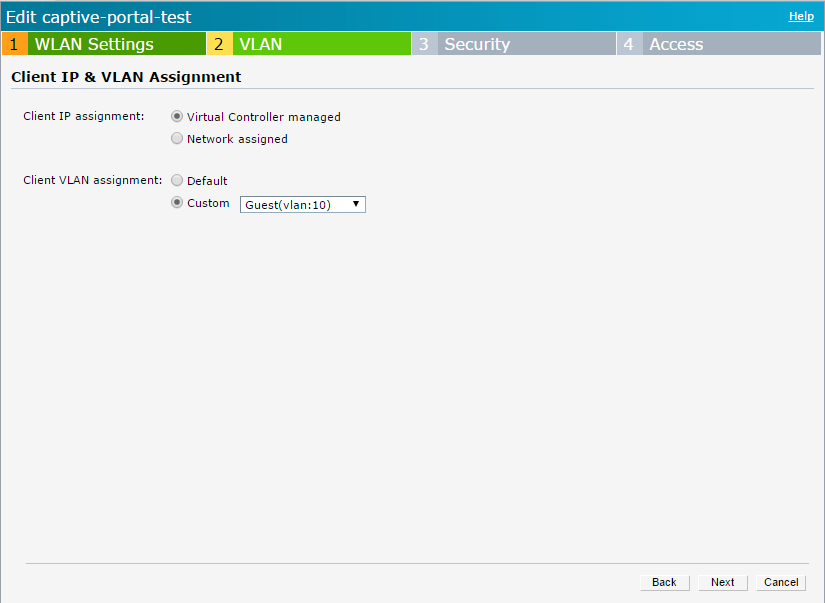
Select “Virtual Controller managed” and with the “Custom” setting select the created scope. Configure the VLAN, in my case VLAN 10 tagged on all uplink Ports, for all IAP’s belonging to the cluster. All IAP’s, not housing the virtual controller, send the traffic tagged with VLAN 10 to the wire and the virtual controller assigns an IP to all clients. In this scenario, the client get the IP address from the controller, the traffic from the client is always source-Nat’ed with the IP of the IAP.
Change the Certificate
In the last part, you import a new certificate to the IAP and you use this certificate for the external captive portal.
I assume, the certificate is ready and can be imported to the IAP. If you have trouble to create the certificate, leave me a comment and I can cover this in the future.
To import a new certificate login to the IAP and go to “Maintenance–>Certificates” and press the “Upload New Certificate” button:
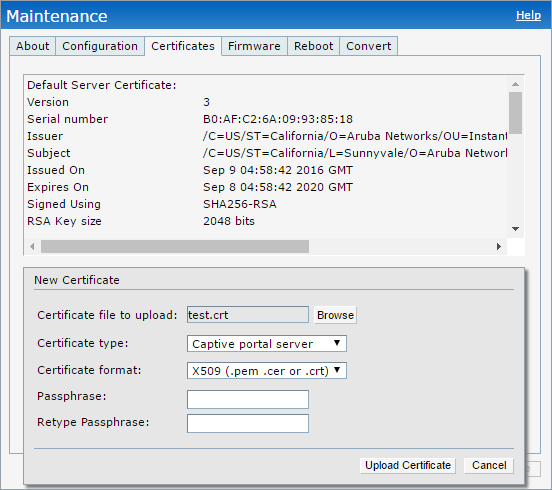
Press the “Upload Certificate” button, to start the upload. It might happen, that you have to login again. But afterwards, the new certificate is listed as the default CP certificate:
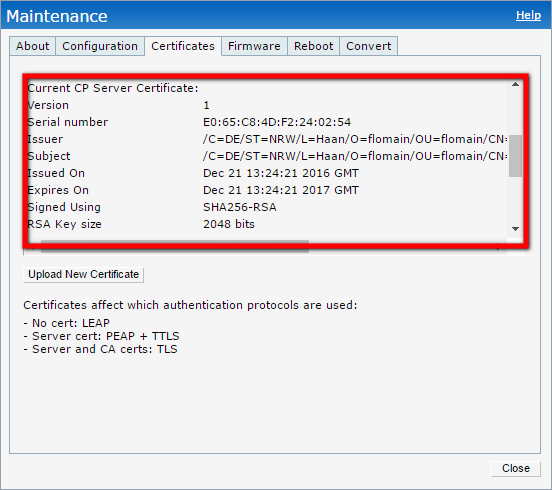
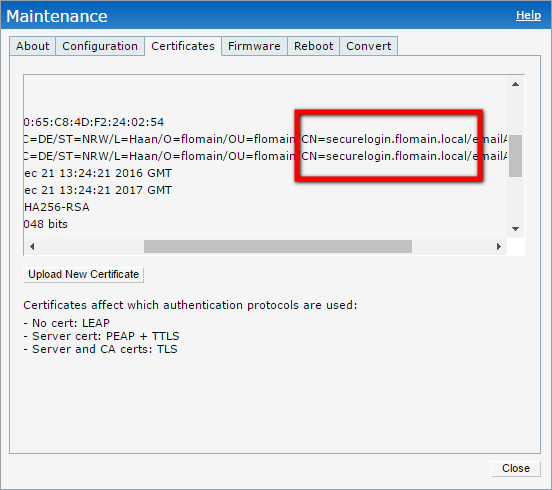
The CN of the new certificate is very important. This is the new URL to send the login information to. In my case it is the following:
Adjust the HTML page accordingly:
<!doctype html>
<html lang="de">
 <head>
 <meta charset="utf-8">
 <meta name="viewport" content="width=device-width, initial-scale=1.0">
 <title>External Captive Portal with Username</title>
 </head>
 <body>
 <form method="POST" action="https://securelogin.flomain.local/swarm.cgi">
 <input type="hidden" name="cmd" value="authenticate" />
 <input type="hidden" name="user" id="user" value="test" />
 <input type="hidden" name="password" id="password" value="test" />
 <input type="hidden" name="url" ip="url" value="http://www.arubanetworks.com" />
 <input type="submit" value="Login"/>
 </form>
 </body>
</html>
The new URL triggers the IAP and the authentication information is used to authenticate the user. Afterwards, the user is online.
If you have any questions please use the comment function below. If you would like to provide feedback please contact me or use the comment function as well.
Hi Florian I came across your informative article whilst searching for an answer to difficulties I’m encountering trying to get Auth text to work with IAP-205 in the same way your write up states it can be done.
“It is also possible to create a welcome page, which includes the terms and conditions and an accept button which will bring up a new page, containing the authentication string”
I have not been able to get auth text to work if the authentication string used is on the second page. Can you provide more details??
hi Berrick,
actually, it should be very easy to accomplish this. You just need the authentication text within the second page. I might have time to set this up next week.
BR
Florian
Hi,
I did the setup in my lab and could successfully authenticate on the second page.
here is my external captive portal profile:
wlan external-captive-portal Auth-text

server debian.lab.flomain.local

port 80

url "auth1.html"

auth-text "test-auth-text"
Here is the first page:
<!doctype html>

<html lang="de">

<head>

<meta charset="utf-8">

<meta name="viewport" content="width=device-width, initial-scale=1.0">

<meta HTTP-EQUIV="refresh" CONTENT="5">

<title>External Captive Portal with Authentication Text</title>

</head>

<body>

This is a test page. To login click

<a href="http://debian.lab.flomain.local/auth2.html">

here

</a>

</body>

</html>
and the second one:
<!doctype html>

<html lang="de">

<head>

<meta charset="utf-8">

<meta name="viewport" content="width=device-width, initial-scale=1.0">

<meta HTTP-EQUIV="refresh" CONTENT="5">

<title>External Captive Portal with Authentication Text</title>

</head>

<body>

<p style="visibility:hidden">

test-auth-text

</p>

Sucessfully logged in using auth text.

</body>

</html>
hope it helps to solve your issue.
It would be appreciated if you could try 🙂
I can get this to work but only if the text for authentication is on the first page. Soon as I move it to the second page it fails to authenticate
Hi, Thanks for trying. This is what I am doing but unfortunately it wont work for me.
Thinking it may be a firmware issue. Trying this on an IAP205 f/m 6.4
I have sent you a PM on Airheads
Hi Berrick,
thanks for your answer. I did the test with 305 and the latest 8.6.x software. So it might be a software issue. But I have a 205 here as well. Let’s if I have the time to check this as well.
BR
Florian
Hi Florian,
Please could you confirm the Model of IAP and firmware on which this is working for you?
I still cant get this to work
Kind regards
Hi Florian,
Please could you verify the IAP model and Firmware you used when it works for you?
Many thanks