In this post, I would like to describe the steps needed to set up
Prepare Ubuntu
I assume that you have installed Ubuntu, either on your hardware machine or in a virtual machine. If Ubuntu is up and running, the steps below will create the development environment, to be able to create your own application for the HPE VAN SDN controller.
The first step is to install Java on Ubuntu, to be able to run eclipse and develop the java application later on. This is very simple by just issue this command to the CLI:
sudo apt-get install openjdk-8-jdkTo check, if java is installed correctly, simply use this command:
test@test-virtual-machine:~$ java -version
openjdk version "1.8.0_91"
OpenJDK Runtime Environment (build 1.8.0_91-8u91-b14-3ubuntu1~16.04.1-b14)
OpenJDK 64-Bit Server VM (build 25.91-b14, mixed mode)
If you see the above output, Java is installed successfully. There is already a new version of this SDK available, which is
The next step is to install maven. Maven is needed to create and compile the application package. Install maven, using this command:
test@test-virtual-machine:~$ sudo apt-get install mavenThis should download and install maven, together with some dependencies. To check, if maven is installed correctly, with the correct version, as you need at least version 3.0.4, issue this command:
test@test-virtual-machine:~$ mvn --version
Apache Maven 3.3.9
Maven home: /usr/share/maven
Java version: 1.8.0_91, vendor: Oracle Corporation
Java home: /usr/lib/jvm/java-8-openjdk-amd64/jre
Default locale: en_US, platform encoding: UTF-8
OS name: "linux", version: "4.4.0-34-generic", arch: "amd64", family: "unix"
If you see the output above, maven is installed correctly.
To write your code, you need a development environment. From my study
Download Eclipse from the official page, do not use the Package manager to install Eclipse, this version is far
Unpack the downloaded package and install Eclipse on your system. After Eclipse is installed successfully, you can add a very useful plugin, which is EclEmma. This plugin for Eclipse will help you testing your application, as it will show, which code parts are tested successfully, if you use Unit Test.
To install this plugin add the plugin repository to Eclipse, by opening the “Install New Software” manager. Go to “Help–>Install New Software”:

Press the “Add” button and add the location of the EclEmma repository, which is “http://update.eclemma.org”.
Select the plugin and go through the wizard to install the plugin. Afterwards, Eclipse needs to be restarted to activate the plugin.
The last step is to install the HPE VAN SDN Controller SDK. This is included in the download of the HPE VAN SDN Controller and needs to be unpacked and installed.
To unpack the package use this command:
test@test-virtual-machine:~/Downloads$ unzip hp-sdn-sdk-2.7.10.zipTo install the SDK change to the “bin” directory within the unpacked folder and start the “install-
test@test-virtual-machine:~/Downloads$ cd hp-sdn-sdk-2.7.10/bin/
test@test-virtual-machine:~/Downloads/hp-sdn-
test@test-virtual-machine:~/Downloads/hp-sdn-sdk-2.7.10/bin$ ./install-sdk
This will download additional files from the web and create a new folder “.m2” in your home folder.
For those, who would like to jump start, I have created a VM, which has everything installed and ready to use and I uploaded it to my google drive. Everything, up to this step is prepared, just follow the steps below, to get startet.
You can download the OVA package here:
Changelog:
20.12.2016
– Updated the SDK Version to the latest (2.7.18)
– Updated Eclipse to the latest version, as of today
– Updated the OS with the latest patches
– Include the SDN API documentation
https://goo.gl/y2MSqs
Below is the old version.
https://goo.gl/KOXa0x
I’m using the google url shortener to track the count of downloads. This is to get a feeling if it is helpful to provide this package.
I will make sure, that with a new version of the SDK, I will upload a new version of the VM.
Now, everything is ready to start with the first application. The next step is to prepare the controller.
Prepare the HPE VAN SDN Controller
In order to work with the controller and to be able to debug your
sdn@medium-hLinux:~$ vi /opt/sdn/virgo/bin/startup.shGo to the bottom of the file and edit the last line to look like this:
exec "$SCRIPT_DIR"/"$EXECUTABLE" start -debug "$@"This will enable the debug mode and you can now use Eclipse to connect to the controller. To get this working, open the debug configurations in Eclipse by clicking on “Run–>Debug Configurations” and create a new configuration for “Remote Java Application” configuration:
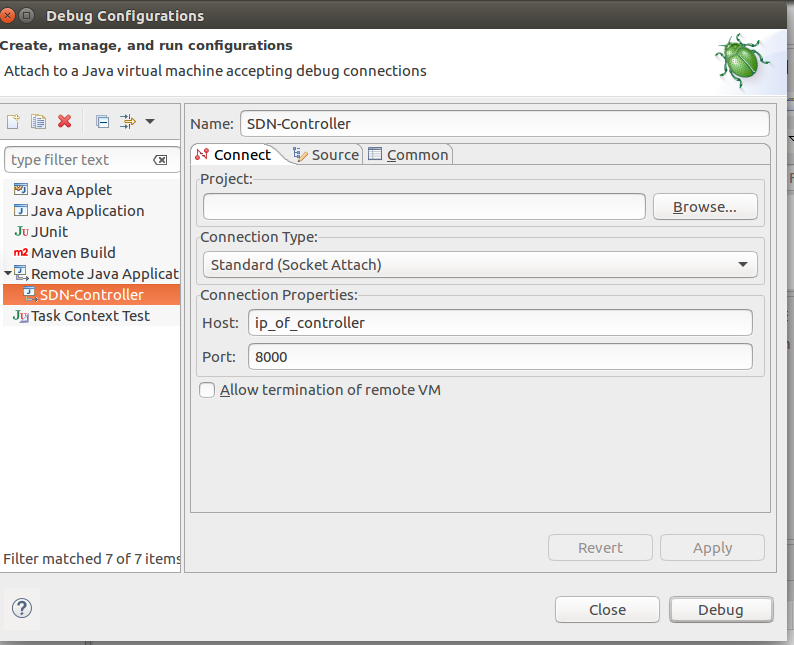
This will allow you to connect to the controller and debug your application code. You will not get the actual error
sdn@medium-hLinux:~$ vi /opt/sdn/virgo/serviceability/logs/log.logYou should also be aware, that you can only connect once to the controller. There is no need to restart the debugging process after each test. To debug your code, simply set a breakpoint and refresh the web interface in the controller. If your code is used Eclipse will switch to the debug view and you are able to step into each instructions in the code.
Before you can test and debug your application, you need to install the application on the controller. As my applications are not officially signed, I need to allow the installation of unsigned applications on the controller.
To do so stop the corresponding service first:
sdn@medium-hLinux:~$ sudo service sdnc stopOpen this file:
sdn@medium-hLinux:~$ vi /opt/sdn/virgo/bin/dmk.shand search for “JMX_OPTS” and add this line to the options “-Dsdn.signedJar=none”. It should look like this:
cd $KERNEL_HOME; exec $JAVA_EXECUTABLE
                        $JAVA_OPTS
                        $DEBUG_OPTS
                        $JMX_OPTS
                        -XX:+HeapDumpOnOutOfMemoryError
                        -XX:ErrorFile=$KERNEL_HOME/serviceability/error.log
                        -XX:HeapDumpPath=$KERNEL_HOME/serviceability/heap_dump.hprof
                        -Dsdn.signedJar=none
                        -Djava.security.auth.login.config=$AUTH_LOGIN
                        -Dorg.eclipse.virgo.kernel.authentication.file=$AUTH_FILE
Line 8 adds the option to accept unsigned JAR packages. start the service again:
sdn@medium-hLinux:~$ sudo service sdnc startYou can now add any application to the controller and the controller will not check if the application is signed. This is very helpful for development systems but should never be used for production systems.
You are now ready to start coding.
Write the First Application
To start coding you should use the “gen-sdn-app” script from the HPE VAN SDN Controller SDK, which will create all the needed folders and classes to start the coding.
Move to the root folder from the downloaded and unpacked SDK from above. There should be
test@test-virtual-machine:~/Downloads/hp-sdn-sdk-2.7.10$ ./bin/gen-sdn-app --directory ~/dev/sdn-apps/mySDNApp --template skeleton --app mf --companyThis will create the folder “dev” in your home directory. Within this directory, you will find everything needed to start coding your application. To get the code into Eclipse follow the steps below.
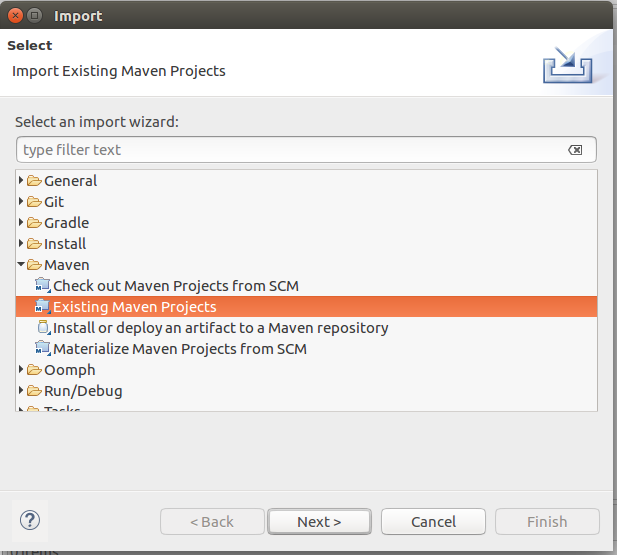
Start Ecipse and click “File–>Import” and select “Existing Maven Project”:
Click next and select the created Application root folder within the “dev” folder:
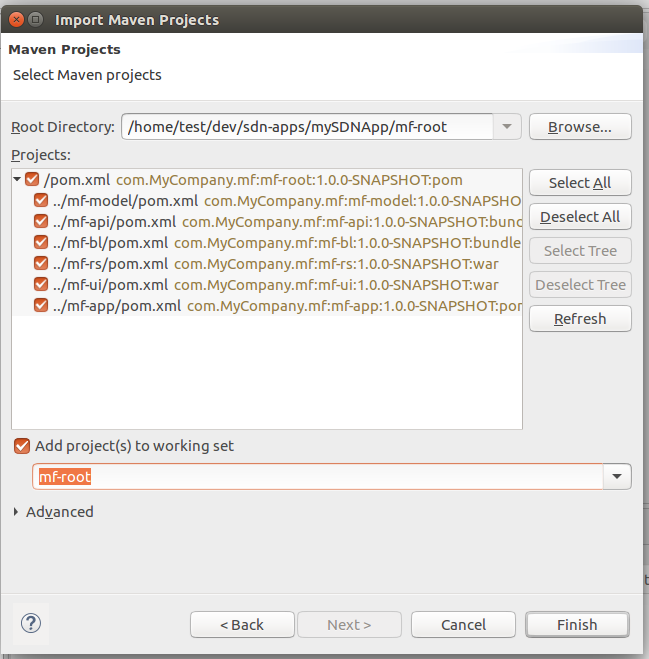
Click finish to start the import. It will take a while to import the application, Eclipse will download some additional files and you might get some messages like this:
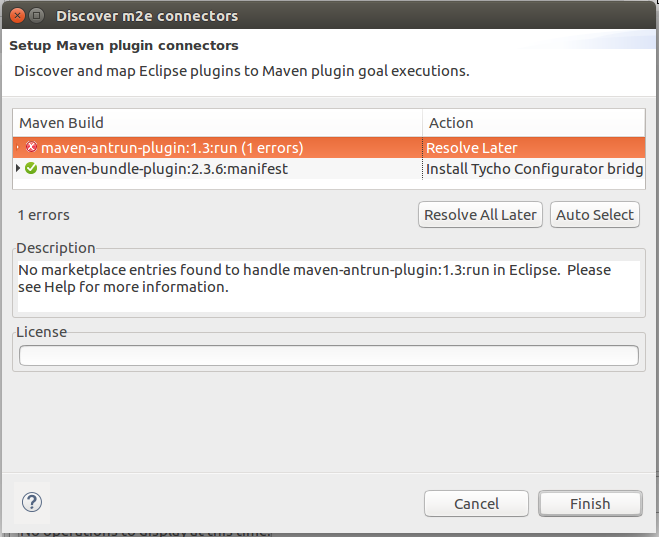
You can stick to the supposed actions here and click finish. There will be a warning, which can be ignored. So click OK.
After restarting Eclipse it is possible that there are still errors with the project. It looks like this error is due to a bug within Eclipse together with maven-antrun. As this will not interfere with the build process, you can ignore this error:
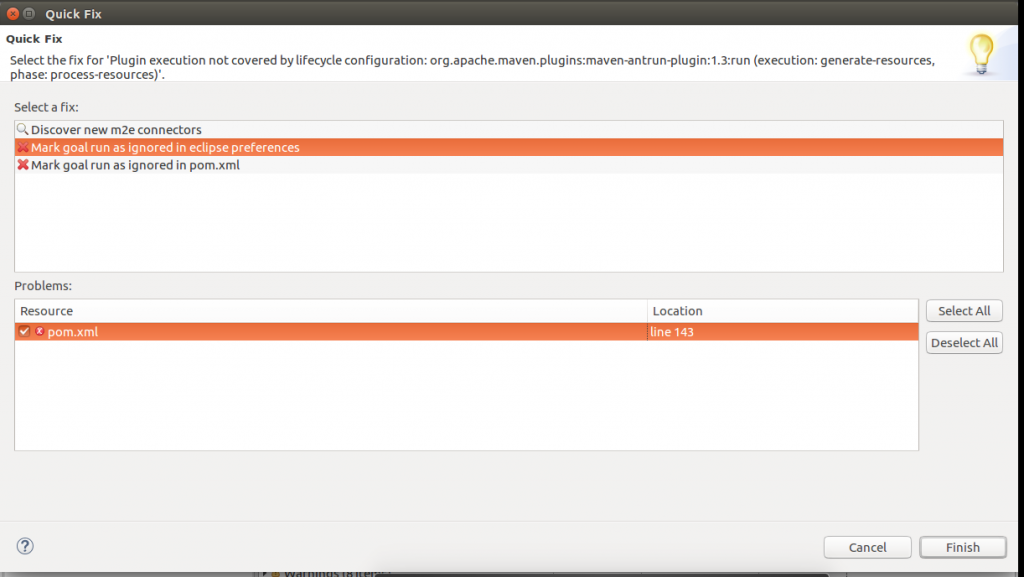
After clicking “Finish” the error is gone and you can build the application. First step is to clean the target folders. No need to do this, if it is the first time you build the application but is good practice to do so before actually building the application. In the package explorer within Eclipse look for the root folder and right click on the “pom.xml” file:
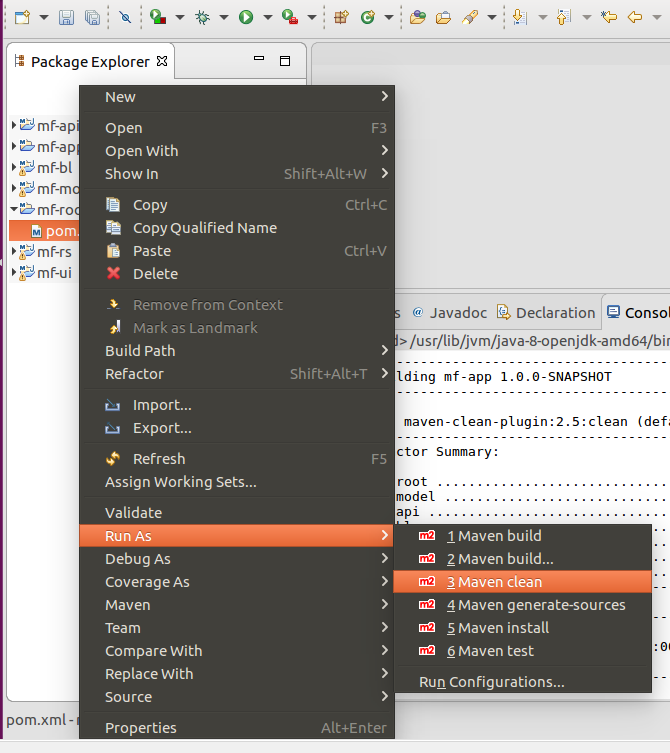
Select “Run As” and click “Maven clean”.
After this has finished you can build the application:
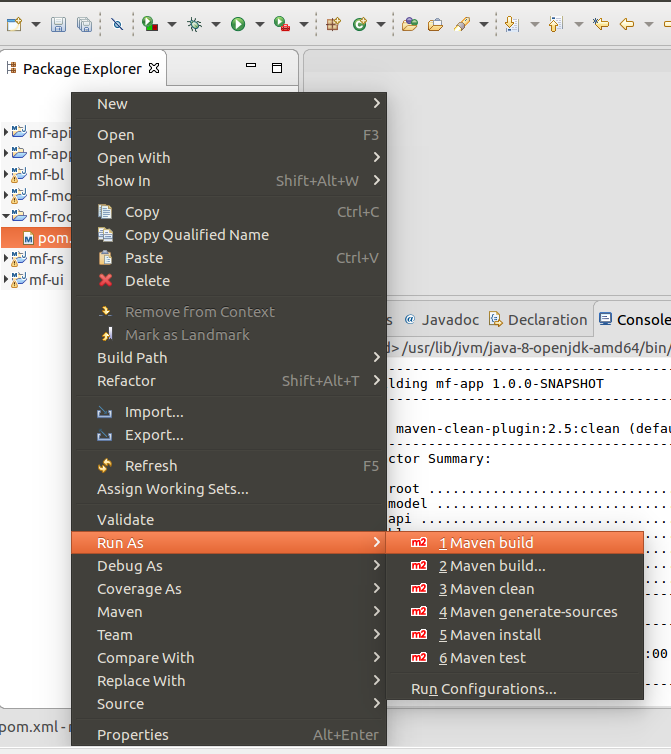
Again, right click on the “pom.xml”, “Run As” and click “Maven build”. This will open a new window, where you can configure some options. At this stage leave
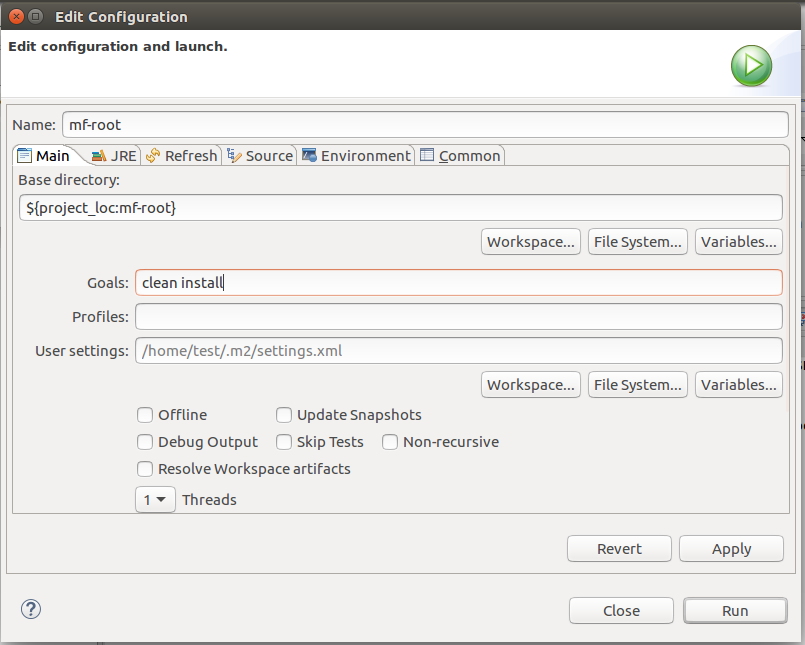
Click “Run” and the build process will start. This will take some time to finish. If the build is successfully, you should get the following console output:

You should also find the packages within the app folder:
test@test-virtual-machine:~$ cd ~/dev/sdn-apps/mySDNApp/mf-app/target/
test@test-virtual-machine:~/dev/sdn-apps/mySDNApp/mf-app/target$ ls -l
total 32
drwxrwxr-x 2 test test  4096 Aug 16 14:37 bundles
-rw-rw-r-- 1 test test 24725 Aug 16 14:37 mf-1.0.0-SNAPSHOT.zip
This package can now be installed on the HPE VAN SDN Controller and your application should be ready to use.
If you have any questions please use the comment function below. If you would like to provide feedback please contact me or use the comment function as well.
Whats the password for the VM ?
hi Usman,
I have used the default password from the SDN controller, which is “skyline”.
Hope this helps.
BR
Florian