This time I would like to show, how to use the UAM captive portal with the MSM solution. As the MSM solution did not support the portal protocol, which is used to transfer all the necessary information from the UAM captive portal server to the access device, we have to use at least one Comware based device in our environment. I prefer to use the VSR router, as this one is a virtual device and can easily be installed. You can find a description on how to install that one on my post here:
How to: Install the HP VSR Router in ESXi
I will start with the MSM based configuration and show the UAM captive portal configuration of the VSR afterwards.
Prepare the MSM Controller for UAM Captive Portal
The configuration of the MSM controller is very simple, as the MSM controller only puts all traffic from the clients into one specific VLAN which is than send to the VSR router. I will send the traffic to the controller and then onto the VLAN to the VSR. You can also put the traffic at the AP into this VLAN. What would be your best practice on this one?
I will start with creating the VLAN. Go to “Network–>Network profiles” and click “Add New Profile”:
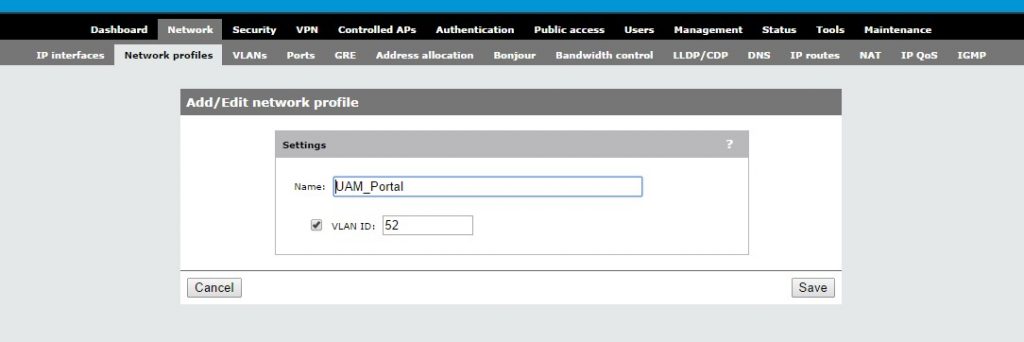
Just enter a Name and a VLAN ID. Afterwards click “Save”. Now we need to put this VLAN onto the Internet Port. Go to “Network–>VLANs” and click on the created network profile:
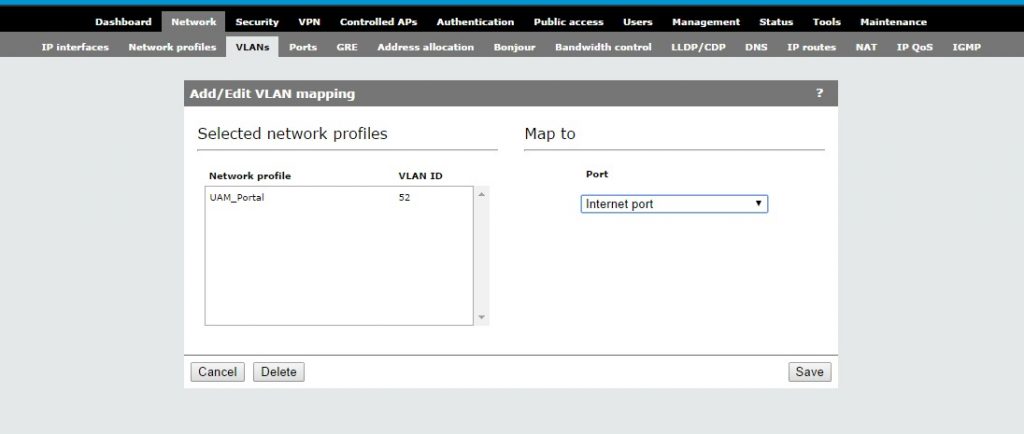
Map the VLAN to the internet port and click “Save”. I always map egress networks to the internet port. What is your best practice on this one?
Now we need to create a VSC which will use the created VLAN as the egress network. To create a new VSC go to “VSC’s–>VSC profiles” and click “Add New VSC Profile”. I will just show the important Settings for the VSC.
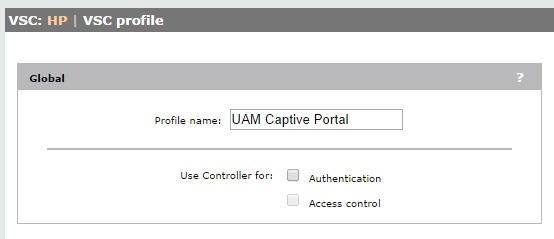
Give it a Profile name and uncheck the checkmarks for “Authentication” and “Access control”.
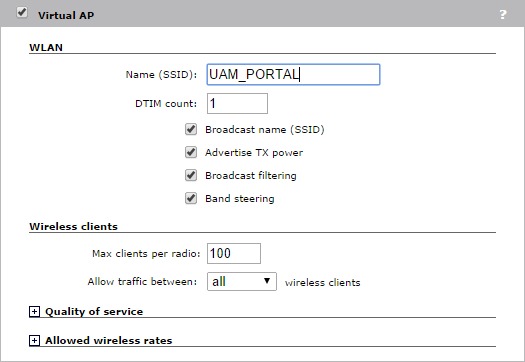
Just enter a SSID. You can also check the checkmarks like I did. What is your experience with those settings?

For my setup, all the traffic will pass the controller. Therefore I need to enable “Wireless mobility”. If you pass the traffic from the AP directly to the VLAN, you do not need “Wireless mobility”. You can now save the VSC. Next step is to bind the VSC to the AP group of choice.
Go to the group of choice and click on “VSC bindings”. Click “Add New Binding”:
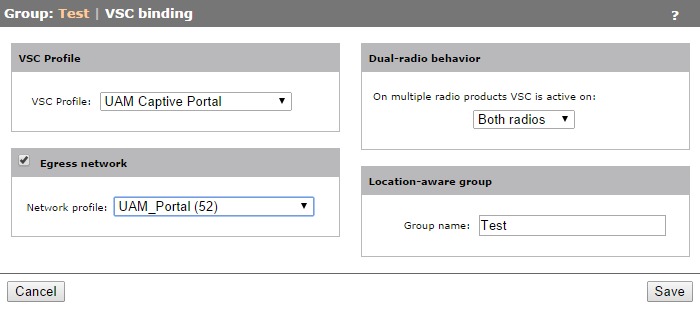
Select the created VSC profile and network profile. Click “Save” and synchronize the AP configuration to the AP’s. We can now start with the VSR part of the configuration.
Configure the VSR for UAM Captive Portal
I use a dedicated port on the VSR for the UAM captive portal. Create one, by just adding another network interface in VMWare ESX or ESXi. I will start with the configuration of the DHCP relay. First, you need to enable DHCP globally:
Afterwards you need to configure DHCP relay on the interface like this:
This will enable DHCP relay on the interface and use “10.3.2.10” as the DHCP server.
Now, we need to configure the portal globally to use the UAM captive portal server. The configuration differs from the one, I already showed in other posts, as the VSR is a Comware 7 device:
This will configure the VSR to use the UAM captive portal at “192.168.1.57” for redirecting. We need to add some free rules, to let DNS work:
This will allow DNS for clients in the 10.3.52.0/24 subnet with the server at 10.3.2.10. Afterwards, you need to enable the portal on the interface:
The last two commands will enable the portal for this interface. All clients should now be redirected to the UAM captive portal server. Currently, the page will show an error, as we did not configured the UAM captive portal server to accept requests from this device and from the IP range.
Before we can configure the stuff at the UAM captive portal, we need to configure the UAM captive portal server on the VSR. This is the part of the portal configuration, where the portal protocol is configured. In Comware 5 this was just one step, in Comware 7 it is a two-step approach.
This will configure the portal protocol to work with the server add “192.157.1.57” with the chosen secret.
You also need to configure a radius scheme, which will be used for the authentication for the users:
Afterwards, you need to configure the domain, which will use the radius scheme for authentication:
This will complete the configuration on the VSR and we can head over to the UAM captive portal server.
Configure the UAM Captive Portal
I assume, that you already have a running UAM captive portal server. If not, have a look at this post:
How To: UAM Portal with the Unified Controller
To add the VSR as a portal device go to “User–>User Access Policy–>Portal Server –>Device” and click “Add”:

Just fill in the “Device Name” and the “IP Address”. The “Key” is the one, configured in the
Before we can add the port group, we need to configure the “IP Group”. Just go to “User–>User Access Policy–>Portal Service–>IP Group” and click “Add”:
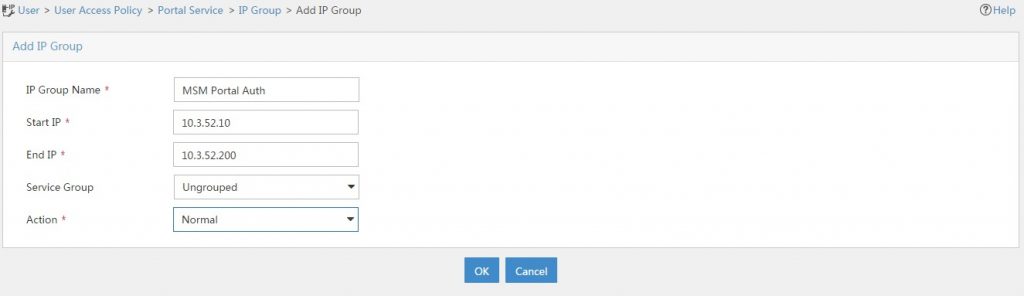
To save the configuration click “OK”.
Now, you need to configure the port group. Go back to the device settings and click on the “Port Group” symbol and add a new port group:
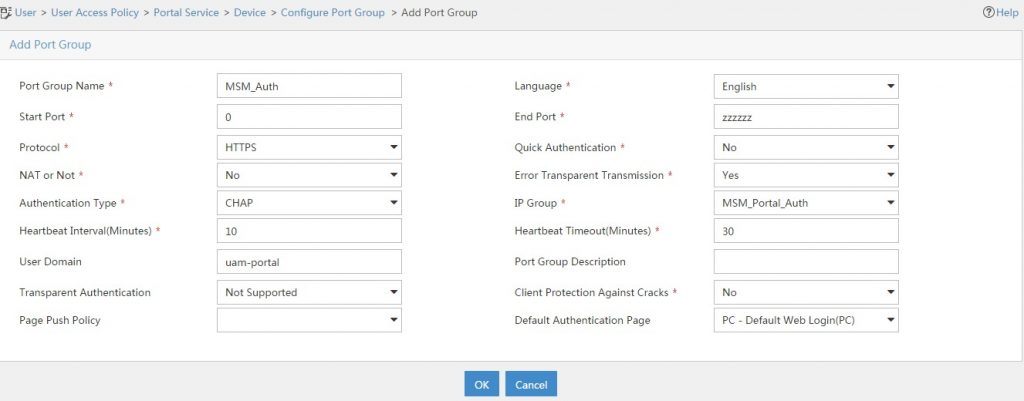
Click “OK” to save the configuration.
You also have to add the VSR as an access device in UAM. This will make sure, that the radius authentication is working. There is a description in this post on how to do that:
How to: MSM Captive Portal with Remote Authentication
You can now add users and they will be able to use the UAM captive portal, connecting to the MSM controller. You can also use the enhancements for UAM captive portal which I describe in this post:
UAM Portal Authentication Enhancement
For any questions or feedback, please you can use the comment function.