
In this post I will share my experience with controller discovery in the network. You will get many information on how the AP can discover the controller and what network requirements needs to be meet to do that. I will cover the following topics:
- Where to place the AP’s in the network
- How the discovery process works
- L2 controller discovery or the simple way
- DHCP based controller discovery
- DNS based controller discovery
- Provisioned based controller discovery
- DHCP configuration with windows server
- DHCP vendor specific options
Before we start, this post will only cover the non-cloud AP’s. For the Cloud based AP’s I will write a separate post, as soon as I get my hands on those new AP’s
Where to place the AP’s
As mentioned in earlier posts, I fully agree with the idea of putting AP’s in a separate VLAN. from my point of view, this has a lot of benefits
- When using encryption on the Unified Controller, you can specify a specific IP segment from which requests are coming and you can disallow the request from other IP segments
- You can specify, which controller to use, as AP’s needs to get the controller IP from somewhere in the network (I will describe how below) and will not just connect to the one, answering first
- Traffic to the AP’s can be restricted for security reasons
- As the AP did not answer to SNMP requests or other management requests at all, you can exclude the whole segment from the management system, which will preserve licenses
- For troubleshooting, it is helpful if you have your AP’s in a separate VLAN without any other clients doing some sort of traffic.
- I’
m a friend of putting things with the same function in the same VLAN and separate it from the rest.
Putting AP’s in a VLAN specifically for AP’s is just my best practice, you can also put them in other existing VLAN’s, but you will lose some of the benefits above. You can also put the controller in the same VLAN as the AP’s, but this is not always possible, as the controller normally has to stay in the datacenter, where as the AP’s are located in the campus and you can’t extend your campus VLAN to the datacenter.
How the discovery process works
When putting the AP in separate a VLAN or having the AP in the branch you need to make sure, that the AP can find the controller and the controller discovery process works. To do that, there are 3 methods available and I will explain how they work and what the benefits are. Actually there are 4 methods to discover the controller, but the first one, is the standard method via L2 which is not available when following my suggestion above.
Nevertheless, I will also describe how the L2 discovery process works.
L2 controller discovery or the simple way
When doing L2 controller discovery, the AP and the controller needs to be in the same VLAN. Therefore it is good for very small environments, but in most of the larger deployments, this is not possible.
The process itself is very simple. The AP is getting an IP address, either from the controller or an external DHCP server. Afterwards, the AP is sending out a UDP broadcast to the broadcast address. As the controller and the AP are within the same VLAN, the controller (or the controllers) will receive the broadcast.
When dealing with MSM controllers, the controller will answer the request and the AP will connect to the first controller which answers the request.
When working with the Unified controller, the controller will only answer to the controller discovery request from the AP, when the AP is configured. There are other scenarios, where it is not a requirement to preconfigure the AP on the controller, which will be described in a later post.
This is the process. Very simple and fast. The broadcast method will always be used when the AP is starting. When there are more than one VLAN connected to the AP port, the AP will try all VLAN’s one by one.
When no controller answers the request, the AP will start trying the other methods.
DHCP based controller discovery
When using the DHCP based discovery method, the AP can find very fast the corresponding controller. The AP will ask for an IP address and DHCP option 43. The DHCP server needs to be configured to provide also option 43 to the AP. I will explain the details later. When the AP gets an IP address and the option 43, which is the IP address of the controller, the AP will immediately connect to this address, without doing L2 controller discovery. This is a very fast and streamlined process.
When having more than one controller, option 43 should contain all IP addresses. For teamed controllers, you need to send the physical IP addresses of all members. Sending the team IP address will not work.
DNS based controller discovery
This is a very handy method when you can not change the VLAN, the AP will be placed into or you want to be very flexible where to connect your AP’s. The AP will get an IP address from a DHCP server and will start L2 controller discovery. As this will fail, the AP will try to get the controller IP via DNS.
When working with MSM controllers, the AP will try to resolve those names:
- cnsrv1.your-domain.com
- cnsrv2.your-domain.com
- cnsrv3.your-domain.com
- cnsrv4.your-domain.com
- cnsrv5.your-domain.com
It is not necessary, to resolve all the names. Just on for every controller and you are fine.
When you have a unified controller, the AP will try to resolve a different name, which is:
- HPN.your-domain.com
If you have more than one controller, you should resolve all IP addresses from that name. Doing it that way, with a round robbing algorithm at the DNS server, will lead to a good sharing of AP’s between those controllers.
Keep in mind, that all AP’s will come with a MSM image, even when you have a unified controller and even after a hard reset, the AP will boot up with a MSM boot code. This mean, you should always put both name formats into your DNS system.
Provisioned based controller discovery
This method is based on a manual configuration of each AP, therefore I did not recommend using this method, as it means a lot of management overhead. For those who still want to do this, here is how it works.
When working with MSM controllers use the steps below
When you get a new AP, you can connect this AP to your network. Make sure, the AP is getting an IP address. Now you can use your browser of choice and open the web GUI of the AP and
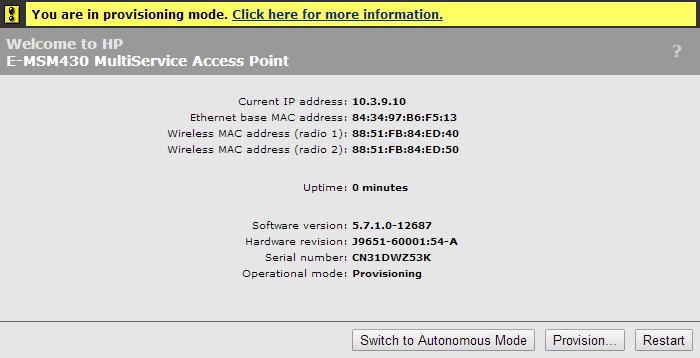
Press the “Provision…” button to get to the provisioning settings:
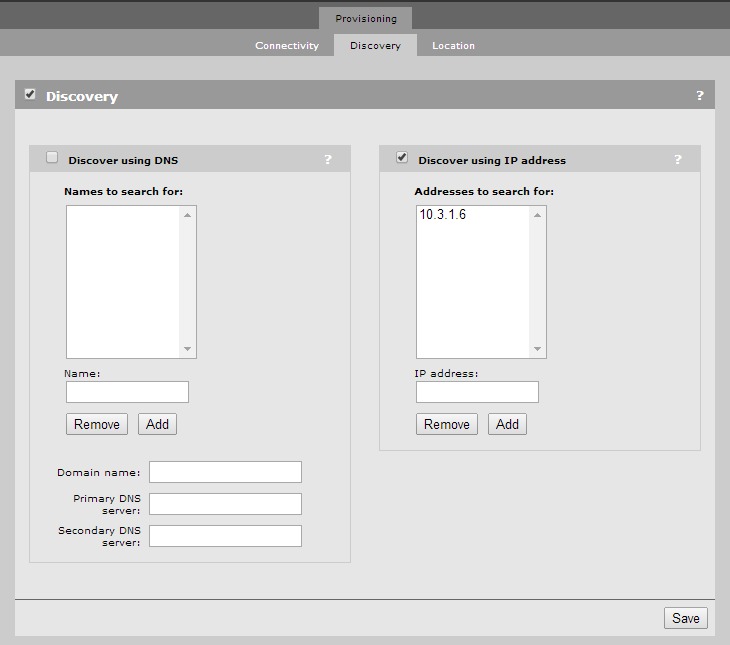
Make sure, that you check the check boxes for “Discovery” and “Discovery using IP address”. Now add the IP of your controller, click “Save” and reboot the AP from the GUI.
After the AP reboots, it will directly connect to the controller IP, which was previously configured. After the AP is up and running, you have to configure provision based controller discovery on the controller, otherwise the AP will not find the controller after the next reboot.
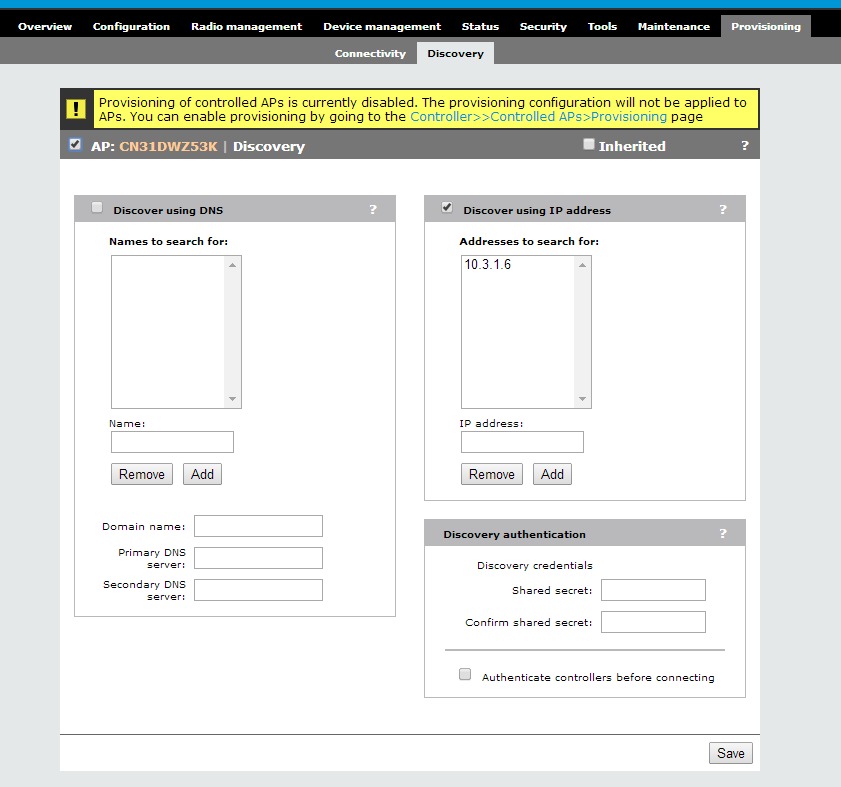
You have to enable provisioning globally, by following the link in the top yellow square. Afterwards go back to this screen and configure it as showed in the screenshot, but replace my controller IP with yours and click “Save”.
When working with unified controllers the process is different
The process above will not work with unified controllers, as during the controller discovery, the controller will load a new software on the AP which will erase the provisioning settings. When you get a new AP which is running MSM code, you have to connect this AP to the unified controller, using one of the methods above, but not provisioning based controller discovery. Than you can configure the needed provisioning settings on the controller. The command below will configure a static controller IP on the AP.
The marked line will tell the AP to discover the controller at 10.1.3.11. Then, this is saved to the AP with the command:
The first line will save the provisioning settings to all running AP’s. Now you can disconnect and put the AP to the final location. But be aware, resetting the AP to factory default, will lead to the same situation as described above. The AP will boot up with an MSM boot image and no provisioning settings.
Therefore I do not recommend this method. Because if this and because of the management overhead.
DHCP configuration with Windows Server
As described above, my personal preferred way for controller discovery is the DHCP based controller discovery as this is faster than the DNS based discovery, due to the elimination of the L2 based controller discovery and offers much more control, as I can decide which controller IP will be advertised in which subnet.
As also mentioned, to do this, you need to configure some vendor-specific options on the DHCP server. I will explain how to configure those options with Windows Server 2008R2 below.
Before we start, I need to explain a bit about those options. In the former MSM days, the vendor-specific option where quite easy. There was just one vendor code, used by the AP’s. In contrast, in the old H3C days, they used a specific vendor code for each AP and a
We will start with the configuration for the MSM code, as this is needed for both controller types, even when the AP, controlled by an unified controller only need this option before conversion to the unified code occur.
Back to the Windows Server. Open the DHCP management console:
Select your IPv4 server and with a right-click, open “Define Vendor Classes…”:
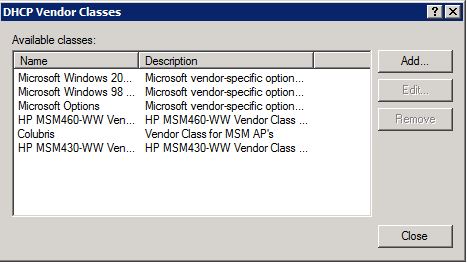
Click “Add…” to add a new vendor class:
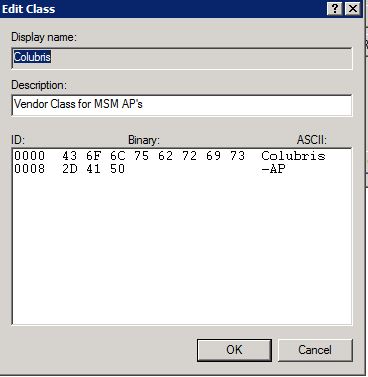
The display name and the description can be filled with something meaningful for you, but the part in the ASCII column needs to be exact this value: “Colubris-AP”.
Click “OK” and then “Close” to return to the DHCP management console. Again right-click on “IPv4” and now select “Set Predefined Options”. Select your created vendor class as “Option class” and click “add”:
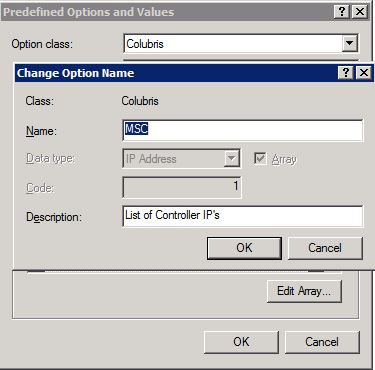
Give it a “Name” and select as “Data type” “IP Address” and check “Array”. The “Code” must be “1”. The “Description” is free of choice. Click two times “OK” to return to DHCP management console.
Now expand the “Scope” of choice and right-click on “Scope Options” and select “Configure Options”:
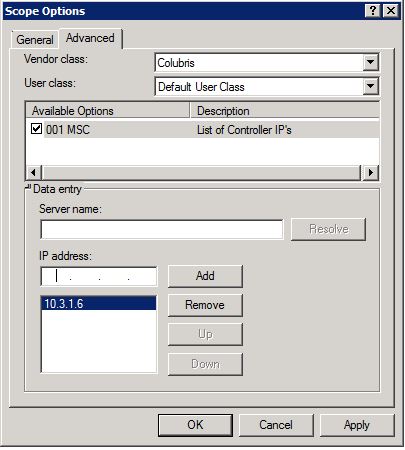
Select the “Advanced” tab and as “Vendor class” your created vendor class. Check the created option and “Add” your controller IP address or if you have more than one, simply add all and press “Apply”.
You are done for the MSM part. Now, all request from AP’s with MSM code, which sends “Colubris-AP” as the vendor id, will be
When working with unified controllers, you need to configure the stuff above and you also have to create some more vendor classes. To be specific, you have to configure a vendor class for every AP type in your environment. A full list will be at the end of the post.
I will describe the necessary configuration steps for the MSM460, but the same steps applies to all the other AP’s. Starting point is again the vendor class. So, add a new “Vendor Class”:
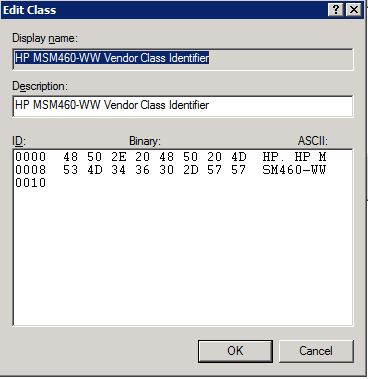
This time, the vendor class is just for the MSM460-WW. Therefore the ASCII code is “HP. HP MSM460-WW”. Return to the DHCP management console and add the predefined option for this new class:
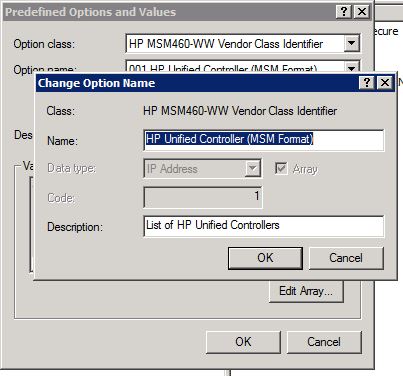
This is the same as with the MSM vendor class. Now return to the DHCP management console and go to the “Scope” of choice to configure the scope options:
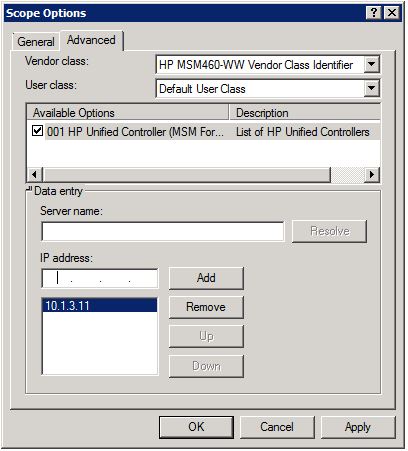
This is the same as before with the MSM vendor class. so strait forward. Your done now, for all MSM460-WW models in this scope. Repeat this for other AP types in your environment and the last part for all scopes where AP’s are placed.
The DHCP server is now configured to respond to specific vendor classes, option 60 in the DHCP request, with a corresponding option 43 and send the correct IP address of the controller to the AP.
DHCP vendor specific options
As we discovered in the part above, there is a vendor specific class for every AP I would like to make it as easy as possible for you to create those classes. Therefore I created the list below to help you creating those classes. I will keep them up to date and expand the list when new AP’s arrive.
| AP Type | Vendor-Class | Vendor-Class (HEX) |
|---|---|---|
| HP 417-AM | HP. HP 417-AM | 48502e204850203431372d414d |
| HP 417-WW | HP. HP 417-WW | 48502e204850203431372d5757 |
| HP 425-AM | HP. HP 425-AM | 48502e204850203432352d414d |
| HP 425-IL | HP. HP 425-IL | 48502e204850203432352d494c |
| HP 425-JP | HP. HP 425-JP | 48502e204850203432352d4a50 |
| HP 425-WW | HP. HP 425-WW | 48502e204850203432352d5757 |
| HP 525-AM | HP. HP 525-AM | 48502e204850203532352d414d |
| HP 525-IL | HP. HP 525-IL | 48502e204850203532352d494c |
| HP 525-JP | HP. HP 525-JP | 48502e204850203532352d4a50 |
| HP 525-WW | HP. HP 525-WW | 48502e204850203532352d5757 |
| HP 527-AM | HP. HP 527-AM | 48502e204850203532372d414d |
| HP 527-IL | HP. HP 527-IL | 48502e204850203532372d494c |
| HP 527-JP | HP. HP 527-JP | 48502e204850203532372d4a50 |
| HP 527-WW | HP. HP 527-WW | 48502e204850203532372d5757 |
| HP 560-AM | HP. HP 560-AM | 48502e204850203536302d414d |
| HP 560-IL | HP. HP 560-IL | 48502e204850203536302d494c |
| HP 560-JP | HP. HP 560-JP | 48502e204850203536302d4a50 |
| HP 560-WW | HP. HP 560-WW | 48502e204850203536302d5757 |
| HP MSM430-AM | HP. HP MSM430-AM | 48502e204850204d534d3433302d414d |
| HP MSM430-IL | HP. HP MSM430-IL | 48502e204850204d534d3433302d494c |
| HP MSM430-JP | HP. HP MSM430-JP | 48502e204850204d534d3433302d4a50 |
| HP MSM430-WW | HP. HP MSM430-WW | 48502e204850204d534d3433302d5757 |
| HP MSM460-AM | HP. HP MSM460-AM | 48502e204850204d534d3436302d414d |
| HP MSM460-IL | HP. HP MSM460-IL | 48502e204850204d534d3436302d494c |
| HP MSM460-JP | HP. HP MSM460-JP | 48502e204850204d534d3436302d4a50 |
| HP MSM460-WW | HP. HP MSM460-WW | 48502e204850204d534d3436302d5757 |
| HP MSM466-AM | HP. HP MSM466-AM | 48502e204850204d534d3436362d414d |
| HP MSM466-IL | HP. HP MSM466-IL | 48502e204850204d534d3436362d494c |
| HP MSM466-JP | HP. HP MSM466-JP | 48502e204850204d534d3436362d4a50 |
| HP MSM466-R-AM | HP. HP MSM466-R-AM | 48502e204850204d534d3436362d522d414d |
| HP MSM466-R-IL | HP. HP MSM466-R-IL | 48502e204850204d534d3436362d522d494c |
| HP MSM466-R-JP | HP. HP MSM466-R-JP | 48502e204850204d534d3436362d522d4a50 |
| HP MSM466-R-WW | HP. HP MSM466-R-WW | 48502e204850204d534d3436362d522d5757 |
| HP MSM466-WW | HP. HP MSM466-WW | 48502e204850204d534d3436362d5757 |
This table was updated on 2015-02-24.
For more information on the products go to http://www.hp.com/go/networking