This is the third and last post in this series. I will now show how I configured the IMC (Intelligent Management Center) with UAM (User Access Manager) to get all the magic working.
In this post I will describe how to configure the following points:
- enable the BYOD functionality in UAM
- setup the Guest functionality
- create two Access Policies
- modify the BYOD landing page
- create two Access Services
Before we start, I would like to make clear, that I will just describe the Guest part of the BYOD story. How to handle internal Users will be described in a later post.
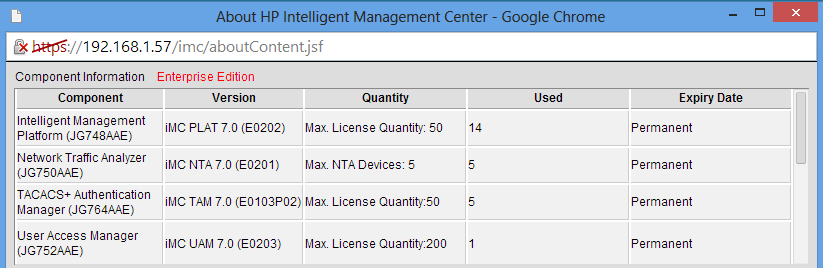
I did all the testing with the latest version of IMC and UAM as shown in the picture below:
Before we can use the BYOD functionality, we need to make sure it is enabled. To do so, go to User–>User Access Policy–>Service Parameters–>System Settings–>User Endpoint Settings:
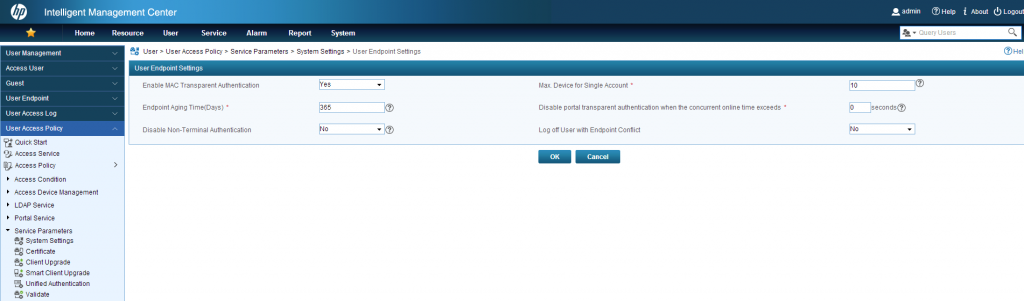
Make sure “Enable MAC Transparent Authentication” is set to “yes”. With the option “Max. Device for Single Account” we can set the maximum Number of devices, which are allowed per account. If the maximum is reached, the clients or a guest manager needs to delete one or more devices for this client. This needs to be adjusted for every scenario.
Save the settings with clicking “OK”.
Next thing is to adjust the Guest Settings. Therefor go to User–>Guest–>Guest Parameters:
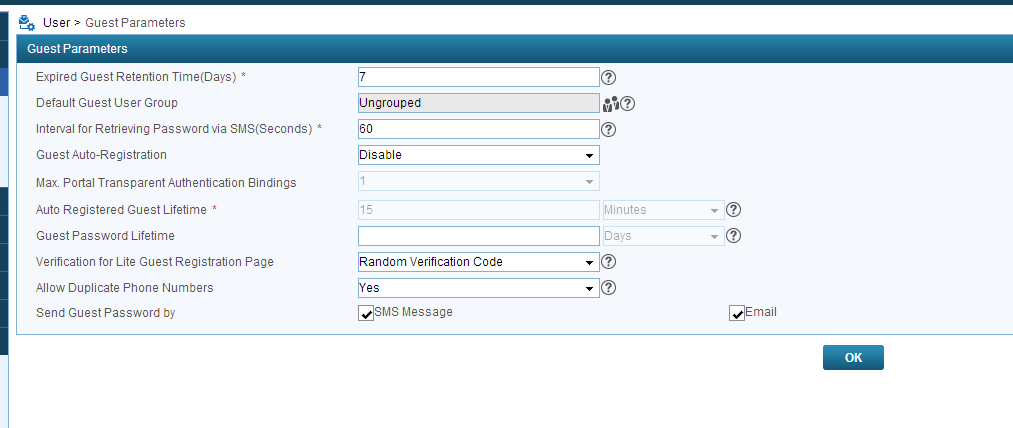
On this page you need to decide if guests should be able to register themselves and go online or if there should be any approval process. This can be configured with “Guest Auto-Registration”. When set to disable, the guest can register themselves, but before he can go online, a guest manager needs to approve the account.
When set to enable, the guest can go online for the specified time (“Auto Registered Guest Lifetime”).
A cool new feature with the new version is, that you can decide if the password should be send via SMS or Mail to the guest. In the Selfservice Portal it’s also possible to print a voucher for the guest. This will be described in a later post.
To approve guests, you need to specify guest managers. This could be done in this screen User–>Guest–>Guest Manager:
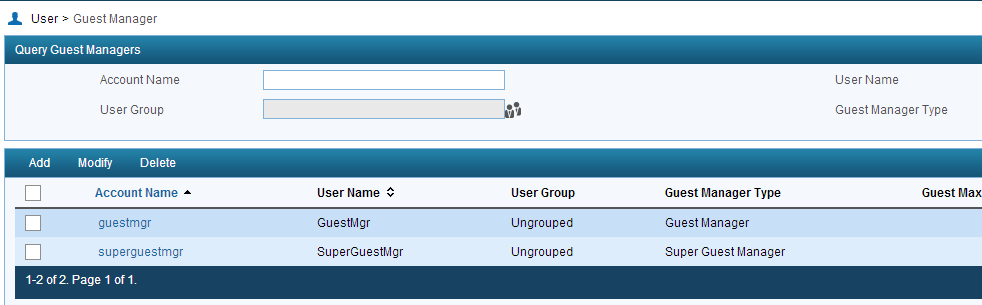
To add a new Guest manager, click on “Add”:

First, you have to decide if the Account should be a “Guest Manager” or a “Super Guest Manager”. The difference is, that the “Guest Manager” just controls guests he approved, and the “Super Guest Manager” can manage all guests in the system.
You can also set the “Maximum Validity Time of Managed Guests”. This option will set the maximum time, a guest account can be approved for.
Last step, is to select a prior created access user as a guest manager and click the “OK” button. Now you have a guest manager who can approve guests.
Now, we need to create to Access Policy. The first one is for the registration process, which will be
Registration Policy:
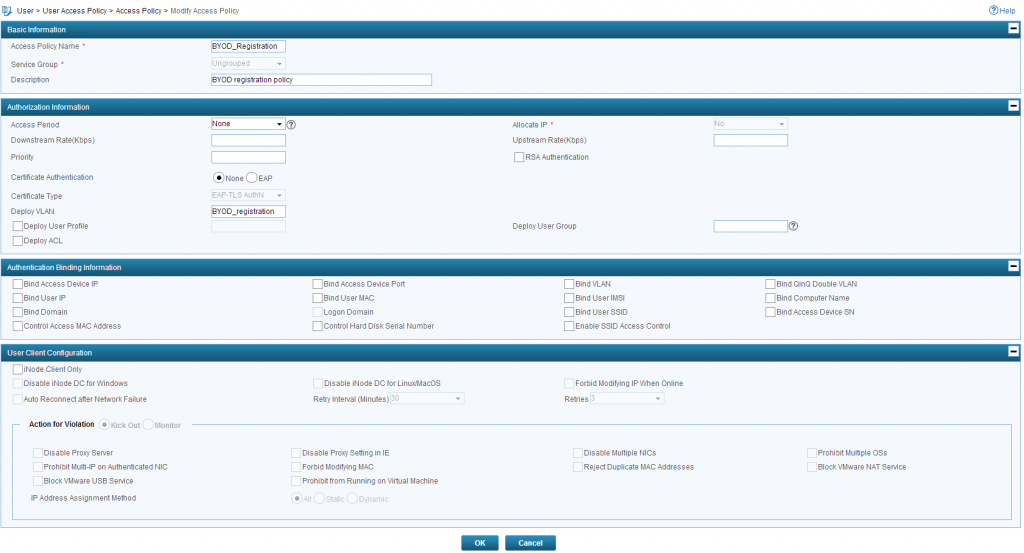
Guest Policy:

The summery screen should look like this:

In the above paragraph, I talked about an HTTP forwarding device. This is a mandatory requirement for the BYOD solution to work. The task of this device is to redirect all HTTP request to the IMC portal. This functionality is only implemented in the Comware based devices as the unified controller itself. This also means, when using an MSM controller, you need at least one Comware device to let the solution work. For smaller environments without any Comware based switches, one could use the VSR (Virtual Service Router – http://h17007.www1.hp.com/us/en/networking/products/routers/HP_VSR1000_Virtual_Services_Router_Series/index.aspx#.Uz_3ivmSxps )
The configuration of the redirection is quite simple:
portal server imc ip 192.168.1.57 url
 portal free-rule 1 source vlan 50 destination ip 192.168.1.57 mask 255.255.255.255
The first line configures the redirect URL, which should always point to the IMC BYOD page. In my installation, the portal is running on port 80 and 443, which are the default ports. If you are to fast, clocking “next” during the installation of UAM the default ports are 8080 and 8443. You need to configure those ports in the redirect statement. The second line sets a free rule, which will allow the traffic the IMC Portal Server. Without this rule, the traffic will be blocked. You also need to create a rule for the DNS server, to allow traffic to this server. In my environment, the IMC Server is also the DNS server. For environments with a separate DNS
Now, we need to bind the portal server to the interface:
interface Vlan-interface50
 description BYOD_Registration
 ip address 10.1.50.1 255.255.255.0
 dhcp select relay
 dhcp relay server-select 0
 portal server imc method direct
The portal server only needs to be applied to the interface. This is done in the last line. When this command is applied to an interface, every traffic will be blocked and the http/https traffic is redirected to the portal server.
That’s it, the redirecting is configured and all unknown guests should be redirected to the BYOD page.
Now, we need to create the BYOD page, which will be presented to the guest. Therefor go to User–>User Access Policy–>Customize Terminal Pages–>BYOD Page:
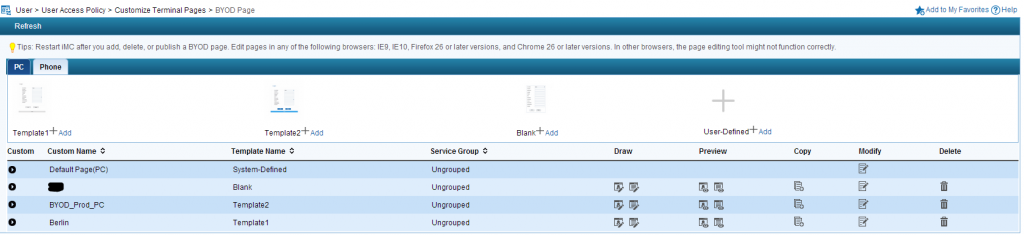
There is already a default page, which can be used, but for most of the cases it is needed to create a customized one. Just click “Add” on the button, which is closest to the Template you like and give your template a name. To edit the page, click in the “Draw” column on the first button. This will open the window below:
On this page, you can edit the BYOD page quite
The most important stuff is the “Set Properties” tool. This will open the window below:
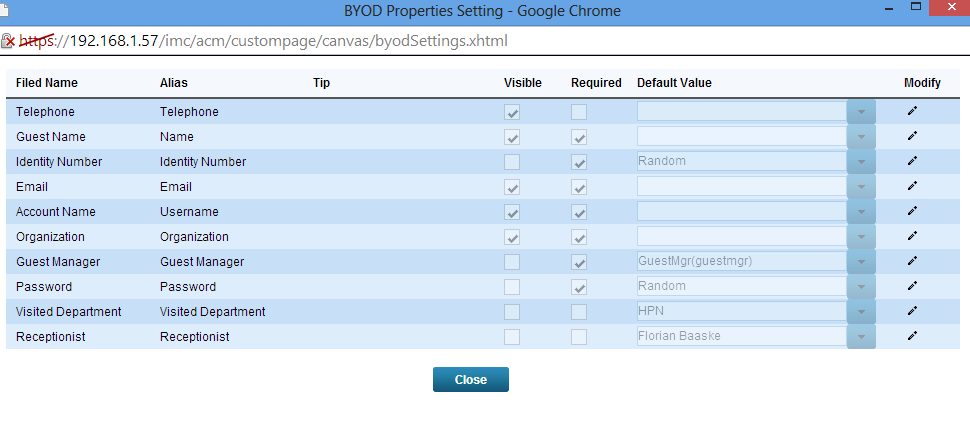
With the help of this window, you can manage the fields which should be presented to the guest. This is quite easy. Just click on the “Modify” symbol and then check the visible checkbox if the filed should be showed to the guest. Via the “Alias” setting you can set the field name in the page. This can be used to translate the portal to every language. You can also set some default values. This is helpful for some system required values which should not be shown to the guest. In the example above it is for example, the “identity Number”, which is generated randomly.
Closing this page will bring you back to the screen before. Here you need to click “Save” and “Publish” in this order, to make the changes visible to the user.
You can do the same for mobile devices, which is a great possibility to show a smaller and cleaner interface for phones or tablets.

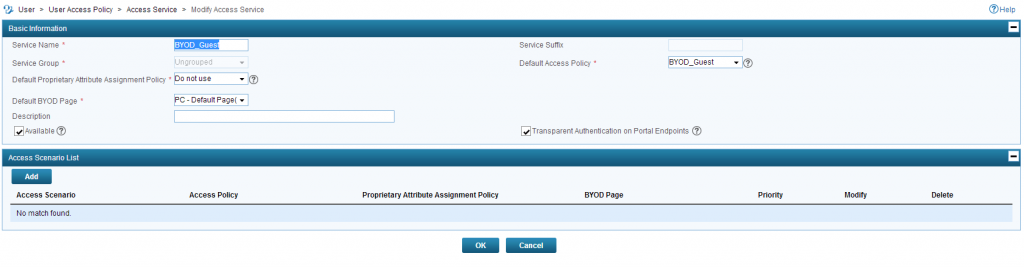
To bring the policies and the pages together, we need to create an “Access Service”. Go to User–>User Access Policy–>Access Service and create two Services. The first is for the registration process and will use the registration policy. The second one is for the guests and will use the guest policy.
Registration Service:
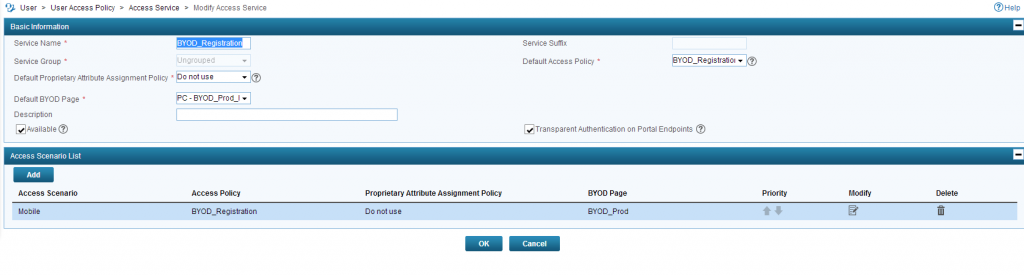
Select the registration Policy as the “Default Access Policy” and a “Default BYOD Page”.
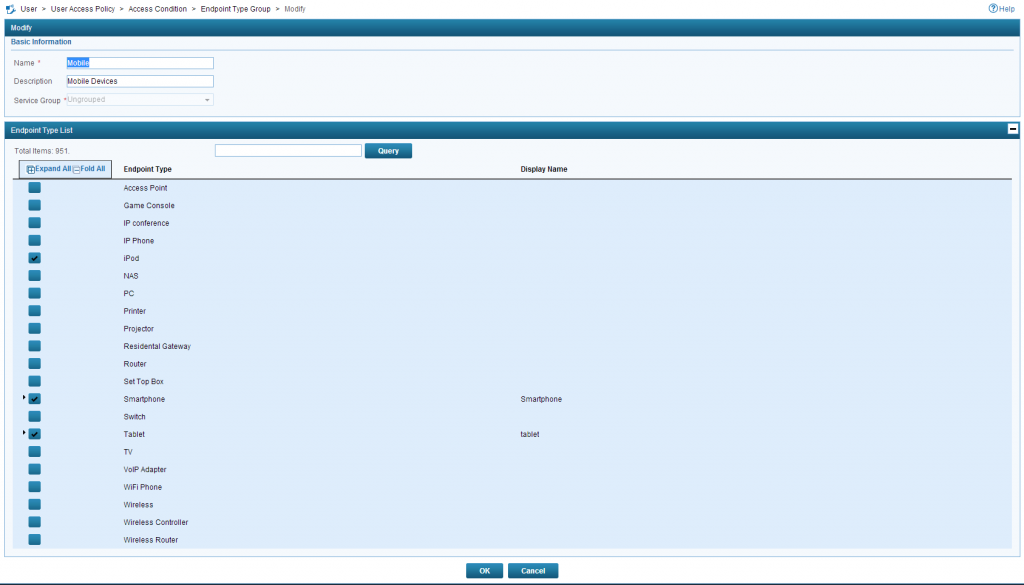
To present the mobile page to users with mobile devices I had created an “Access Scenario” called “Mobile”. If you need to do this, you first need to create an “Endpoint Type Group. Save the Service and go to User–>User Access Policy–>Access Condition–>Endpoint Type Group:

Add a new one and select all the devices which should see the mobile page:
Click on the “OK” button and go back to the service configuration. Back in the service configuration click “Add” in the “Access Scenario List” and the window below will open:
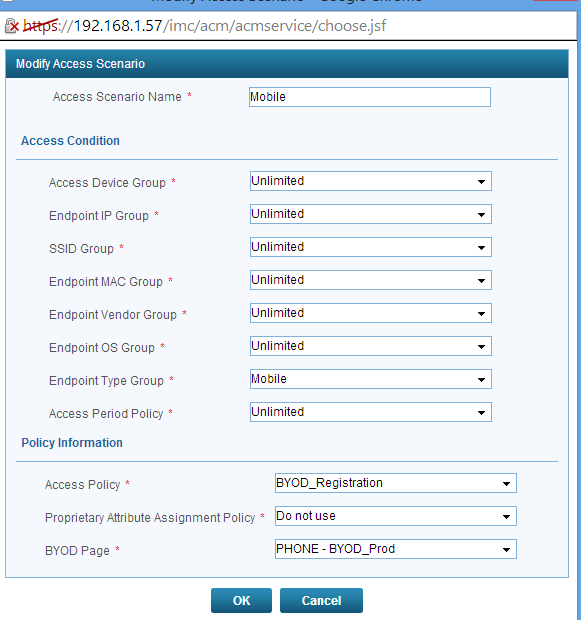
Select the created “Endpoint Type Group” and select the mobile version of the “BYOD Page”. You can also select a different “Access Policy”, but in my environment, this is not necessary.
As you can see, there more Access Conditions, which can be used to select the “Access Policy”. This brings great flexibility.
Click “OK”, and you have created a new Access Scenario.
Also create an “Access Service” for the guest user:
Now we have to create a default user, which will be applied to every unknown guest. Go to User–>Access User–>All Access User and click on “Add” to get the add user screen:
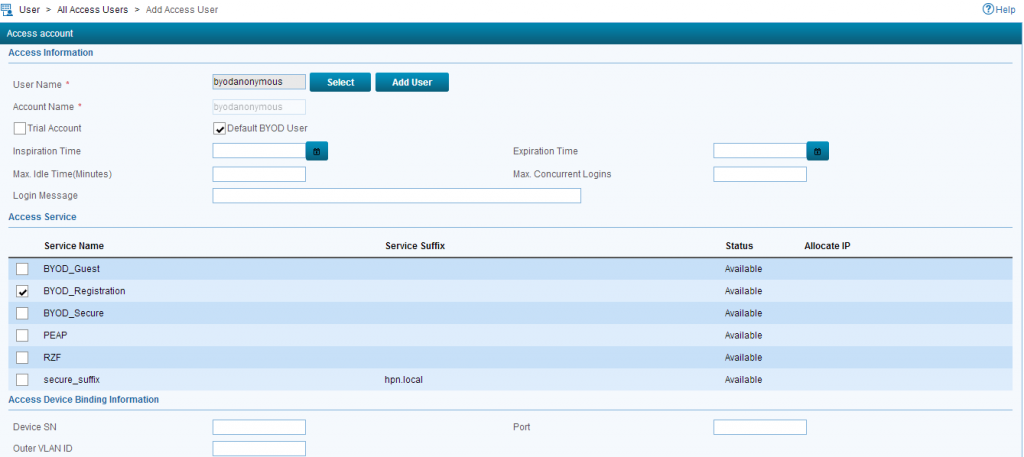
You have to check the “Default BYOD User” checkbox to mark this user as the default user for all unknown clients. Just select the registration policy and you are done with this step.
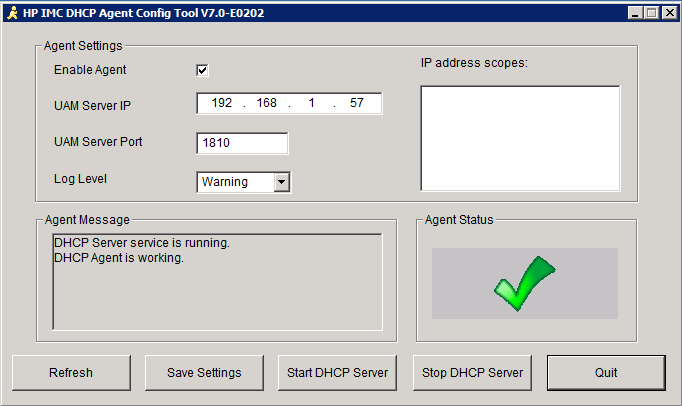
Before we can start and let our guest using this cool Service, we need a last mandatory requirement. The HP DHCP Agent. This little tool has to run on the DHCP Server, which distributes IP addresses to the clients in the registration VLAN. This is very important because this tool is used to match the IP address of a client on the IMC Portal to a MAC address on the controller. Without this tool, IMC is not able to connect the user with the MAC address and the authentication will fail.
The installation is quite simple, just install the “.exe” on the DHCP server and start the Agent as a service. It should look like this:
Now, we are ready to get the guests online.
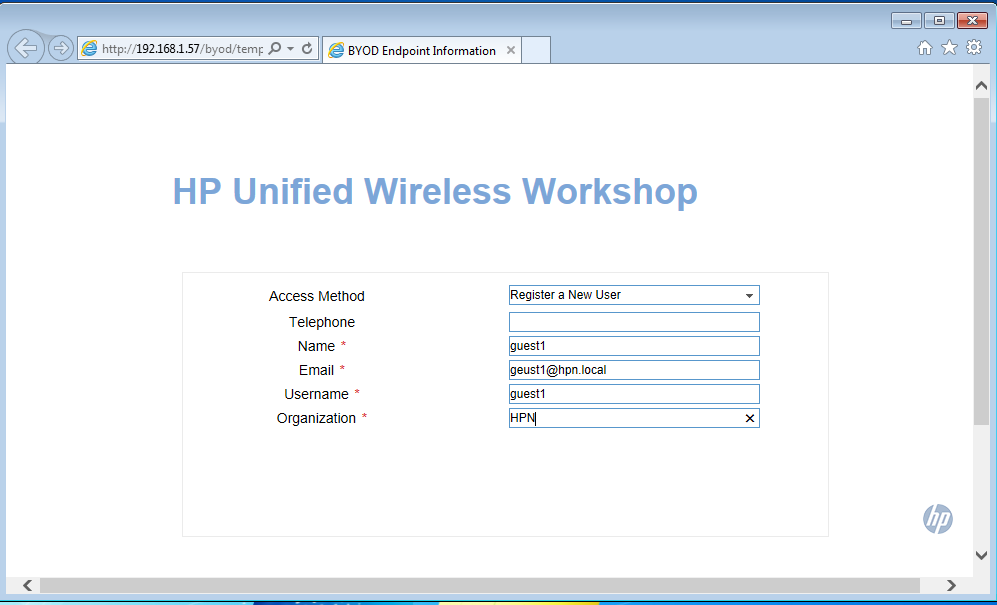
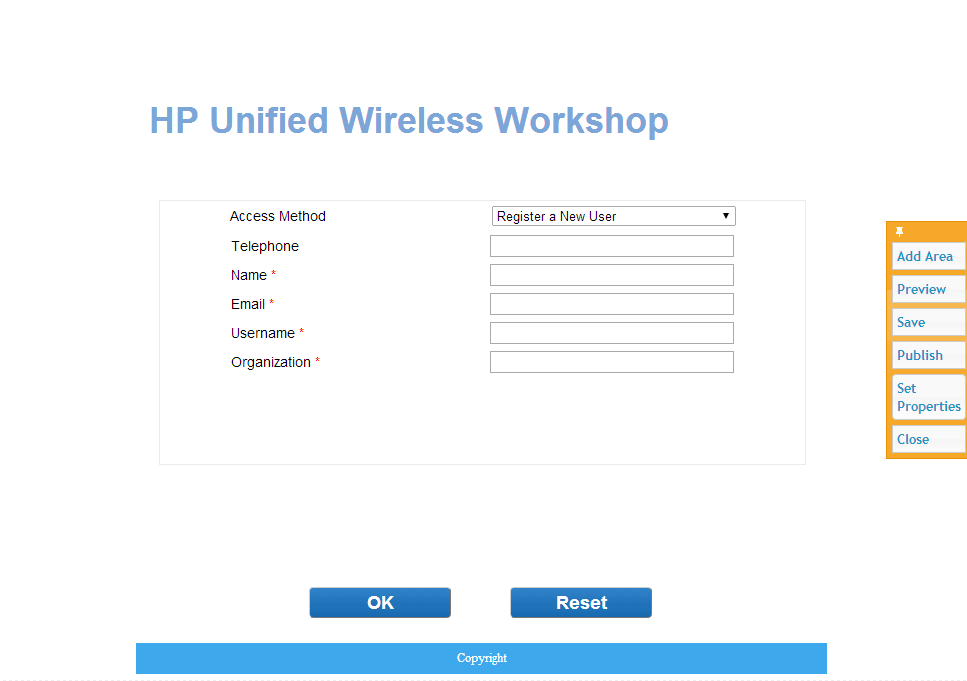
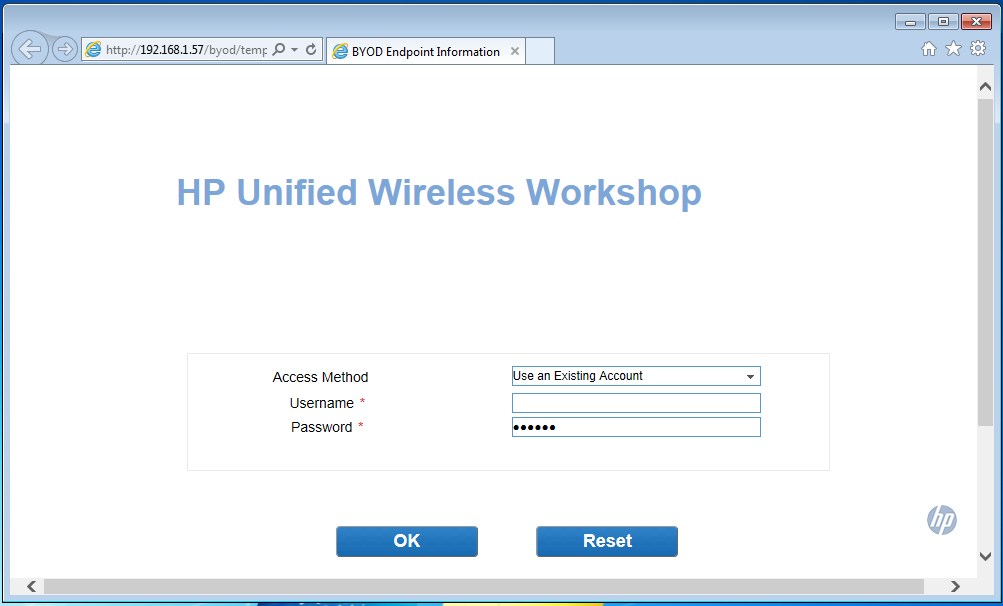
When User tries to connect to the WLAN, in this case, the SSID “BYOD” the user gets into the registration VLAN and gets redirected to the Portal page like this one:
In IMC the device is visible under User–>User Endpoint–>Endpoint Management
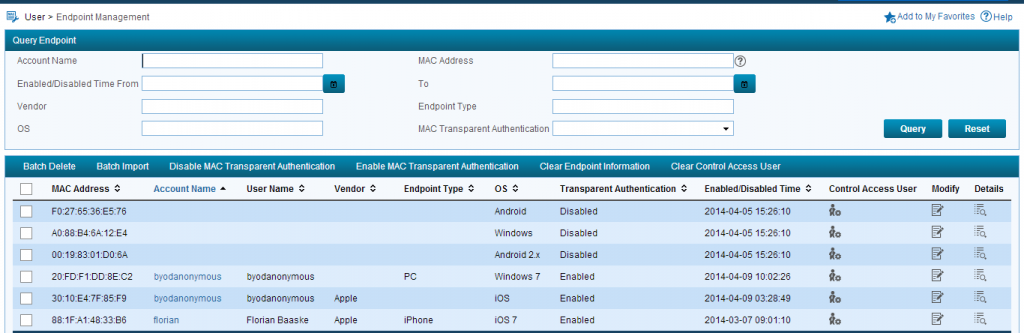
In this case, it is the Windows 7 Machine. This User is matched to the “byodanonymous” user.
The user can now enter all the information needed to register:

Even if it is not in screenshot, there is an “OK” button, which will bring the user to this screen:
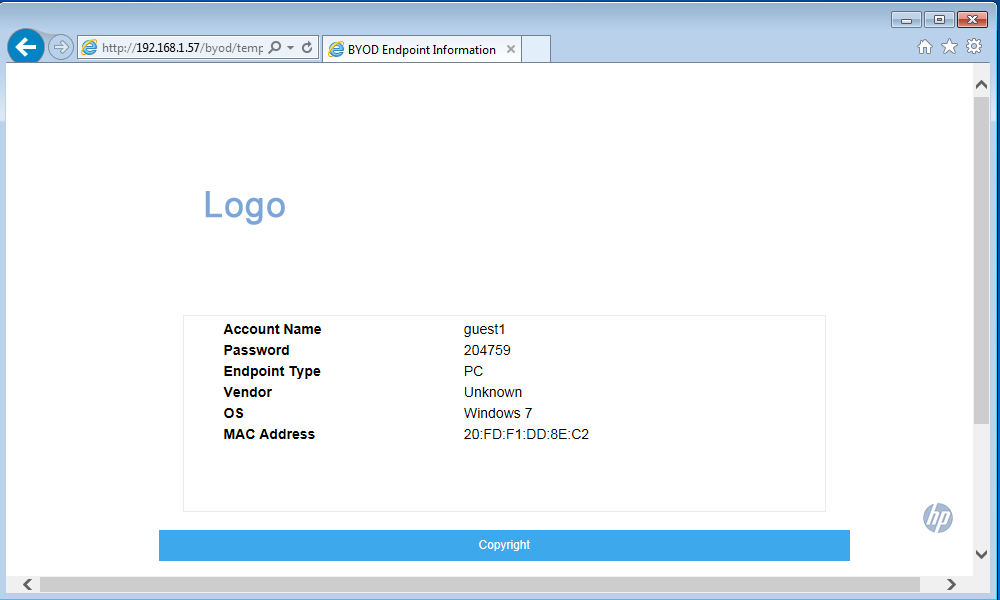
The user has now all the Information needed to sign in and use the connection, but there is still one step to be done.
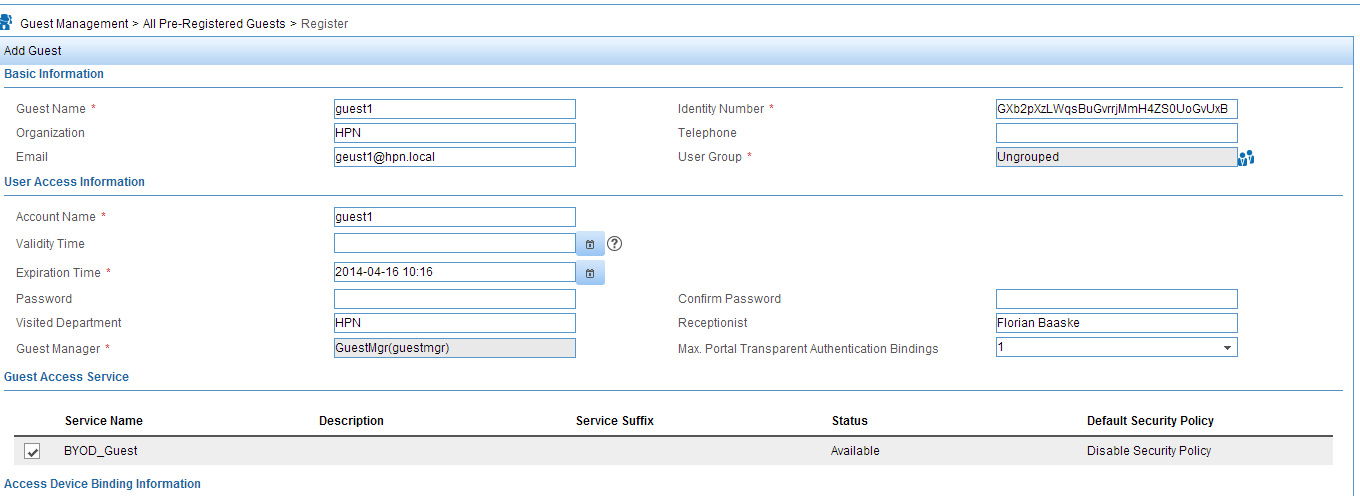
An Administrator needs to approve the account in the Selfservice portal.
In this portal, the user is listed as a preregistered user (only if you choose this option earlier in the configuration of guest users) and needs to be approved. This list can be found under Guest Management–>All Pre-Registered Guests:

Just click on the button in the “Formal Registration” column and the screen below will show up:
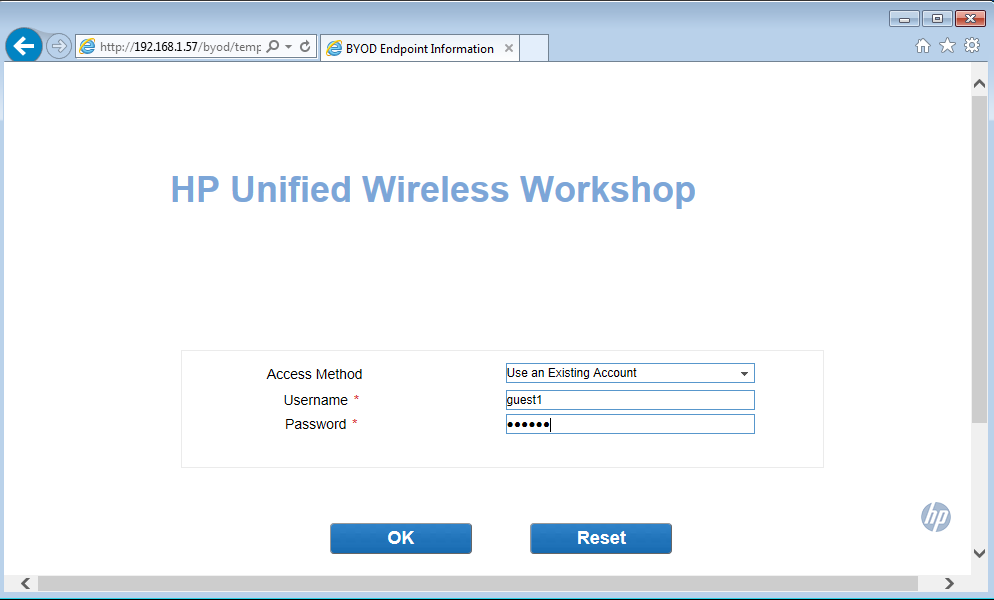
Just select the guest service for this user and click the “OK” or the “OK And Print” button at the bottom the page. This will approve the user. The guest needs to go back to the Portal and enter the generated credentials:
The user should be disconnected from the SSID and connected very quick (the user will not notice it) and should be assigned to the guest VLAN. That’s it, the guest is online.
This was quite a lot of information, but it is important to know all the necessary steps, as it will not work if you miss one. In a later post, I will describe how we deal with internal users and how to get them online.
If you have any remarks or questions, leave a command.